When you need to learn a programming language, you buy a book. From books, we learn basics of the language and how to program, but this is only the beginning – there is also a development environment, and the work with it is another complicated story. Let’s take a look at some secrets of Visual Studio and some secrets of classes.
Problem Statement
The PropertyGrid component allows displaying the class properties as a grid similar to the Properties window in the development environment. To make the component display the properties of the required class, simply assign this class to the SelectedObject property. For example, the following string will display the properties of Button1:
propertyGrid.SelectedObject = Button1;
Suppose, we need to use PropertyGrid to output the required set of values. How? Quite simply – we can combine all these properties into a separate class and use it similar to any other standard class from .NET Framework. To make these properties look fine, we need to properly design them when describing the class.
Let’s write an example in which the window will include only the PropertyGrid component in which the program properties of the potential application should be outputted. All properties will be combined into a separate ProperitesClass class. Such an approach is convenient, elegant and corresponds to all principles of OOP. Let’s consider the way how to design a class in the most correct and elegant way. Perhaps, you will learn something new about .NET.
Creation of Fields
What is the difference between a field (in some books, you can find the term ‘property’) and simple variables? In general, a field is a variable that is closed from external actions. To make external objects modify the value of the field, we need to create the set and get the pair.
The simplest way to create a field is to declare a variable and use the refactoring wizard – Encapsulate Field. Suppose, we need the serverName property to store the server name. Let’s declare the following variable:
private string serverName;
Variable names in .NET usually start with a lower case letter, while the fields should have the same names but they start with a capital letter. Besides, a variable must be private, while the methods must be public.
Select this string and select the Refactor | Encapsulate Field menu.
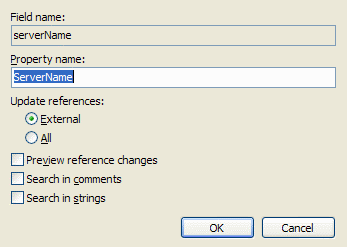
Variable to Field Wizard
In the Property Name field, we need to specify the name of the future field. As I wrote before, the field names must start with a capital letter and this is the thing the wizard prompts us to do. Below, we can select which links should be updated, external or all links that the development environment will be able to find. If you just create a filed and the variable has not been used anywhere, it does not matter what you will choose.
The wizard window also includes three options you can select:
- Preview reference changes – makes the wizard show you the fragments it wants to modify. If you do not trust the wizard, select this option. In my practice, the wizard works perfectly, so I don’t preview anything.
- Search in comment – searches for the use of the variable references in comments and replaces them with the field name. Comments are safe and do not affect the code. So, the use of the option affects only the aesthetic look.
- Search in string – searches for the use of the variable references in strings and replaces them with the field name. It is dangerous and it is better not to select this option. If you select this option, it is better to preview changes. If you have the ‘This is error’ error message somewhere and you replace the ‘error’ with the Ugas field, the string search will change the message to ‘This is Ugas’.
As a result of the wizard work, the variable declaration string will turn into the following code:
private string serverName;

public string ServerName
{
 get { return serverName; }
 set { serverName = value; }
}
If you run the application and look at the properties grid, you will see that our field is already there and it can be modified. At that, the field values in the class will be modified automatically when they are changed in PropertyGrid. If the filed has is the Color type, the standard color drop-down list will appear in the grid.

The Color property and a dropdown box for selecting standard values.
Attributes
Note that all the fields in the properties grid are located in the Misc section. Besides, none of them features hints. How can we do both? Simply – we need to use attributes, but for this, we need to enable the System.ComponentMode namespace.
Attributes are set in square brackets right before the description of the field, not before a variable or anything else. In the square brackets, the attribute is set in the following way:
AtributeName(“Value”)
The property category is set with the help of the Category attribute. For example, the following code has the ServerName property in the “Connection” section:
private string serverName;

[Category("Connection")]
public string ServerName
{
 get { return serverName; }
 set { serverName = value; }
}
What if we place the mouse pointer on the Category attribute name and call the context prompt? As it turns out, this is an object, not a statement. In OOL, everything should be objects and in this case, everything is correct. When we declare an attribute, we create a class instance in fact. The CategoryAttribute class is responsible for the Category attribute.

The Category attribute prompt.
Let’s look through some of the most interesting attributes.
Description – allows specifying a description. In PropertyGrid, when we highlight a field, this description will appear below the component;
DisplayName shows the displayed name. Field names must be in the English language and must not contain spaces. What should people who don’t know English do? In such cases, you can specify a friendly name with help of this attribute. In the code, the field will be accessed through the English name, while PropertyGrid will feature the name in the familiar language;
DefaultVallue – a value by default. This is just an attribute and it does not affect the real value, but sometimes it may become useful.
There are other attributes, and MSDN will always help you to find them, but as for me, I’m good with these four.
Programming of Attributes
We considered the attributes and understood they are convenient if we use the PropertyGrid component. But this component is not required all the time, while attributes can be used in other places, for example, for localization and storing object properties in a file.
Listing 1 shows an example of how to access to attributes. I tried to write the maximally universal code so you could use it for various purposes with minimum changes. The main thing is what the code shows – search of the required attribute, and the rest depends on your technique.
Listing 1. The code for handling the attributes of all the properties
// create a PropertiesClass instance
PropertiesClass tempClass = new PropertiesClass();

// get a list of properties (fields) of the class
PropertyInfo[] pi = tempClass.GetType().GetProperties();

// loop over all of the fields
for (int i=0; i<pi.Length; i++)
{
 // loop over the attributes within the current field
 foreach (Attribute attr in Attribute.GetCustomAttributes(pi[i]))
 {
  // if the current attribute is a category, output it
  if (attr.GetType() == typeof(CategoryAttribute))
  MessageBox.Show(pi[i].Name+" is in the category "+
    ((CategoryAttribute)attr).Category.ToString());
 }
}
Initially, an instance of the PropertiesClass is created. We will look through its properties in the search for attributes. In this example, we look through all the properties. That is why we get the list of all the properties and loop over them. The properties have the GetCustomAttributes method with help of which we can get the list of all the attributes.
Looping over the attributes, we check the type of the current one in the loop and if it is a category, we output the value which can be seen in ((CategoryAttribute)attr).Category.
Metadata
The GetType() method which we used for retrieving attributes, exists in all data types and allows retrieving metadata for this type. For example, in the case of an object, we can find out almost everything we need.
In listing 2, I prepared a small but fancy code that allows saving values of all fields in an XML file. Note that the color value is processed individually and results in the RGB integer and this integer is saved. It is quite reasonable since color is a complex object and if we save it with a simple transformation to ToString(), the loading of the result will be problematic.
Listing 2. Saving the values of all the fields of the class to XML
// the XmlWriter class is used for writing
XmlWriter xmlOut = XmlWriter.Create(filename);
xmlOut.WriteStartElement("SectionName");

// obtain the list of all the fields of the current class
PropertyInfo[] pi = this.GetType().GetProperties();

// loop for saving all the fields
for (int i = 0; i < pi.Length; i++)
{
 // color is saved individually as an integer
 if (pi[i].PropertyType == typeof(Color))
 {
  Color c = (Color)(pi[i].GetValue(this, null));
  xmlOut.WriteElementString(pi[i].Name, c.ToArgb().ToString());
 }
 else
  xmlOut.WriteElementString(pi[i].Name, pi[i].GetValue(this, null).ToString());
}

xmlOut.WriteEndElement();
xmlOut.Flush();
xmlOut.Close();
Listing 3 shows the code that loads property values from the XML file and sets them for the current object. The code is maximally universal so that you could use it in your examples without any changes. The only thing you should remember is that you process all the data types used in the class.
Listing 3. Loading field values from the file
// the XmlReader class is used for reading
XmlReader xmlIn = XmlReader.Create(filename);
xmlIn.MoveToContent();

string lastElementName = "";
// loop to read file
while (xmlIn.Read())
{
 switch (xmlIn.NodeType)
 {
   // if a new tag is found
  case XmlNodeType.Element:
   lastElementName = xmlIn.Name;
   break;
   // if the end of the current tag is found
  case XmlNodeType.EndElement:
   if (xmlIn.Name == "MenuProperties")
    return;
   break;

   // the tag value is obtained
  case XmlNodeType.Text:
   PropertyInfo pi = this.GetType().GetProperty(lastElementName);

    // transform the tag value into the field type
   if (pi.PropertyType == typeof(string))
     pi.SetValue(this, xmlIn.Value, null);
   else if (pi.PropertyType == typeof(int))
      pi.SetValue(this, int.Parse(xmlIn.Value), null);
   else if (pi.PropertyType == typeof(bool))
      pi.SetValue(this, bool.Parse(xmlIn.Value), null);
   else if (pi.PropertyType == typeof(Color))
       pi.SetValue(this, Color.FromArgb(int.Parse(xmlIn.Value)), null);
    break;
  }
}
xmlIn.Close();
Regions
There is one more useful option in Visual Studio – combining a code block into region and wrapping (hiding) this region within the code editor. Functions, comments can be hidden for quite some time now. If they are already debugged, the code can be wrapped so it can be under the radar. In the same way, we can hide several functions if we combine them into a single block.
Region starts from #region, after which the region name goes and ends with #endregion.
#region RegionName

function 1
function 2
function 3

#endregion RegionName
In my projects, I always combine methods and variables that are similar in meaning within separate regions. Now, when everything is wrapped, the source file in the code editor becomes maximally compact, and the search of the method to be edited takes a minimum of time. Expanding of the code is much faster than scrolling down a large file.

Grey words in rectangles are the names of collapsed regions.
Summary
Throughout my career, I had to work with various programming languages and various development environments. The first version of .NET brought out not the most positive emotions since it was a rough copy of Java. Now it is a full-featured language and together with Visual Studio, .NET shows its true power.
Tags: .net, .net framework, visual studio Last modified: September 23, 2021