Managing numerous database servers in an organization can be performed using the PowerShell scripts but it requires some complex PowerShell coding. This task can be managed more efficiently using Registered Servers which are the ones of the SQL Server Management Studio’s hidden gems. Of course, first, you need to create new database in SQL Server Management Studio.
The benefits of using registered servers are as follows:
- Viewing the status of SQL service on registered servers.
- Evaluation of SQL Server policies on multiple servers.
- Creation of a group of servers and providing a user-friendly name.
- Opening object explorer and query editor window of the individual registered server or the entire group.
Registered servers can be created in two ways:
- Using Central Management Servers.
- Using Local server group.
Central Management Server
Central Management Server is an SQL server instance that organizes one or more central management server groups. It stores the list of registered SQL instances in a Central management server instance. Whatever action is performed on the central management server group, it applies to all the servers. We can connect servers by using Object Explorer and execute T-SQL queries across multiple servers. Additionally, there are a lot of SSMS add-ins that can automate our work and make it much easier. And the best thing is that we can connect from other servers using SQL Server Management Studio. For example, the SQL instance of server A has been designated as a central management server with multiple SQL servers registered which can be accessed using SSMS of Server B. See the image below:

ServerGroupAdministratorRole and ServerGroupReaderRole Roles
Central Management Server uses Windows authentication. To configure CMS, a user must have the ServerGroupAdministratorRole and ServerGroupReaderRole database roles on the MSDB database. Members of ServerGroupAdministratorRole can configure and administrate the central management server, and membership of ServerGroupReaderRole is required to connect to the central management server.
Configuring Centralized Management Servers
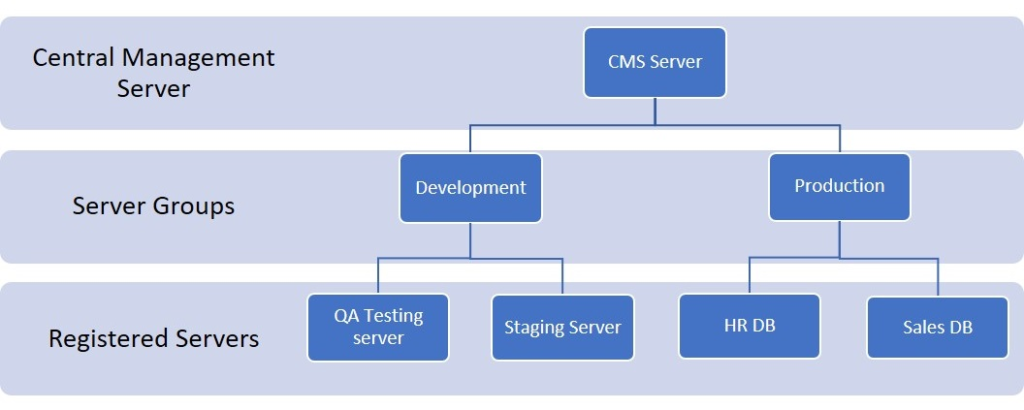
In this demo, I am going to explain the process of configuring CMS. We are going to create a hierarchy as shown in the image below:

We will:
- Designate an SQL Server instance as Central Management server.
- Create server groups named Production servers and Development servers under CMS server.
- Register QA Testing server and Staging server under the development server group, and HR DB and Sales DB under the production server group.
- Connect and access the CMS server from another server inside the same domain using SSMS.
How to Register Central Management Server in SSMS
I have created an instance specifically for designating it as a CMS. First, we will register the Central Management Server. To do that, right-click Central Management servers underneath the Local server group and click Register Central Management Server, as shown in the following image:

Once you click Register Central Management Server, the New Server Registration dialogue box will open for configuring connection properties. See the following image:
As shown in the above image, in the Server Name drop-down, select the hostname or IP address of the server, designated as Central Management Server. In the Authentication drop-down box, select Windows Authentication. We can give an alias to CMS instance, e.g. CMS Server. To verify the configuration, click Test. If the connection is configured properly, the connection test will be successful. See the following image:
Creating Server Groups under Central Management Server
After designating instance as a CMS, we will create multiple groups under CMS, and under the respective groups, we will register servers. To do that, right-click CMS server and select New Server Group. See the image below:

The New server group properties dialog box will open. In the Group name text box, give an appropriate name of the server group and click OK. I am going to register development servers under this group, hence the group name will be Development servers. See the following image:

Registering Server under Server Group
Once the group is created, we will register servers under those groups. To register the servers under the Development Servers group, right-click the Development server folder and select New server registration. The New server registration dialog box will open. In the dialog box, select a hostname / IP address of a server from the Server Name drop-down box. In the Authentication drop-down, select Windows authentication. Name the registered server as QA testing server. Click Test to test the connectivity and close the dialog box as shown in the following image.
Same way, I will register another server named “Staging Server” under the “Development server” group. Then I will create another server group named “Production Server” and register two servers named “HR DB” and “Sales DB”. The entire hierarchy will look as follows:

Accessing Central Management Server from Another Server
Once CMS configuration is completed, we will connect the CMS server from a different host and verify the list of registered servers. To do that, we will register the CMS server from another host. Follow the same process which we performed to register the CMS server. The only difference is that in the “Server Name” drop-down box, we select the hostname of the server designated as the Central Management Server. SQL will read configuration automatically and you’ll access the entire hierarchy from the different host. See the following screenshot:

We can review the configuration of the Central Management Server by executing the query below.
SELECT
      G.name AS [Group Name],
      S.name as [Server Alias],
      S.server_name AS [Server Host Name]
FROM    msdb.dbo.sysmanagement_shared_server_groups_internal G
LEFT JOIN msdb.dbo.sysmanagement_shared_registered_servers_internal S
      ON G.server_group_id = S.server_group_id
WHERE G.server_type = 0 --only the Database Engine Server Group
AND server_name IS NOT null
Below is the output:

Central management servers have a disadvantage. CMS does not use SQL server security because passwords are not stored. Hence accessing it from outside of the domain is impossible from SQL Server Management Studio. So, we must use local server groups on the individual registered server.
Local Server Groups in SSMS
As the name suggests, the Local server group should be created locally on the database server. Using the local server group, we can create a hierarchical list of database servers. Unlike Central Management Server, it cannot be accessed directly from another server. To do that, we should export the configuration and import it to another server.
Creating and Configuring Local Server Group
For this demo, I am going to create the same hierarchy explained above. Here, I will:
1. Create server groups named Production servers and Development servers under the Local server group.
2. Register QA Testing server and Staging server under the development server group, and HR DB and Sales DB under the production server group.
Creating Server Groups
First, let’s create an SQL Server group under the Local server group. To do that, right-click the Local server group folder underneath the Database engine, select the Tasks option and select Register Local Servers as shown in the following image:

A dialog box will open. In that dialog box, we will enter the details of the local server group. We are going to register DEV servers hence Group Name will be Development Server as shown in the following image.

Registering SQL Server Under the Server Group
Once the group is created, we will register servers under those groups. To register the servers under the Development Servers group, right-click the Development server folder and select New server registration. The New server registration dialog box will open. In the dialog box, select the hostname / IP address of the server from the Server Name drop-down box. In the Authentication drop-down, select Windows authentication. Name registered server as QA testing server. Click Test to test the connectivity and close the dialog box as shown in the following image.

Same way, we will register another server named Staging Server under the Development server group. Then I will create another server group named Production Server and register two servers named HR DB and Sales DB. The entire hierarchy will look as follows:
Now, I am going to demonstrate how to execute a query on multiple servers using Registered Servers. Later, I will cover how we can evaluate the database policy on multiple database servers using Registered Servers.
Querying Registered Servers
Let’s execute a query on multiple servers of the same group.
I have already set up an environment. The high-level overview is below:
- An SQL instance CMS Server has been designated as a central management server.
- Under the CMS server, two server groups have been created named Development Servers and Production Servers.
- Under the Development server groups, we have registered the database servers named QA Testing Server and Staging Server. Similarly, under Production Server, two registered servers have been named, Sales DB and HR DB.
See the image below for a better understanding:
To execute a query on the Development Server group of the central management server, expand CMS Server. You will see two server groups that have been created. Right-click the Development server group underneath of CMS Server and select New Query as shown in the following image:
A query editor window will open.
Usually, we do not notice that the status bar of the regular query editor window is colored with yellow. But, the status bar of the Central Management Server query editor has a different color (pink) as shown in the following image:
You can change the color of the taskbar of the Central Management Server query editor and choose dark colors to identify it easily. To change the color of the status bar, use Options> Tools> Text Editor> Editor Tab and Status Bar> Status Bar Layout and Colors and select a different color from the drop-down list, as shown in the image below:
Now we want to collect a list of database objects of all databases that belong to the servers, registered in the Development Servers group. I have written an SQL script that will populate the below information:
- Server Name
- Database Name
- Object Type
- Count of Objects
- Report Run Date
The script is as follows:
Create Table #FinalSummery
 (
  id int identity (1,1),
  DatabaseName varchar(350),
  ObjectType varchar(200),
  TotalObjects int
 )
 declare @SQLCommand nvarchar(max)
 declare @I int=0
 declare @DBName varchar(350)
 declare @DBCount int
 Create Table #Databases (Name varchar(350))
 insert into #Databases (name) select name from sys.databases where name <> 'Report-Server' and database_id>5
 set @DBCount=(Select count(*) from #Databases)
 while (@DBCount>@I)
 Begin
 Set  @DBName=(Select Top 1 name from #Databases)
 Set @SQLCommand='
  Insert Into #FinalSummery (DatabaseName,ObjectType,TotalObjects)
  Select
  ''' + @DBName +''',
  Case
   when Type=''TR'' then ''SQL DML trigger''
   when Type=''FN'' then ''SQL scalar function''
   when Type=''D'' then ''DEFAULT (constraint or stand-alone)''
   when Type=''PK'' then ''PRIMARY KEY constraint''
   when Type=''P'' then ''SQL Stored Procedure''
   when Type=''U'' then ''Table (user-defined)''
   when Type=''V''  then ''View''
   when Type=''X'' then ''Extended stored procedure''
  End As ObjectType,
   Count(Name)TotalObjects from ' + @DBName +'.sys.all_objects
   group by type'
   exec sp_executesql @SQLCommand
   delete from  #Databases where name =@DBName
   Set @i=@i+1
 End
select DatabaseName,ObjectType,TotalObjects,convert(date,getdate()),as ‘Report Run Date’ from #FinalSummery Where ObjectType is not null
 Drop Table #FinalSummery
 drop table #Databases
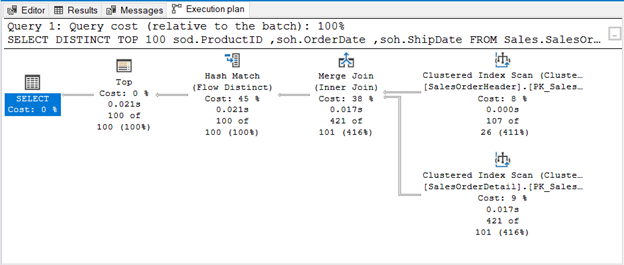
Now let’s execute the above query on the Central Management Server. The output will be shown in the following image:
If we execute the “Select” query on the CMS server group, the first column of the query output will be the name of a Registered Server. The above query has been executed on the Development server group.
Evaluating Database Policies
Using a Central Management Server, we can evaluate database policies on multiple servers.
What is Database Policy
According to the MSDN definition, Policy-Based Management is a policy-based system for managing one or more instances of SQL Server. Use it to create conditions that contain condition expressions. Then, create policies that apply the conditions to database target objects. (Reference: https://docs.microsoft.com/en-us/sql/relational-databases/policy-based-management/administer-servers-by-using-policy-based-management?view=sql-server-2017)
Database Policy Evaluation
I have upgraded the SQL server edition from SQL 2008 to SQL 2014 and created a database policy Check Compatibility on the SQL Instance which will ensure that the compatibility level of the database has been changed across all servers. I want to evaluate this policy on the Development server group of the CMS server.
Expand CMS Server, right-click the Development server group and select Evaluate Policies as shown below.
In the dialog box, click Ellipses, next to the Source text box. The Select Source dialog box will open.
Here you can import the policy file which is in the XML format exported from another server OR you can retrieve policies from the SQL server instance. Choose the server option and in the Server Name drop-down box, select the name of the database server where policy has been created and click OK.
It will retrieve the list of policies that have been created by the system OR by the user. Select the Check Compatibility policy and click Evaluate as shown in the following image:
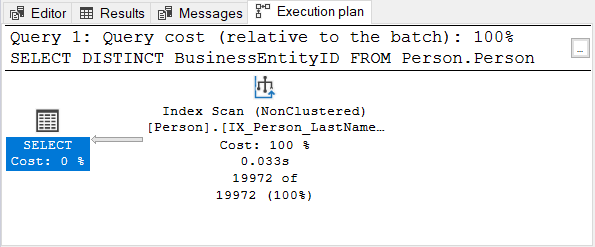
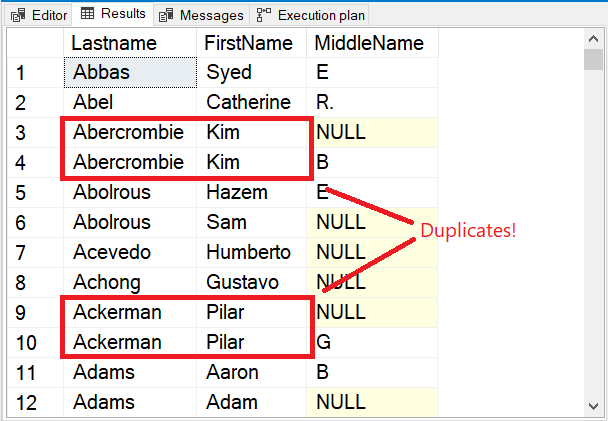
Registered Servers will evaluate policy across all the servers and instances of databases and generate the result as shown in the below image:
Export and Import Local Server Group Configuration
We can export and import the configuration of central management servers and local groups. I will demonstrate how we can export the configuration of the Local server group.
Export Local Server Group Configuration
To export local server group configuration, expand Local server group, right-click Development Server, select Tasks, click Export as shown in the below image:

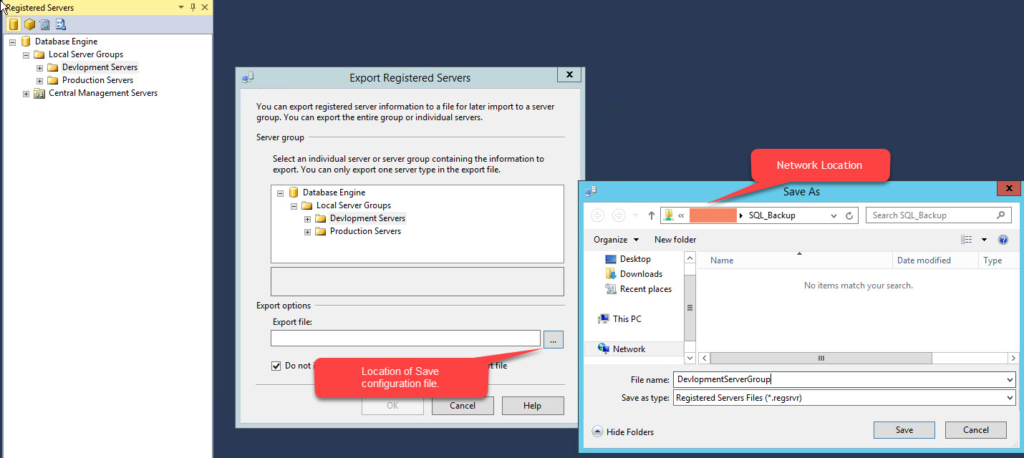
The Export Registered Servers dialog box will open. In the dialog box, you can see the list of local server groups. Click the ellipses next to the Export File text box. A dialog box will open. As I am going to export it to a different server, I will copy the file to a network location. Navigate to the network drive and click Save as shown in the below image:
Export is completed successfully. See the image below:
Importing Registered Server Configuration
To do that, right-click Local server group, select Tasks, click Import, as shown in the below image:
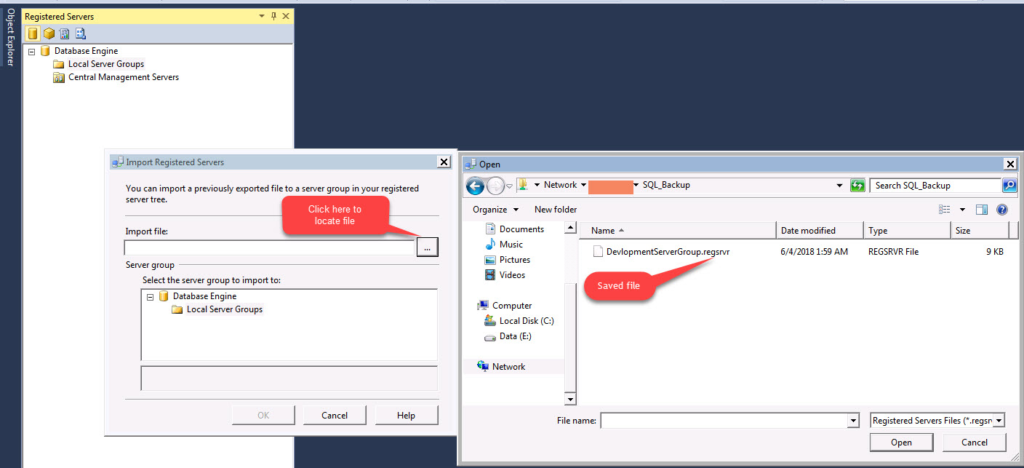
The Import Registered Server dialog box will open. In the dialog box, you can see the list of local server groups. Click ellipses next to the Import File text box. A dialog box will open. Go to the location where the configuration file is stored, select the file and click Open as shown in the below image:
Import is completed successfully. See the below image:
As a result of the successful import, the Development server of the Local Server Group has been created. See the below image:
Summary
In this article, I have explored what registered servers are and how they are used. We also discussed how to configure the Local server group and Central Management Server. Registered Server is one of the good options to manage multiple servers more efficiently. But as I mentioned, it should be used carefully. To help with this tricky issue, I showed how to query the Registered Servers, how to evaluate database policies on multiple DB servers, and how to import and export server group configurations.
Tags: database administration, sql server, ssms Last modified: September 24, 2021