In the previous articles, “Introduction to Docker and Docker Toolbox” and “Docker and SQL Server on Linux“, we discussed a lot about SQL Server Docker containers. As you should know by now, instantiating SQL images is very simple and pretty straightforward thing with the Docker containers.
This article talks about shared volumes and the preferred mechanism for data persistence using the Docker containers.
This article covers the following topics:
- Introduction of the Docker volumes.
- How to manage volumes using Docker CLI commands or Docker API.
- How the sharing of data between containers and between containers and hosts takes place.
- Sharing database files across containers.
- And more…
Introduction
Containers are independent of the storage engine and volumes. Let’s discuss briefly on how Docker accomplishes the idea of images and containers. How does the layer organized in storage and keeping them isolated, letting them be stacked on top of each other as layers?
We are in the era of rapid development and faster deployment; we also know how to do a release faster. Now, we will see how to build the application and port it as a micro-services using containers with data persistence.
Before jumping to the demo, let’s understand the available Docker solutions. Let’s talk about sharing data between containers and between containers and hosts.
Docker offers the solution of data externalization and this feature is called volumes. The volumes are like a shared folder or the directory structures of the file system. They’re virtual discs that you can store data in and share them between the containers, and between containers and the host or both. So they have two main varieties of volumes available within Docker.
We’ve got the persistent ones, where we can place the data there, and it will be available to the host. And when the container goes away, the data will be still available. And, another one is ephemeral volumes. They exist as long as the container is using them. But when no container is using them, they evaporate. So they’re ephemeral. They’ll stick around as long as they’re being used but they’re not permanent. These are not part of images. No part of volumes will be included when you download an image and no part of volumes is going to be involved if you upload an image. They’re for your local data, local to this host. So first let’s talk about sharing data between the host and a container.
The underlying file systems manage and determine which bits on the drive are part of which file and it’s up to the kernel with the file-systems to keep track of every file. Now on top of all that, you can take programs, and programs can pretend to be file systems. We call this FUSE file system. For a detailed example, you can refer here.
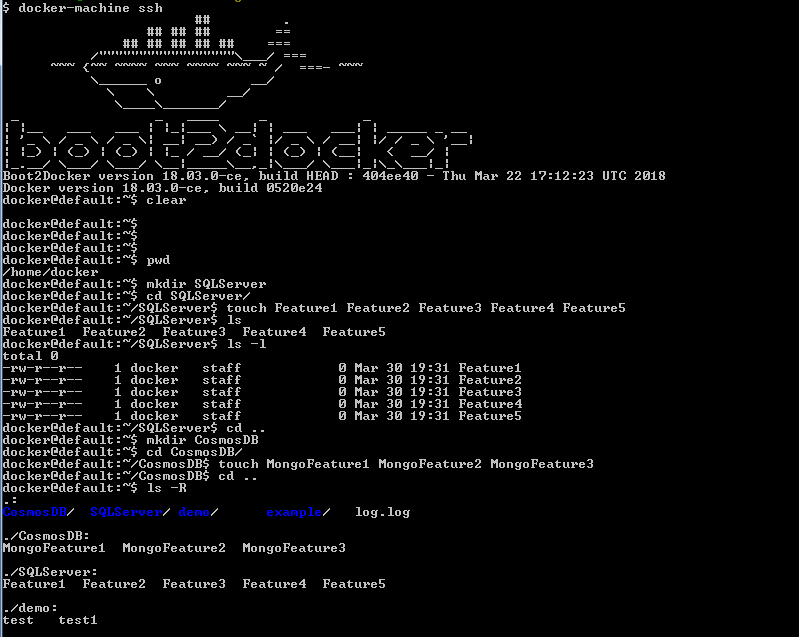
Let’s see an example to understand the how the layers work in Dockers. For the demo, I’ve created two folders in the home directory named SQL Server and MongoDB also created few files in each directory.
The following list of the commands ensures the creation of the files in the respective directories.
$ docker-machine ssh
$ pwd
$mkdir SQLServer
$ cd SQLServer/
~/SQLServer$ touch Feature1 Feature2 Feature3 Feature4 Feature5
~/SQLServer$ ls
Feature1 Feature2 Feature3 Feature4 Feature5
~/SQLServer$ cd ..
$ mkdir CosmosDB
~$ cd CosmosDB/
~/CosmosDB$ touch MongoFeature1 MongoFeature2 MongoFeature3
~/CosmosDB$ cd ..
docker@default:~$ ls –R
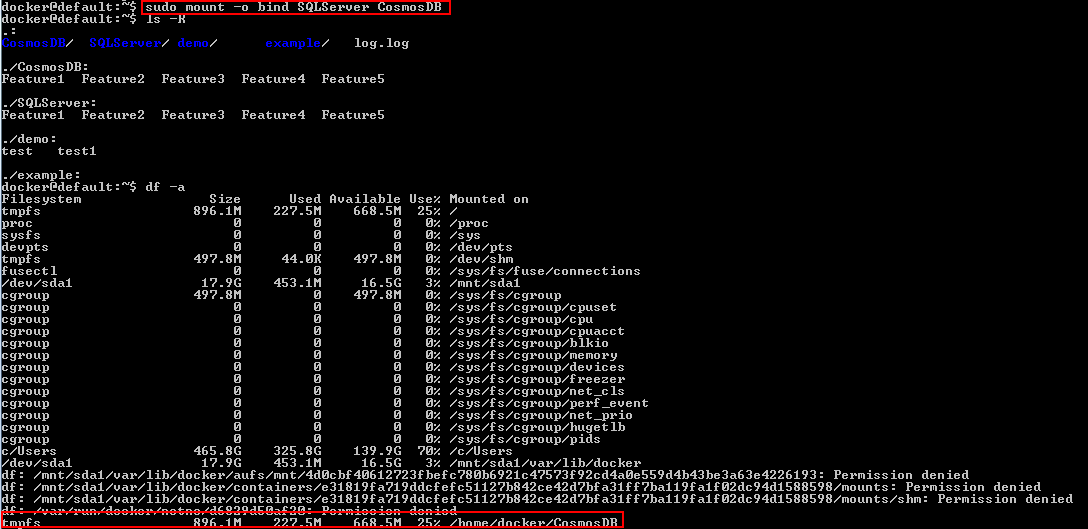
Now, mount the SQL Server directory on top of the working directory using the following sudo mount command:
sudo mount -o bind <Source : name for the source process or directory> < Target: name of the destination directory or process>
$sudo mount -o bind SQLServer CosmosDB
Let’s take a look in the CosmosDB directory. CosmosDB has the same files of SQL Server. I didn’t copy the files; instead, I just layered one set of files on top of the other. In fact, we can take a look at that layering by executing the df –a command. The –a option binds mounts as well.
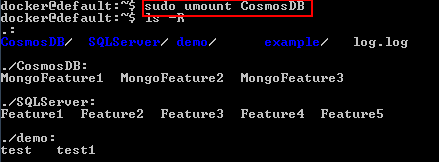
$ls -R
There’s just another directory that SQL Server mounted on top of the CosmosDB directory. When I unmount, they’ll come right back again.
$sudo umount CosmosDB
Now, let’s take a look at the directory structure. Everything is exactly the way it was. I just placed the file system temporarily on the other file system layer. This is how Docker does the shared folders between a container and the host.
Let’s discuss sharing data back and forth between this host and the Docker containers.
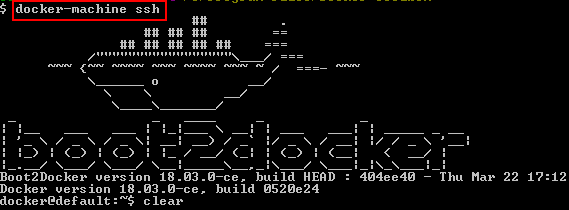
First, let’s get into the Linux host using
$ docker-machine ssh
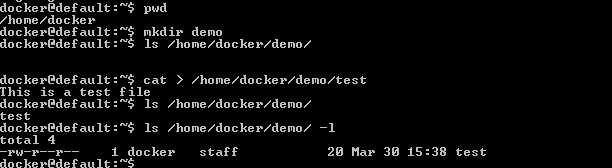
- Create a directory to store some example data, for example, demo.
$mkdir demo
- The pwd (Present Working Directory) is /home/docker/demo.

- Run the container with docker run-it, and new part, – v/home/docker/demo:/sharedfolder.
Inside the container when I run it, the data is going to be found under /sharedfolder.
$docker run -it -v /home/docker/example:/sharedfolder centos bash
# ls /home/docker/demo/ -l
#cat > /home/docker/demo/test1
#ls sharedfolder/ -l
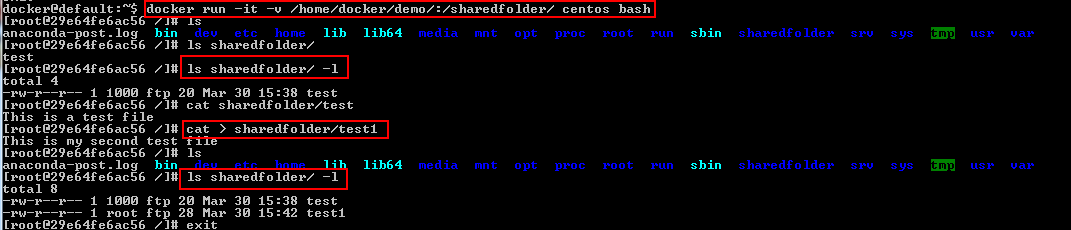
Let’s go ahead and create a file named test1. Now, when I exit this container and browse the demo folder, there are test and test1 files.
$ ls /home/docker/demo/ -l
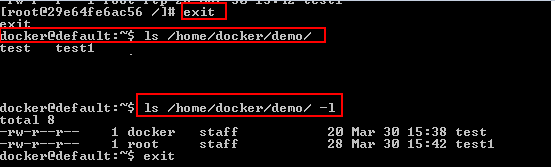
So the file is shared with the host.
Now, let’s talk about a more interesting case of sharing data between the containers. This introduces a new argument to the Docker run, called volumes-from.
These are shared discs that exist only as long as they are being used, the scope is limited and its existence is limited. When they’re shared between the containers, they’ll be common for the containers that are using them.
Let’s create a volume for the container which is not shared with the host.
$ docker run -it -v /demoshare centos:latest bash
docker run –it –v /demoshare creates the folder and runs it on the centos:latest container with a bash console.
Let’s create a file with some data on the container using the cat command.
# cat >demoshare/share_between_containers
# ls demoshare/ -l
Now, start up another Docker container, call it has the second session. First look up the name of that container that I just started by running Docker ps –l.
$docker ps -l

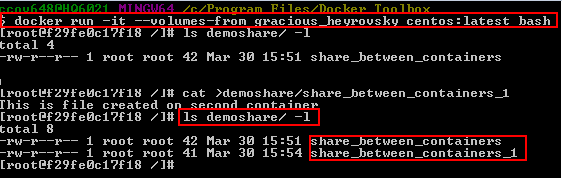
$ docker run -it --volumes-from gracious_heyrovsky centos:latest bash
Put the docker run command, then –volumes-from (this is the new part), then paste in the name of the machine that has the volumes I want to use. The image, centos:latest and the console to start with the container is bash. Now if I go look in /demoshare using the following command, it will list the file layered on the new container.
# ls demoshare/ -l
Create another file, share_between_containers_1 and add some content to the file.
# cat >demoshare/share_between_containers_1
#ls demoshare/ -l
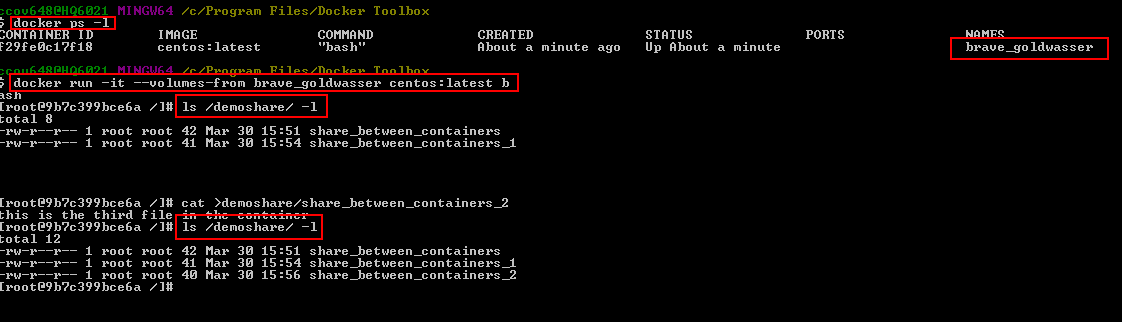
Now exit the original container, the demoshare is still there. Let’s go ahead and start up a third container, repeat the same steps that we followed for creating a second container.
$docker ps –l
$ docker run -it --volumes-from brave_goldwasser centos:latest bash
# ls /demoshare/ -l
# cat >demoshare/share_between_containers_2
#ls /demoshare/ -l
We can see that the data file, originated in one container, was inherited by a second container, and then inherited by a third container, even though the machine that created it is gone.
Now, when I exit both of these containers, this is the important part to understand, right then when I exited the last container using this volume, it went poof! And now it’s gone. That’s what volumes are for. They are ephemeral. They can be passed from one container to the next, but they are not saved. They will eventually go away.

To view the list of all the volumes that are attached to the host machine use docker volume ls:
$docker volume ls

We can also find out where the volume exists on the host machine using the docker inspect command:
docker inspect -f "{{json .Mounts}}"
for example,
$ docker inspect -f "{{json .Mounts}}" voltest

We can also get the similar data using the docker volume inspect command:
$docker volume inspect 89441820476a4fe62477f44e81b968187e2994d75e4ca4484ec8959607ddafa8

To delete the volumes, use the docker rm <Volume Name> command.
$docker volume 89441820476a4fe62477f44e81b968187e2994d75e4ca4484ec8959607ddafa8
Docker volume
In this section, we will discuss how the application database data externalization is possible using the Docker volume option. As long as the containers remain intact with the host, the data will remain safe even if the container is stopped or restarted. However, if you remove the container, your databases get removed with it and it’ll be gone forever.
Let’s discuss the Docker’s solution that keeps the data safe across containers using a Docker data volume. It is that simple, during the SQL Server container creation, map file directory to the SQL Server database using the –v parameter.
Let’s create a new container:
#docker run -e'ACCEPT_EULA=Y' -e'MSSQL_SA_PASSWORD=thanVitha@2015' --name SQLdemo –v sqlservervolume:/var/opt/mssql -d microsoft/mssql-server-linux:2017-latest

#docker ps –a

-v, this is where we’re going to specify the volume information. Create a new volume sqlservervolume and map it with the internal directory structure of the SQL Server instance, or the Linux instance, where SQL Server stores its data and log files. In this case, the default volume location /var/opt/mssql is mentioned.
Now we’ve created the Sqldemo container. Now, instead of storing database files within the container, the data files are stored in the /var/opt/mssql directory, the container data is now externalized. Its stored in the sqlservervolume data volume. We can take a look at volumes using docker volume ls.
#docker volume ls
Let’s go into the container and create a database using the docker exec command and sqlcmd.
#docker exec –it sqldemo bash
#/opt/mssql-tools/bin/sqlcmd –U SA –P thanVitha@2015
1>create database sqlvolumetestDB;
2>go

So far, we’ve created a database sqlvolumetestDB. Let’s go ahead, quit SQL shell and exit out of the Linux shell. Now, go ahead and remove the container. Before that, stop the container using the docker stop command. Once it’s stopped, remove the sqldemo container using docker rm command but the volume still exists.

Now, create a new SQL container and link the existing volume to the SQL container. The new SQL instance is going to be Newsqldemo.
#docker run -e'ACCEPT_EULA=Y' -e'MSSQL_SA_PASSWORD=thanVitha@2015' --name Newsqldemo –v sqlservervolume:/var/opt/mssql -d microsoft/mssql-server-linux:2017-latest

Let’s go into the Newsqldemo container and make sure that we still have the database that we’d created earlier in the demo.
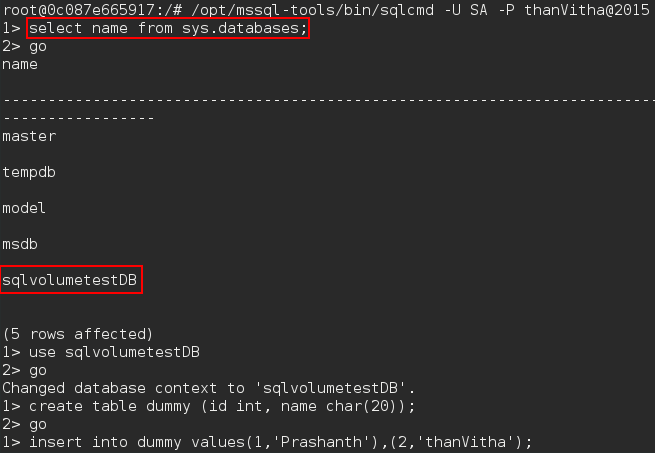
#docker exec –it sqldemo bash
#/opt/mssql-tools/bin/sqlcmd –U SA –P thanVitha@2015
1>select name from sys.databases
2>go
1>use sqlvolumetestDB
2>go
1>create table dummy(id int, name char(20));
2>go
1>insert into dummy values(1,’Prashanth’),(2,’thanVitha’);
2>go
![]()
Once we get into the SQL shell, query the sys.databases system object. This will list all the databases of the Newsqldemo instance.
That’s all for now…Stay tuned for more updates.
Summary
Docker containers definitely a choice and talking point for many developers for its rapid development and seamless deployment process.
Docker doesn’t give you a way of saying mount this guest file system into the host, preserving what was on the guest. It always chooses to mount the host filesystem over the guest filesystem.
You can also have multiple containers linked to this single volume in order to have them share a common storage resource. With Docker volumes, you can save data across multiple Docker containers or share data between several containers at the same time.
Tags: docker, sql server Last modified: September 22, 2021