Introduction
A few years ago we were tasked with a business requirement for card data in a specific format for the purpose of something called “reconciliation”. The idea was to present the data in a table to an application which would consume and process the data which would have a retention period of six months. We had to create a new database for this business need and then create the core table as a partitioned table. The process described here is the process we use to ensure that data older than six months is moved out of the table in a clean fashion.
A Bit About Partitioning
Table Partitioning is a database technology that allows you to store data belonging to one logical unit (the table) as a set of partitions which will sit on separate physical structure – data files – through an abstraction layer called File Groups in SQL Server. The process of creating this Partitioned Table involves two key objects:
A Partition Function: A Partition Function defines how the rows of a partitioned table are mapped based on the values of a specified column (the Partition Column). A partitioned table could be based on either a list or a range. For the purpose of our use case (preserving only six months’ worth of data), we used a Range Partition. A Partition Function can be defined as either RANGE RIGHT or RANGE LEFT. We used RANGE RIGHT as shown in the code in Listing 1 meaning the boundary value will belong to the right side of the boundary value interval when the values are sorted in ascending order from left to right.
-- Listing 1: Create a Partition Function
USE [post_office_history]
GO
CREATE PARTITION FUNCTION
PostTranPartFunc (datetime)
AS RANGE RIGHT
FOR VALUES
('20190201'
,'20190301'
,'20190401'
,'20190501'
,'20190601'
,'20190701'
,'20190801'
,'20190901'
,'20191001'
,'20191101'
,'20191201'
)
GO
A Partition Scheme: A partition Scheme is based on the Partition Function and determines on which physical structures rows belonging to each partition will be placed. This is achieved by mapping such rows to filegroups. Listing 2 shows the code for creating a Partition Scheme. Prior to creating the Partition Scheme, the filegroups to which it will refer must exist.
-- Listing 2: Create Partition Scheme --

-- Step 1: Create Filegroups --

USE [master]
GO
ALTER DATABASE [post_office_history] ADD FILEGROUP [JAN]
ALTER DATABASE [post_office_history] ADD FILEGROUP [FEB]
ALTER DATABASE [post_office_history] ADD FILEGROUP [MAR]
ALTER DATABASE [post_office_history] ADD FILEGROUP [APR]
ALTER DATABASE [post_office_history] ADD FILEGROUP [MAY]
ALTER DATABASE [post_office_history] ADD FILEGROUP [JUN]
ALTER DATABASE [post_office_history] ADD FILEGROUP [JUL]
ALTER DATABASE [post_office_history] ADD FILEGROUP [AUG]
ALTER DATABASE [post_office_history] ADD FILEGROUP [SEP]
ALTER DATABASE [post_office_history] ADD FILEGROUP [OCT]
ALTER DATABASE [post_office_history] ADD FILEGROUP [NOV]
ALTER DATABASE [post_office_history] ADD FILEGROUP [DEC]
GO


-- Step 2: Add Data Files to each Filegroup --

USE [master]
GO
ALTER DATABASE [post_office_history] ADD FILE (NAME = N'post_office_history_part_01', FILENAME = N'E:\MSSQL\DATA\post_office_history_part_01.ndf', SIZE = 2097152KB, FILEGROWTH = 1048576KB) TO FILEGROUP [JAN]
ALTER DATABASE [post_office_history] ADD FILE (NAME = N'post_office_history_part_02', FILENAME = N'E:\MSSQL\DATA\post_office_history_part_02.ndf', SIZE = 2097152KB, FILEGROWTH = 1048576KB) TO FILEGROUP [FEB]
ALTER DATABASE [post_office_history] ADD FILE (NAME = N'post_office_history_part_03', FILENAME = N'E:\MSSQL\DATA\post_office_history_part_03.ndf', SIZE = 2097152KB, FILEGROWTH = 1048576KB) TO FILEGROUP [MAR]
ALTER DATABASE [post_office_history] ADD FILE (NAME = N'post_office_history_part_04', FILENAME = N'E:\MSSQL\DATA\post_office_history_part_04.ndf', SIZE = 2097152KB, FILEGROWTH = 1048576KB) TO FILEGROUP [APR]
ALTER DATABASE [post_office_history] ADD FILE (NAME = N'post_office_history_part_05', FILENAME = N'E:\MSSQL\DATA\post_office_history_part_05.ndf', SIZE = 2097152KB, FILEGROWTH = 1048576KB) TO FILEGROUP [MAY]
ALTER DATABASE [post_office_history] ADD FILE (NAME = N'post_office_history_part_06', FILENAME = N'G:\MSSQL\DATA\post_office_history_part_06.ndf', SIZE = 2097152KB, FILEGROWTH = 1048576KB) TO FILEGROUP [JUN]
ALTER DATABASE [post_office_history] ADD FILE (NAME = N'post_office_history_part_07', FILENAME = N'G:\MSSQL\DATA\post_office_history_part_07.ndf', SIZE = 2097152KB, FILEGROWTH = 1048576KB) TO FILEGROUP [JUL]
ALTER DATABASE [post_office_history] ADD FILE (NAME = N'post_office_history_part_08', FILENAME = N'G:\MSSQL\DATA\post_office_history_part_08.ndf', SIZE = 2097152KB, FILEGROWTH = 1048576KB) TO FILEGROUP [AUG]
ALTER DATABASE [post_office_history] ADD FILE (NAME = N'post_office_history_part_09', FILENAME = N'G:\MSSQL\DATA\post_office_history_part_09.ndf', SIZE = 2097152KB, FILEGROWTH = 1048576KB) TO FILEGROUP [SEP]
ALTER DATABASE [post_office_history] ADD FILE (NAME = N'post_office_history_part_10', FILENAME = N'G:\MSSQL\DATA\post_office_history_part_10.ndf', SIZE = 2097152KB, FILEGROWTH = 1048576KB) TO FILEGROUP [OCT]
GO
ALTER DATABASE [post_office_history] ADD FILE (NAME = N'post_office_history_part_09', FILENAME = N'G:\MSSQL\DATA\post_office_history_part_11.ndf', SIZE = 2097152KB, FILEGROWTH = 1048576KB) TO FILEGROUP [NOV]
ALTER DATABASE [post_office_history] ADD FILE (NAME = N'post_office_history_part_10', FILENAME = N'G:\MSSQL\DATA\post_office_history_part_12.ndf', SIZE = 2097152KB, FILEGROWTH = 1048576KB) TO FILEGROUP [DEC]
GO


-- Step 3: Create Partition Scheme --

PRINT 'creating partition scheme ...'
GO

USE [post_office_history]
GO
CREATE PARTITION SCHEME PostTranPartSch
AS PARTITION PostTranPartFunc TO
(
JAN,
FEB,
MAR,
APR,
MAY,
JUN,
JUL,
AUG,
SEP,
OCT,
NOV,
DEC
)
GO
Notice that for N partitions, there will always be N-1 boundaries. Care must be taken when defining the first Filegroup in the Partition Scheme. The first boundary listed in the Partition Function will lie between the first and second Filegroups thus this boundary value (20190201) will sit in the second partition (FEB). In addition, it is actually possible to place all partition in a single filegroup but we have chosen separate filegroups in this case.
Getting Our Hands Dirty
So let’s dive into the task of switching out partitions!
The first thing we need to do is to determine exactly how our data is distributed among the partitions so we can know which partition we would like to switch out. Typically we will switch out the oldest partition.
-- Listing 3: Check Data Distribution in Partitions --

USE POST_OFFICE_HISTORY
GO
SELECT $PARTITION.POSTTRANPARTFUNC(DATETIME_TRAN_LOCAL)
			AS [PARTITION NUMBER]
	, MIN(DATETIME_TRAN_LOCAL) AS [MIN DATE]
	, MAX(DATETIME_TRAN_LOCAL) AS [MAX DATE]
	, COUNT(*) AS [ROWS IN PARTITION]
FROM DBO.POST_TRAN_TAB -- PARTITIONED TABLE
GROUP BY $PARTITION.POSTTRANPARTFUNC(DATETIME_TRAN_LOCAL)
ORDER BY [PARTITION NUMBER]
GO
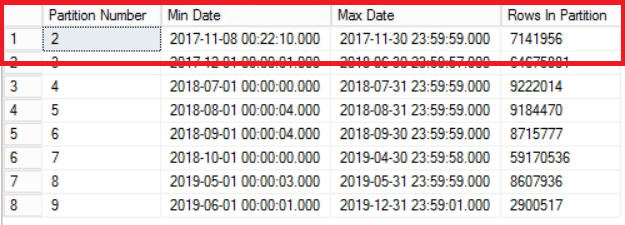
Fig. 1 Output of Listing 3
Fig. 1 shows us the output of the query in Listing 3. The oldest partition is Partition 2 which contains rows from the year 2017. We verify this with the query in Listing 4. Listing 4 also shows us which Filegroup holds the data in Partition 2.
-- Listing 4: Check Filegroup Associated with Partition --

USE POST_OFFICE_HISTORY
GO
SELECT PS.NAME AS PSNAME,
		DDS.DESTINATION_ID AS PARTITIONNUMBER,
		FG.NAME AS FILEGROUPNAME
FROM (((SYS.TABLES AS T
	INNER JOIN SYS.INDEXES AS I
		ON (T.OBJECT_ID = I.OBJECT_ID))
	INNER JOIN SYS.PARTITION_SCHEMES AS PS
		ON (I.DATA_SPACE_ID = PS.DATA_SPACE_ID))
	INNER JOIN SYS.DESTINATION_DATA_SPACES AS DDS
		ON (PS.DATA_SPACE_ID = DDS.PARTITION_SCHEME_ID))
	INNER JOIN SYS.FILEGROUPS AS FG
		ON DDS.DATA_SPACE_ID = FG.DATA_SPACE_ID
WHERE (T.NAME = 'POST_TRAN_TAB') AND (I.INDEX_ID IN (0,1))
	AND DDS.DESTINATION_ID = $PARTITION.POSTTRANPARTFUNC('20171108') ;
Fig. 1 Output of Listing 3
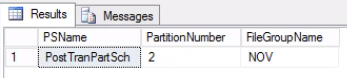
Fig. 2 Output of Listing 4
Listing 4 shows us that the filegroup associated with Partition 2 is NOV. In order to switch out Partition 2, we need a history table which is a replica of the live table but sits on the same filegroup as the partition we intend to switch out. Since we already have this table, all we need so is recreated it on the desired Filegroup. You also need to recreate the clustered index. Take note that this clustered index has the same definition as the clustered index on the table post_tran_tab and also sits on the same filegroup as post_tran_tab_hist table.
-- Listing 5: Re-create the History Table
-- Re-create the History Table --

USE [post_office_history]
GO

SET ANSI_NULLS ON
GO

SET QUOTED_IDENTIFIER ON
GO

SET ANSI_PADDING ON
GO

DROP TABLE [dbo].[post_tran_tab_hist]
GO

CREATE TABLE [dbo].[post_tran_tab_hist](
	[tran_nr] [bigint] NOT NULL,
	[tran_type] [char](2) NULL,
	[tran_reversed] [char](2) NULL,
	[batch_nr] [int] NULL,
	[message_type] [char](4) NULL,
	[source_node_name] [varchar](12) NULL,
	[system_trace_audit_nr] [char](6) NULL,
	[settle_currency_code] [char](3) NULL,
	[sink_node_name] [varchar](30) NULL,
	[sink_node_currency_code] [char](3) NULL,
	[to_account_id] [varchar](30) NULL,
	[pan] [varchar](19) NOT NULL,
	[pan_encrypted] [char](18) NULL,
	[pan_reference] [char](70) NULL,
	[datetime_tran_local] [datetime] NOT NULL,
	[tran_amount_req] [float] NOT NULL,
	[tran_amount_rsp] [float] NOT NULL,
	[tran_cash_req] [float] NOT NULL,
	[tran_cash_rsp] [float] NOT NULL,
	[datetime_tran_gmt] [char](10) NULL,
	[merchant_type] [char](4) NULL,
	[pos_entry_mode] [char](3) NULL,
	[pos_condition_code] [char](2) NULL,
	[acquiring_inst_id_code] [varchar](11) NULL,
	[retrieval_reference_nr] [char](12) NULL,
	[auth_id_rsp] [char](6) NULL,
	[rsp_code_rsp] [char](2) NULL,
	[service_restriction_code] [char](3) NULL,
	[terminal_id] [char](8) NULL,
	[terminal_owner] [varchar](25) NULL,
	[card_acceptor_id_code] [char](15) NULL,
	[card_acceptor_name_loc] [char](40) NULL,
	[from_account_id] [varchar](28) NULL,
	[auth_reason] [char](1) NULL,
	[auth_type] [char](1) NULL,
	[message_reason_code] [char](4) NULL,
	[datetime_req] [datetime] NULL,
	[datetime_rsp] [datetime] NULL,
	[from_account_type] [char](2) NULL,
	[to_account_type] [char](2) NULL,
	[insert_date] [datetime] NOT NULL,
	[tran_postilion_originated] [int] NOT NULL,
	[card_product] [varchar](20) NULL,
	[card_seq_nr] [char](3) NULL,
	[expiry_date] [char](4) NULL,
	[srcnode_cash_approved] [float] NOT NULL,
	[tran_completed] [char](2) NULL
) ON [NOV]

GO

SET ANSI_PADDING OFF
GO

-- Re-create the Clustered Index --
USE [post_office_history]
GO

CREATE CLUSTERED INDEX [IX_Datetime_Local] ON [dbo].[post_tran_tab_hist]
(
	[datetime_tran_local] ASC,
	[tran_nr] ASC

) WITH (PAD_INDEX  = OFF, STATISTICS_NORECOMPUTE  = OFF, SORT_IN_TEMPDB = OFF, IGNORE_DUP_KEY = OFF, DROP_EXISTING = OFF, ONLINE = OFF, ALLOW_ROW_LOCKS  = ON, ALLOW_PAGE_LOCKS  = ON) ON [NOV]
GO
Switching out the last partition is now a one-line command. Taking a count of both tables before and after executing this one-line command will give an assurance that we have all the data desired.

Fig. 3 Table post_tran_tab_hist sits on the NOV Filegroup
-- Listing 6: Switching Out the Last Partition
SELECT COUNT(*) FROM 'POST_TRAN_TAB';
SELECT COUNT(*) FROM 'POST_TRAN_TAB_HIST';

USE [POST_OFFICE_HISTORY]
GO
ALTER TABLE POST_TRAN_TAB SWITCH PARTITION 2 TO POST_TRAN_TAB_HIST
GO

SELECT COUNT(*) FROM 'POST_TRAN_TAB';
SELECT COUNT(*) FROM 'POST_TRAN_TAB_HIST';
Since we have switched out the last partition, we no longer need the boundary. We merge the two ranges previously split by that boundary using the command in Listing 7. We further truncate the history table as shown in Listing 8. We are doing this because this is the whole point: removing old data that we no longer need.
-- Listing 7: Merging Partition Ranges
-- Merge Range

USE [POST_OFFICE_HISTORY]
GO
ALTER PARTITION FUNCTION POSTTRANPARTFUNC() MERGE RANGE ('20171101');


-- Confirm Range Is Merged

USE [POST_OFFICE_HISTORY]
GO
SELECT * FROM SYS.PARTITION_RANGE_VALUES
GO
Fig. 4 Boundary Merged
-- Listing 8: Truncate the History Table


USE [post_office_history]
GO
TRUNCATE TABLE post_tran_tab_hist;
GO
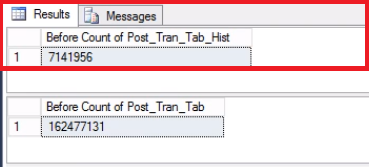
Fig. 5 Row Count for Both Tables before Truncate
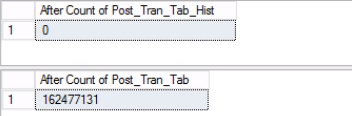
Take note that the number of rows in the history table is exactly the same as the number of rows previously in Partition 2 as shown in Fig. 1. You can also go the extra mile by recovering the empty space in the filegroup belonging to the last partition. This will be useful if since you need this space for the new data that will sit on the earlier partition. This step may not be necessary if you feel you have ample space in your environment.
-- Listing 9: Recover Space on Operating System
-- Determine that File has been emptied

USE [post_office_history]
GO
SELECT DF.FILE_ID, DF.NAME, DF.PHYSICAL_NAME, DS.NAME, DS.TYPE, DF.STATE_DESC FROM SYS.DATABASE_FILES DF
JOIN SYS.DATA_SPACES DS ON DF.DATA_SPACE_ID = DS.DATA_SPACE_ID;

Fig. 7 File to Filegroup Mappings
-- Shrink the file to 2GB

USE [post_office_history]
GO
DBCC SHRINKFILE (N'post_office_history_part_11’, 2048)
GO


-- From the OS confirm free space on disks

SELECT DISTINCT DB_NAME (S.DATABASE_ID) AS DATABASE_NAME,
S.DATABASE_ID, S.VOLUME_MOUNT_POINT
--, S.VOLUME_ID
, S.LOGICAL_VOLUME_NAME
, S.FILE_SYSTEM_TYPE
, S.TOTAL_BYTES/1024/1024/1024 AS [TOTAL_SIZE (GB)]
, S.AVAILABLE_BYTES/1024/1024/1024 AS [FREE_SPACE (GB)]
, LEFT ((ROUND (((S.AVAILABLE_BYTES*1.0)/S.TOTAL_BYTES), 4)*100),4) AS PERCENT_FREE
FROM SYS.MASTER_FILES AS F
CROSS APPLY SYS.DM_OS_VOLUME_STATS (F.DATABASE_ID, F.FILE_ID) AS S
WHERE DB_NAME (S.DATABASE_ID) = 'POST_OFFICE_HISTORY';

Fig. 8 Free Space on Operating System
Conclusion
In this article, we have done a walkthrough of the process to switch out partitions from a partitioned table. This is a very efficient way to manage data growth natively in SQL Server. More advanced technologies such as Stretch Database are available in current versions of SQL Server.
References
Isakov, V. (2018). Exam Ref 70-764 Administering a SQL Database Infrastructure. Pearson Education
Partitioned Tables and Indexes in SQL Server
Tags: partitioning, sql server Last modified: September 21, 2021