This article helps to get started with ASP.NET Core MVC quickly. It describes how to get the latest ASP.NET MVC version and create a simple ASP.NET MVC project in Visual Studio 2015, and explains how a basic ASP.NET MVC application works.
What is .NET Core?
Let’s start with some theory..NET Core is an open-source modular platform for creating applications and services that run on Windows, Linux and Mac. It supports multiple languages, like C#, VB, F#, and modern solutions, like generics, LINQ (Language Integrated Query), async development and more.
What is ASP.NET Core?
ASP.NET Core is great redesign of classic ASP.NET. It’s open source and cross-platform framework for building internet connected applications (web, cloud, IoT, mobile backend, etc). It can run on .NET Core or on full .NET Framework. It’s also modular so it introduces minimal overhead as you can take only components you really need.
What is ASP.NET Core MVC?
ASP.NET Core MVC is a web application framework based on ASP.NET Core, which implements the model-view-controller pattern. MVC is a composition of three logic layers:
- Model – business layer
- View – display/presentation layer
- Controller – input control
A model represents application state. A controller handles interactions and modifies the model. The controller also passes information to a view. The view takes necessary information and presents it to a user – renders interface.
Environment setup
I’ll use a free edition of my favorite IDE (Integrated Development Environment) – Visual Studio 2015 Community. It can be used by individuals developing commercial or non-commercial products. You can get it from Visual Studio Download Page.
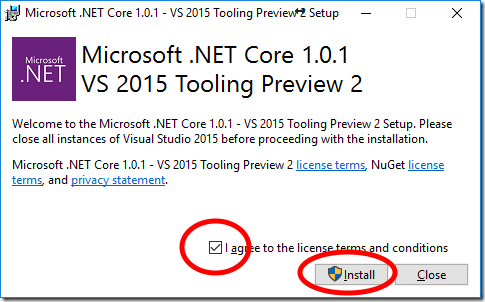
Next step is to install .NET Core SDK – visit .NET Core installation guide and click ‘Download .NET Core 1.0.1 tools Preview 2’ (or later if available). Close all instances of Visual Studio and run the installer.
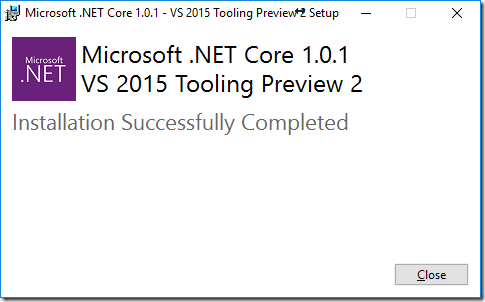
The installation should finish in a minute.
Create First ASP.NET Core Project
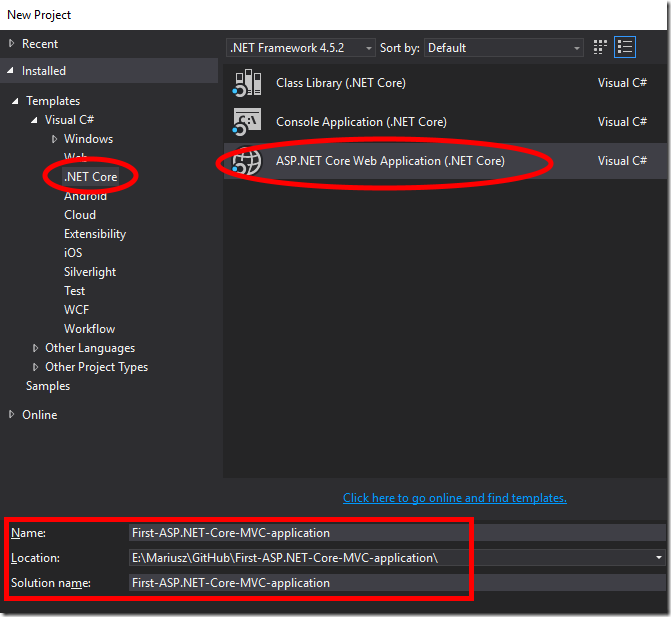
Open Visual Studio and click File / New / Project in the menu.
Then select your application template. The .NET Core SDK added new templates – you can find them under Templates \ Visual C# \ .NET Core – select ‘ASP.NET Core Web Application (.NET Core)’.
Remember to fill in name and location of your application.
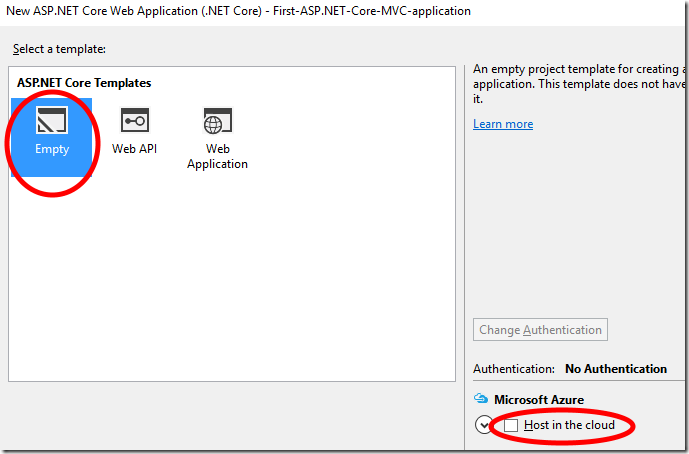
Next, you will be asked about ASP.NET Core template. For the educational purposes let’s start with Empty template. This way you will better understand the modularity of ASP.NET Core.
Please clear the ‘Host in the cloud’ check box as it’s not needed in this tutorial.
Run ASP.NET Core Application
Once the project is created, you can run it just by pressing F5 or clicking following button.
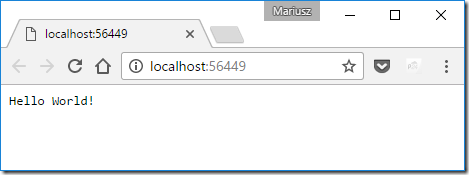
A web browser should be opened and you should see Hello World message.
How ASP.NET Core works?
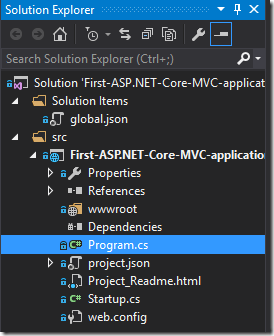
Now, let’s have a look at what exactly happened. There is Program.cs file in Solution Explorer.
using System;
using System.Collections.Generic;
using System.IO;
using System.Linq;
using System.Threading.Tasks;
using Microsoft.AspNetCore.Hosting;
namespace First_ASP.NET_Core_MVC_application
{
    public class Program
    {
        public static void Main(string[] args)
        {
            var host = new WebHostBuilder()
                .UseKestrel()
                .UseContentRoot(Directory.GetCurrentDirectory())
                .UseIISIntegration()
                .UseStartup<Startup>()
                .Build();
            host.Run();
        }
    }
}
When the Main method is executed, first WebHostBuilder is initialized.
new WebHostBuilder()
Then Kestrel is specified as a server to be used by the web host.
.UseKestrel()
Next content root directory is set to current directory.
.UseContentRoot(Directory.GetCurrentDirectory())
Then IIS integration is enabled – it configures port and base path the server should listen on.
.UseIISIntegration()
The line that defines the startup type is very important; we will describe it in more details shortly.
.UseStartup<Startup>()
Finally, the web host is built and assigned to the host variable.
var host = (…)
    .Build();
At last, the web host is run and the thread is blocked until host is shutdown.
host.Run();
Ok, so this all is responsible just for starting the web host. But what is responsible for providing the content?
What is ASP.NET Core Startup Class?
Every ASP.NET application requires at least one startup class. It configures the request pipeline that handles all requests that are sent to the application.
Startup class must have a Configure method that specifies how ASP.NET will respond to HTTP requests.
// This method gets called by the runtime. Use this method to configure the HTTP request pipeline.
public void Configure(IApplicationBuilder app, IHostingEnvironment env, ILoggerFactory loggerFactory)
{
    loggerFactory.AddConsole();
    if (env.IsDevelopment())
    {
        app.UseDeveloperExceptionPage();
    }
    app.Run(async (context) =>
    {
        await context.Response.WriteAsync("Hello World!");
    });
}
In the generated project it adds logging to the console.
loggerFactory.AddConsole();
Next, it turns detailed exception reporting for local development.
if (env.IsDevelopment())
{
    app.UseDeveloperExceptionPage();

}
Finally, it defines constant response for any request – the reason you see ‘Hello World!’ message when the application is started.
app.Run(async (context) =>
{
    await context.Response.WriteAsync("Hello World!");
});
Startup class can have also a ConfigureServices method that is used to include features that must be added before they are wired up in the request pipeline. The method is empty in generated project.
// This method gets called by the runtime. Use this method to add services to the container.
// For more information on how to configure your application, visit http://go.microsoft.com/fwlink/?LinkID=398940
public void ConfigureServices(IServiceCollection services)
{
}
Enable MVC
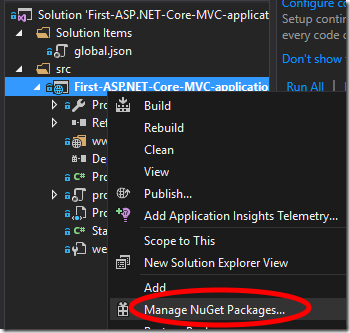
Now you know how a raw ASP.NET Core application works. Let’s try to enable MVC framework. First we need to add a NuGet package that adds MVC support – right click on the project and select ‘Manage NuGet Packages…’.
Click ‘Browse’ in the new tab, then type ‘Microsoft.AspNetCore.MVC’ in search box. Select the package and click ‘Install’.
Next let’s add MVC in Startup.ConfigureServices method.
public void ConfigureServices(IServiceCollection services)
{
    services.AddMvc();
}
Then add it to request execution pipeline – update Startup.Configure method.
public void Configure(IApplicationBuilder app, IHostingEnvironment env, ILoggerFactory loggerFactory)
{
    app.UseMvc();
    // The rest of the method unchanged
}
So far so good, but if you run the application you will still see the same ‘Hello World!’ message. It’s because we have no MVC objects defined.
Add First MVC Controller
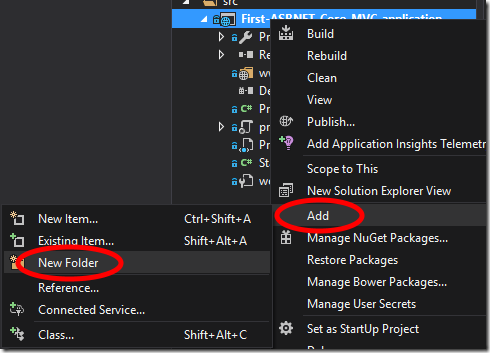
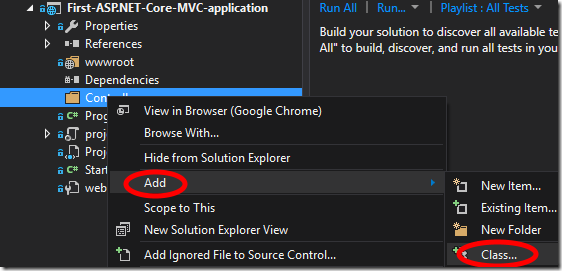
First, let’s create the Controllers folder.
Next, let’s create the HomeController class.
Put the following code in the file.
using Microsoft.AspNetCore.Mvc;
namespace First_ASP.NET_Core_MVC_application.Controllers
{
    public class HomeController : Controller
    {
        [Route("home/index")]
        public IActionResult Index()
        {
            return Ok("Message from controller");
        }
    }
}
If you run your application and append the URL with ‘/home/index’ you should see a new message.
Hurray, something more than ‘Hello World!’
Add First MVC View
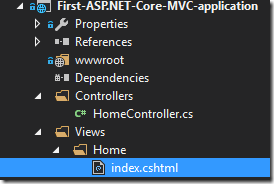
Let’s work a little bit on presentation of your application. Add one more directory to the project – Views, then create Home subdirectory. Next, add index.cshtml to the Home subdirectory with following content.
<div>
    <h1>Nice message from MVC</h1>
< /div>
Last thing is to update Controller to return the View result.
public IActionResult Index()
{
    return View();
}
When you run the application, you should see the nice message.
Summary
ASP.NET Core is a very flexible platform that follows modern patterns, like dependency injection. This way it can be easily adjusted to various scenarios.
In this tutorial we have shown only the very basics of ASP.NET Core functionality. Full application sources are available on GitHub.
To continue studying ASP.NET Core, you may visit its website where you can find a number of more advanced tutorials and interesting articles.
Related articles:
ASP.NET Core 1.0. Part 1: Introduction, general description and the future of .NET Framework
Tags: asp.net core Last modified: October 06, 2022