Introduction
You would have already heard about views in databases. We create views for a number of reasons. One of the main reasons for using views is simplicity. Instead of writing complex queries again and again, you can just write a reusable view which fetches data from the underlying base tables. Another important reason for using views is security. If you don’t want to grant user privileges for the entire table, you can create a view instead which simplifies the process by letting you grant access directly to this view instead of the table. That said, views have certain limitations. The queries used in views have to fetch data from the underlying base tables which is not optimal when dealing with a huge number of rows. There is a strong likelihood of unnecessary I\O which would lead to poor database performance.
Indexed Views
With indexed views, you can get better performance as unnecessary I/O can be eliminated. However, just creating indexes on a view without due diligence will do more harm than good. So, it is important to analyze first and create indexed views after a thorough investigation only if it’s really required. In this article, we will describe what indexed views are and go through different scenarios with examples.
What is an Indexed View?
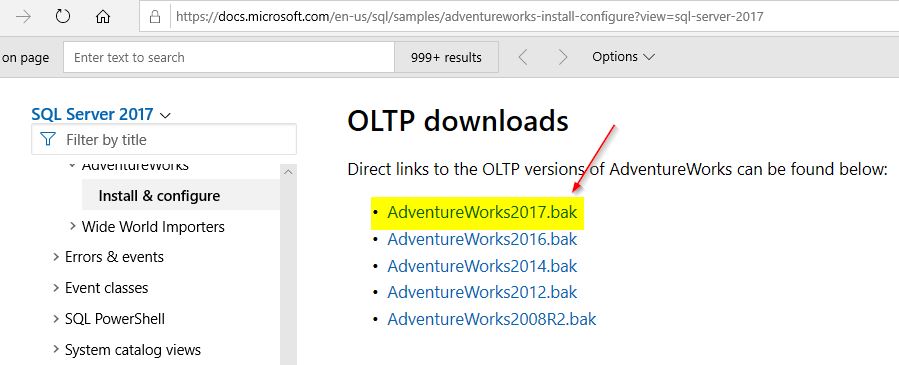
As the name implies, an indexed view is a view with a unique clustered index. Just to remind you, this is not as easy as just creating a unique clustered index on the view – we need to fulfill a number of conditions before creating the indexed view as the SQL Server engine requires. For the purpose of this demo, we will be using the AdventureWorks sample database. You can download the sample backup file and restore it on your server. Refer to this link for the backup file. You can download it as shown by clicking on the required backup file.
Once the backup file is downloaded, restore the database by using the backup. You can run this sample script to achieve it. You may also need to update the folder paths as per the location on your server.
restore database AdventureWorks
from disk='C:\ AdventureWorks2017.bak'
with move ' AdventureWorks2017' to 'C:\SQLData\AdventureWorks2017.mdf',
     move ' AdventureWorks2017_log' to 'C:\SQLData\AdventureWorks2017_log.ldf',
 stats
Pre-requisites for an indexed view
Microsoft has outlined a detailed set of requirements that need to be followed before you can create an indexed view. The full list can be obtained from the official Microsoft documentation. However, the important points are outlined below.
-
Certain SET Options require certain values before a table or a view can be created. For more details about this, refer to this link as mentioned previously. As an example, a SET option called ANSI_NULLS requires the ON value.
-
Index View definition needs to be deterministic. This means that the same value needs to be returned every time.
-
Tables referenced in the view need to follow this two-part naming convention: schema.tablename
-
[With SCHEMABINDING] needs to be used while creating the view
-
A unique clustered index needs to be created on the view
These are some of the important points to consider before successfully creating an indexed view.
Create an index view on the AdventureWorks database
In this demo, we will try to query information from the sample database about the products that a customer has purchased. We will join a few tables to collect this data – to do this, you can use the sample script as shown. AdventureWorks is a sample OLTP database. To get a better understanding of the underlying objects in this database, feel free to refer to this link. It’s basically the data dictionary for this database, so you could check what kind of tables are used in it.
Create VIEW Sales.vCustomerSalesInfo
WITH SCHEMABINDING
AS
SELECT  C.CustomerID ,
        P.FirstName ,
        P.LastName ,
        SH.SalesOrderID ,
        SH.OrderDate ,
	 SD.ProductID ,
        PRD.Name ,
	 PRD.StandardCost as [Cost in USD],
	 SD.OrderQty
FROM    Sales.SalesOrderHeader SH
        INNER JOIN Sales.SalesOrderDetail SD
               ON SH.SalesOrderID = SD.SalesOrderID
        INNER JOIN Production.Product PRD
               ON PRD.ProductID = SD.ProductID
        INNER JOIN Sales.Customer C
               ON SH.CustomerID = C.CustomerID
        INNER JOIN Person.Person P
               ON P.BusinessEntityID = C.PersonID
If you check the script above, you will see the option “With SCHEMABINDING” which is one of the requirements for creating an indexed view. Before creating a unique clustered index on the view, just use the SELECT statement to check the estimated query plan.
Check the query plan before creating a unique clustered index
Just use the SELECT statement that you used in the view above.
SELECT  C.CustomerID ,
        P.FirstName ,
        P.LastName ,
        SH.SalesOrderID ,
        SH.OrderDate ,
	 SD.ProductID ,
        PRD.Name ,
	 PRD.StandardCost as [Cost in USD],
	 SD.OrderQty
FROM    Sales.SalesOrderHeader SH
        INNER JOIN Sales.SalesOrderDetail SD
               ON SH.SalesOrderID = SD.SalesOrderID
        INNER JOIN Production.Product PRD
               ON PRD.ProductID = SD.ProductID
        INNER JOIN Sales.Customer C
               ON SH.CustomerID = C.CustomerID
        INNER JOIN Person.Person P
               ON P.BusinessEntityID = C.PersonID
Click on the “Display Estimated Execution Plan” option in SQL Server Management Studio (SSMS).
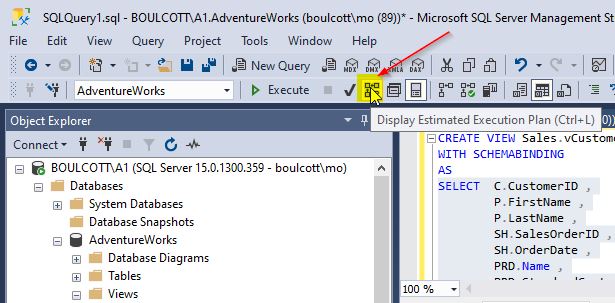
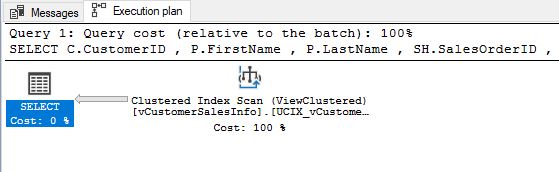
Once this is done, you will be able to view the estimated execution plan. Check the following screenshot:

Similarly, you can just try a SELECT on the view you created by using the following script and click the “Display Estimated Execution Plan” option. You will see the same execution plan as above.
select * from Sales.vCustomerSalesInfo
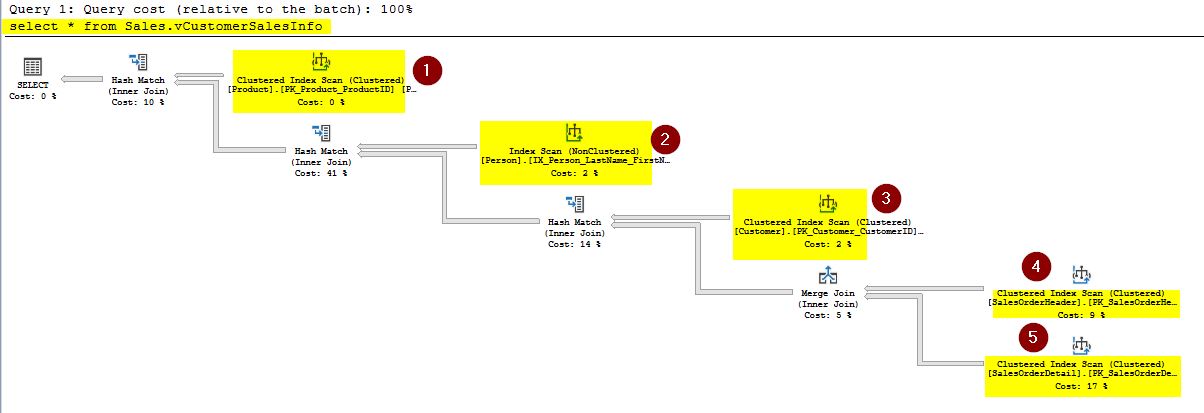
You can also point to the individual operators in the execution plan to check the details of the operations planned by the query optimizer. From the execution plan, you can see that an index scan is performed on all 5 base tables that are used in the view. Imagine if millions of rows need to be scanned and what kind of impact it would have on server performance when the I/O operations occur on each of the underlying base tables.
Create a unique clustered index on the view
In this step, let’s create a unique clustered index on the view. Before doing it, you would need to meet the requirements which we outlined earlier. For the specific details, you can refer the official Microsoft documentation here. Use the code below to create the unique clustered index.
CREATE UNIQUE CLUSTERED INDEX UCIX_vCustomerSalesInfo
	ON Sales.vCustomerSalesInfo(CustomerID, SalesOrderID, ProductID)
Once this unique clustered index is created successfully, the view is now known as an indexed view. The choice of columns is important as the column or combination of columns you use needs to be unique – duplicates of any kind are not accepted. Now, with the indexed view created, you will see considerable changes in the behavior of the query optimizer when you run queries again to test the performance. The indexed view will be just like any other table and you will see that the optimizer will no longer require to scan the underlying base tables as it was before creating the unique clustered index. In the next section, we will check the “Estimated query plan” to view the execution plans.
Check query plans after creating a unique clustered index\Indexed Views
You can click on the “Display Estimated Execution Plan” for the query below like you did earlier.
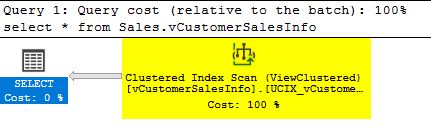
select * from Sales.vCustomerSalesInfo
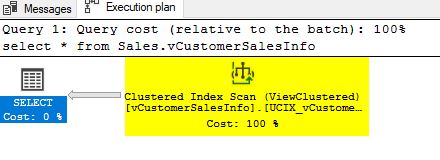
You will notice a huge change in the query execution plan as shown below.

Earlier, before creating the unique clustered index, you noticed that this same query had to scan each of the underlying base tables. Now, it just performs a clustered index scan on the newly created index thereby reducing the need for querying directly from the underlying base tables and minimizing I/O operations. You can hover your mouse over the operator to check further. Here, you can see more details for the clustered index scan operator.
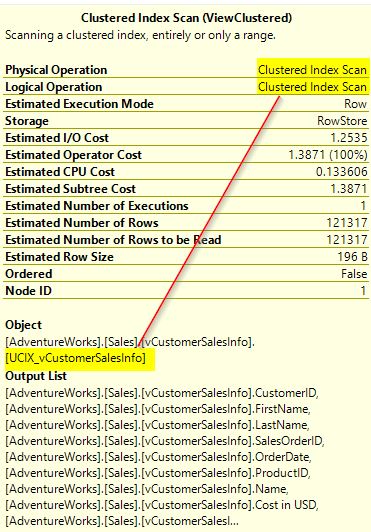
Similarly, when you check the “Estimated Plan” for the SELECT statement that is used in your view, you will see the same clustered index scan operation.
SELECT  C.CustomerID ,
        P.FirstName ,
        P.LastName ,
        SH.SalesOrderID ,
        SH.OrderDate ,
	 SD.ProductID ,
        PRD.Name ,
	 PRD.StandardCost as [Cost in USD],
	 SD.OrderQty
FROM    Sales.SalesOrderHeader SH
        INNER JOIN Sales.SalesOrderDetail SD
               ON SH.SalesOrderID = SD.SalesOrderID
        INNER JOIN Production.Product PRD
               ON PRD.ProductID = SD.ProductID
        INNER JOIN Sales.Customer C
               ON SH.CustomerID = C.CustomerID
        INNER JOIN Person.Person P
               ON P.BusinessEntityID = C.PersonID
The estimated query plan is a clustered index scan, just as shown:
Updating underlying base tables
With the indexed view created, modifying the underlying base tables would cause additional overhead as the indexed view would need to be updated as well. Let’s consider updating one of the base tables that are used in this view. The following query will help with this.
update Sales.SalesOrderHeader
	set OrderDate= CAST('2010-08-24' AS DATETIME)
	   where SalesOrderID=43663
In this update statement, you can see that the OrderDate column used in the indexed view is getting updated. Just click “Display Estimated Execution Plan” to view the plan. From the screenshot below, you will notice that there is an operator assigned to updating the clustered index which was created as a part of the indexed view.
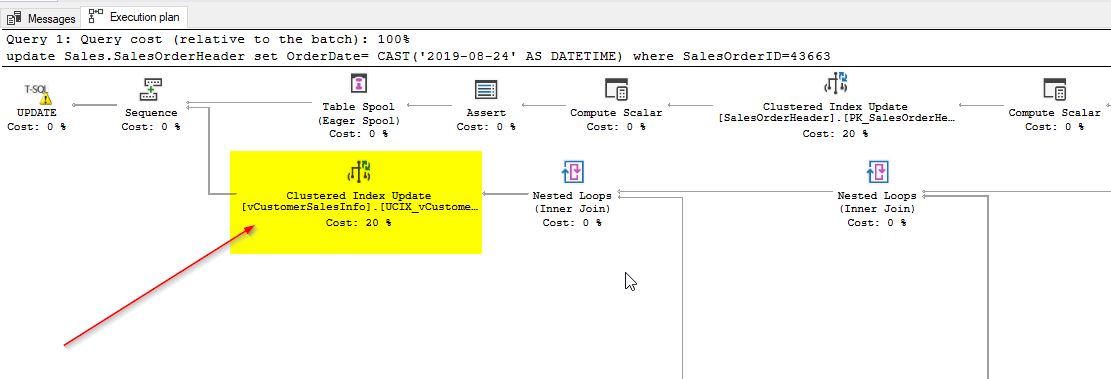
When you hover over the operator above, you will see further details of the unique clustered index that is used in the view.

In the update query, you will notice that only one row in the table Sales.SalesOrderHeader is getting updated. It has a column value of 43663 for the SalesOrderID column. You can also see that an estimated operator cost of 20% for the clustered index update. If you change the update query to update a greater number of rows, you will notice a change in the estimated operator cost for the clustered index update. Just try using the following query to see the change and click “Display Estimated Execution Plan”.
update Sales.SalesOrderHeader
	set OrderDate= CAST('2010-08-24' AS DATETIME)
	   where SalesOrderID>1
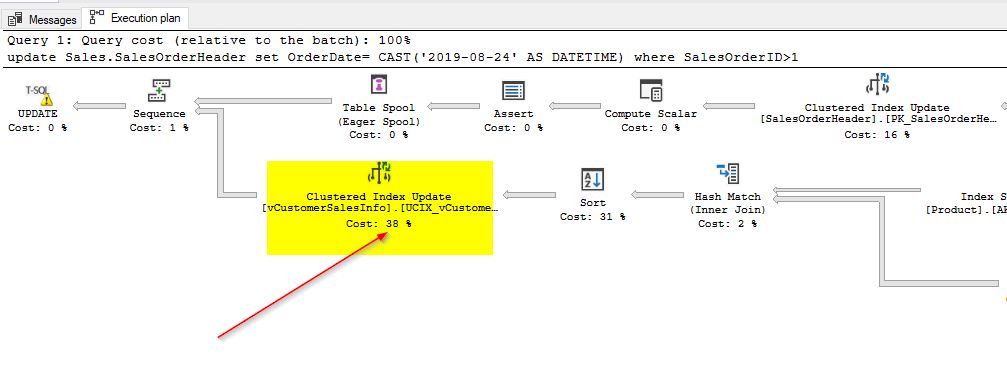
Here, you can see that the operator cost has almost doubled for the clustered index update. It increased from 20% to 38%. When you check further, you will notice that this clustered index update is the most expensive operator in the execution plan. This is just an example, but by now you understand what performance impact it would have if we were to frequently update a number of base tables that are used in indexed views. As part of maintaining consistency, SQL server has the overhead of updating both base tables and indexes that are used. This is why indexed views need to be used with caution and are mostly recommended for reporting databases in which data does not change too frequently. These examples were run on a SQL Server Developer Edition. The behavior you see in the Developer edition would be similar to that of the Enterprise edition. However, this behavior changes in the Standard Edition as we would need to force the Query optimizer to use the indexed view by including the WITH (NOEXPAND) option in the query. Otherwise, the query optimizer will ignore the indexed view and continue to query directly from the base tables causing unnecessary I/O.
Disabling the Indexed View
In this section, we will try disabling the unique clustered index on the indexed view we created. Before disabling the unique clustered index, check the estimated query plan to confirm that it is working as expected. Use the following query to do this:
select * from Sales.vCustomerSalesInfo
You will see that the indexed view is being used in the estimated plan.
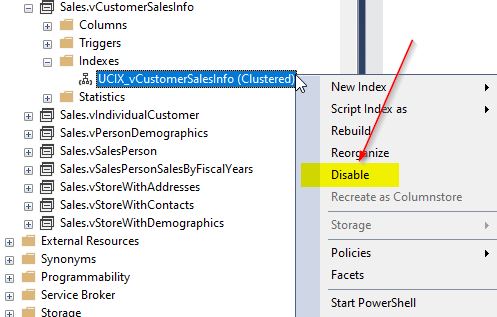
Now, disable the unique clustered index by right-clicking the index as shown and then clicking the “Disable” option.
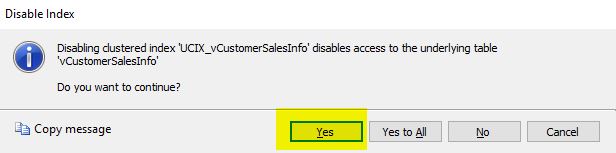
You will see the following pop-up window. Click “OK” to continue.

Once this is done, the following window will appear:
Click “Yes”, and then try querying the view again and check the estimated query plan.
select * from Sales.vCustomerSalesInfo
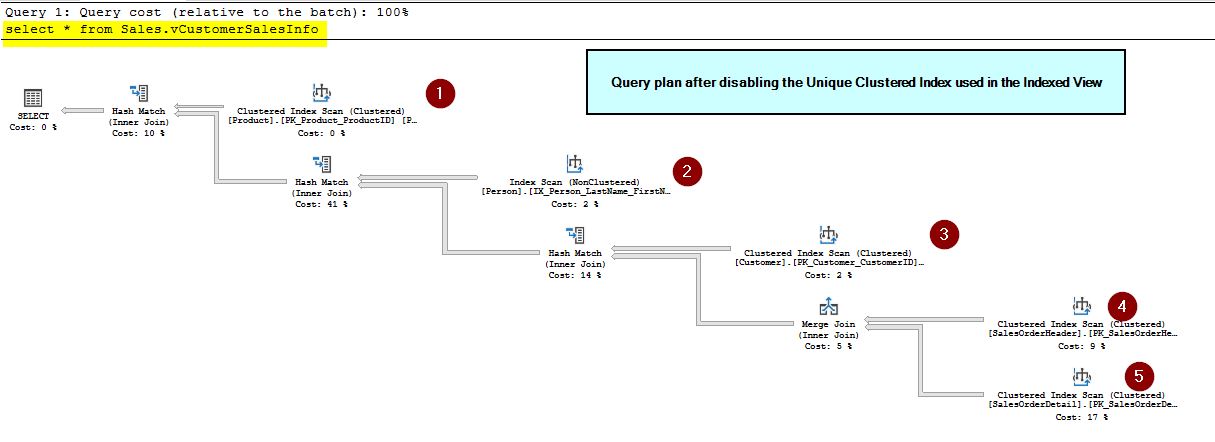
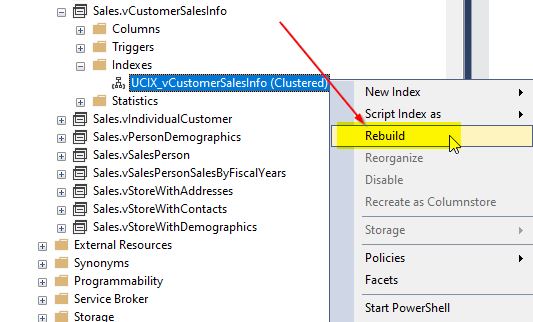
From the query plan, you can see that the optimizer is no longer using the indexed view and has gone back to the original plan of querying each of the underlying base tables, similar to what it did before we created the indexed view. Next, for re-enabling the unique clustered index, you would need to rebuild the index again. Refer to this screenshot to rebuild the index:
When you click “Rebuild”, you will get the following window. Click “OK” to continue.
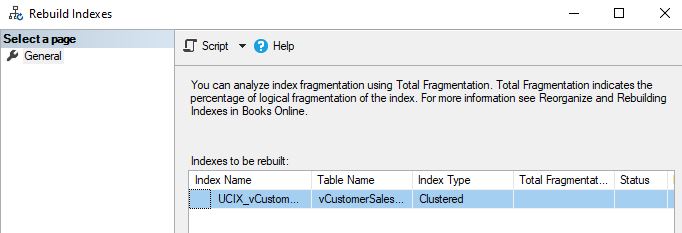
Once the index is rebuilt, it will be re-enabled. You can try the query again and view the estimated query plan.
select * from Sales.vCustomerSalesInfo
The optimizer is using the indexed view again.
Conclusion
- You read about the benefits of using views
- After that, you read about indexed views
- You learned about the pre-requisites for creating indexed views. The full details can be accessed in the official Microsoft documentation
- There was a demo using the sample AdventureWorks database
- You learned about the benefits of using indexed views
- In the demo, you saw the impact on updating underlying base tables
- You also learned how to disable and enable the unique clustered index used in the indexed view
- Finally, you learned that Indexed views improve performance on certain scenarios and are generally preferred on workloads that don’t change frequently
Always complete a thorough investigation and only then consider creating indexed views as they can severely impact performance if not used correctly.
Tags: indexed view, sql server Last modified: October 07, 2022


