Last time, you learned about a primer on SQL Server. In that article, you also learned about the different versions and editions of Microsoft SQL Server. But enough with background information. Hands-on learning is more fun. So, in this article, you will learn how to install SQL Server step-by-step.
But before you download the software, there’s something you need to have first.
SQL Server Installation Prerequisites
Note in this guide that the prerequisites apply to SQL Server 2019 Developer Edition. It’s FREE and perfect for learning.
Hardware Requirements
Here are the hardware requirements for installing SQL Server.
Processor | x64 processor with a minimum of 1.4 GHz. 2 GHz or faster is recommended. 32-bit (x86) is no longer supported. |
RAM | Minimum of 1GB. Optimal 4GB or higher. |
Disk | Minimum of 6GB. More is required as you add features. Check here for a detailed disk requirement per feature. |
Other | Internet connectivity and a monitor with 800×600 resolution or higher. |
Operating System Requirements
SQL Server 2019 Developer Edition can be installed on the following operating systems:
Windows | Windows Server 2016 or higher Windows 10 TH1 1507 or higher |
Linux | Red Hat Enterprise Linux 7.7 or higher SUSE Linux Enterprise v12 SP3 or higher Ubuntu 16.04 or higher Installation in Linux is done within a terminal using commands. These commands will get the SQL Server package from a Linux distro repository. You can find further details about this in the official documentation for Ubuntu, Red Hat, and SUSE. |
Docker | With Docker containers, you can run SQL Server on a Mac. Docker must be installed first. And then, issue terminal commands like Linux to download and install SQL Server. |
In this tutorial, SQL Server 2019 Developer Edition will be installed on Windows 10 Home 21H1.
Software Requirements
.Net Framework | .Net Framework 4.6.1. (Windows) |
If everything above looks alright for your PC, then let’s begin.
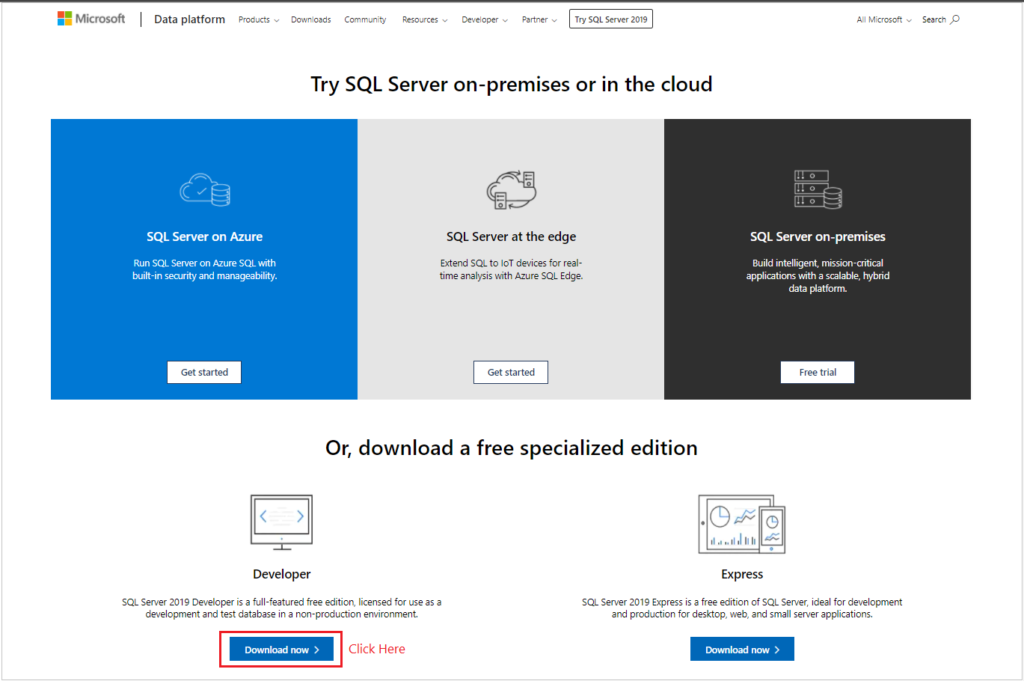
How to Download SQL Server Installer
Figure 1 below is a screenshot of the SQL Server download page. So, when you open this link, it should look like the one below. Never get the installer other than the official download link. This will protect you from viruses and unofficial software.
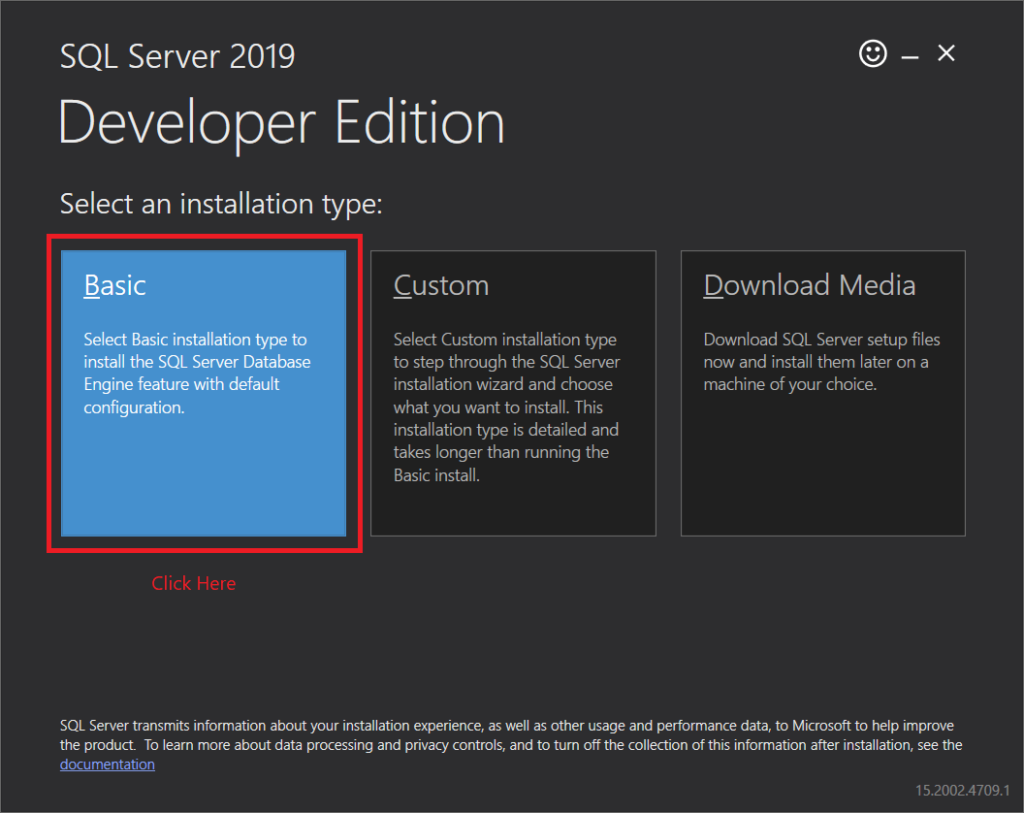
Before you run the installer, you should be aware that there are 3 types of installation:
- Basic – SQL Server Basic installation will install the database engine with the default configuration.
- Custom – This option will let you choose features to install and change some configurations. Picking this option will also take you longer to install. And depending on the features you choose, it will consume more disk space.
- Download Media – This will let you download the offline installer as an ISO or CAB file. By choosing this, you can install SQL Server into another machine of your choice.
Where to Save the SQL Server Installation Media
Another thing you need to know is about the installer you downloaded from Microsoft. It does not include the setup files yet. Upon running the installer, the setup files will be written in C:\SQL2019 by default. You can change it to your location of choice. Remember that this is the media root directory or the place to go if you want to add more features in the future.
Did you notice the short path name for the SQL Server installation media? Take note of that because long path names to files on SQL Server installation media will fail. It is not a valid installation folder. So, if you use something like C:\Shared\Downloads\Work Tools\Development Tools\SQL Server Installation Media for SQL Server 2019 Developer Edition – English Download Folder\Developer_ENU, rename it. Or leave the suggested folder name as is.
Now that you know about installation types and media, let’s install SQL Server.
Step-by-Step Guide to SQL Server Installation
As a newbie to SQL Server, you only need the Basic installation for now. You can change the configuration when the time comes to use SQL Server in production.
So, the steps here focus on the Basic type of installation. And here they are.
STEP 1: Run the Installer.
So, where did you download the installer? Wherever you put it, the file is SQL2019-SSEI-Dev.exe. Run it. Then, a prompt will appear. It will ask you if you want to install SQL Server 2019 from Microsoft. So, click Yes.
STEP 2: Click Basic Installation Type
Select the Basic installation type. See Figure 2 for a screenshot.
STEP 3: Accept the Terms of Agreement
Then, you need to read the License Terms and click Accept. See a screenshot in Figure 3.

STEP 4: Choose the Installation Location
At this point, you have the option to change the installation path or leave it as is. To change it, click Browse. See a screenshot in Figure 4.

Then, click Install to proceed.
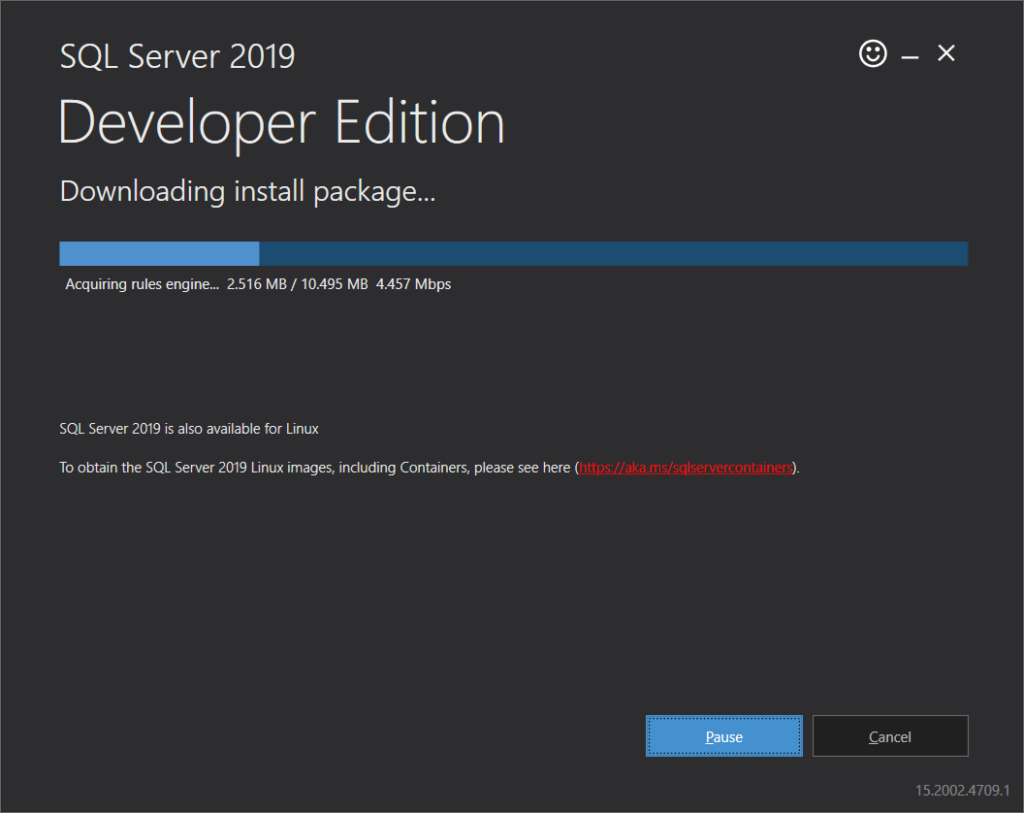
And then, the installer will download the install package. See how it looks in Figure 5.
When the download is complete, the installation proceeds. See Figure 6.

From here, you need to wait until the installation is complete.
STEP 5: Finish the Installation
Congratulations! The installation of SQL Server is complete. When the installation finishes, you will see a window like in Figure 7 below.
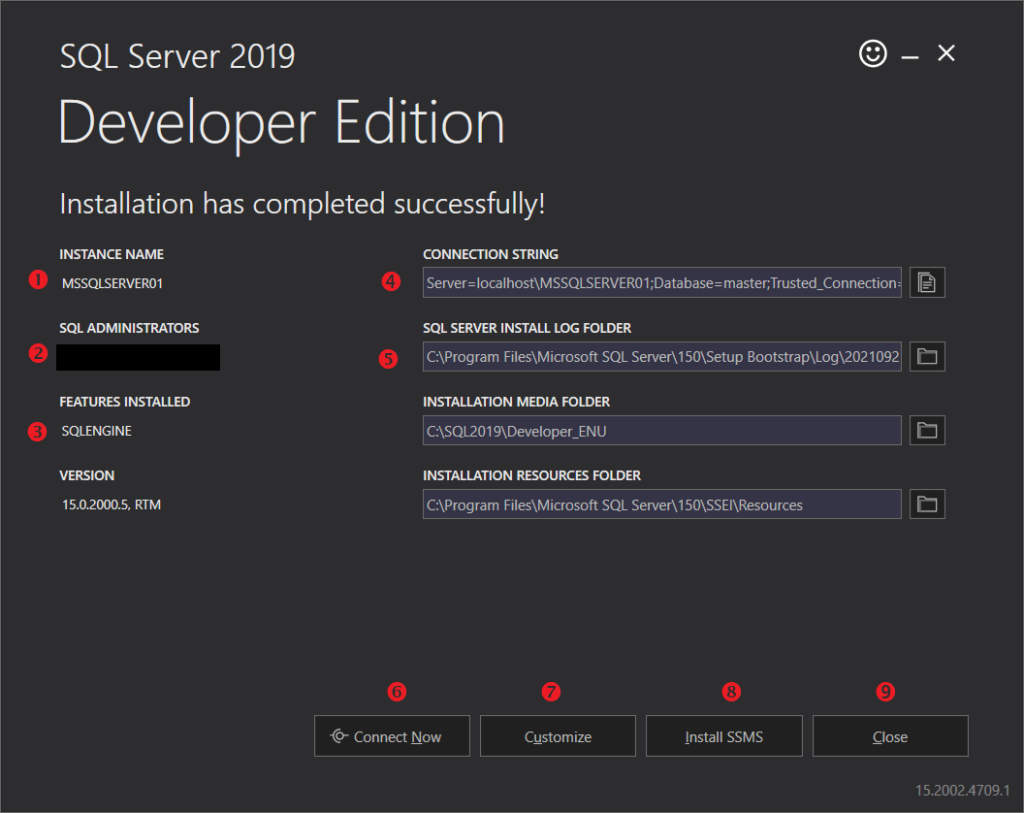
Take note of these points:
- Instance name – this is the name of the SQL Server instance. You need this when connecting to SQL Server from apps.
- SQL Administrators – shown here is the Windows account used as the administrator for SQL Server. The account you used to install SQL Server will be used here.
- Features installed – since Basic installation is selected, only the database engine is installed. You can still customize it, though. See #7 below.
- Connection String – when working with apps you develop, you need a connection string to connect to SQL Server. The default connection string points to Database=master. Change master to your app’s database.
- Install Log Folder – If you encounter errors during the installation and adding features, you will see them here. You can use the log file to troubleshoot errors. The filename is SQLServer_ERRORLOG_<date><time>.txt, where <date><time> is the date and time of installation.
- Connect Now – this will open a separate window to test your installation. This will be discussed in the next section.
- Customize – this will let you customize further the features installed. And this will also allow you to install product upgrades or another SQL Server instance. Upon clicking, the SQL Server installation center will open. Then, follow the installation wizard.
- Install SSMS – this will let you install SQL Server Management Studio (SSMS). This is a free tool for designing, developing, and monitoring databases.
- Close – Close the installer window.
From here, you can choose what to do next. But you may want to check your installation first.
How to Check if SQL Server is Installed or Not
Is the installation successful? How do you check if SQL Server is installed successfully?
When you click Connect Now, did you see a window like in Figure 8 below? Then, you’re good to go. This way, with select @@Version, you can check which version of SQL Server is installed. And Figure 8 also confirms that SQL Server 2019 Developer Edition is installed.

Configuration Tips and Best Practices
Only default configuration was done in the Basic installation type. With this, there’s only 1 account that can access the new SQL Server you installed. This uses Windows authentication.
The default configuration also gives you 1 default instance of SQL Server if no other instance has been installed.
Meanwhile, the default path of the database files and logs is located in C:\Program Files\Microsoft SQL Server\. Here are the subdirectories under this path.
- For Data and log files: C:\Program Files\Microsoft SQL Server\MSSQL15.MSSQLSERVER\MSSQL\DATA\
- For Backup: C:\Program Files\Microsoft SQL Server\MSSQL15.MSSQLSERVER\MSSQL\Backup
Data in SQL Server has an MDF file extension. Meanwhile, LDF is the file extension of the log file. And when you create database backups, it will have a BAK file extension.
This setup is alright for beginners learning SQL Server. But this is not meant for production use. Please do not use this same configuration on corporate servers.
So, what’s the recommended configuration?
This needs another article to explain the best practices in setting up SQL Server in production. But some of it includes the following:
- Changing the path of the database, logs, and tempDB.
- Changing the service accounts used in starting different SQL Server services.
- Setting different port numbers for the SQL Server instance. SQL Server database engine default port is 1433.
You can check a detailed list from here when the time comes.
SQL Server Installation Issues
Did you encounter problems during installation?
The installer is smart enough to detect problems like insufficient disk space. And if the hardware and software requirements are met, you will almost always have a good installation experience. But if you encounter errors, try to reinstall SQL Server and see what happens.
But if you are still unable to install SQL Server, look for the installation log file in C:\Program Files\Microsoft SQL Server\150\Setup Bootstrap\Log. Open the log file in Notepad and search for the word “error”. This will give you an idea of what went wrong. And solve the problem from there.
You can also let us know in the Comments Section about your installation experience. And if you encounter an error, someone will try to help you out. It will also be helpful to indicate any on-screen message you received and the error you found from the log file.
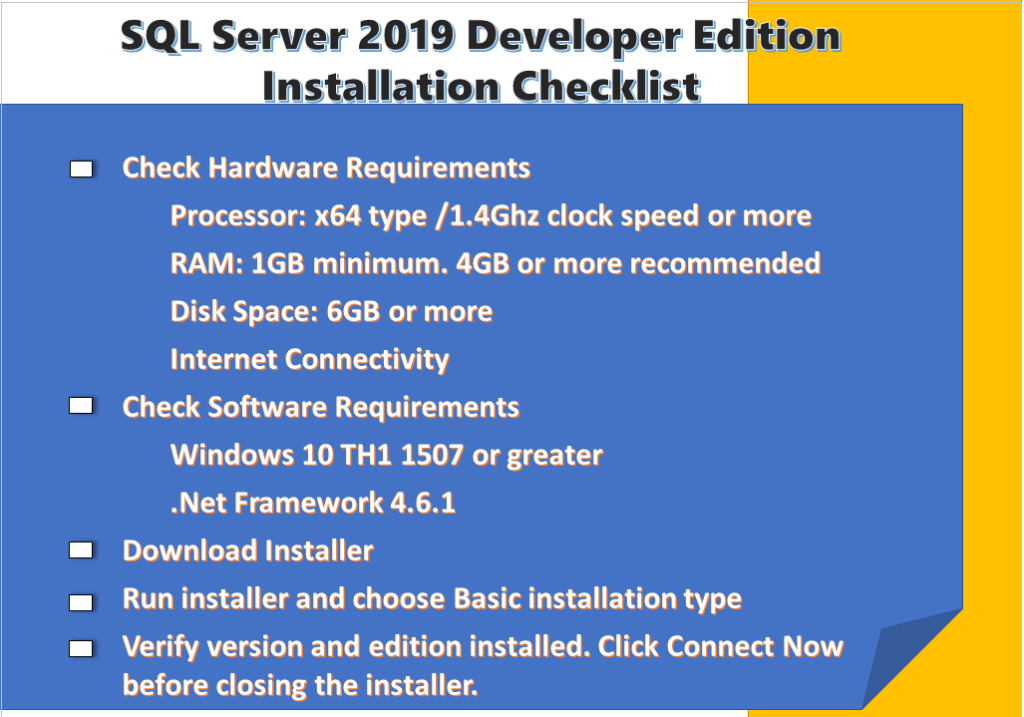
MSSQL Installation Checklist
Before we conclude, we want to make it easier for you. So, here’s a summary of how to install SQL Server 2019 Developer Edition on Windows 10:
- Check the Hardware requirements
- Processor: Is it an x64 type processor with a 1.4Ghz clock speed or more?
- RAM: Do you have 1GB or more of random access memory?
- Disk space: Do you have 6GB or more disk space?
- Internet connectivity: Do you have an internet connection to download the installer and setup files?
- Check the Software requirements
- Are you using Windows 10 TH1 1507 or higher?
- Do you have the .Net Framework 4.6.1?
- Download the installer from here.
- Run the installer and choose the Basic installation type.
- Verify the version and edition installed by clicking Connect Now before closing the installer.
For your own copy of the installation checklist, you can also download it below.
Conclusion
In this article, we have learned how to successfully install SQL Server. We have explored some possible installation issues and got a checklist of the requirements for this process.
Last modified: February 27, 2023