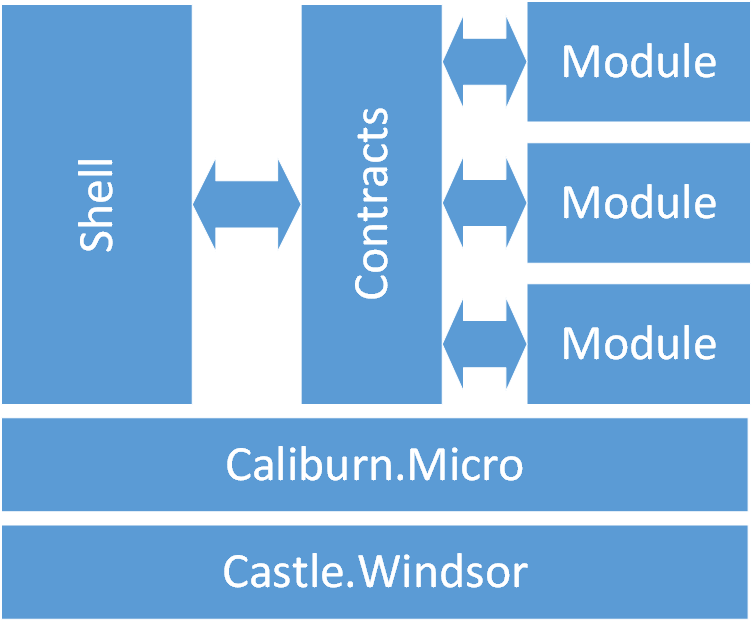
To start with, I want to specify what is meant by a modular application in this article. So, a modular application will be considered an application, which consists of the so-called shell and a set of plug-in modules. There is no direct dependence between them, only via contracts. This allows independently modify each of the components, change their contents, etc. I think everyone knows the advantages of modular architecture.
Perhaps, the most famous framework for creating WPF applications with such architecture is Prism. In this article, I will not conduct a comparative analysis, because I do not have the experience of using Prism. After reading the tutorial, Prism with all its regions, MEF, and other artifacts seemed very complicated to me. If a reader familiar with Prism reasonably points out that I’m wrong and specifies the advantages of this framework – I will be grateful.
This article will discuss the development of a simple modular application using these tools.
Caliburn.Micro
Caliburn.Micro is a framework that greatly simplifies the description of View and ViewModel. In fact, it creates bindings based on naming conventions, thereby preventing the developer from writing them manually and making the code shorter and cleaner. Here are a couple of examples from their website:
<ListBox x:Name="Products" />
public BindableCollection<ProductViewModel> Products
{
    get; private set;
}

public ProductViewModel SelectedProduct
{
    get { return _selectedProduct; }
    set
    {
        _selectedProduct = value;
        NotifyOfPropertyChange(() => SelectedProduct);
    }
}
Here in XAML, we specify neither ItemSource nor SelectedItem.
<StackPanel>
    <TextBox x:Name="Username" />
    <PasswordBox x:Name="Password" />
    <Button x:Name="Login" Content="Log in" />
</StackPanel>
public bool CanLogin(string username, string password)
{
    return !String.IsNullOrEmpty(username) && !String.IsNullOrEmpty(password);
}

public string Login(string username, string password)
{
    ...
}
There are no Command and CommandParameter.
The conventions, if necessary, can be redefined.
Of course, Caliburn.Micro has a lot of capabilities. We will consider some of them below, while you can read about the rest in the documentation.
Castle.Windsor
Castle.Windsor is one of the most famous and functional DI-containers for .NET (it is assumed that the reader is familiar with DI and IoC). Yes, Caliburn.Micro, like many other frameworks, has its own DI-container – SimpleContainer and its capabilities would be quite sufficient for the further example. But it may not work for more complex tasks, so I’ll show you how to use a random container using Castle.Windsor.
Task
A process of creating a simple modular application will serve as an example. The main part – shell – will be a window with the ListBox menu on the left side. If you select an item of the menu, the relevant form will be displayed on the right side. The menu will be filled with modules when they are loaded or at run-time. Modules can be loaded both at the shell startup and at runtime(for example, some module can load other modules if necessary).
Contracts
All contracts will be in the Contracts assembly, to which shell and modules should refer. Based on the task, we will write the contract of our shell.
public interface IShell
{
     IList<ShellMenuItem> MenuItems { get; }
     IModule LoadModule(Assembly assembly);
}
 public class ShellMenuItem
 {
     public string Caption { get; set; }
     public object ScreenViewModel { get; set; }
 }
The shell allows modules to manage the menu, as well as to load modules at runtime. The menu item contains a display name and ViewModel that can be of absolutely any type. If you select a menu item, the View that corresponds to the given ViewModel will be displayed on the right side of the window. How to determine which View is appropriate? Caliburn.Micro will take care of this. This approach is called ViewModel-first, because we use view models in the code, and view creation fades into the background and is managed by the framework. Details are below.
The contract of the module looks very simple.
public interface IModule
 {
     void Init();
 }
The Init() method is called by the party that initiates the module load.
It is important to note that if the assemblies are signed in the project, which is usually the case in large projects, then it is necessary to be sure that the shell and modules use assemblies with contracts of the same version.
Start implementing Shell
Let’s create a WPF Application project. Next, we need to link Caliburn.Micro and Castle.Windsor to the project. The easiest way to do this is through NuGet.
PM> Install-Package Caliburn.Micro -Version 2.0.2
PM> Install-Package Castle.Windsor
You can download the assemblies or build them by yourself. Now, create two folders in the project: Views and ViewModels. In the ViewModels folder, create the ShellViewModel class; it is inherited from PropertyChangedBase of Caliburn.Micro so that we do not implement INotifyPropertyChanged. This will be the view model of the main shell window.
class ShellViewModel: PropertyChangedBase
    {
        public ShellViewModel()
        {
            MenuItems = new ObservableCollection<ShellMenuItem>();
        }

        public ObservableCollection<ShellMenuItem> MenuItems { get; private set; }

        private ShellMenuItem _selectedMenuItem;
        public ShellMenuItem SelectedMenuItem
        {
            get { return _selectedMenuItem; }
            set
            {
                if(_selectedMenuItem==value)
                    return;
                _selectedMenuItem = value;
                NotifyOfPropertyChange(() => SelectedMenuItem);
                NotifyOfPropertyChange(() => CurrentView);
            }
        }

        public object CurrentView
        {
            get { return _selectedMenuItem == null ? null : _selectedMenuItem.ScreenViewModel; }
        }

    }
Copy MainWindow to View and rename it to ShellView. Do not forget to rename the class together with the namespace. That is, Shell.Views.ShellView should be instead of the Shell.MainWindows class. It is important. Otherwise, Caliburn.Micro will not be able to determine that this view corresponds to the previously created view model. As it was mentioned earlier, Caliburn.Micro relies on naming conventions. In this case, the word “Model” is excluded from the name of the view model class resulting in the name of the class of the corresponding view (Shell.ViewModels.ShellViewModel – Shell.Views.ShellView). Windows, UserControl, Page can serve as View. We will use UserControl in the modules.
XAML markup of the main window will look like this:
<Window x:Class="Shell.Views.ShellView"
        xmlns="http://schemas.microsoft.com/winfx/2006/xaml/presentation"
        xmlns:x="http://schemas.microsoft.com/winfx/2006/xaml"
        Title="MainWindow" Height="350" Width="525">
    <Grid>
        <Grid.ColumnDefinitions>
            <ColumnDefinition Width="200"/>
            <ColumnDefinition Width="*"/>
        </Grid.ColumnDefinitions>

        <ListBox x:Name="MenuItems" DisplayMemberPath="Caption" Grid.Column="0"/>

        <ContentControl x:Name="CurrentView" Grid.Column="1"/>

    </Grid>
</Window>
Running Caliburn.Micro
To do this, first, create a Bootstrapper class with minimal content:
public class ShellBootstrapper : BootstrapperBase
    {
        public ShellBootstrapper()
        {
            Initialize();
        }

        protected override void OnStartup(object sender, StartupEventArgs e)
        {
            DisplayRootViewFor<ShellViewModel>();
        }
    }
It must be inherited from BootstrapperBase. The OnStartup method is called when running the program. DisplayRootViewFor() by default creates an instance of the view model class with a default constructor, looks for the corresponding view according to the algorithm described above, and displays it.
For this to work, you need to edit the entry point of the application – App.xaml.
<Application x:Class="Shell.App"
             xmlns="http://schemas.microsoft.com/winfx/2006/xaml/presentation"
             xmlns:x="http://schemas.microsoft.com/winfx/2006/xaml"
             xmlns:shell="clr-namespace:Shell">
    <Application.Resources>
        <ResourceDictionary>
            <ResourceDictionary.MergedDictionaries>
                <ResourceDictionary>
                    <shell:ShellBootstrapper x:Key="bootstrapper" />
                </ResourceDictionary>
            </ResourceDictionary.MergedDictionaries>
        </ResourceDictionary>
    </Application.Resources>
</Application>
We removed StartupUri (managed by Bootstrapper) and added our bootstrapper to the resources. Such nesting is not just a matter of course, otherwise, the project will not be assembled.
Now, when the application starts, the bootstrapper will be created, OnStartup will be called and the main application window tied to the view model will be displayed.
Pay attention to the creation of the view model. It is created by the constructor by default. And if it does not have the latter? What if it depends on other entities or other entities depend on it? Now, it’s time to put the DI-container Castle.Windsor into action.
Running Castle.Windsor
Let’s create the ShellInstaller class.
class ShellInstaller : IWindsorInstaller
    {
        public void Install(IWindsorContainer container, IConfigurationStore store)
        {
            container
                .Register(Component.For<IWindsorContainer>().Instance(container))
                .Register(Component.For<ShellViewModel>() /*.LifeStyle.Singleton*/);
        }
    }
In this class, we will register all our components in the code using fluent syntax. It is possible to do this via XML, see the documentation on the site. For now, we have one component – the view model of the main window. We register it as a singleton (you can not explicitly specify it because it is LifeStyle by default). Also, we register the container in order to have access to it. Running ahead – we will need it when loading the modules.
Next, we make changes to our Bootstrapper:
public class ShellBootstrapper : BootstrapperBase
    {
        private readonly IWindsorContainer _container = new WindsorContain-er();

        public ShellBootstrapper()
        {
            Initialize();
        }

        protected override void OnStartup(object sender, StartupEventArgs e)
        {
            DisplayRootViewFor<ShellViewModel>();
        }

        protected override void Configure()
        {
            _container.Install(new ShellInstaller());
        }

        protected override object GetInstance(Type service, string key)
        {
            return string.IsNullOrWhiteSpace(key)

                ? _container.Kernel.HasComponent(service)
                    ? _container.Resolve(service)
                    : base.GetInstance(service, key)

                : _container.Kernel.HasComponent(key)
                    ? _container.Resolve(key, service)
                    : base.GetInstance(service, key);
        }
    }
Create the container. We use our installer in the redefined Configure method. We redefine the GetInstance method. Its basic implementation uses the default constructor to create an object. We will try to obtain the object from the container.
Interaction with modules
First of all, we need to learn how to load modules. To do this, let’s define what a module is.
A module (in our case) is an assembly containing a set of classes that implement the required functionality. One of these classes must implement the IModule contract. In addition, just like the shell, the module must have an installer that registers the components (classes) of the module in the DI container.
Now, let’s start to implement the loader. Loading will be called when the shell starts, and can also be called at the run-time, so create a separate class.
class ModuleLoader
    {
        private readonly IWindsorContainer _mainContainer;

        public ModuleLoader(IWindsorContainer mainContainer)
        {
            _mainContainer = mainContainer;
        }

        public IModule LoadModule(Assembly assembly)
        {
            try
            {
                var moduleInstaller = FromAssembly.Instance(assembly);

                var modulecontainer = new WindsorContainer();

                _mainContainer.AddChildContainer(modulecontainer);

                modulecontainer.Install(moduleInstaller);

                var module = modulecontainer.Resolve<IModule>();

                if (!AssemblySource.Instance.Contains(assembly))
                    AssemblySource.Instance.Add(assembly);

                return module;
            }
            catch (Exception ex)
            {
                //TODO: good exception handling
                return null;
            }
        }
    }
The shell container is injected through the constructor (we registered it specifically for this). In the LoadModule method, we get the installer from the module assembly. Create a separate container for the components of the loadable module. Register it as a child relative to the shell container. We use the module installer. We are trying to return an instance of IModule and notify Caliburn.Micro about the assembly so that it applies the naming conventions for the components in it.
Do not forget to register our module loader in ShellInstaller.
.Register(Component.For<ModuleLoader>()
A bit about the “child container”. The bottom line is that all its components “see” the components from the parent container, in addition to their own, but not vice versa. The components of different child containers do not know anything about each other either. We get the shell being isolated from modules and modules from each other, rather than modules from the shell – they see it.
Next, we implement the IShell contract, through which the modules will access the shell.
 class ShellImpl: IShell
    {
        private readonly ModuleLoader _loader;
        private readonly ShellViewModel _shellViewModel;

        public ShellImpl(ModuleLoader loader, ShellViewModel shellViewModel)
        {
            _loader = loader;
            _shellViewModel = shellViewModel;
        }

        public IList<ShellMenuItem> MenuItems { get { return _shellViewModel.MenuItems; } }

        public IModule LoadModule(Assembly assembly)
        {
            return _loader.LoadModule(assembly);
        }
    }
Register
.Register(Component.For<IShell>().ImplementedBy<ShellImpl>())
Now, we need to make sure that the modules are loaded when the shell starts. And where do they come from? In our example, the shell will look for assemblies with modules next to Shell.exe.
This functionality should be implemented in the OnStartup method:
 protected override void OnStartup(object sender, StartupEventArgs e)
        {
            var loader = _container.Resolve<ModuleLoader>();

            var exeDir = Path.GetDirectoryName(Assembly.GetExecutingAssembly().Location);
            var pattern = "*.dll";

            Directory
                .GetFiles(exeDir, pattern)
                .Select(Assembly.LoadFrom)
                .Select(loader.LoadModule)
                .Where(module => module != null)
                .ForEach(module => module.Init());

            DisplayRootViewFor<ShellViewModel>();
        }
That’s all, the shell is ready!
Writing a module
Our test module, when loaded, will add two items to the shell menu. The first item displays a very simple form with a caption on the right. The second is a form with a button, with which you can load the module by selecting its assembly in the opened file selection dialog window. Following the naming convention, create 2 folders – View and ViewModels. Then, fill them.
The first view and the view model are trivial:
<UserControl x:Class="Module.Views.FirstView"
             xmlns="http://schemas.microsoft.com/winfx/2006/xaml/presentation"
             xmlns:x="http://schemas.microsoft.com/winfx/2006/xaml"
             xmlns:mc="http://schemas.openxmlformats.org/markup-compatibility/2006"
             xmlns:d="http://schemas.microsoft.com/expression/blend/2008"
             mc:Ignorable="d"
             d:DesignHeight="300" d:DesignWidth="300">
    <Grid>
        <TextBlock HorizontalAlignment="Center" VerticalAlignment="Center" FontSize="60">Hello, I'm first !</TextBlock>
    </Grid>
</UserControl>
  class FirstViewModel
    {
    }
The second view is not complicated either.
<UserControl x:Class="Module.Views.SecondView"
             xmlns="http://schemas.microsoft.com/winfx/2006/xaml/presentation"
             xmlns:x="http://schemas.microsoft.com/winfx/2006/xaml"
             xmlns:mc="http://schemas.openxmlformats.org/markup-compatibility/2006"
             xmlns:d="http://schemas.microsoft.com/expression/blend/2008"
             mc:Ignorable="d"
             d:DesignHeight="300" d:DesignWidth="300">
    <Grid>
            <Button x:Name="Load" HorizontalAlignment="Center" VerticalAlignment="Center" FontSize="50">Load Module</Button>
    </Grid>
</UserControl>
In the second view-model, we implement the loading of the selected module
class SecondViewModel
    {
        private readonly IShell _shell;

        public SecondViewModel(IShell shell)
        {
            _shell = shell;
        }

        public void Load()
        {
            var dlg = new OpenFileDialog ();

            if (dlg.ShowDialog().GetValueOrDefault())
            {
                var asm = Assembly.LoadFrom(dlg.FileName);
                var module = _shell.LoadModule(asm);
                if(module!=null)
                    module.Init();
            }
        }
    }
We implement the IModule contract. In the Init method, add items to the shell menu.
class ModuleImpl : IModule
    {
        private readonly IShell _shell;
        private readonly FirstViewModel _firstViewModel;
        private readonly SecondViewModel _secondViewModel;

        public ModuleImpl(IShell shell, FirstViewModel firstViewModel, SecondViewModel secondViewModel)
        {
            _shell = shell;
            _firstViewModel = firstViewModel;
            _secondViewModel = secondViewModel;
        }

        public void Init()
        {
            _shell.MenuItems.Add(new ShellMenuItem() { Caption = "First", ScreenViewModel = _firstViewModel });
            _shell.MenuItems.Add(new ShellMenuItem() { Caption = "Second", ScreenViewModel = _secondViewModel });
        }
    }
And the final touch is the installer.
public class ModuleInstaller:IWindsorInstaller
    {
        public void Install(IWindsorContainer container, IConfigurationStore store)
        {
            container
                .Register(Component.For<FirstViewModel>())
                .Register(Component.For<SecondViewModel>())
                .Register(Component.For<IModule>().ImplementedBy<ModuleImpl>());
        }
    }
Done!
Sources – on GitHub.
Conclusion
In this article, we considered the creation of a simple modular WPF application using the Castle.Windsor and Caliburn.Micro frameworks. Of course, many aspects were not covered, some details were omitted. And a more detailed information can be found on the official resources and elsewhere.
Please feel free to leave your comments and ask questions.
Thank you for attention!
The article was translated by Codingsight team with the permission of the author.
Tags: .net, c#, ioc container, wpf Last modified: September 23, 2021