MySQL copy database is handy when you need to make clones or duplicates of a MySQL database. These copies are good for backups in case of a damaged original database. And having a database backup system in place is very serious.
Here’s why you should fret about it. More than 90% of businesses never recover after a major database corruption. And the cost in 2022? A whooping $4.35 million in average according to one study. So, the consequences are scary. Data loss will sink your business.
But making copies of your MySQL database is not just to prepare for the worst. Here’s why database administrators and developers will like this idea:
- Making copies of development and production databases is also for testing and debugging.
- It’s also for migrating one or more databases from one server to another. This includes migrating a MySQL database from Windows to Linux or vice versa.
So, learning this today is for your own good. And it’s not even hard to do it. We will have examples using the command line interface (CLI) and using GUI tools.
Let’s dive in.
How to Copy or Clone a Database
You can clone a MySQL database in several ways.
First, is using mysqldump utility. It is a command-line utility to backup and restore one or more databases. It is the basic backup utility that is good for small to large databases. Second is the mysqlpump utility. This utilizes multiple CPUs so it’s better for very large databases than mysqldump. Third is the MySQL Enterprise Backup. Oracle made this one and it’s a commercial product. Another option you may like is the Percona XtraBackup. It’s an open-source backup utility that doesn’t lock your database during backup. Database replication is another way to do real-time or scheduled copies. And finally, physically copying the database files.
Each of these methods have pros and cons. In this article, we will discuss mysqldump.
You can use mysqldump to copy one database, a list of databases, or all databases. But you can also backup your chosen tables only and not the entire database. The backup process creates a text file with a .sql extension. If you view the file, you will see SQL statements. It includes statements that creates the tables, including indexes, constraints, and more. And also INSERT statements that adds rows to the tables.
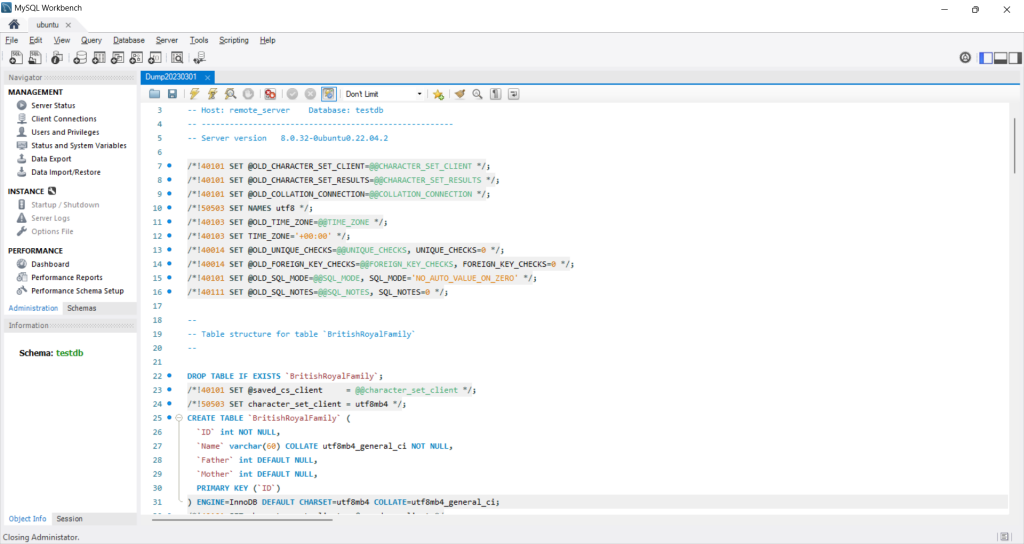
Here’s a sample .sql file generated by mysqldump to make a copy of the sakila database:
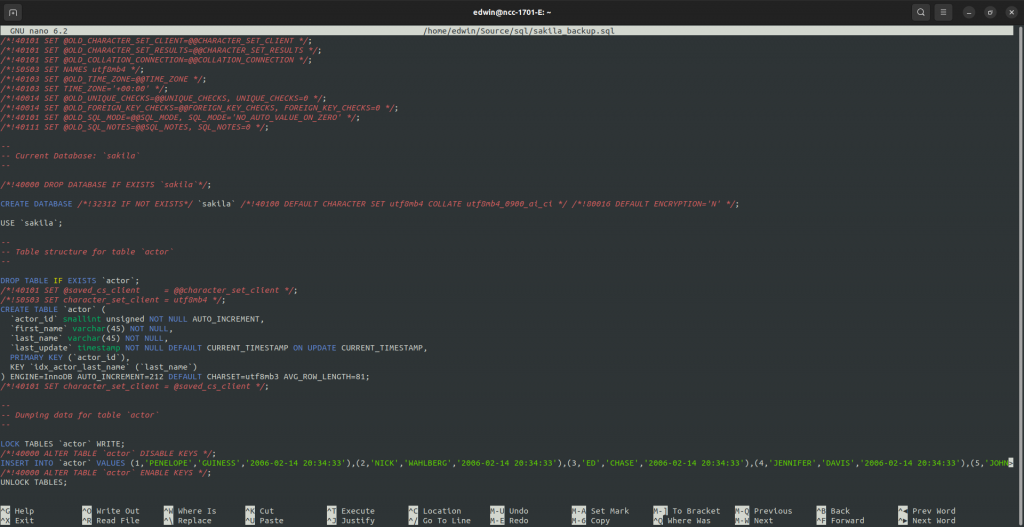
You can see a CREATE DATABASE as a starting point. The succeeding lines include CREATE TABLE and INSERT statements of other tables. This backup assumes the database does not exist in the target when restored. You can use this file to create a clone in another server.
As you can see, you can still edit this file to suit your needs on the target.
Let’s try mysqldump on different scenarios in the following sections.
Copy a MySQL Database on the Same Server
Before I start, know that I’m using the Ubuntu 22.04 Terminal. So, the sample codes use the Linux prompt ($). If you’re using Windows, the prompts can be C:\[folder_name] or the PowerShell PS C:\[folder_name].
The Simplest Example to Make a Database Clone
The most basic way to clone a database using mysqldump is this:
| $ mysqldump db_name > db_name_backup.sql |
Where db_name is the name of your database. Then, the ‘>‘ operator tells mysqldump to create a backup file. And finally, the db_name_backup.sql is where the output will go. You can include a specific path and file. And if you don’t include a path, the mysqldump saves the file to the current folder.
So, if you want to make a clone of a database called testdb, it goes like this:
| $ mysqldump testdb > testdb_backup.sql |
This will scan the testdb database of all the objects within it. And then create a script file to recreate the same tables in testdb_backup.sql.
But there’s a catch to this simplest example.
If your MySQL requires that you use a password, here’s what will happen:
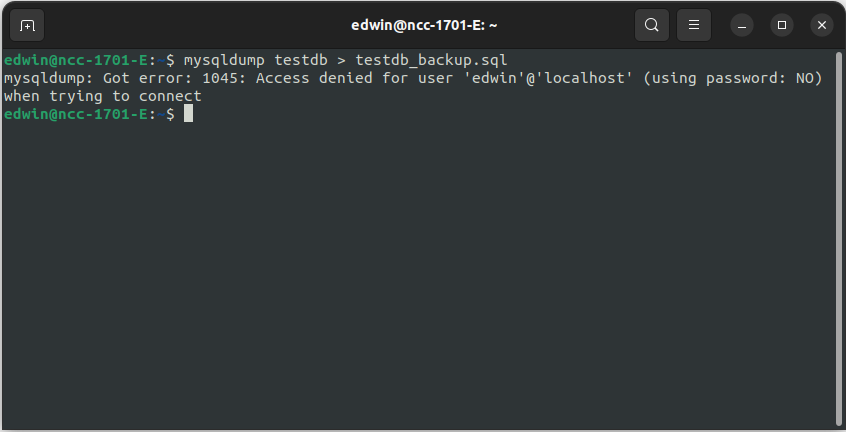
An error 1045: Access Denied error because you need a password to do this. If you’re using a MySQL production database, you should have passwords in place. So, you need to add more options to mysqldump.
Make a Database Clone with User Credentials
You need to provide user credentials to fix error 1045. Here’s how you can do it:
| $ mysqldump -u user_id -p db_name > db_name_backup.sql |
The additional -u is for a valid MySQL user ID. We will use the root superuser here for a simple example. But you can use other user IDs. Just make sure it has the access to the database you’re trying to clone. And the -p tells mysqldump to prompt you for the password. So, if you wish to clone testdb to a specific folder, here’s how:
| $ mysqldump -u root -p testdb > ~/Source/sql/testdb_backup.sql |
The above dumps the backup file in the Source/sql folder from the home directory. See the output below:

At this point, what we did is just make a copy of an existing database. But note the tables we have for testdb so we can use these to check when we restore to another database. We will use SHOW TABLES to list them down. See below:
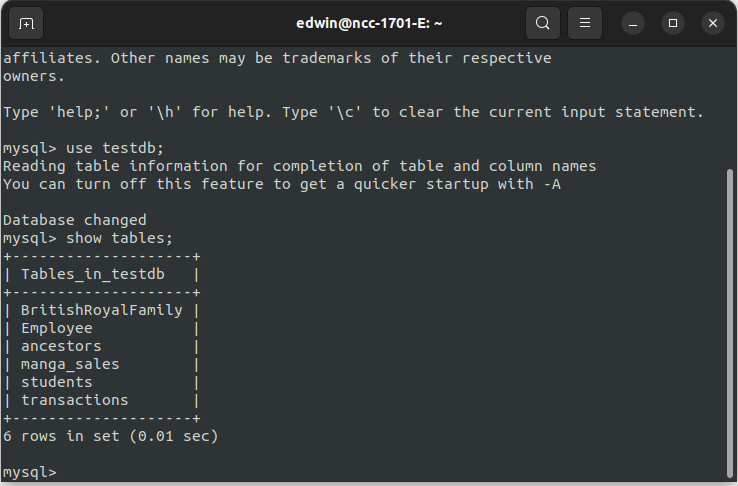
It includes a bunch of unrelated tables I used for samples. But it’s enough for the purpose we want to achieve today.
The next section will show you how to restore that database.
TIP: Use –databases option to backup several databases at once. Then specify the database names to backup. Or you can back up all MySQL databases in one go using —all-databases.
Restore a Backup to the Same Server with a Different Database Name
Now that we have a backup, it’s time to restore that copy. Here’s the syntax to do that:
| $ mysql -u user_id -p target_db_name < db_name_backup.sql |
It uses the MySQL CLI to run the .sql file made by mysqldump. The -u and -p are the same as earlier. The target_db_name is where you want to restore the backup. Before you run the restore process, the target_db_name should already exist. You can do that by using CREATE DATABASE target_db_name in MySQL CLI.
Here’s how to restore the testdb database we backup earlier. Again, this assumes that the target testdb2 already exists.
| $ mysql -u root -p testdb2 < ~/Source/sql/testdb_backup.sql |
Another option is this:
| $ mysql -u user_id -p < db_name_backup.sql |
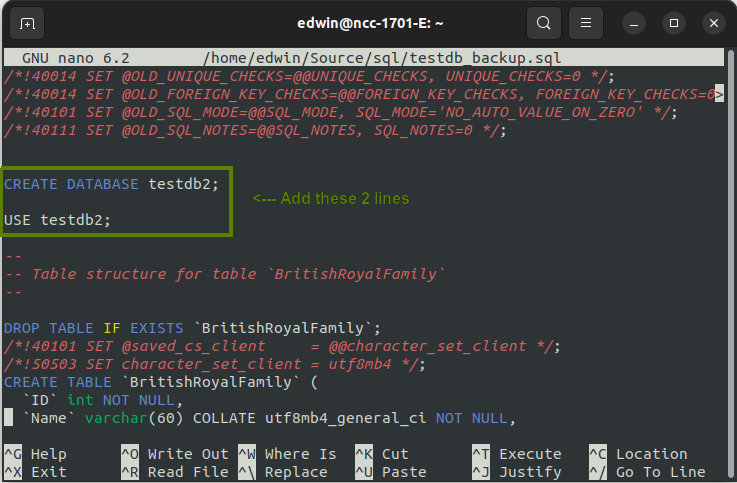
This option does not specify the target database name. But before you restore, you need to open the output .sql file in your favorite text editor. Then, add CREATE DATABASE target_db_name; and USE target_db_name; at the top. Here’s a sample:
Then, follow the syntax earlier to restore to testdb2:
| $ mysql -u root -p < ~/Source/sql/testdb_backup.sql |
After that, let’s verify the restoration we did. Open the MySQL CLI and use testdb2.
| $ mysql -u root -p testdb2 |
Then, type SHOW TABLES;. And then, you should see something like this:

It should be the same as the database we backup earlier.
That’s how to restore a backup on the same server.
Copy a MySQL Database to Another Server
Before we start, make sure the other server accepts remote connections. There are articles and StackOverflow answers on how to do it. We won’t discuss it here.
Once you have done it, note that you have 2 options here:
- Copy the backup .sql file to the target server. Then, perform the same restore procedure we did earlier on that server.
- Use mysqldump with the —host option.
The first option is straightforward. But the copying of .sql files is so old-school. And very inconvenient. So, let’s discuss the second option.
But before that, you have yet 2 more options:
- The source is the remote server and the target is the local server.
- Or, the source is the local server and the target is the remote server.
When the Source is a Remote Server and the Target is the Local Server
Here’s the syntax for creating a backup from another server. Then, save the file to the local server.
| $ mysqldump -u user_id -p –host=host_name/host_ip [–port=port_number] source_db > source_db_backup.sql |
The only syntax difference compared to earlier is the —host and the optional —port options. The host name or IP address is the where you can find the database you want to backup. And the port number only makes sense if the MySQL port is not 3306.
Let’s have an example. I would also like to add the –verbose option so we can see what’s going on. This is good for bigger databases. See the screenshot below:
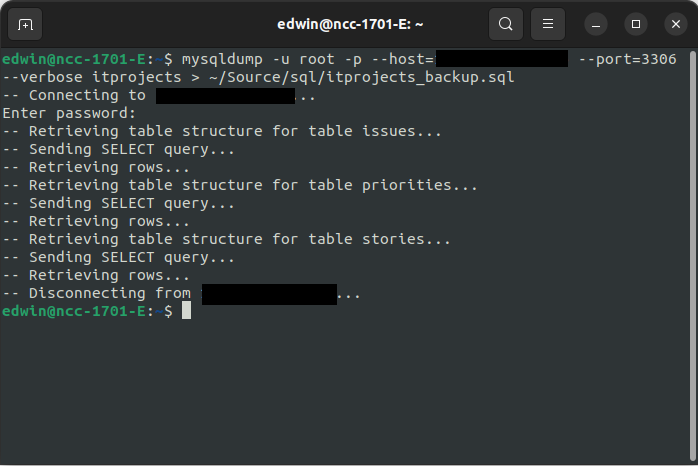
The above uses the root user. And we specified the host IP and the port (though its optional). After entering the correct password, the backup proceeds. The –verbose option showed the current table being backup. We have 3 tables shown here: the issues, priorities, and stories. So, this is another option if you don’t like SHOW TABLES.
Then of course, you want to restore it. You can use the same steps as earlier to restore a database in the local server.
Tip: There’s a better way to avoid editing the .sql file before restoring the backup of a remote database. Use the –databases option and specify just one database. This will add CREATE DATABASE at the beginning. It will use the name of the remote database. Just make sure the same name doesn’t exist in the local server. Here’s the code of what we are talking about:
| $ mysqldump -u root -p –host=remote_server –port=3306 –databases testdb > testdb_backup.sql |
The output .sql file is like the first image showing the sakila backup. But the database name should be testdb.
When the Source is the Local Server and the Target is the Remote Server
You can use the same methods to back up a database in the local server. Then, restore it to the remote server using the —host option.
We will use the testdb_backup.sql we created earlier. This assumes that it does not exist in the target. So, you may need to edit the file to add CREATE DATABASE and USE if you haven’t done it.
Let’s inspect the existing databases from the remote server. The testdb2 database shouldn’t be there. To do that, use MySQL CLI with the host option. Check it out below:
| $ mysql -u root -p –host=remote_server |
After a successful login, type SHOW DATABASES. See a sample output below:

After the restore, the list should be 16 databases.
Here’s the general syntax with some minor changes:
| $ mysql -u root -p –host=remote_server [–port=port_number] < sourcedb_backup.sql |
The sourcedb_backup.sql came from the local server. And the –host and the optional –port will connect the MySQL CLI to the remote server. Then, it will run the .sql file until the database is present and complete in the target. You can add the optional —verbose option if you like so you can see what’s happening.
Now let’s restore the testdb_backup.sql to the remote server. The following example will restore the database in the remote server:
| $ mysql -u root -p –host=remote_server < ~/Source/sql/testdb_backup.sql |
After that, login using MySQL CLI and run SHOW DATABASES. The testdb2 database should be there. Here’s a sample output:

How to Copy MySQL Database Using dbForge Studio for MySQL
Avoid remembering backup and restore syntax by using a MySQL GUI tool. And dbForge Studio for MySQL is one of the best GUI tools.
The backup steps are simple. And before you start, open dbForge Studio for MySQL. This also assumes you already have MySQL connections configured in the Database Explorer.
Creating Backups in dbForge Studio for MySQL
STEP 1: Choose the Database to Backup
From the Database Explorer, right-click the database you want to backup. A context menu will appear. Then, point your mouse to Backup and Restore. And then, click Backup Database.

STEP 2: Specify the Full Path and Filename of the Backup
There are default values for the full path and filename of the backup. But if you want to change this, you can do so in the first page of the Database Backup Wizard.
You also have the option to append a timestamp, Zip the output, and delete old backup files. To continue click Next. Or click Backup if you don’t want to change any other option.

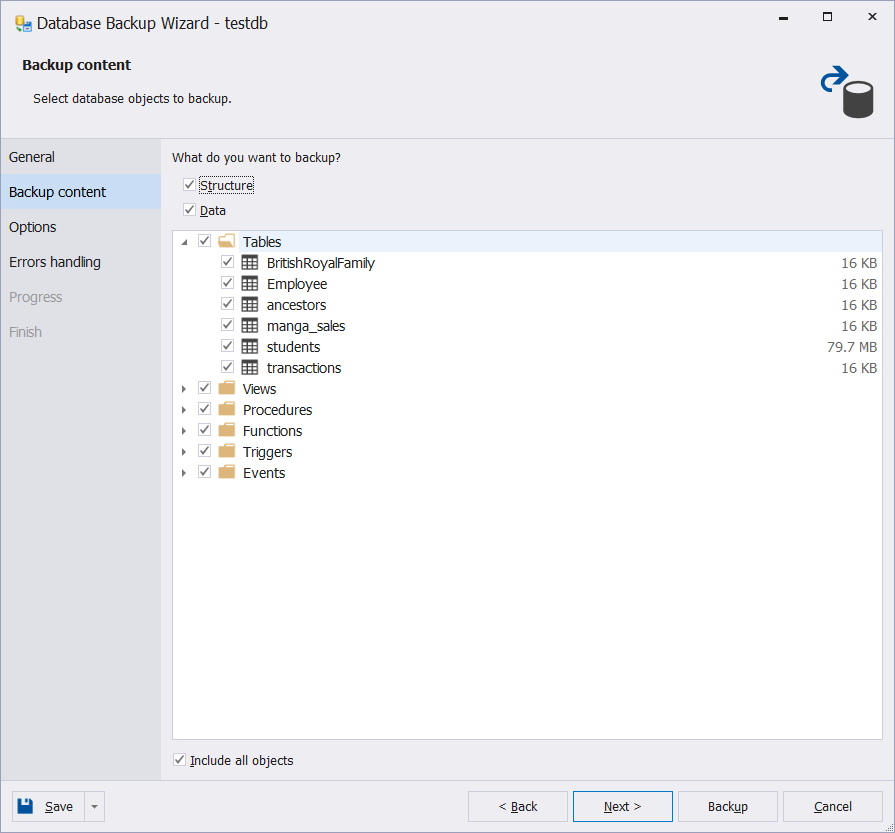
STEP 3: Specify the Objects You Want to Backup
The default is all objects. But you can choose specific tables, views, and more. Expand each object type to see each object. You can also choose if you want to back up the structure only or both structure and data. Then click Next to continue.
See a sample below.
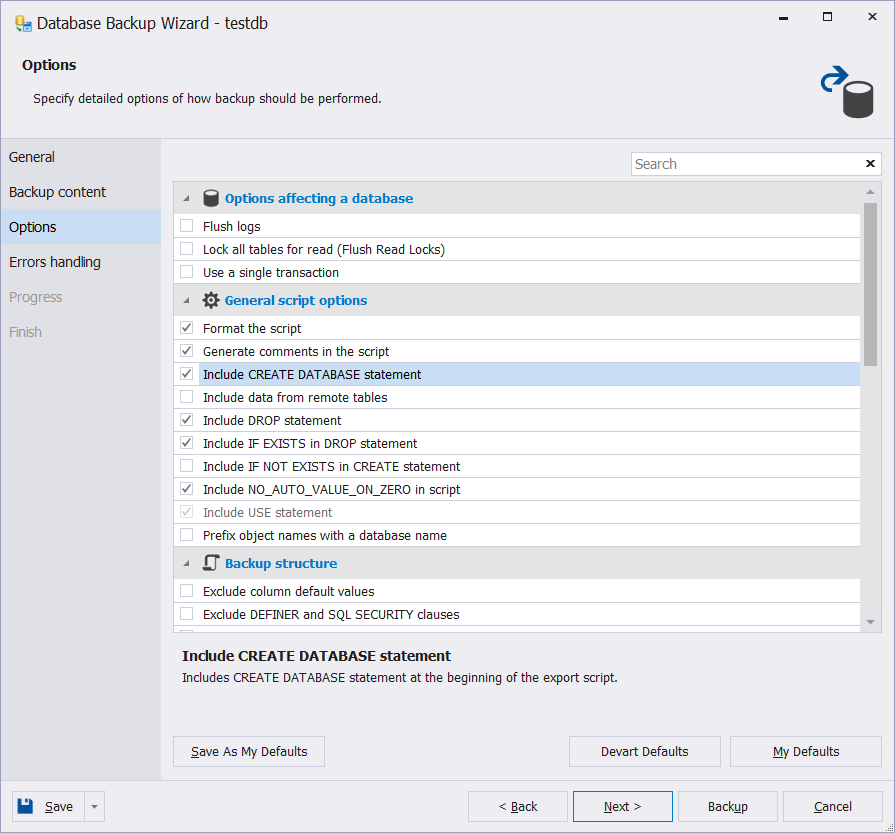
STEP 4: Include More Options in the Backup File
You can optionally add more options in the backup. This includes adding a CREATE DATABASE statement, lock tables, and more. Then, click Next to continue. Or click Backup if you don’t want to change any other option.
In the example below, I check marked the Include CREATE DATABASE statement.
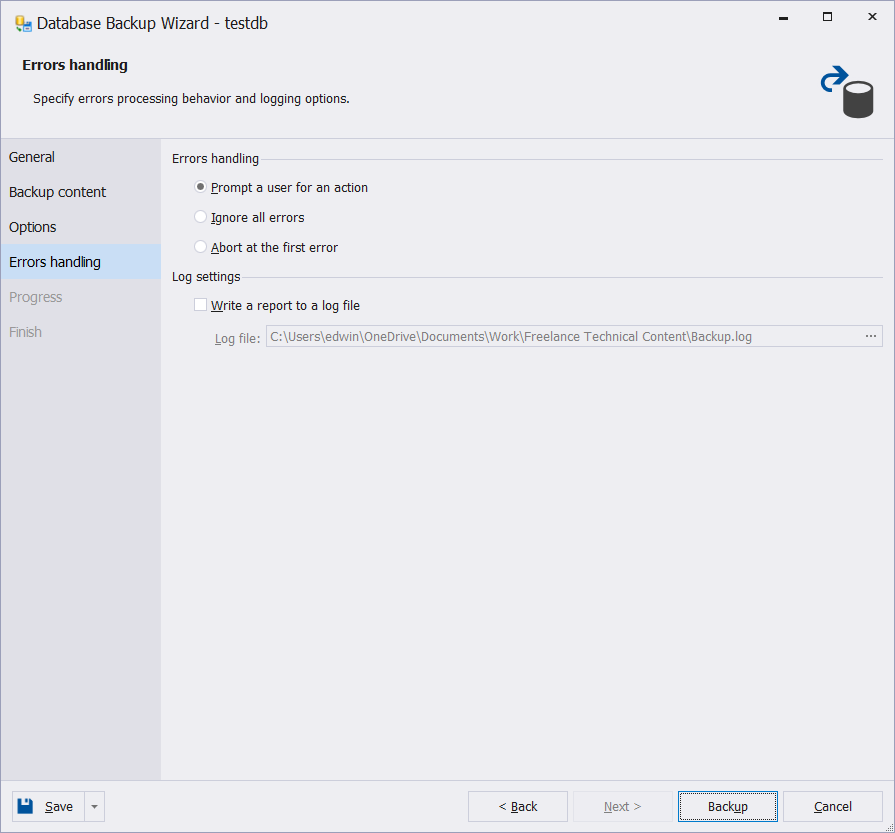
STEP 5: Change Error Handling and Log Settings (Optional)
If you want, you can change the handling of errors and logs. Then, click Backup.
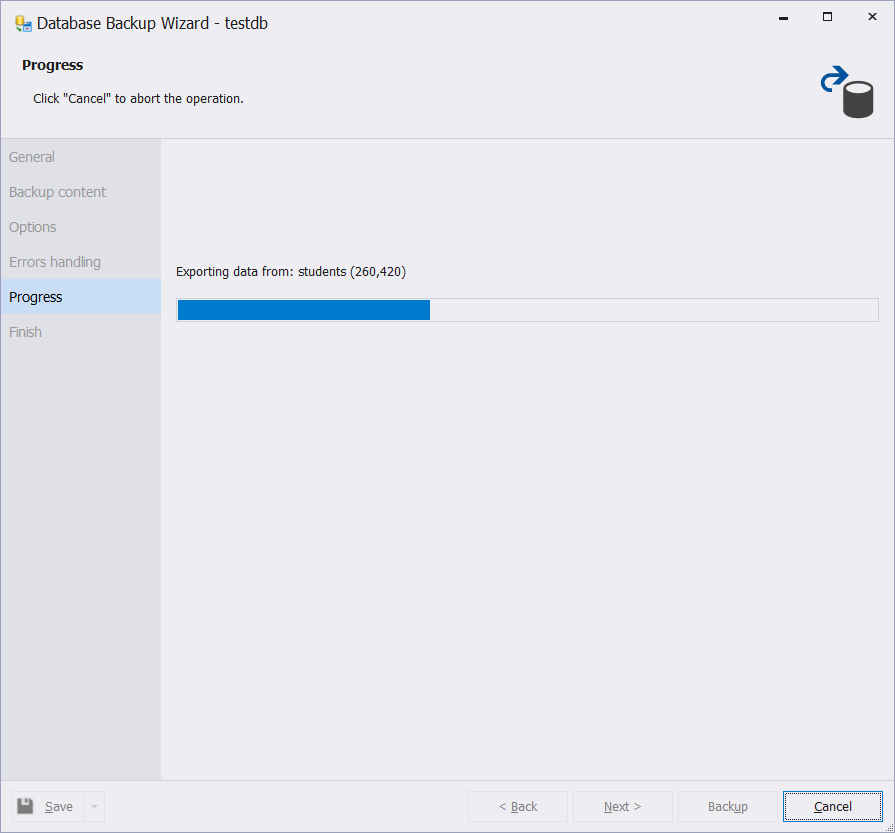
After clicking Backup, you will see the progress of the backup like the one below:
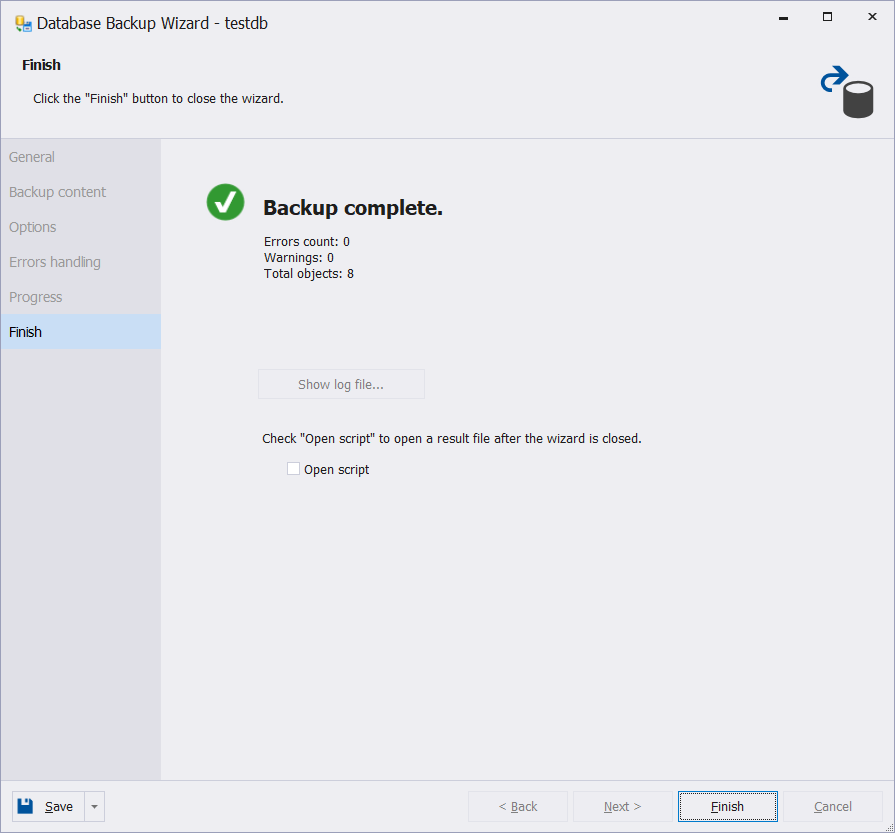
In the end, you will see a Backup complete message. You can choose to open the script or click Finish. See below.

Restoring Backups Using dbForge Studio for MySQL
You have 2 options in restoring database backups in dbForge Studio for MySQL:
- Run the script generated by the backup tool in a SQL window.
- Or, use the GUI tool.
If you need to restore on the same server with a different name, you need to edit the script to change the database name. Below shows an edited version of the backup file generated earlier:

Notice the green lines beside the DROP DATABASE and CREATE DATABASE statements? The green marks mean edited lines. I changed the database name testdb to testdb2. Another line not visible in the image is the USE testdb2 to point it to the created database.
To restore this backup, simply run this script.
The GUI restore database is good if you don’t need to edit the script. And if you are restoring a backup to another server. So, that will use the same database name as the original.
To do that:
- Right-click the connection in the Database Explorer where you will restore the database.
- Point the mouse to Backup and Restore
- Choose Restore Database.
- The Database Restore Wizard will appear. Specify the .sql file to restore.
- Click Restore.
Below is a screenshot of the Database Restore Wizard.

That’s how to do MySQL copy database using dbForge Studio for MySQL. But there’s an even easier way to do it for quick cloning.
Using Copy Database in dbForge Studio for MySQL
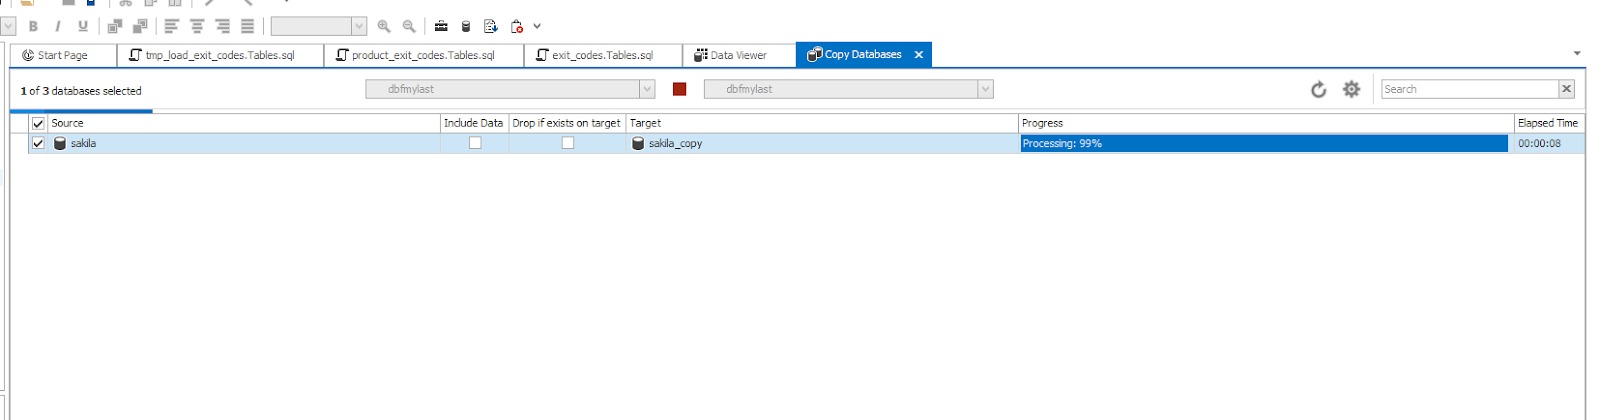
The Copy Databases is another good choice for quicker cloning of one or more databases. Here are the super easy steps:
- From the top menu, click Database then select Copy Databases.
- Select the Source and Target servers. You can have the same source and target but different database names.
- Mark checked the database(s) to copy.
- Optionally check Include Data and Drop if exists on target.
- Optionally change options by clicking Settings. It’s the gear icon in the upper right corner.
- Click Start copying databases to the target server.
Each database you copy will have a progress bar. Wait until it’s 100% complete. See a sample below.

 How to Copy MySQL Database Using MySQL Workbench
MySQL Workbench has its own way to copy databases.
Follow the next sections to learn about backup and restore using MySQL Workbench. This assumes that you already configured a connection in MySQL Workbench. This is your starting point to get to the database you want to backup.
Creating Backups Using MySQL Workbench
To back up a database in MySQL Workbench, you need to use Data Export. To do that, follow these steps:
- Open MySQL and click the connection where your database resides.
- From the top menu, click Server. Then, click Data Export. (Or in the Navigator, click Administration. Then, click Data Export.)
- The Data Export screen appears. Choose the database to backup.
- Mark checked the Schema Objects you want included. And select Dump Structure and Data.
- Mark checked the Stored Procedures, functions, events, and triggers (optional).
- Choose Export to Self-Contained File and specify the full path and filename of the backup. This will back up the entire database into one .sql file.
- Click Start Export.
Here’s a sample of what you will expect in the Data Export screen:

That’s it. When you see Export Completed, your backup is ready.
Check out the dump file below. You can see that it’s almost the same as the generated backups earlier.
Tip: If you choose Export to Dump Folder, you will have a per table .sql file. You can choose which of the tables you need to restore later.
Restoring Backups Using MySQL Workbench
You can open the .sql file created by Data Export in MySQL Workbench. If you are not sure if you’re pointing to the target database for restore, edit the script. And add USE <target_db>. Then, from that Query tab, you can run the script.
Or use the GUI – Data Import. To do that, follow these steps:
- Open MySQL Workbench and click the connection where you need to restore the database.
- From the top menu, click Server. Then, select Data Import. (Or in the Navigator, click Administration. Then, click Data Import/Restore.)
- The Data Import screen will appear. Click Import from Self-Contained File. And specify the full path and filename of the backup file.
- Select the Default Target Schema. Or click New if it doesn’t exist yet. Then, specify a new database name.
- Finally, click Start Import.
Here’s what a Data Import screen looks like:

If you see an Import Complete message, your new database clone is good to go.
At this point, you completed the MySQL copy database using MySQL Workbench.
MySQL Copy Database Best Practices
Knowing how to copy databases is one thing. But here’s some extra points before you jump in to cloning databases:
- Make sure that the target MySQL server has enough space. This one is self-explanatory.
- The sql_mode settings of both the source and the target should be compatible. The generated SQL statements may differ in different SQL modes. The difference may be so big it may fail when you run it in the target.
- Grant enough permissions to the user. This applies to the MySQL user used in copying. Depending on the options you choose, you may need more privileges aside from SELECT. For example, copying database triggers need TRIGGER privileges.
- You may need to increase max_allowed_packet for cloning large databases. See the documentation on how to handle a packet too large error.
Takeaways
MySQL copy database is a must for disaster recovery, testing, and data migration.
This article gave you some of the easy ways to do it. You have mysqldump and MySQL CLI for the command line tools. And there’s MySQL Workbench and dbForge Studio for MySQL.
So, it’s good to know how to do MySQL copy database whether your role is an administrator or developer.If you want to try a sophisticated MySQL GUI tool, dbForge Studio for MySQL will never fail to amaze. Check out what’s in store for you with this award-winning MySQL tool. I like it’s MySQL script editor with its Intellisense, code completion, and more. And the Query Profiler for query optimization. Get your copy here today.
Last modified: May 04, 2023