When working as a SQL Server database administrator or developer, you cannot live in your isolated SQL Server world without communicating with other data sources. For example, there is rarely a day when you won’t be requested to import data from an Excel, Access or CSV file into your SQL Server table. Or, conversely, export one of your SQL Server database tables to an external file in order for this table to be used in another database engine or to be analyzed externally by the corresponding team.
SQL Server provides us with a number of methods that can be used to export an existing SQL Server database table to an Excel or text file, and import data from an external data source to a new or existing SQL Server database table. In this article, we will gradually cover all these methods.
BCP Utility
The Bulk Copy Program utility, also known as BCP, is a command line utility that can be used to import large number of rows from an operating system data file into your SQL Server database table, or exporting an existing SQL Server database table to an operating system data file.
BCP tool’s syntax contains a large variety of options. These are the most commonly-used ones:
- The name of the SQL Server database table or view – this will act as the data source in case of data export process and as the destination in case of data import process.
- The data direction, where IN indicates data import and OUT indicates data export.
- The name of the local data file that will acts as the source in case of data import process and as the destination in case of data export process.
- -S server\instance – this is used to specify the SQL Server instance name.
- –d – this is used to specify the database that contains the source or destination table.
- -T – this is used to specify that Windows Authentication will be used to connect to the SQL Server.
- -U username and -P password – these specify the username and the password used to connect to the SQL Server instance.
- The Bulk Copy Program utility, also known as BCP, is a command line utility that can be used to import large number of rows from an operating system data file into your SQL Server database table, or exporting an existing SQL Server database table to an operating system data file. – these are used to specify the format for the source or destination data file and delimiters used in that data file.
For example, the BCP command below is used to export the contents of the Employee_Main database table in bulks into a CSV file, as follows:
bcp AdventureWorks2016CTP3.dbo.Employee_Main out C:\Test\Employees.csv -S MININT-QQBE87A -T -c -t , -r \n
This data will be quickly copied into a CSV file, as shown in the result below:

In order to import the content of a CSV file into a database table, the following BCP command can be used to achieve this quickly in bulks:
bcp AdventureWorks.dbo.Employee_Main in C:\Test\Employees.csv -S MININT-QQBE87A -T -c -t , -r \n
And the data will be inserted into the database table, as shown in the result below:

By spending a few minutes preparing these commands with proper options, you can easily use the BCP utility to import data from or export it to text data files.
BULK INSERT
The BULK INSERT T-SQL statement works similar to the BCP IN command and is used to import data from a data file that is accessible by the SQL Server service into a SQL Server database table – all done directly within SQL Server. Unlike the BCP IN command, the BULK INSERT statement can be grouped with other operations in a single SQL Server transaction that is running under your control.
The BULK INSERT T-SQL statement below can be used to import data from a CSV file into an existing database table, specifying both the column and row delimiters, as shown below:
BULK INSERT AdventureWorks.dbo.Employee_Main
FROM 'C:\Test\Employees.csv'
WITH
(
FIELDTERMINATOR =',',
ROWTERMINATOR ='\n'
);
GO
OPENROWSET
The OPENROWSET function is used to connect to data sources using an OLEDB connection provider and then use the T-SQL query specified to retrieve data from that data source. The key advantages of the OPENROWSET function over the BCP and BULK INSERT methods are the following:
- you can filter the data retrieved by the OPENROWSET statement using a WHERE clause
- you can use it in a SELECT statement for reading the data from the data source – not only with the INSERT statement
To use the OPENROWSET statement, you will need to enable the ad hoc distributed queries system configuration option first by using the script below:
sp_configure 'show advanced options', 1;
RECONFIGURE;
GO
sp_configure 'Ad Hoc Distributed Queries', 1;
RECONFIGURE;
GO
After enabling the ad hoc distributed queries system configuration option, you can use the OPENROWSET function to import data into SQL Server database tables from CSV files with a previously-defined data format, as shown in the T-SQL query below:
INSERT INTO [AdventureWorks].[dbo].[Employee_Main]
([EMP_FirsrName],[EMP_LastName],[EMP_BirthDate],[EMP_PhoneNumber])
SELECT [EMP_FirsrName],[EMP_LastName],[EMP_BirthDate],[EMP_PhoneNumber]
FROM OPENROWSET(
   BULK 'C:\Test\Employees.csv',
      FORMATFILE = 'C:\Test\Fmt.xml'
) AS rows;
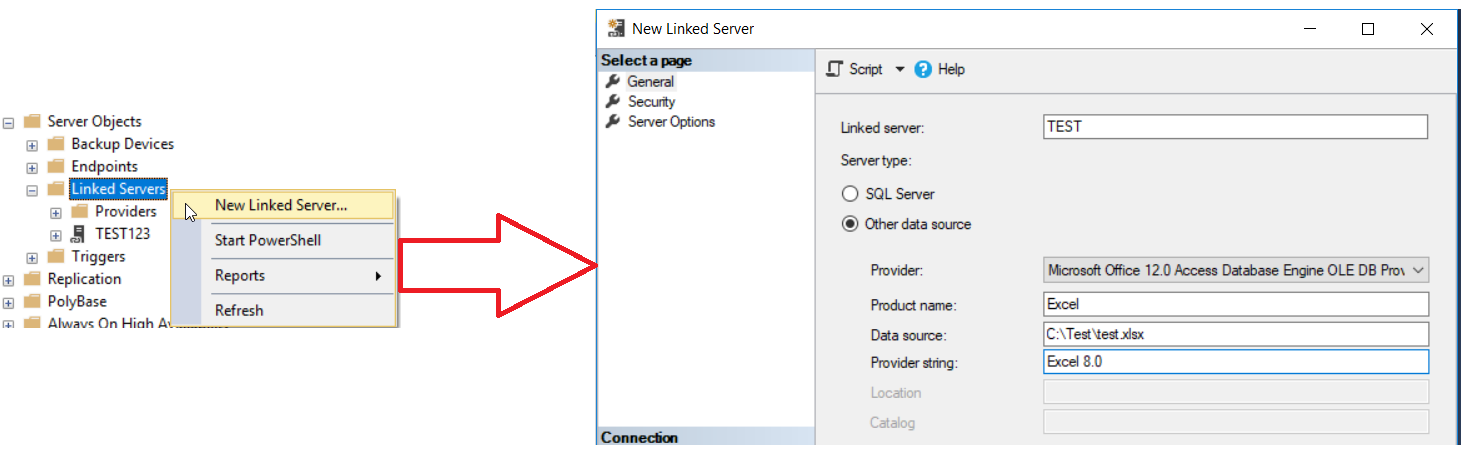
Linked Server
The SQL Server Linked Server is a server object that is configured to allow the SQL Server Database Engine to connect to different types of OLE DB data sources outside of the SQL Server instance. The Linked Server can be easily created using the SQL Server Management Studio or T-SQL Commands, as shown below:
Once created, the linked server can be easily used to access the remote data source and import the corresponding data into the SQL Server database table as shown in the T-SQL query below:
INSERT INTO [AdventureWorks].[dbo].[Employee_Main]
([EMP_FirsrName],[EMP_LastName],[EMP_BirthDate],[EMP_PhoneNumber],[EMP_Address])
SELECT [EMP_FirsrName],[EMP_LastName],[EMP_BirthDate],[EMP_PhoneNumber],[EMP_Address] FROM TEST...Employee_Main$
SQL Server Export/Import Wizard
The SQL Server Export and Import wizard provides us with a simple interface for creating SQL Server Integration Service packages that can be used right away or saved for later use. These packages allow importing data from and export it to a wide variety of data sources, starting from simple flat files and ending with more complex database engines.
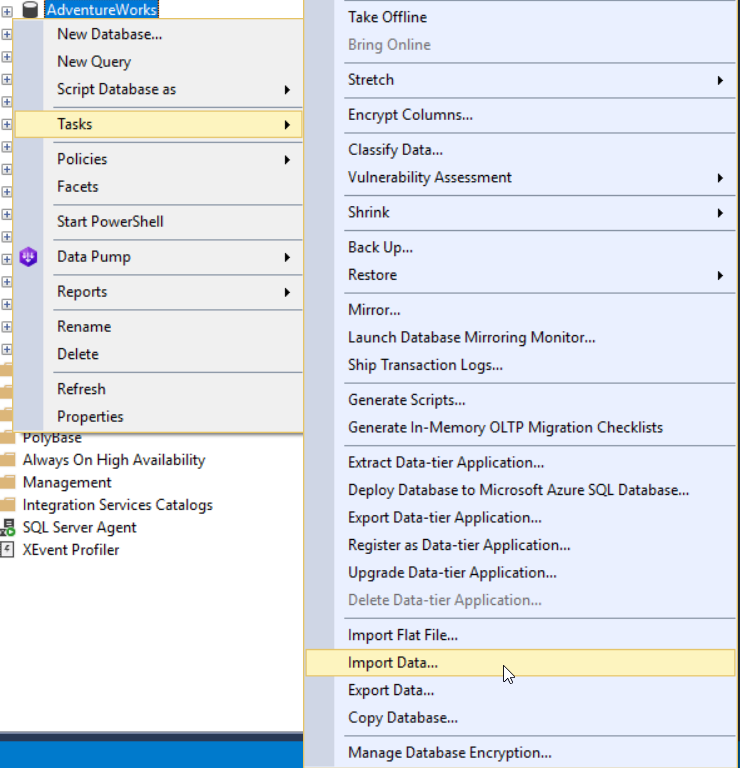
The Export and Import wizard can be used, for example, to import data from an Excel data source into an existing database table. The following steps describe this process:
- In SQL Server Management Studio’s Object Explorer, right-click on the AdventureWorks database that contains the table to which you will write the data. Then, choose the Import Data option from the Tasks submenu:

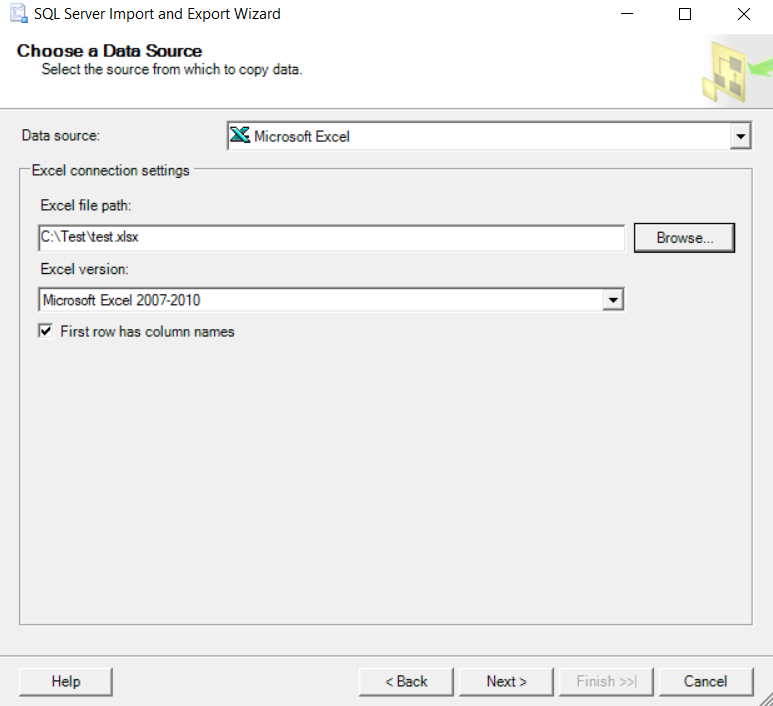
- The SQL Server Import and Export Wizard will be opened. In the Choose a Data Source window, specify the type of the data source. In this particular example, we will choose Microsoft Excel, and the full path for the desired Excel file. After specifying it, click the Next button:

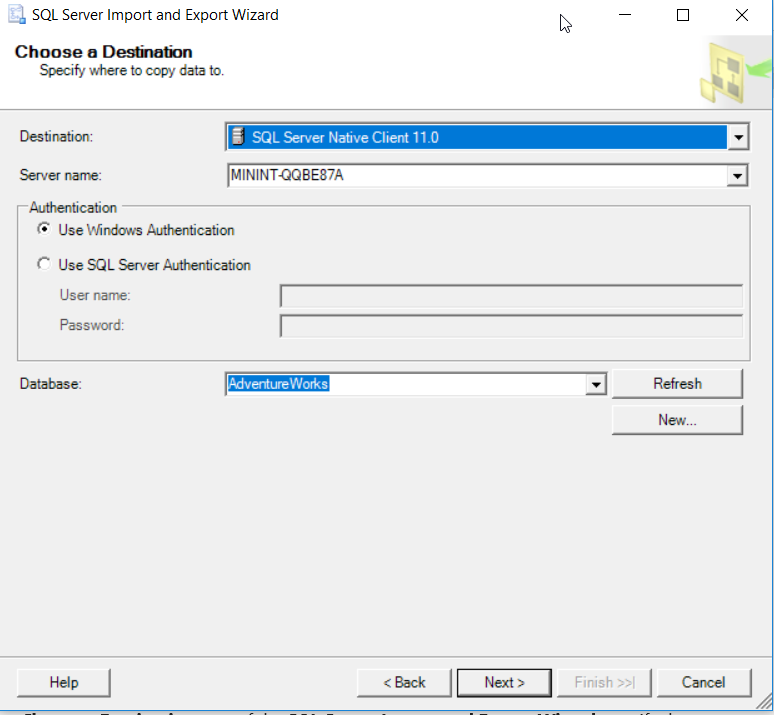
- In the Choose a Destination window, you will be requested to specify the type of destination to which the source data will be written. In our example, it’s SQL Server database. You will also be asked to specify the server name, credentials and the name of the database in which the destination table is located. After providing all of this information, click Next to proceed:

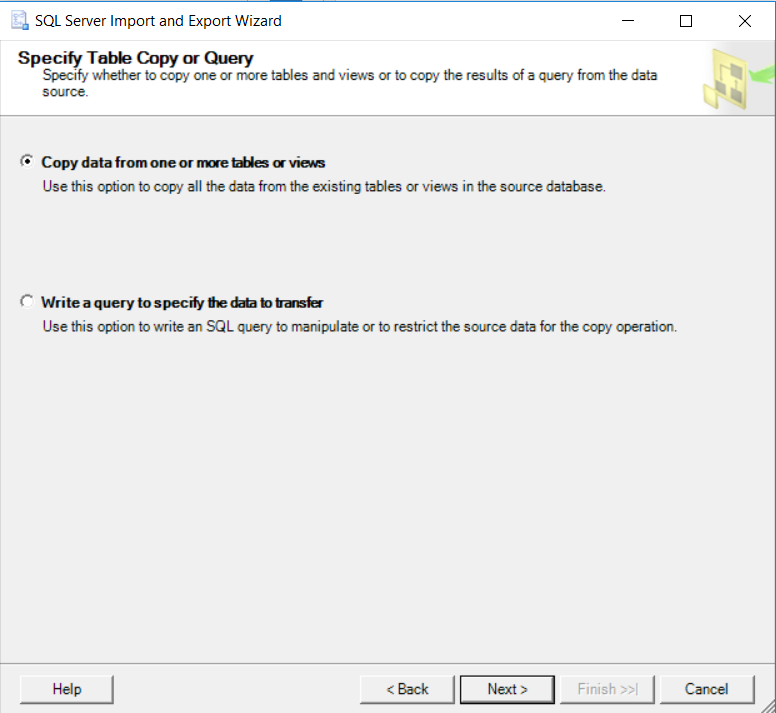
- In the Specify Table Copy or Query window, you will have an option to either copy all data from the source to an existing or new table, or write a customized query to retrieve a specific range of data. When this is decided, click the Next button:

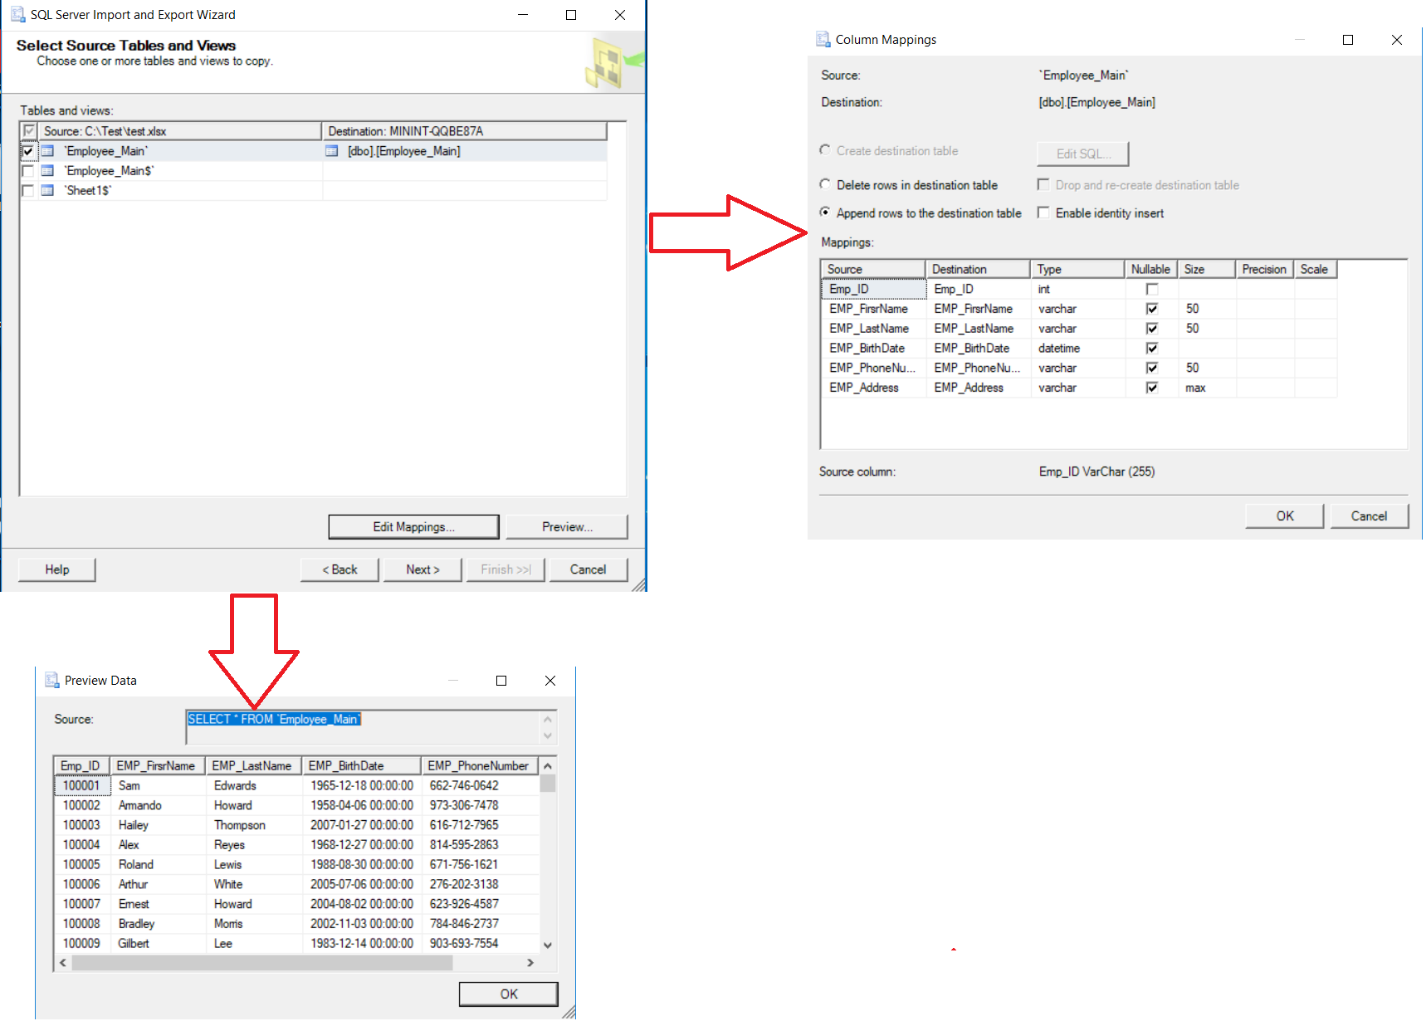
- In the Select Source Tables and Views window, specify the source sheet or table from the data source and the destination table to which the source data will be written. You will have the ability to preview the source, check the mapping of the columns between the source and destination tables, and specify if the data should be appended to an existing table or to a newly-generated table. Click the Next button to proceed:

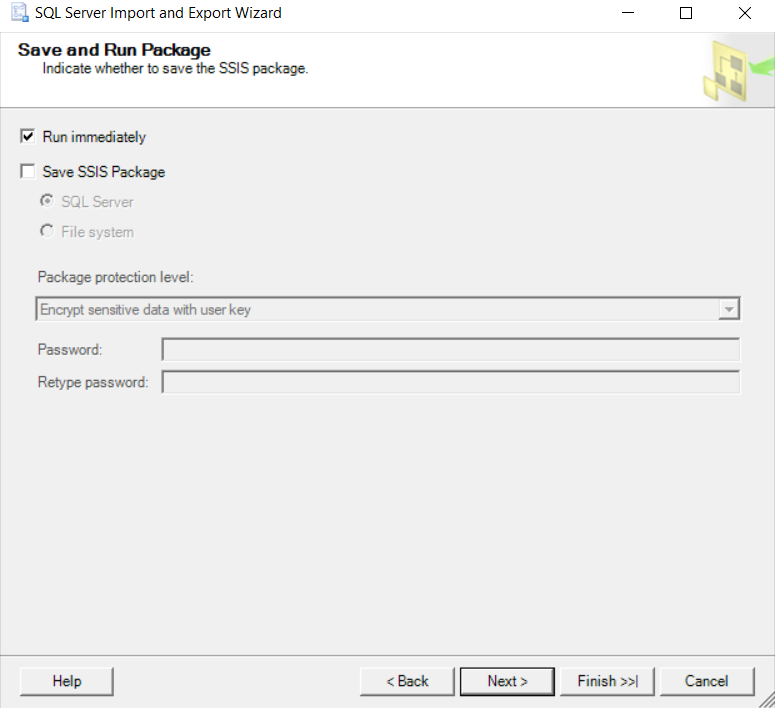
- In the Save and Run Package Window, you have the option to save the SSIS package that is created within the Import and Export Wizard to run it immediately or save it for scheduling or running it later. Click the Next button to proceed:

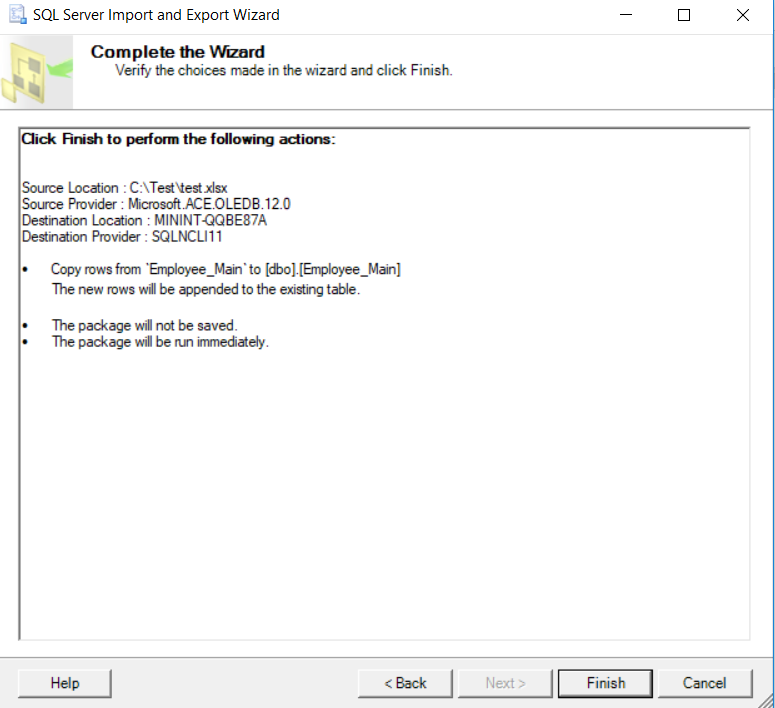
- In the Complete the Wizard window, you will see a summary for the selected options and provided settings. Click the Finish button to start copying the data:
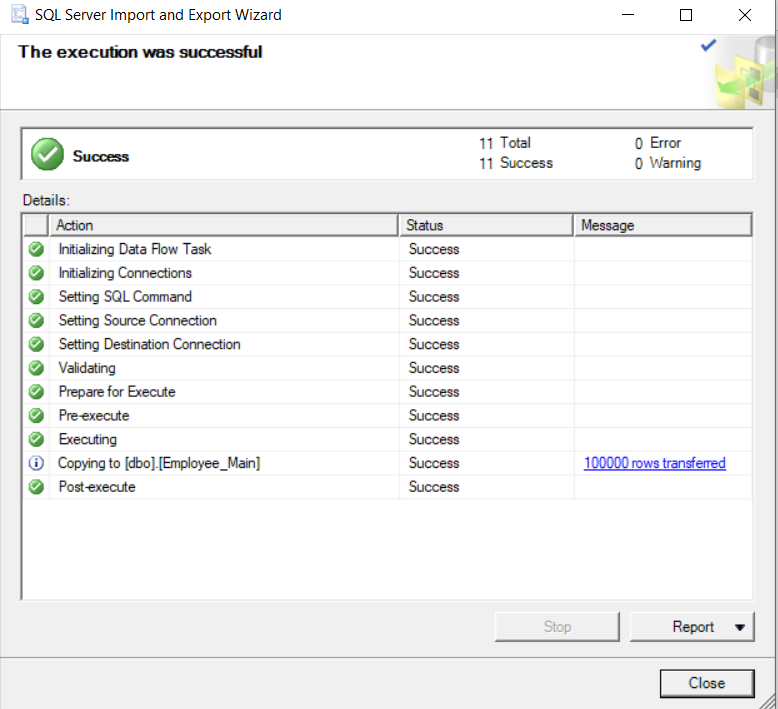
- After completing the copying process, the wizard will display the number of records copied to each table. If there are no errors, you can click on the Close button to close the window:
 You can see from the previous example that the Import and Export wizard can be easily used to copy data between different types of data sources and destinations, without considering the relationship between the tables. If the table has a Foreign Key constraint that references one of the columns of the parent table, you need to manage the order of the data copying process manually. In addition, to start a new data import process, you will need to close the wizard and open it again.
 You can see from the previous example that the Import and Export wizard can be easily used to copy data between different types of data sources and destinations, without considering the relationship between the tables. If the table has a Foreign Key constraint that references one of the columns of the parent table, you need to manage the order of the data copying process manually. In addition, to start a new data import process, you will need to close the wizard and open it again.
dbForge Data Pump
dbForge Data Pump is a third-party tool included with the SQL Server Management Studio as an add-in. It can be used to easily migrate data between SQL Server and different external data sources. It allows you to import and export from 10+ commonly-used data formats (Text, MS Excel, XML, CSV, JSON etc.) with a number of advanced options and templates that can be utilized for recurring scenarios.
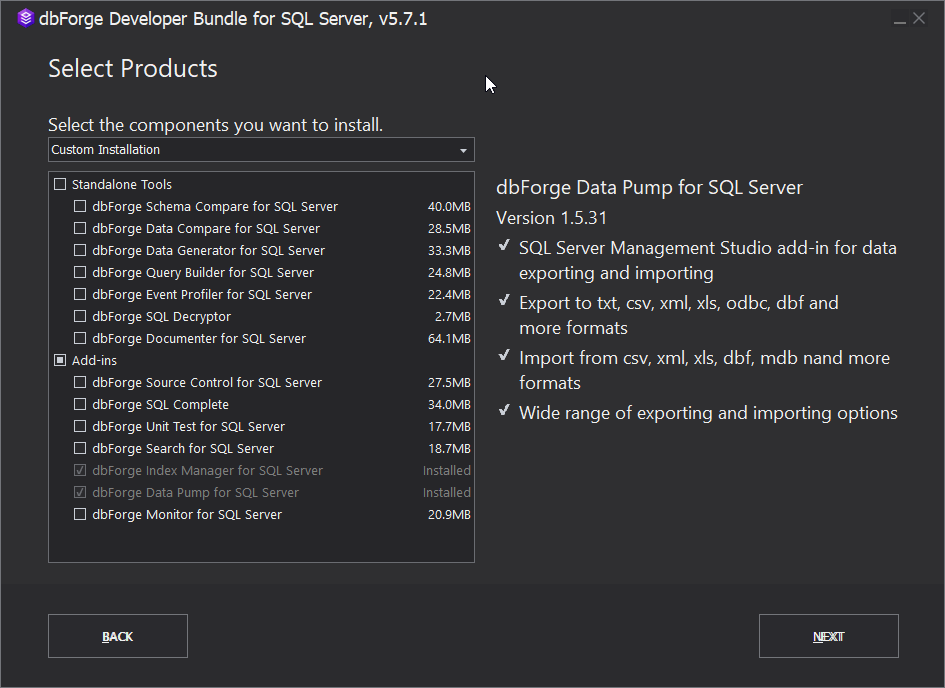
After downloading dbForge Data Pump from the Devart download page, you will need to install it to the machine as an SSMS tool add-in, as shown below:
Data Export
dbForge Data Pump can be used within SSMS to export data from a SQL Server database table or to view data in 13 supported types of formats including HTML, Text, MS Excel, MS Excel 2007, MS Access, RTF, PDF, XML, CSV, ODBC, DBF (Foxpro, dBase III, dBase IV, dBase 7), SQL and JSON.
To export data from a specific SQL Server table, follow the steps below:
- Connect to the SQL Server instance through SSMS. From the Objects Explorer, right-click on the database that contains the source table, and choose Export Data from the Data Pump submenu:

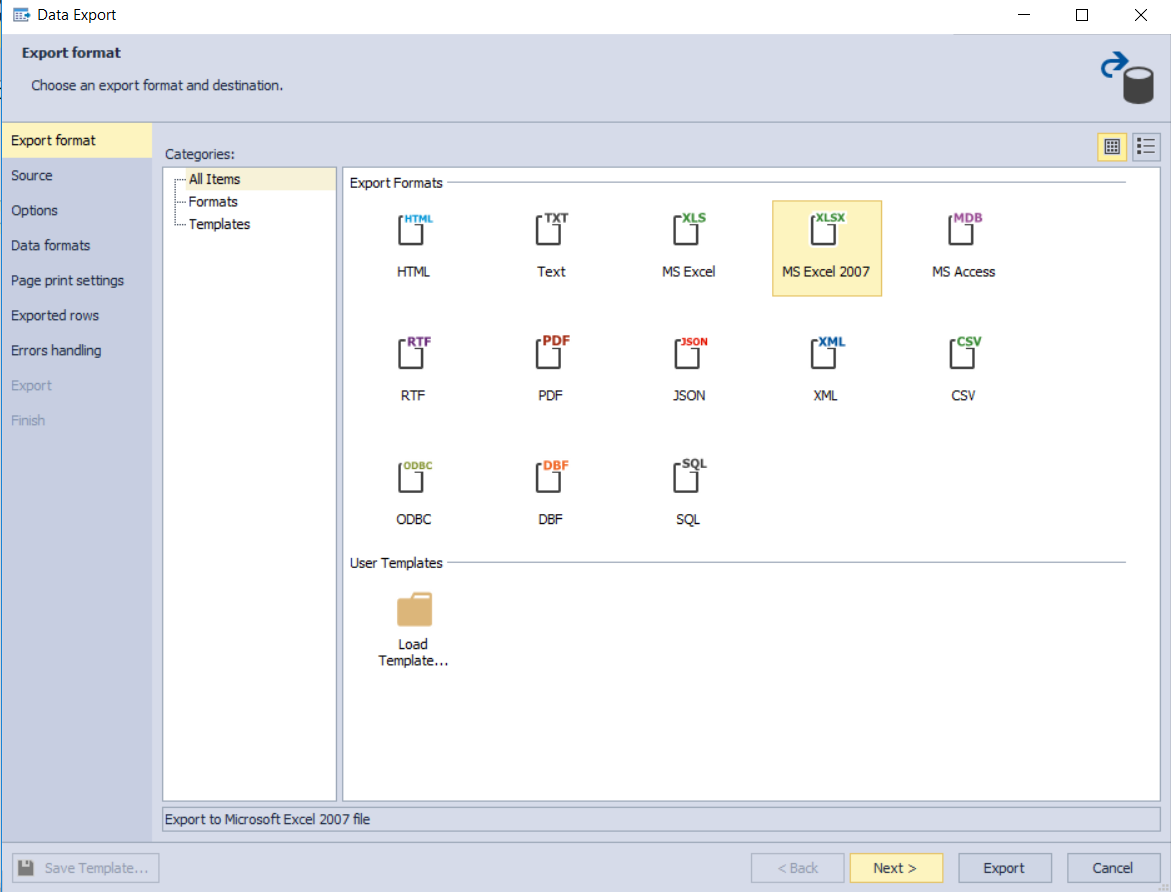
- In the Export Format window, choose the format of the file to which the source table data will be exported, or load a previously saved template. In our example, we will choose MS Excel 2007. Click the Next button to proceed:

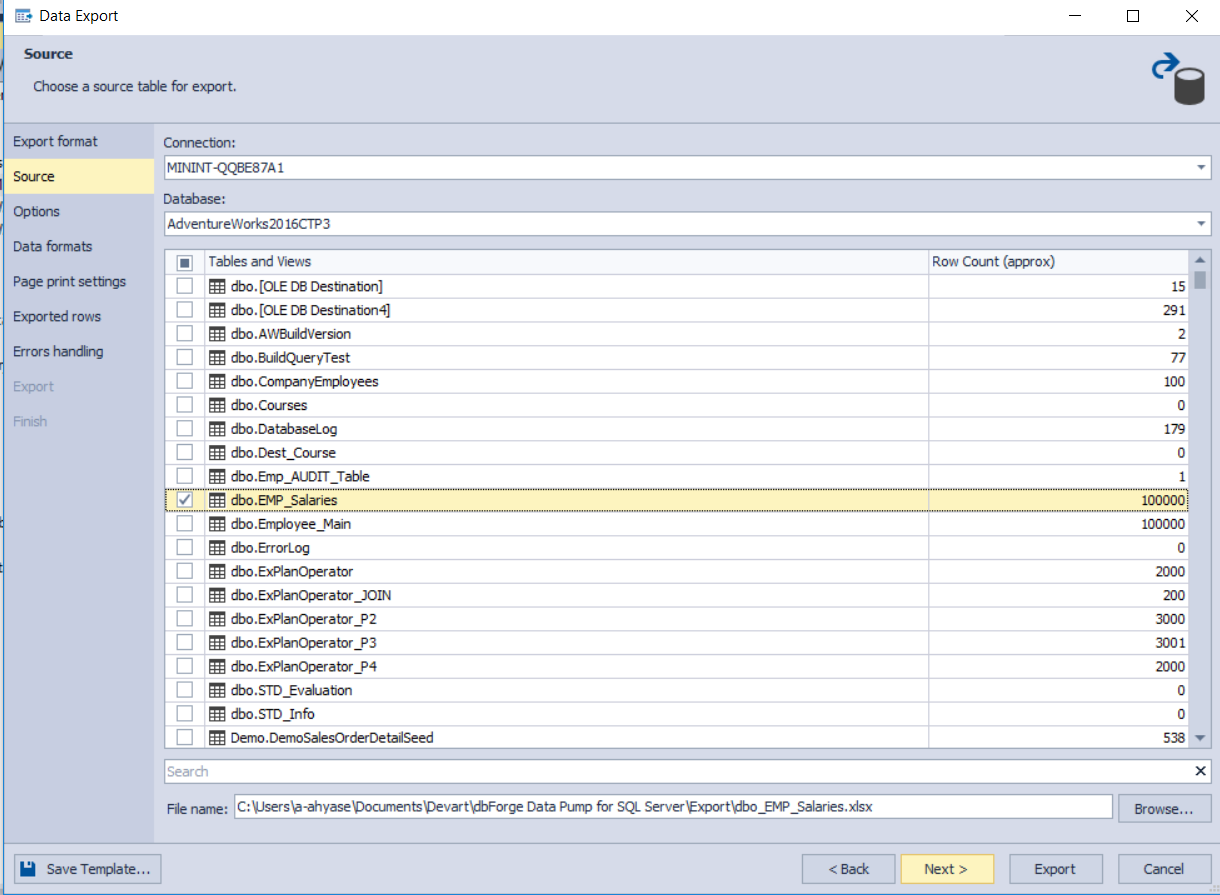
- In the Source window, review the connection details and select the table(s) that contain the source data to be exported. Click Next to proceed:

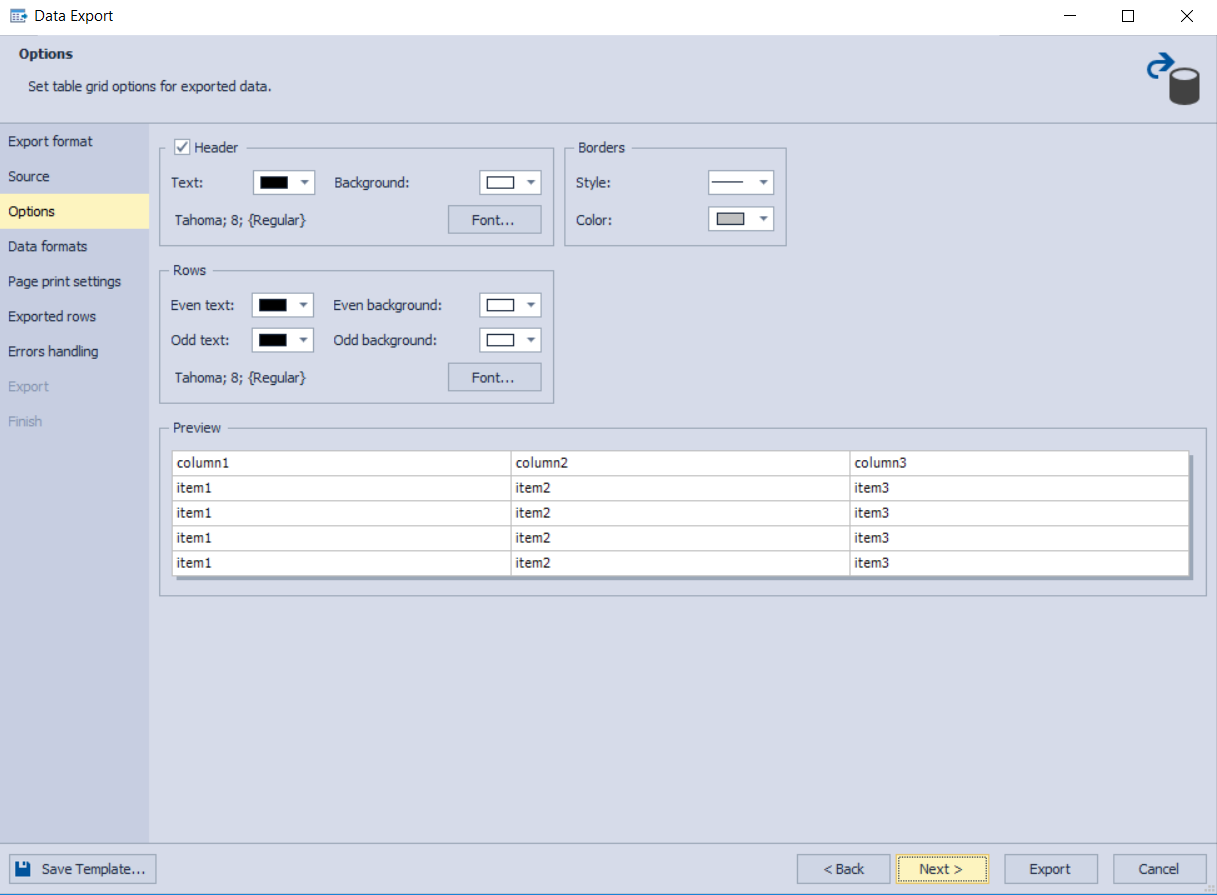
- In the Options window, check and set the different customizable options for the exported data’s table grid. Then, click Next to proceed:

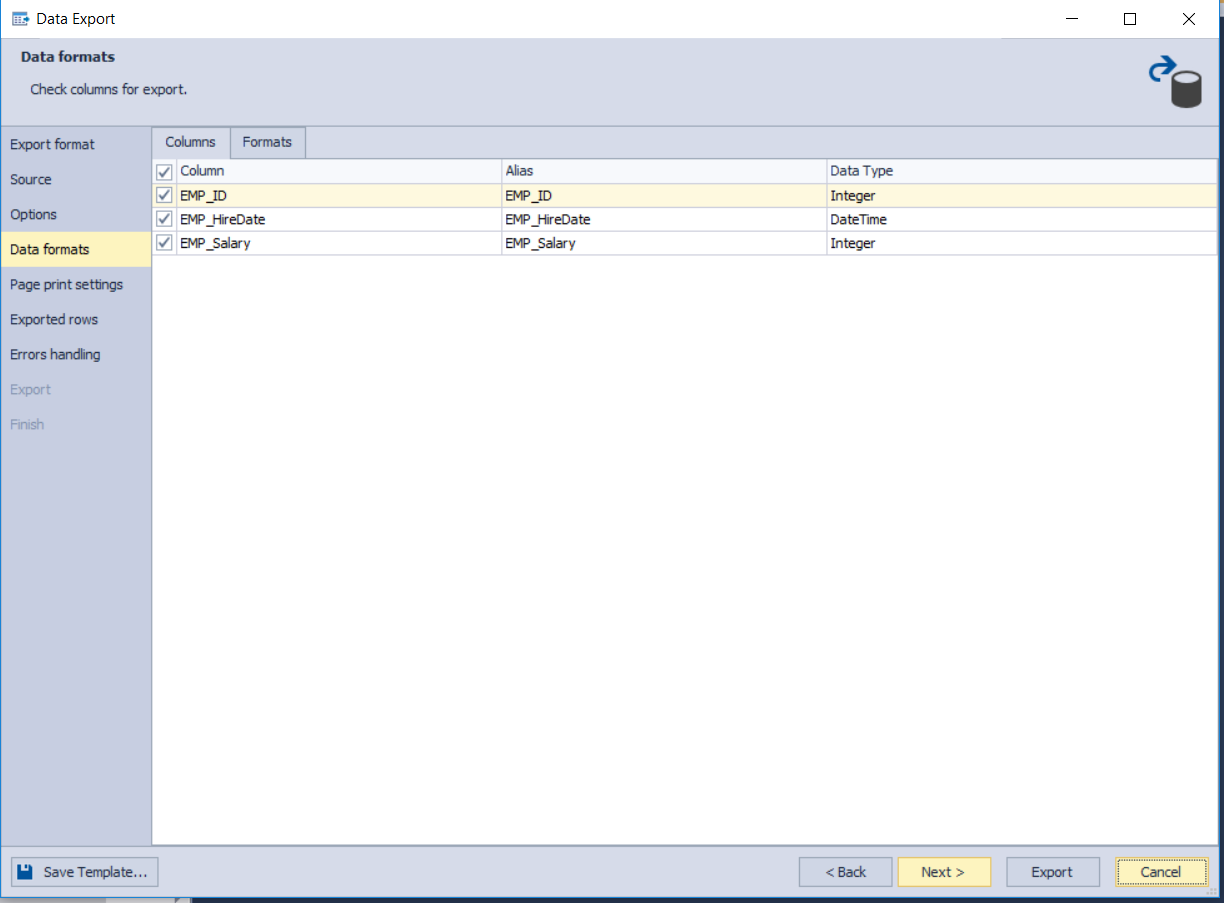
- In the Data Formats window, under the Columns tab, select the columns that will be exported and review their data types:
 Also, in the Formats tab, set up the format of different data types for the columns you selected. Click the Next button to proceed:
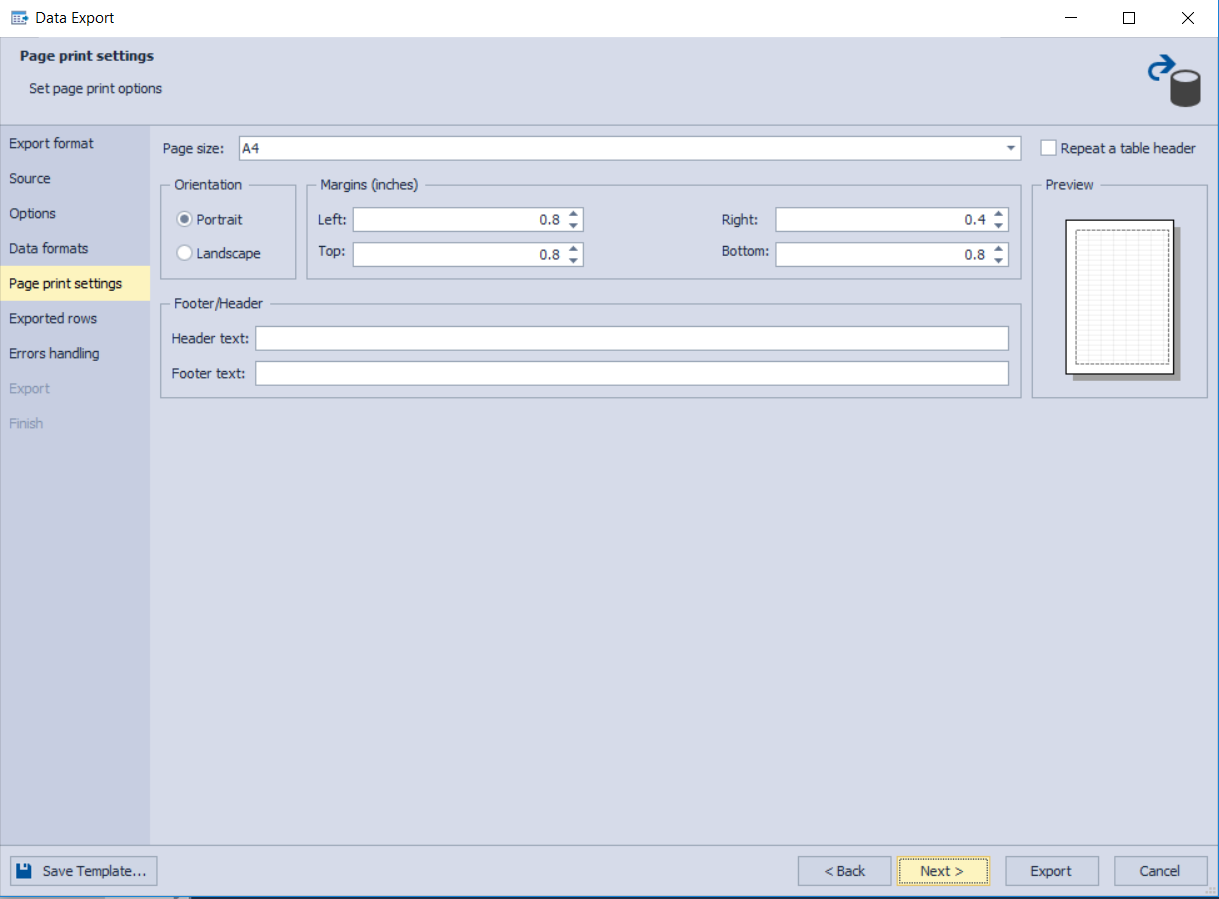
- In the Page Print Settings window, you can set the different options for the exported file pages for printing purposes. Click Next to proceed:

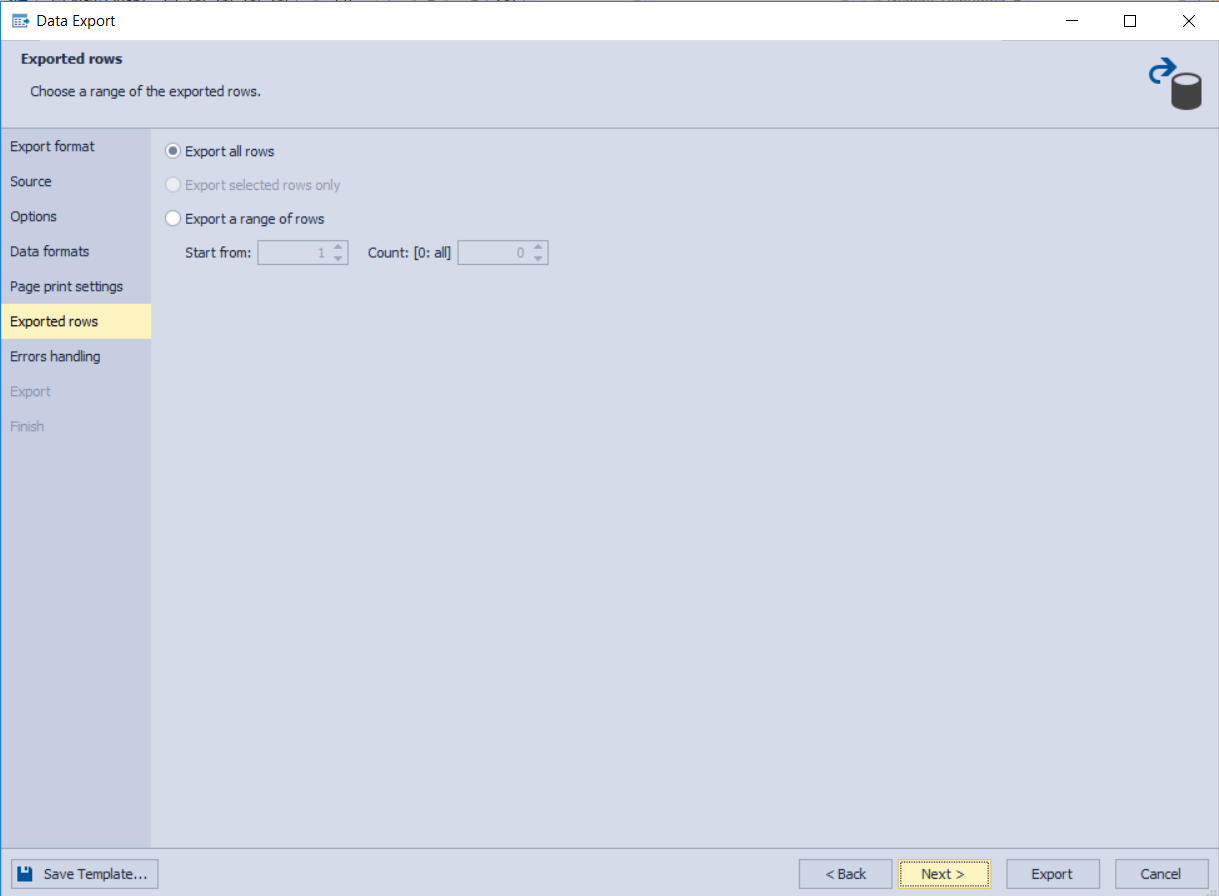
- In the Exported Rows window, specify a range of rows to be exported from the source table or choose to export all table rows. Click Next to proceed:

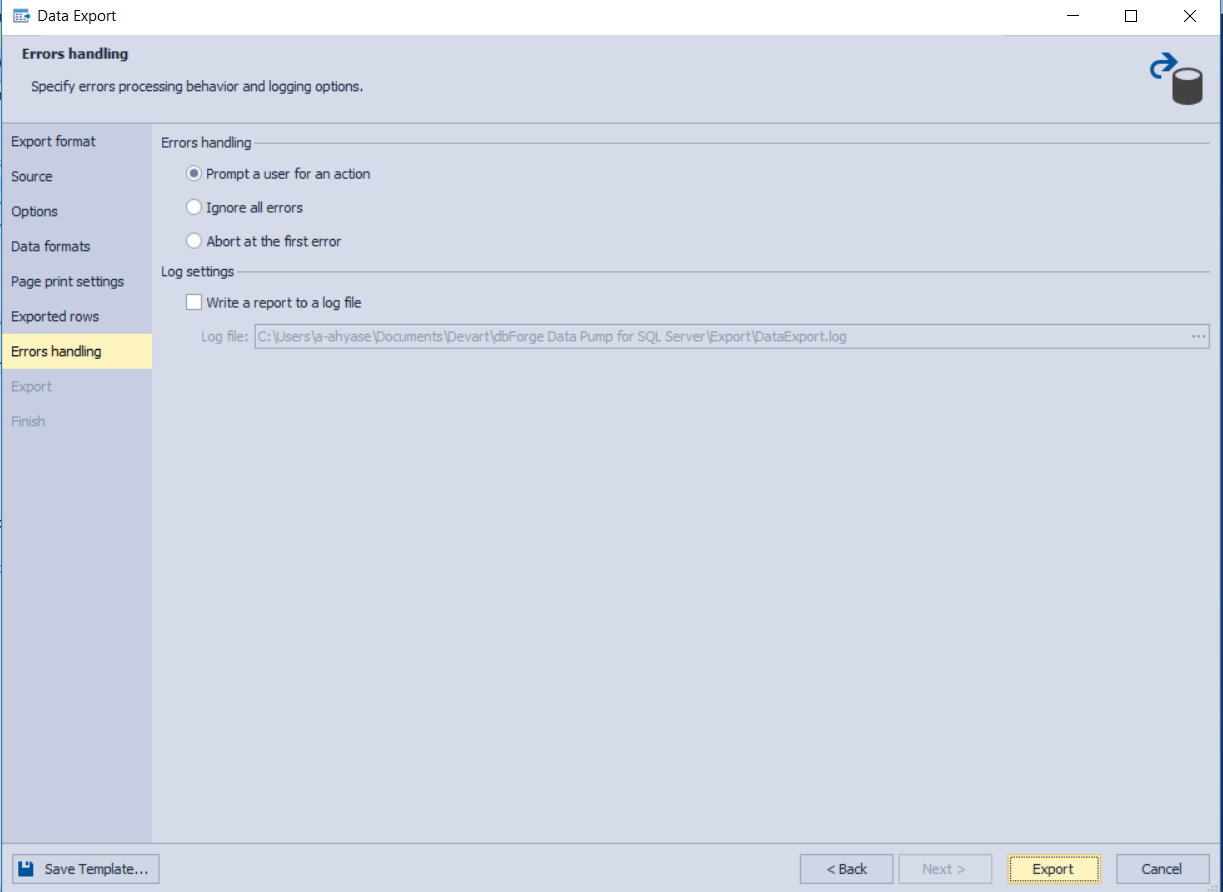
- The Error Handling window provides you with a number of options that can be used to specify how to process errors if they occur and where to log the execution results. Click on the Save Template to save the settings as a template to be used in the future, or press the Export button to start the data export process, as shown below:
 During the data export process, Data Pump will provide you with informational messages that display the number of records copied from the current table, as shown below:
 When the data export process is completed successfully, a summary for the export process will be displayed. Options will be provided to open the generated file or the containing folder and to export more data from the same page without the need to close and reopen the tool:

 Also, in the Formats tab, set up the format of different data types for the columns you selected. Click the Next button to proceed:
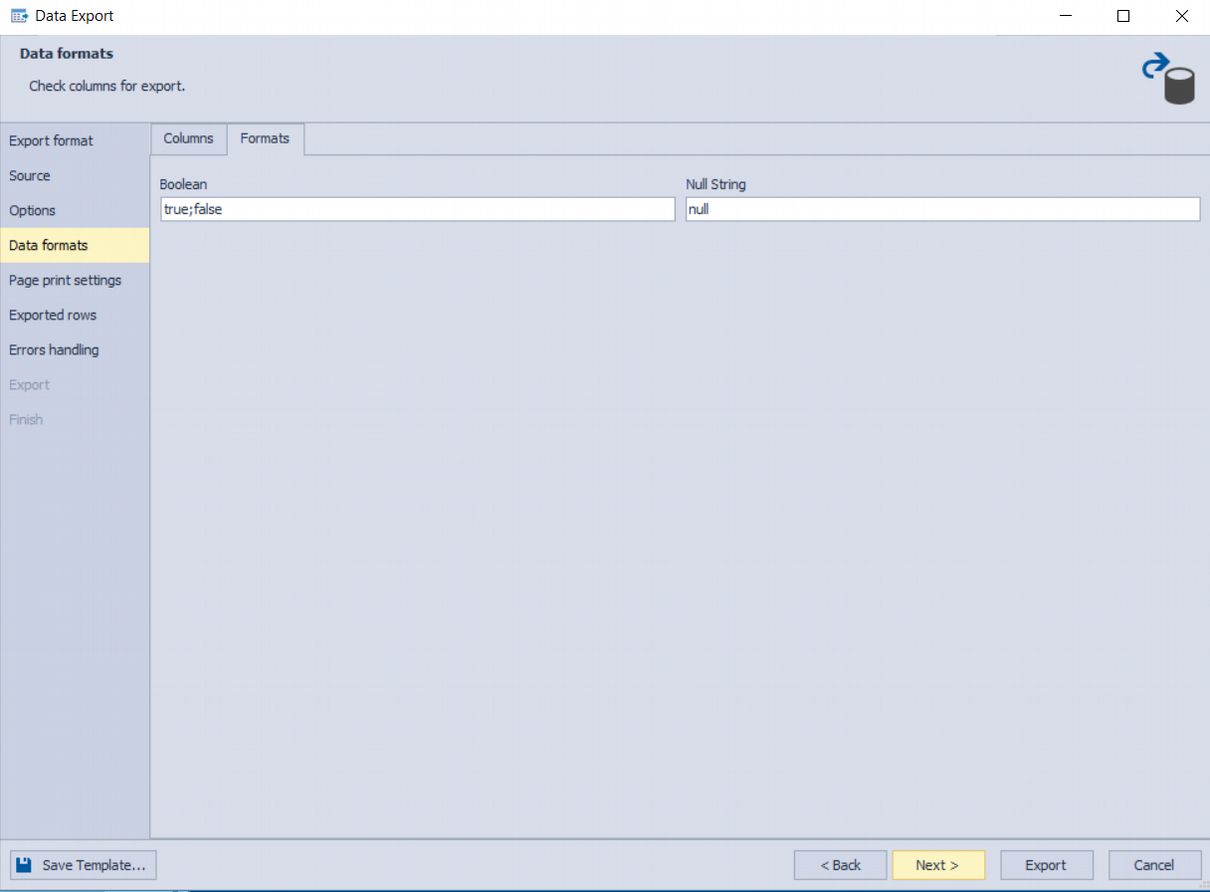
 During the data export process, Data Pump will provide you with informational messages that display the number of records copied from the current table, as shown below:
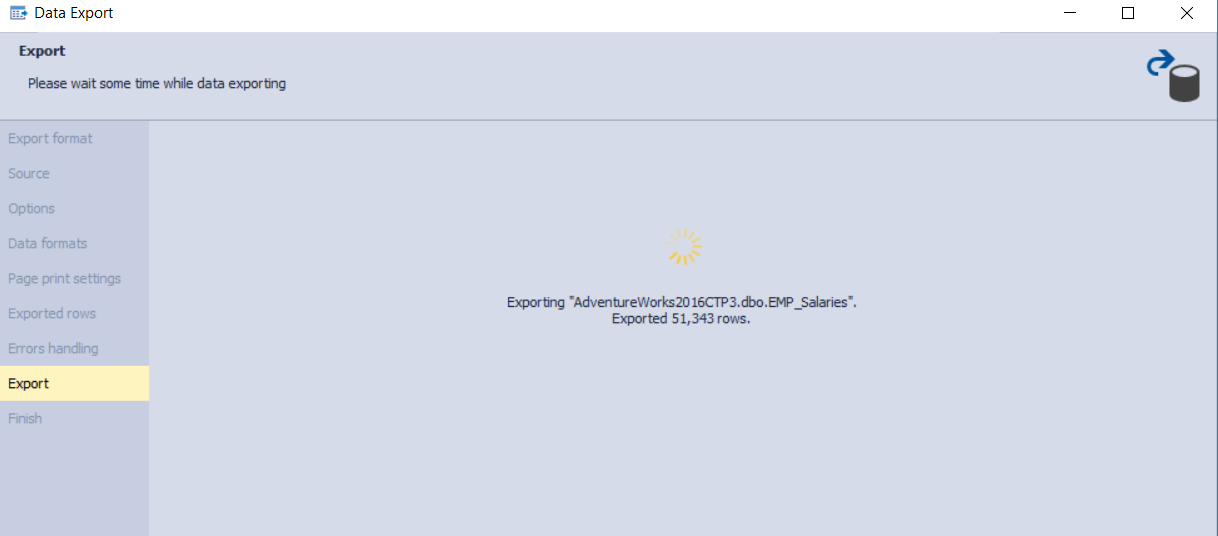 When the data export process is completed successfully, a summary for the export process will be displayed. Options will be provided to open the generated file or the containing folder and to export more data from the same page without the need to close and reopen the tool:
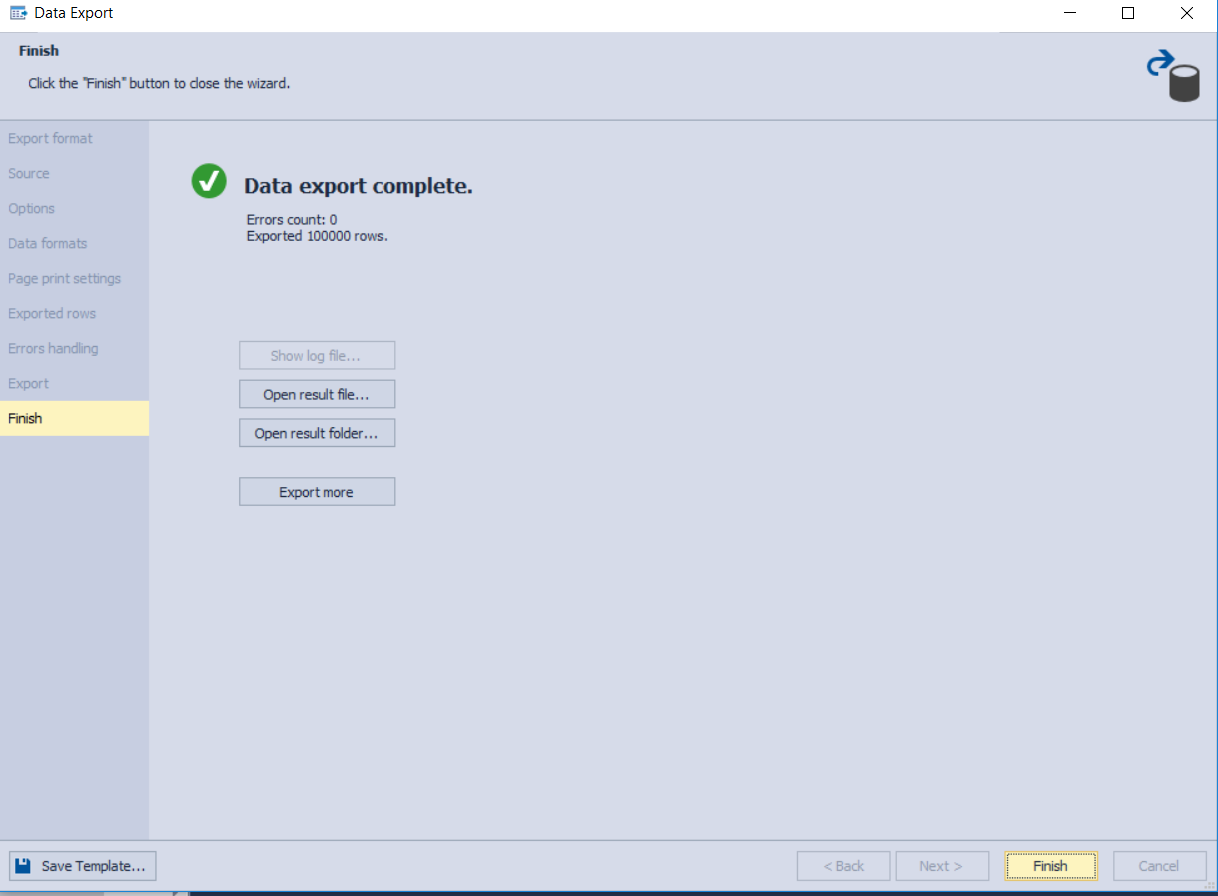
Data Import
dbForge Data Pump can be used within SSMS to import data into a SQL Server database table. The following 9 widely-used data formats are supported: Text, MS Excel, MS Excel 2007, MS Access, XML, CSV, ODBC, DBF (Foxpro, dBase III, dBase IV, dBase 7) and JSON.
To import data from an Excel sheet to a specific SQL Server table, follow the steps below:
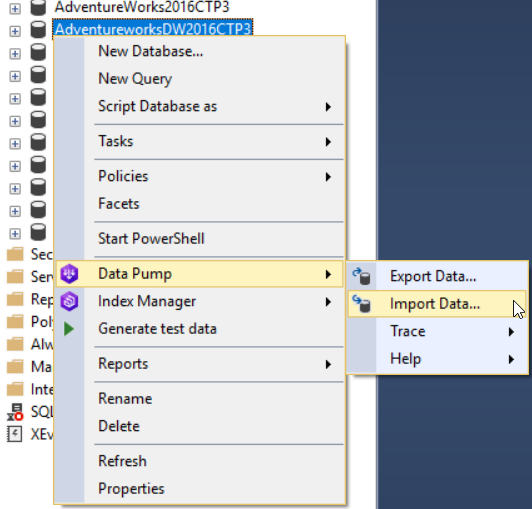
- Connect to the SQL Server instance using SSMS. From the Objects Explorer, right-click on the database that contains the destination database table, and choose Import Data from the Data Pump submenu:

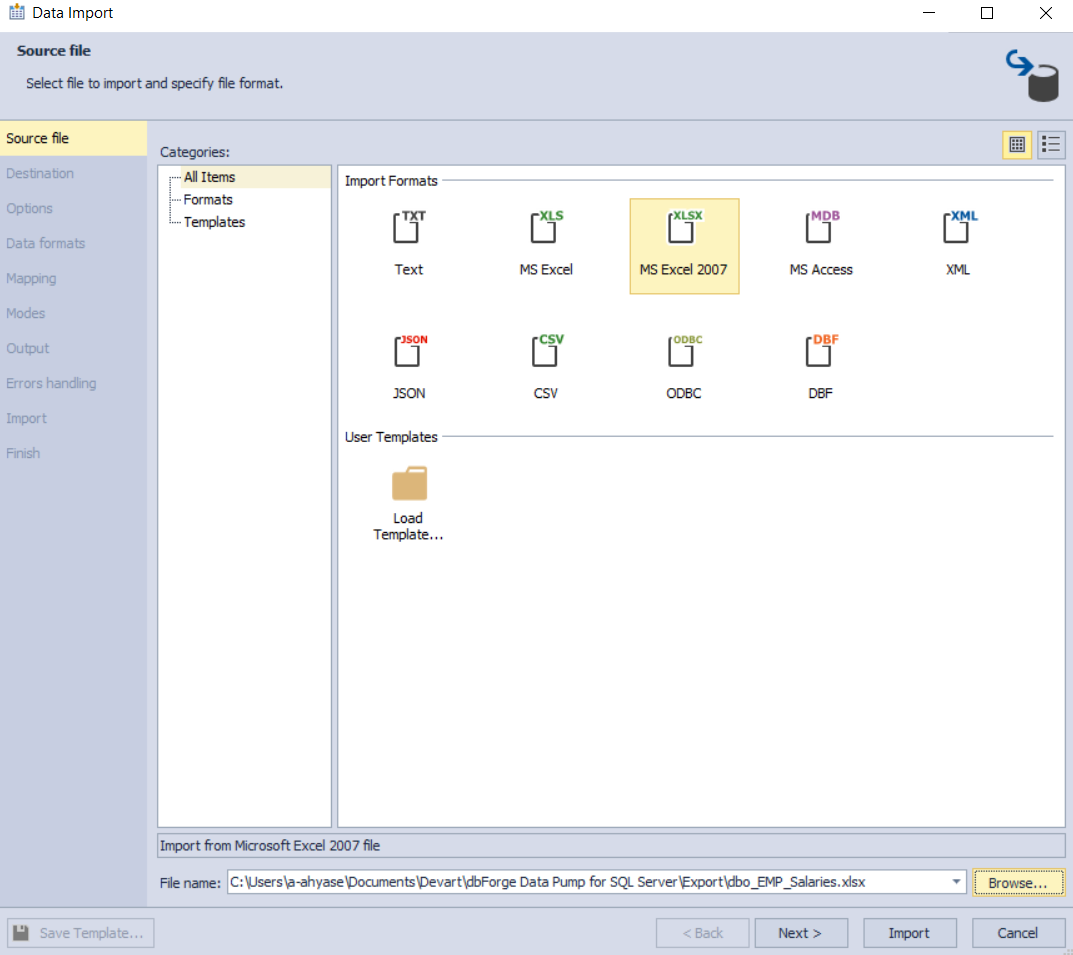
- In the Source File window, choose the format of the source file or simply load a previously-saved template to perform the import process. In our example, we will use Microsoft Excel 2007, and click Browse button to locate the Excel sheet. Click the Next button to proceed:

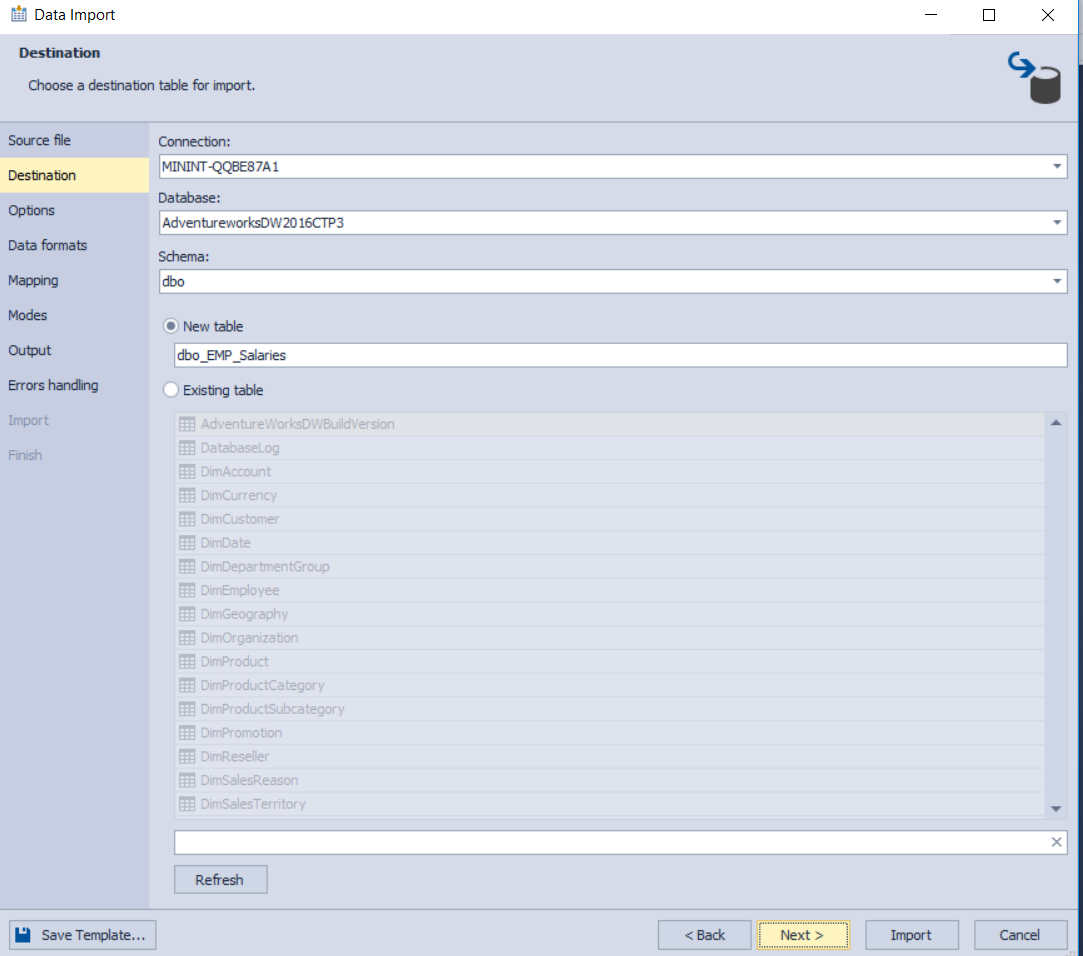
- In the Destination window, review the connection information and specify whether the data should be imported to a new table or an existing table from the provided list. Click Next to proceed:

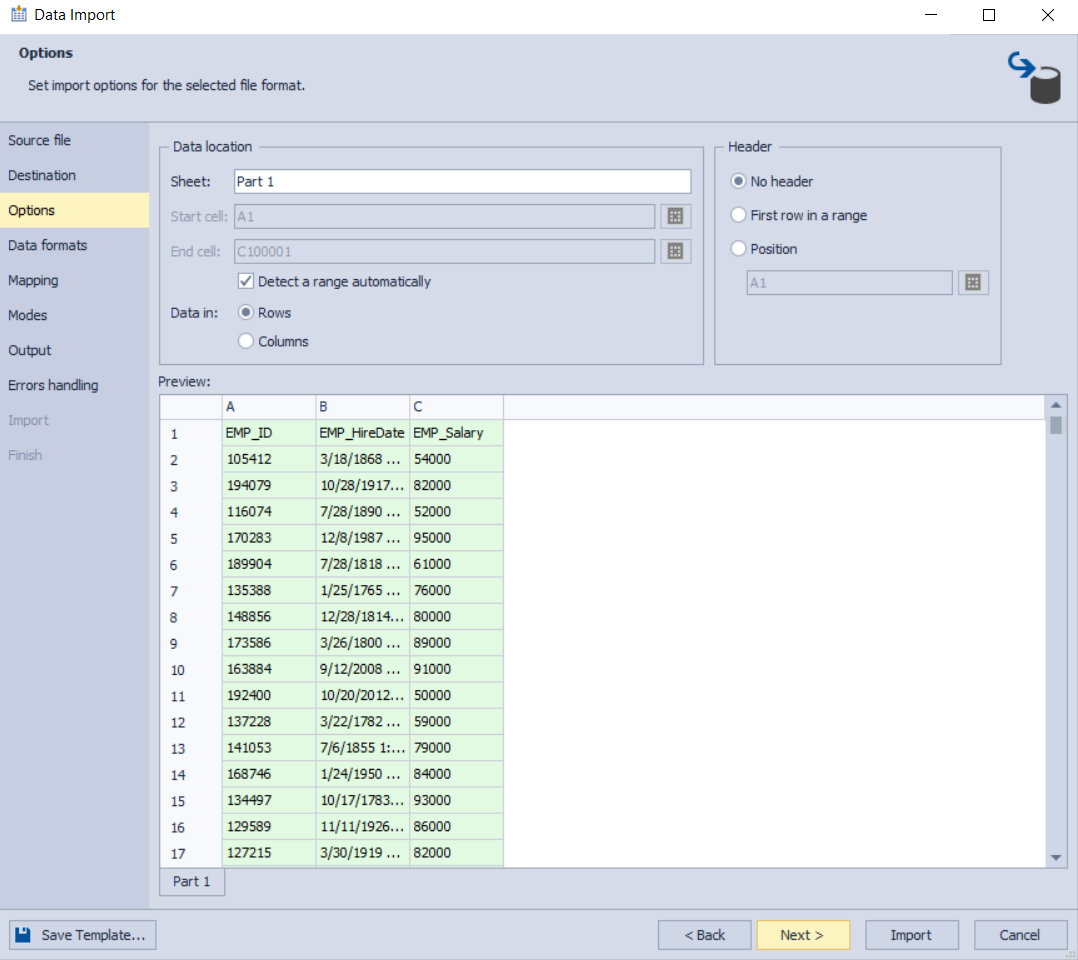
- In the Options window, you can set different options that specify the location of the header and the data in the source file, with the ability to preview the source file data before importing. Click Next to proceed:

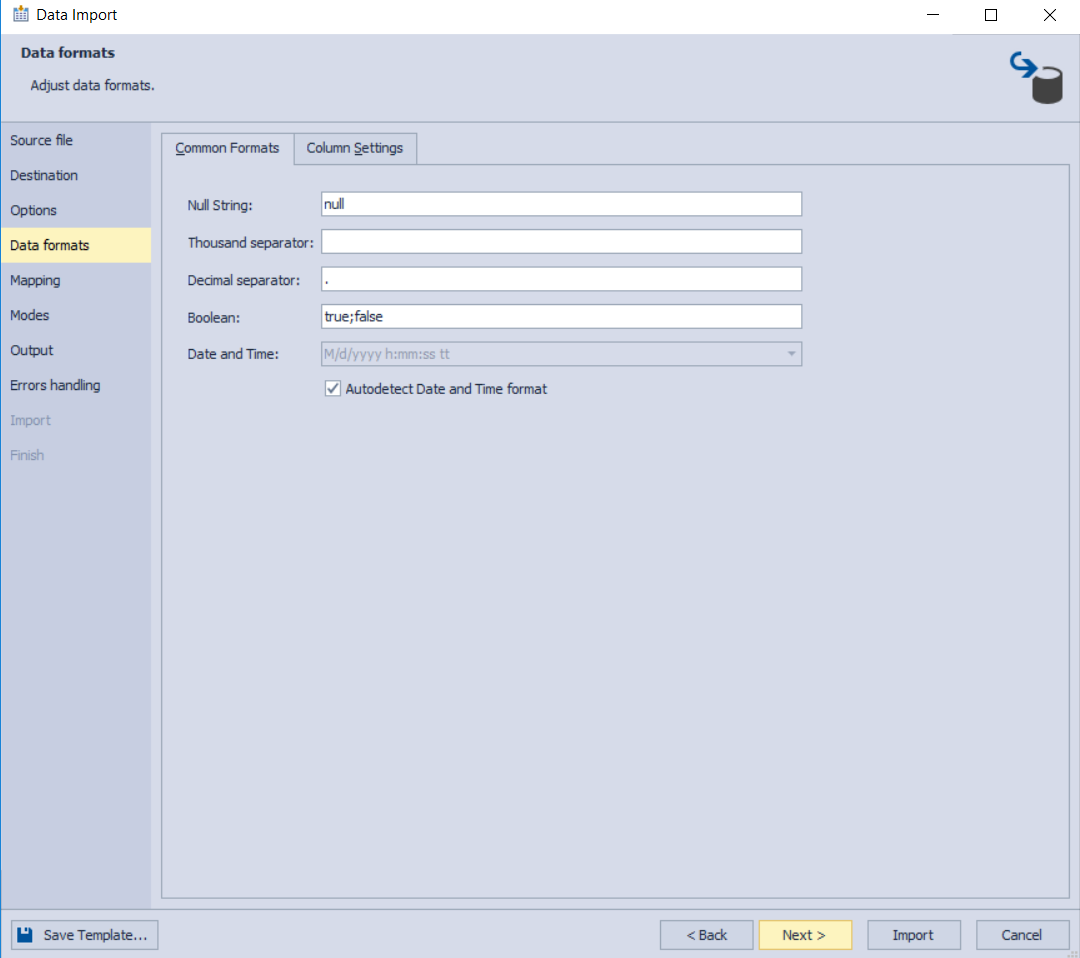
- In the Data Formats window, you can adjust the data type format for different text columns in the source file before importing it to the database table. Click Next to proceed:

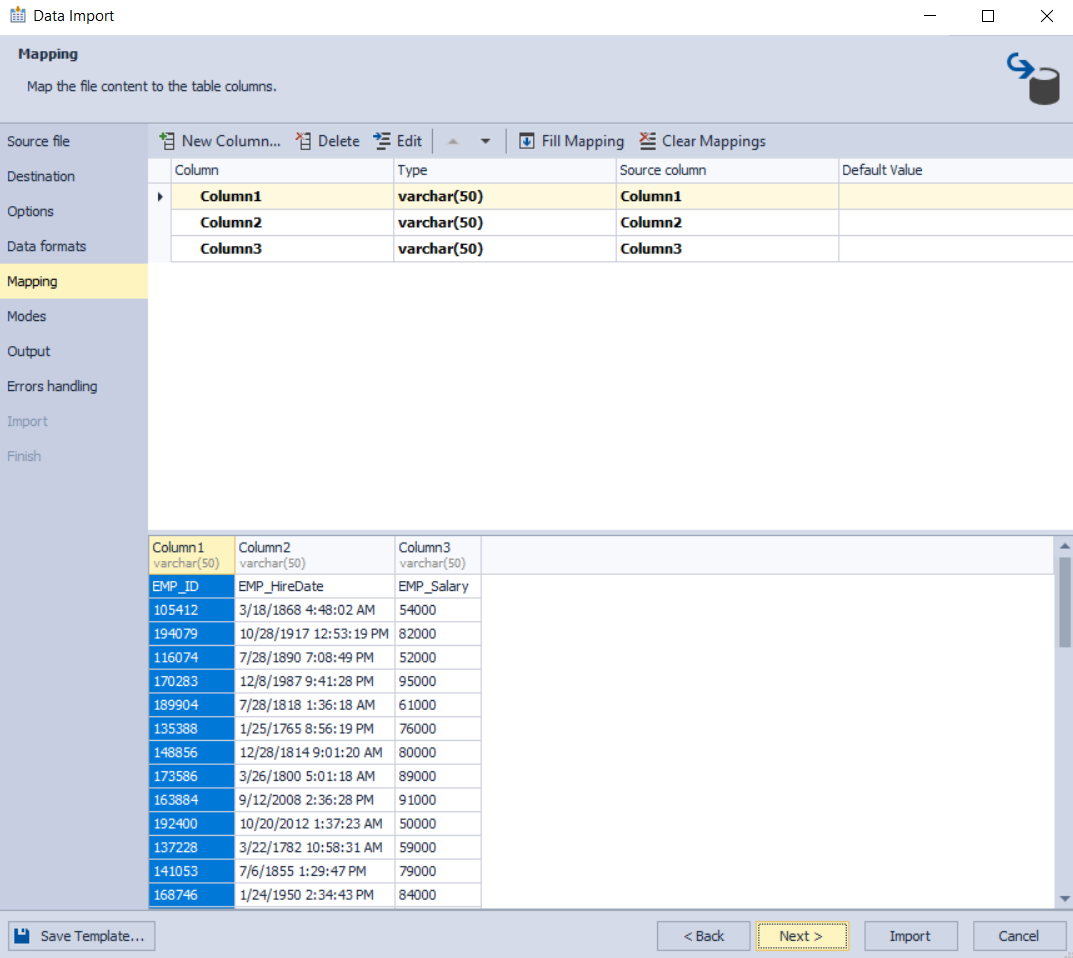
- In the Mapping window, you can map the columns from the source file to the destination database table, with the ability to preview the data after the performing the change. Click Next to proceed:

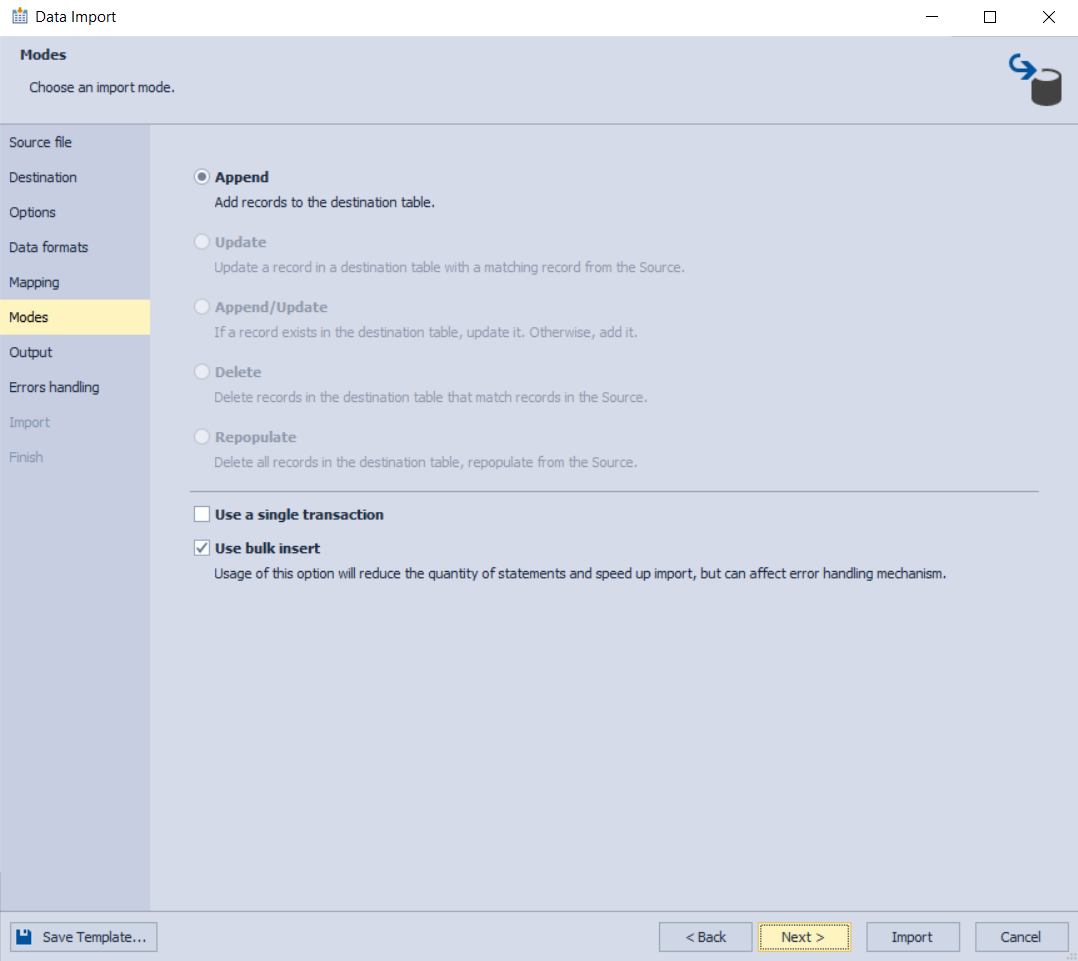
- In the Modes window, you can specify the data import mode, such as appending the data to the existing data in the destination table and perform a bulk insert or import the data with a single transaction. Click Next to proceed:

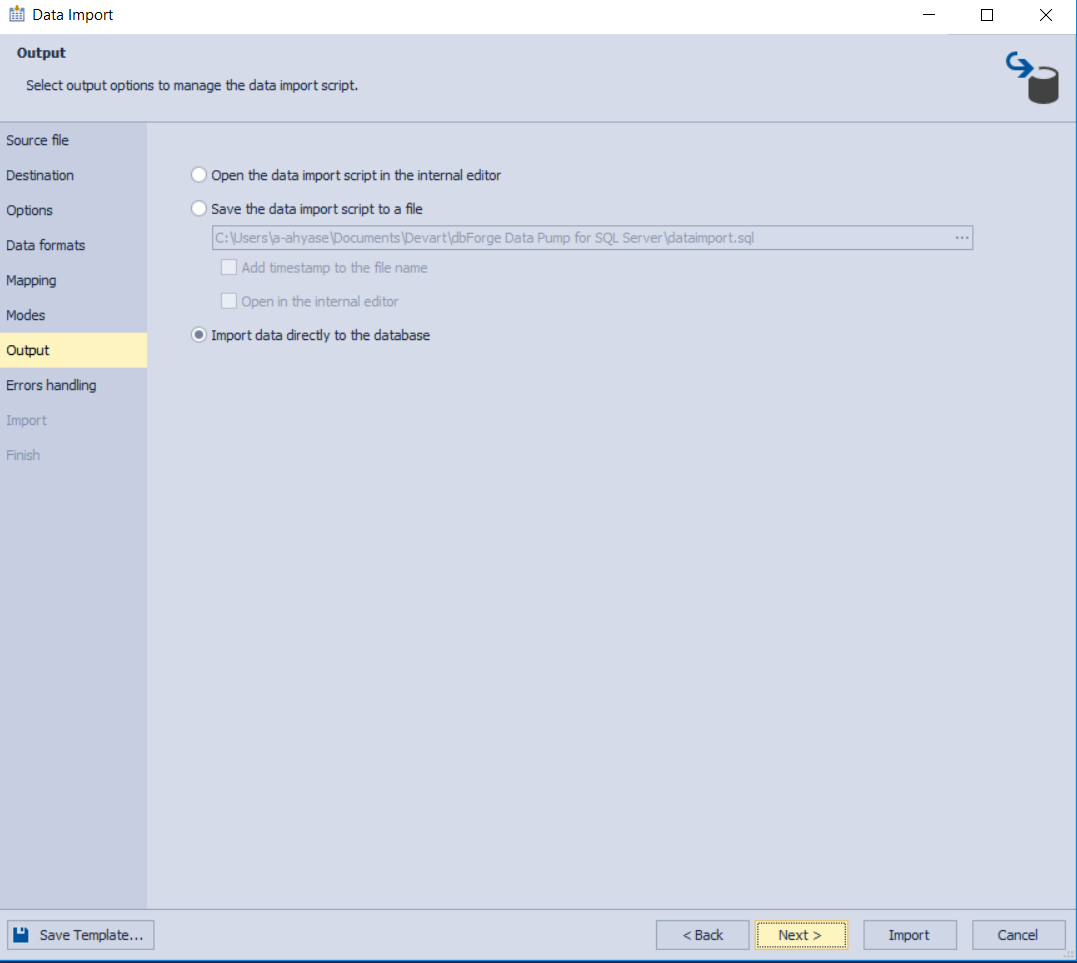
- In the Output window, you can specify to generate or save the data import script or proceed with the data import process immediately. Click Next to proceed:

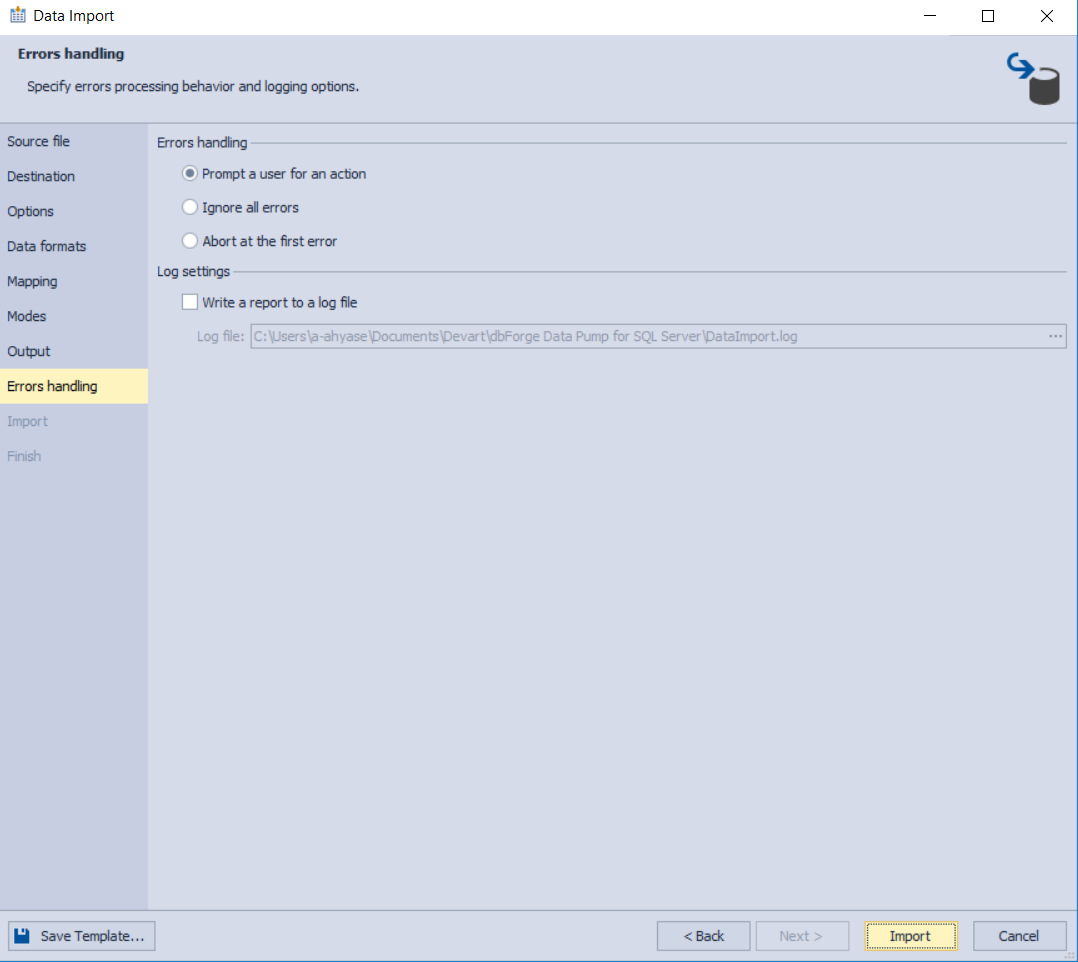
- The Error Handling window provides you with a number of options that can be used to specify how to behave if errors occur and where to log the execution results. Click on the Save Template to save the settings as a template to be used in the future, or the Import button to start the data import process, as shown below:

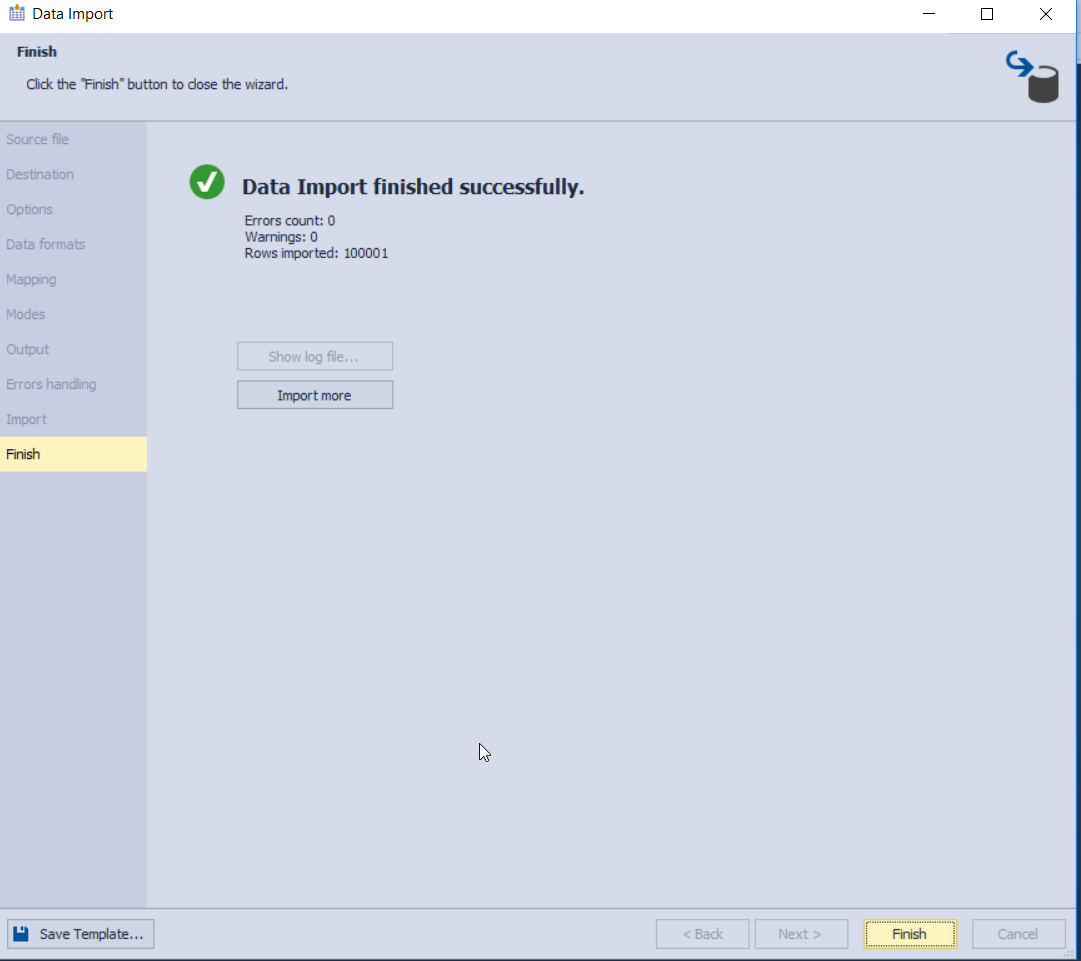
- When the import process is completed successfully, the Wizard will display a summary for the number of imported records. You will have the ability to review the error log file in case any errors occurred and to import other files from the same window without the need to close and reopen the tool:

It is clear from the previous example that dbForge Data Pump tool provides us with the ability to import and export data to and from various data file formats. The wizard dedicated for this is simple to configure, rich with different options and requires no development efforts. It deserves a try! Additionally, if you want to learn how to import data during the DevOps process with the help of dbForge Data Pump, feel free to watch this video.