
In SQL Server, triggers are database objects which get executed whenever a triggering event happens on the database or server.
Triggers play a key role in achieving Business requirements like alerting targeted people, start a job, or other operations. Since Triggers can handle many such operations, we should define them with care to avoid performance impacts.
In this article, we will examine Triggers, types of Triggers, and various Trigger options available. Also, we’ll explore the necessary precautions while using DML triggers.
Triggers in SQL
A Trigger is a special type of Stored procedure which is executed upon defined events, running the script defined in the Trigger body. There are several types of triggers:
- DML Triggers – for performing DML operations like INSERT, UPDATE, and DELETE commands on tables.
- DDL Triggers – for performing DDL operations like CREATE, ALTER, and DROP commands across any objects on the Database or Server.
- Logon Triggers – for the attempt to log in to an instance of SQL Server during the LOGON event.
DML Triggers in SQL Server
DML Triggers are those fired by DML commands (INSERT, UPDATE, or DELETE) on tables or views. We can create such Triggers on those tables or views only where data resides so that they accept DML commands on them.
Based on the time of firing/invoking, DML triggers can be of the following types:
- FOR or AFTER Trigger Type – the trigger is invoked after the successful completion of the DML statement on a table or view. Note: it is possible to create the AFTER trigger on Tables only, not Views.
- INSTEAD OF Trigger Type – Trigger will be invoked before (INSTEAD OF) the DML script executed on the Table or view.
SQL Server creates two special or logical tables named INSERTED and UPDATED whenever DML triggers are created across Tables or views. These logical tables help to identify the record changes that happen via INSERT/UPDATE/ DELETE operations. This way, it ensures that DML triggers function effectively.
- INSERTED logical table stores copies of new records of records modified during the INSERT and UPDATE operations. When a new record is added to the actual table, it is added into the INSERTED table too. Similarly, any changes on existing records via the UPDATE statement move the latest values to the INSERTED table and older values – to the DELETED logical table.
- DELETED logical table stores copies of older values during the UPDATE and DELETE operations. Whenever a record is updated, older values get copied to the DELETED table. Whenever a record is deleted from the actual table, records are inserted into the DELETED table.
SQL Server has built-in functions COLUMN_UPDATED() and UPDATE() to identify the presence of INSERT or UPDATE operations on the particular column.
- COLUMN_UPDATED() returns varbinary values of columns that were affected by the INSERT or UPDATE operations.
- UPDATE() accepts the column name as an input parameter and returns the information whether that column has any data changes as part of the INSERT or UPDATE operations.
The NOT FOR REPLICATION property can be used in DML triggers to avoid firing them for changes coming via the Replication process.
DML Triggers can be created with .Net Framework Common Language Runtime (CLR) as well.
The system DMV sys.triggers stores the list of all database-scoped triggers. We can use the below query to fetch the details of all DML triggers within a Database:
SELECT *
FROM sys.triggers
WHERE type = 'TR';
The DML Trigger definitions can be viewed if the trigger is not encrypted. We use any of the below options:
sys.sql_modules
SELECT OBJECT_SCHEMA_NAME(object_id, db_id()) Schema_name, OBJECT_NAME(object_id) Trigger_Name, definition
FROM sys.sql_modules
WHERE object_id = OBJECT_ID(<trigger_name>);
OBJECT_DEFINITION() function
SELECT OBJECT_DEFINITION (OBJECT_ID(<trigger_name>)) AS ObjectDefinition; sp_helptext stored procedure
EXEC sp_helptext '<trigger_name>';All possible DML Events are available in the sys.events table. We can view them using the below query:
SELECT *
FROM sys.events;
Syntax of the DML Trigger
CREATE TRIGGER <trigger_name>
ON <schema_name.table_name | schema_name.view_name >
[ WITH <DML_trigger_option> [ ,...n ] ]
{ FOR | AFTER | INSTEAD OF} <event_type>
AS { sql_statement | EXTERNAL NAME <method specifier> }
For demo purposes, I’ve created two tables named Sales and SalesHistory with few columns in the test database:
CREATE TABLE Sales (SalesId int IDENTITY NOT NULL, SalesDate datetime, Itemcount int, price money);
CREATE TABLE SalesHistory (SalesId int NOT NULL, SalesDate datetime, Itemcount int, price money, ChangeType varchar(10), ChangeDate datetime DEFAULT GETDATE(), ChangedUser varchar(100) DEFAULT SUSER_NAME());
GO
As you can see, the SalesHistory table has 3 additional columns to track the modified date and username which invoked the change. If required, we can have one more Identity column defined and make it a Primary key as well.
INSERT Trigger
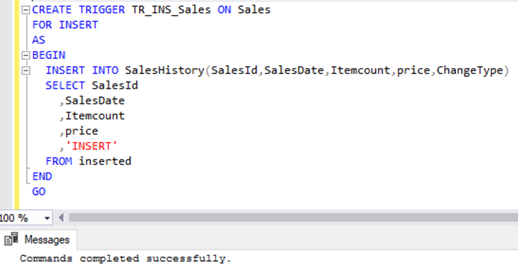
We create a simple INSERT trigger on the Sales tables to INSERT any new record changes to SalesHistory table. Use the below script:
CREATE TRIGGER TR_INS_Sales ON Sales
FOR INSERT
AS
BEGIN
  INSERT INTO SalesHistory(SalesId,SalesDate,Itemcount,price,ChangeType)
  SELECT SalesId
    	,SalesDate
	,Itemcount
	,price
	,'INSERT'
  FROM inserted
END
GO
To explain the trigger syntax, we have created a DML trigger named TR_INS_Sales on the Sales table. It must fire the trigger for the INSERT operations only – inserting records to the SalesHistory table from the inserted table.
As we know, inserted is a logical table that captures the changes happening in the Source table (the Sales table in our case).
We can see another special logical table deleted in the UPDATE trigger because the deleted table isn’t applicable for INSERT triggers.
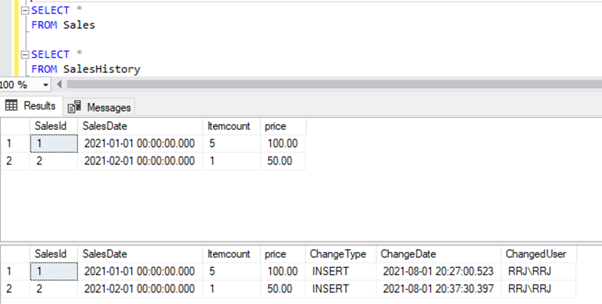
Let’s add a new record to check if records are inserted into the SalesHistory table automatically.
INSERT INTO Sales(SalesDate,Itemcount,price)
VALUES ('2021-01-01', 5, 100);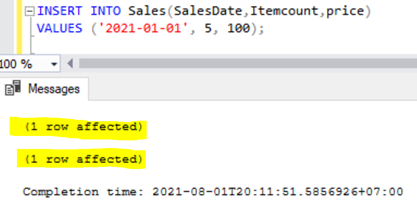
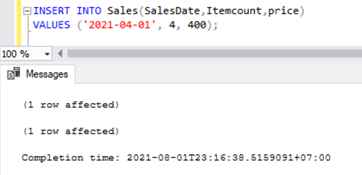
Even though we have inserted only one record into the Sales table, we get 2 lines of the 1 row affected message. The second record appears because of the INSERT operation as part of the trigger invoked by the INSERT activity on the Sales table – inserting a record to the SalesHistory table.
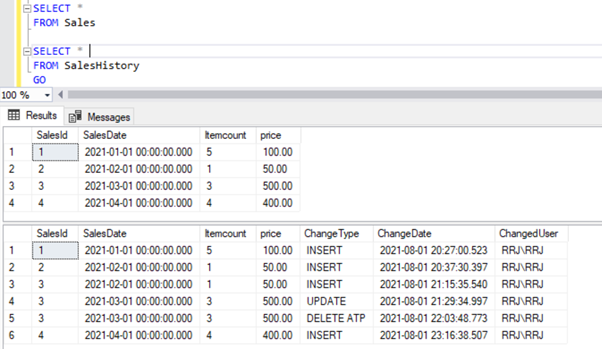
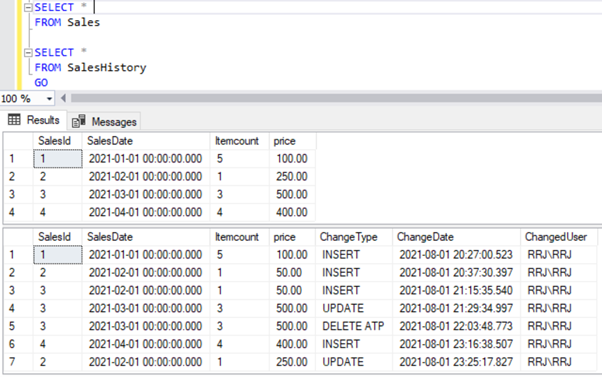
Let’s verify the records across both the Sales and SalesHistory tables:
SELECT *
FROM Sales

SELECT *
FROM SalesHistory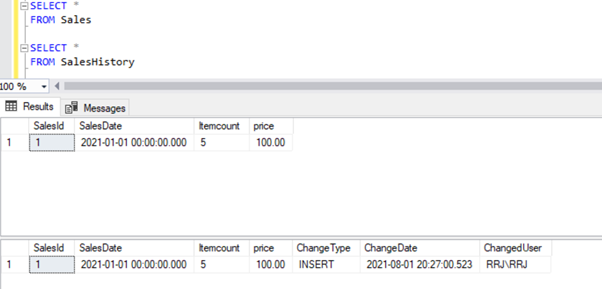
We can see that ChangeDate and ChangedUser are automatically populated. It is because we designed our History table with the default values as GETDATE() and SUSER_NAME().
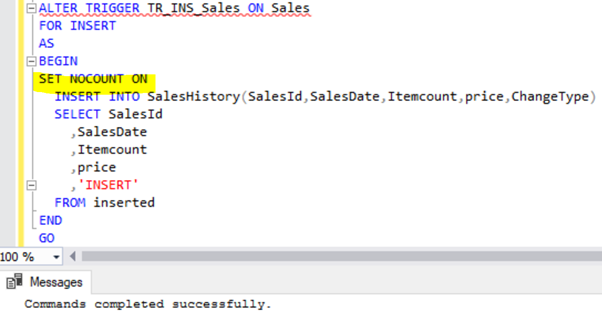
End-users can see via Trigger or some other means their INSERT was audited via the additional 1 row affected message. If you want to monitor changes without informing users, you need to apply the SET ROWCOUNT ON command. It suppresses the results displayed for DML operations that happen inside the trigger.
Let’s ALTER our trigger using the script with the SET ROWCOUNT ON option and see it in action:
ALTER TRIGGER TR_INS_Sales ON Sales
FOR INSERT
AS
BEGIN
SET NOCOUNT ON
  INSERT INTO SalesHistory(SalesId,SalesDate,Itemcount,price,ChangeType)
  SELECT SalesId
    ,SalesDate
	,Itemcount
	,price
	,'INSERT'
  FROM inserted
END
GO
Now, we insert another record into the Sales table:
INSERT INTO Sales(SalesDate,Itemcount,price)
VALUES ('2021-02-01', 1, 50);
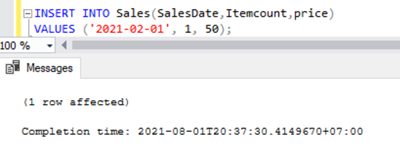
We can see only a single 1 row affected message. Thus, the target audience might not get notified that their actions are under monitoring at all.
Let’s verify whether the INSERT trigger was invoked by verifying the Sales and SalesHistory tables.
Yes, the INSERT event on the Sales table was triggered successfully. The records were inserted into the SalesHistory table without notifying users.
Hence, if you create triggers for auditing purposes, the SET NOCOUNT ON is necessary. It allows for auditing without alerting anyone.
UPDATE Trigger
Before creating an actual UPDATE trigger on the Sales table, let’s again refer to the special logical inserted and deleted tables. Create a sample UPDATE trigger on the Sales table:
CREATE TRIGGER TR_UPD_Sales ON Sales
FOR UPDATE
AS
BEGIN
SELECT * FROM inserted
SELECT * FROM deleted
END
GO
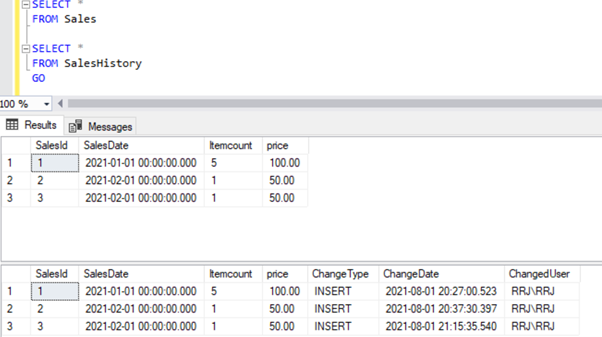
The UPDATE trigger was created successfully. Now, let’s INSERT a new record incorrectly. Later we’ll update it to verify the UPDATE trigger in action:
INSERT INTO Sales(SalesDate,Itemcount,price)
VALUES ('2021-02-01', 1, 50);
We have the below records across the Sales and SalesHistory table:
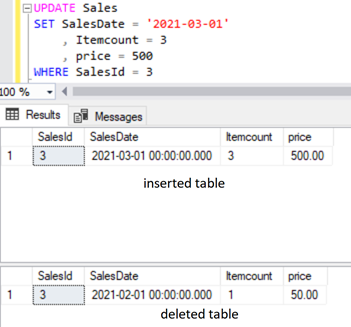
Let’s update SalesId = 3 in the Sales table with new values. We’ll see the data across the inserted and deleted tables:
UPDATE Sales
SET SalesDate = '2021-03-01'
	, Itemcount = 3
	, price = 500
WHERE SalesId = 3
When the UPDATE operation takes place, all new or modified values will be available in the inserted table, and old values will be available in the deleted table:
Now, let’s modify the UPDATE trigger with the below script and verify it in action:
ALTER TRIGGER TR_UPD_Sales ON Sales
FOR UPDATE
AS
BEGIN
  INSERT INTO SalesHistory(SalesId,SalesDate,Itemcount,price,ChangeType)
  SELECT SalesId
    ,SalesDate
	,Itemcount
	,price
	,'UPDATE'
  FROM inserted
END
GO
The UPDATE trigger was altered successfully, and we can execute the same UPDATE script again:
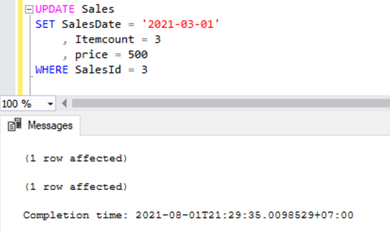
Now, we can see the 1 row affected message twice. It indicates the execution of the UPDATE operation on the Sales table and the INSERT operation on the SalesHistory table. Let’s verify this by selecting across both tables:
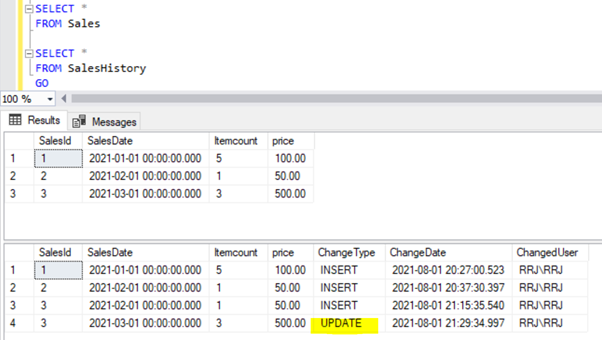
The UPDATE activity got tracked in the SalesHistory table as a new record. Before that record, we have another one showing when the record was inserted first.
DELETE Trigger
Till now, we tested the FOR or AFTER type of triggers for both INSERT or UPDATE operations. Now, we can try using the INSTEAD OF type of DML trigger for the DELETE operation. Use the below script:
CREATE TRIGGER TR_DEL_Sales ON Sales
INSTEAD OF DELETE
AS
BEGIN
	RAISERROR ('Notify Sales Team', 16, 10);
END
GO
The DELETE trigger is successfully created. It will send an error message to the client instead of performing the DELETE command on the Sales table.
Let’s try to delete record SalesID = 3 from the Sales table using the script below:
DELETE FROM Sales
WHERE SalesId = 3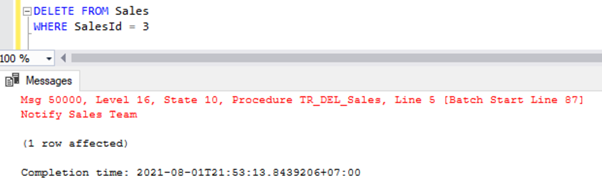
We have prevented users from deleting records from the Sales table. The trigger raised an error message.
Let’s also verify whether the record was deleted from the Sales table and if there were any changes on the SalesHistory table:
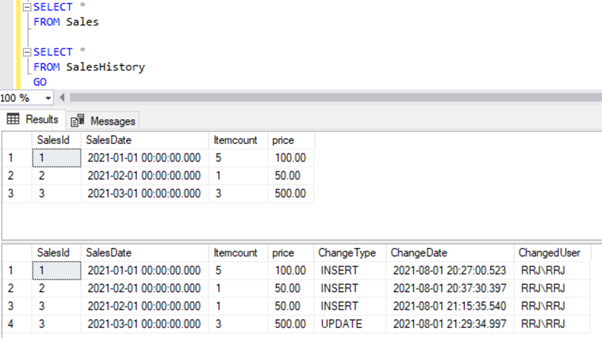
As we have executed the trigger script before the actual DELETE statement using INSTEAD OF trigger, the DELETE operation on SalesId=3 wasn’t successful at all. Hence, no changes were reflected across both the Sales and SalesHistory table.
Let’s modify the trigger using the below script to identify the DELETE attempt on the table:
ALTER TRIGGER TR_DEL_Sales ON Sales
INSTEAD OF DELETE
AS
BEGIN
  INSERT INTO SalesHistory(SalesId,SalesDate,Itemcount,price,ChangeType)
  SELECT SalesId
    ,SalesDate
	,Itemcount
	,price
	,'DELETE ATP'
  FROM deleted
END
GO
The trigger was modified successfully. Let’s delete the SalesId = 3 record from the Sales table again:
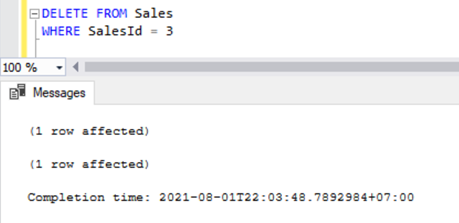
Execution of the DELETE statement shows the 1 row affected message twice. Let’s check records across the Sales and SalesHistory tables to see what exactly happens there:

The logic used in the DELETE Trigger was to capture any DELETE attempts on the table without actually deleting the record from the Sales table using the INSTEAD OF trigger. We can confirm that the record wasn’t deleted from the Sales table, and a new record was inserted into the SalesHistory table.
A Single Trigger to Handle INSERT, UPDATE and DELETE Operation
Till now, we have created 3 triggers to handle the INSERT, UPDATE, and DELETE operations on a single table. If we have multiple triggers, it would be difficult to manage them, especially if they are not properly documented. There can be performance issues if the developers used contradicting logic across multiple triggers.
I personally recommend using a single trigger with all logic combined to avoid potential data loss or performance issues. We can try combining 3 triggers in a single trigger for better performance. But before we do it, let’s examine how to DROP existing triggers and how to Disable or Enable triggers.
Drop the Trigger
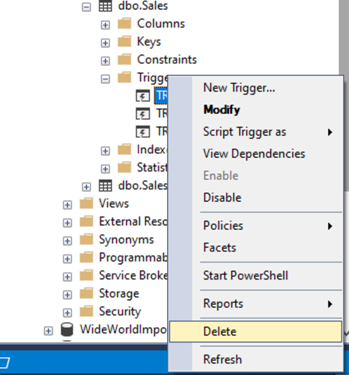
To merge 3 triggers into a single one, we first need to DROP these 3 triggers. It is possible via both SSMS and T-SQL approaches.
In SSMS, expand the Test database > Tables > Sales table > Triggers.
We can see our 3 triggers created so far:

To drop a trigger, simply right-click on it > Delete > OK.
If you prefer using T-SQL, see the below syntax to drop the trigger:
DROP TRIGGER <trigger_name>There is the TR_INS_Sales trigger we created on the Sales table. The script will be:
DROP TRIGGER TR_INS_SalesImportant: Dropping a table drops all triggers by default.
Disable and Enable Trigger
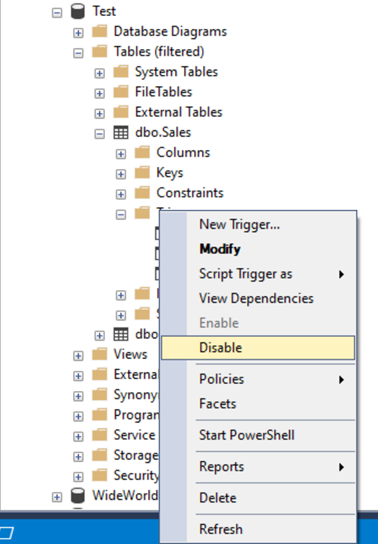
Instead of dropping the trigger, we can disable it temporarily with the Disable trigger option via SSMS or T-SQL.
In SSMS, right-click on the Trigger name > Disable. Once disabled the trigger won’t be fired till you enable it back.
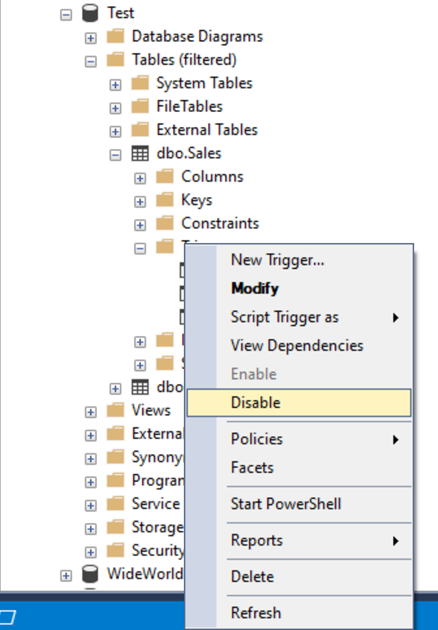
While the Trigger is working, the Enable option is greyed out. When you disable it, the Enable option will become visible and active.
If you prefer using T-SQL, you can disable and enable triggers using the below scripts:
-- To Disable all triggers on a specific table
DISABLE TRIGGER ALL ON <table_name>;

-- To Disable a specific trigger on a table
DISABLE TRIGGER <trigger_name> ON <table_name>;

-- To Enable all triggers on a specific table
ENABLE TRIGGER ALL ON <table_name>;

-- To Enable a specific trigger on a table
ENABLE TRIGGER <trigger_name> ON <table_name>;
To disable and enable our particular TR_INS_Sales trigger on the Sales table, we use the below scripts:
-- To Disable TR_INS_Sales trigger on Sales table
DISABLE TRIGGER TR_INS_Sales ON Sales;

-- To Enable TR_INS_Sales trigger on Sales table
ENABLE TRIGGER TR_INS_Sales ON Sales;
Thus, we have learned how to DROP, DISABLE, and ENABLE triggers. I’ll drop 3 existing triggers and create a single trigger covering all the 3 operations or inserting, updating, and deleting using the script below:
DROP TRIGGER TR_INS_Sales
DROP TRIGGER TR_UPD_Sales
DROP TRIGGER TR_DEL_Sales
GO

CREATE TRIGGER TR_INS_UPD_DEL_Sales ON Sales
FOR INSERT, UPDATE, DELETE
AS
BEGIN
IF (SELECT COUNT (*) FROM deleted) = 0
BEGIN
  INSERT INTO SalesHistory(SalesId,SalesDate,Itemcount,price,ChangeType)
  SELECT SalesId
    ,SalesDate
	,Itemcount
	,price
	,'INSERT'
  FROM inserted
END
ELSE IF (SELECT COUNT (*) FROM inserted) = 0
BEGIN
  INSERT INTO SalesHistory(SalesId,SalesDate,Itemcount,price,ChangeType)
  SELECT SalesId
    ,SalesDate
	,Itemcount
	,price
	,'DELETE'
  FROM deleted
END
ELSE IF (UPDATE (SalesDate) OR UPDATE (ItemCount) OR UPDATE (Price))
BEGIN
  INSERT INTO SalesHistory(SalesId,SalesDate,Itemcount,price,ChangeType)
  SELECT SalesId
    ,SalesDate
	,Itemcount
	,price
	,'UPDATE'
  FROM inserted
END
END
GO
The single trigger creation was successful. We have used logic to identify the operation by using the inserted and deleted tables.
For the INSERT operation, the deleted table won’t be populated. For the DELETE operation, the inserted table won’t be populated. We can identify these operations easily. If these 2 conditions aren’t matching then it is an UPDATE operation, and we can use a simple ELSE statement.
I’ve used the UPDATE() function to show how it works. If there were any updates on those columns, the UPDATE trigger action would fire. We can also use the COLUMNS_UPDATED() function which we discussed earlier to identify an UPDATE operation as well.
Let’s test our new trigger by inserting a new record:
INSERT INTO Sales(SalesDate,Itemcount,price)
VALUES ('2021-04-01', 4, 400);
Verifying records across the Sales and SalesHistory tables shows data as below:
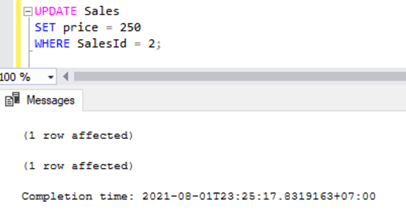
Let’s try updating SalesId = 2 record:
UPDATE Sales
SET price = 250
WHERE SalesId = 2;
Let’s try a DELETE script via this procedure on SalesId = 4 record:
DELETE FROM Sales
WHERE SalesId = 4;
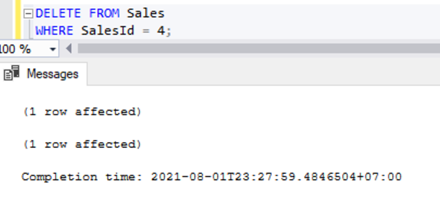
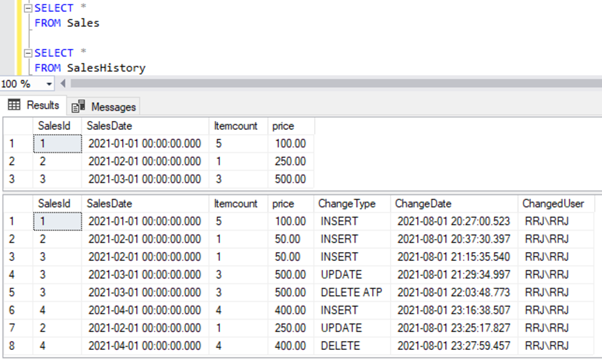
As we can notice, SalesId = 4 was deleted from the Sales table since this is a FOR or AFTER trigger, making the DELETE operation to succeed on the Sales table and then insert a record into the SalesHistory table.
Purpose of DML Triggers
DML Triggers serve effectively for the following scenarios:
- Track historical changes of INSERT, UPDATE, and DELETE operations on a specific table.
- Audit the DML events happening on a table without exposing the Auditing activity to users.
- Prevent DML changes from happening on a table via INSTEAD OF triggers and alert users with a specific error message.
- Send notifications to targeted people when achieving any predefined conditions.
- Start the SQL Server Agent Job or any other process whenever achieving any predefined conditions.
And, you can use them for any other business logic requirements that you can implement with T-SQL statements.
Conclusion
The DML trigger body is similar to the stored procedure. We can implement any Business logic required, but we have to be careful while writing that logic involved to avoid potential issues.
Even though SQL Server supports the creation of multiple triggers on a single table, it’s better to consolidate to a single Trigger. This way, you can maintain triggers easily and troubleshoot them faster. Whenever DML triggers are implemented for auditing purposes, make sure that the SET NOCOUNT ON option is used effectively.
In the next article, we’ll examine DDL triggers and Logon Triggers.
Tags: dml, sql server, trigger Last modified: September 08, 2022