The SQL Server trigger is a special type of stored procedures that is automatically executed when an event occurs in a specific database server. SQL Server provides us with two main types of triggers: the DML Triggers and the DDL triggers. The DDL triggers will be fired in response to different Data Definition Language (DDL) events, such as executing CREATE, ALTER, DROP, GRANT, DENY, and REVOKE T-SQL statements. The DDL trigger can respond to the DDL actions by preventing these changes from affecting the database, perform another action in response to these DDL actions or recording these changes that are executed against the database.
The SQL Server DML Trigger is a special type of stored procedures that is designed to perform a sequence of actions on a database table, to which the trigger is attached, when a Data Manipulation Language (DML) events, such as INSERT, UPDATE or DELETE action, occurs to modify the content of the database tables or views, regardless of whether or not the table rows are affected. The triggers differ from the stored procedures in that the triggers are fired automatically when a predefined data modification occurs. The DML triggers can be used to maintain data integrity and enforce company business rules, same as table check and foreign keys constraints functionality, by performing auditing processes and other post DML actions. You can use the DML triggers to query other tables and perform complex T-SQL queries.
If the trigger is fired, a special type of virtual tables called Inserted and Deleted tables will be used to keep the data values before and after the modification. The trigger statement will work under the scope of the same transaction that fires that trigger. This means that the transaction will not be committed completely until the trigger statement is completed successfully. On the other hand, the transaction will be rolled back if the trigger statement fails.
There are two types of DML triggers: AFTER or FOR trigger and INSTEAD OF trigger. The AFTER trigger will be fired and executed after performing the INSERT, UPDATE or DELETE action that fires it successfully. Also, any referential cascade actions and constraint checks should succeed before firing the trigger. The AFTER trigger can be defined on the table level only without the possibility define it on views. The INSTEAD OF trigger is used to override the statement of the action that fires the trigger with the statement provided in the trigger, rolling back that statement after raising an error when someone is trying to perform an action that breaks a specific policy, such as updating a critical financial column or writing the change into an audit table before performing the change. The INSTEAD OF trigger allows you to INSERT, UPDATE or DELETE data from the views that reference data from multiple tables, in addition to the possibility to reject a part of a batch query and execute another part of that batch successfully. The INSTEAD OF trigger cannot be used with the updatable views that have WITH CHECK OPTION and in the tables with a referential relationship that specifies cascade actions on DELETE or UPDATE.
After discussing the triggers theoretically, we will start showing what we discuss practically. In the upcoming demos, we will show the different situations in which we can take benefits from the SQL Server triggers.
AFTER… DML Trigger
Assume that we need to track the DML actions that are performed on a specific table and write these logs in a history table, where the ID of the inserted, updated or deleted record and the action that is performed will be written to the history table. The CREATE TABLE T-SQL statements below can be used to create both the source and history tables:
CREATE TABLE TriggerDemo_Parent
(
   ID INT IDENTITY (1,1) PRIMARY KEY,
   Emp_First_name VARCHAR (50),
   Emp_Last_name VARCHAR (50),
   Emp_Salary INT
  )
GO

CREATE TABLE TriggerDemo_History
(
   ID INT IDENTITY (1,1) PRIMARY KEY,
   ParentID INT,
   PerformedAction VARCHAR (50),
  )
GO
To track the INSERT operation, we will create a DML trigger that will be fired after performing an INSERT operation on the parent table. This trigger will retrieve the last inserted ID value to that parent table from the virtual inserted table, as in the CREATE TRIGGER T-SQL statement below:
CREATE TRIGGER AfterInsertTrigger
ON TriggerDemo_Parent
AFTER INSERT
AS
INSERT INTO TriggerDemo_History VALUES ((SELECT TOP 1  inserted.ID FROM inserted), 'Insert')
GO
Tracking the DELETE operation can be achieved by creating a DML trigger that is fired after performing the DELETE operation on the parent table. Again, the trigger will retrieve the ID value of the last deleted record from that parent table from the virtual deleted table, as in the CREATE TRIGGER T-SQL statement below:
CREATE TRIGGER AfterDeleteTrigger
ON TriggerDemo_Parent
AFTER DELETE
AS
INSERT INTO TriggerDemo_History VALUES ((SELECT TOP 1  deleted.ID FROM deleted), 'Delete')
GO
Finally, we will track also the UPDATE operation by creating a DML trigger that will be fired after performing an UPDATE operation on the parent table. Within this trigger, we will retrieve the last updated ID value from that parent table from the virtual inserted table, taking into consideration that the UPDATE process is performed by deleting the record and inserting a new record with the updated values, as in the CREATE TRIGGER T-SQL statement below:
CREATE TRIGGER AfterUPDATETrigger
ON TriggerDemo_Parent
AFTER UPDATE
AS
INSERT INTO TriggerDemo_History VALUES ((SELECT TOP 1  inserted.ID FROM inserted), 'UPDATE')
GO
The tables and the triggers are ready now for our testing. If you try to insert a new record into the parent table using the INSERT INTO T-SQL statement below:
INSERT INTO TriggerDemo_Parent VALUES ('AAA','BBB',500)
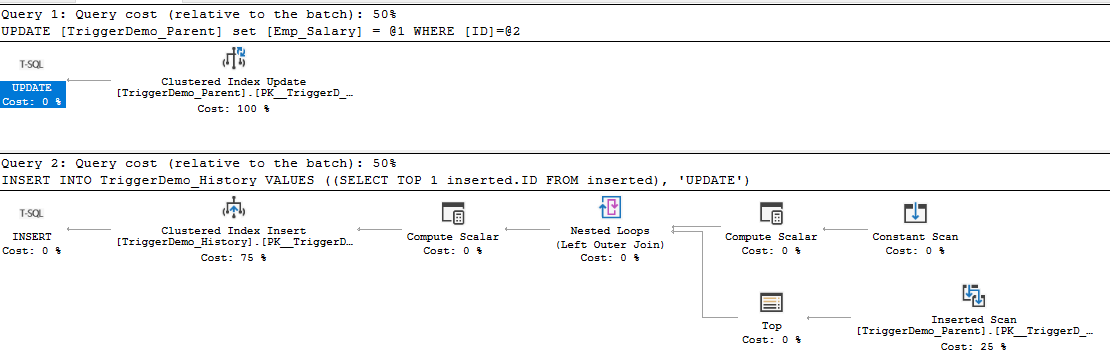
Then by checking the execution plan generated by executing the previous INSERT statement, you will see that two insert operations will be performed, affecting two tables; the parent table with the values specified in the INSERT statement and the history table due to firing the AFTER INSERT trigger, as shown in the execution plan below:

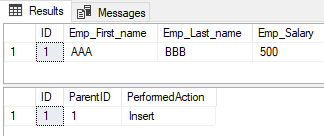
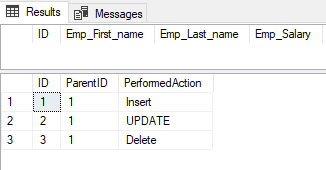
It is also clear when you check the data inserted into both the parent and history tables using the SELECT statements below:
SELECT * FROM TriggerDemo_Parent
GO
SELECT * FROM TriggerDemo_History
Where the values specified in the INSERT statement will be inserted into the parent table, and the insert log that contains the ID of the inserted record and the operation performed will be inserted into the history table, as shown in the result below:
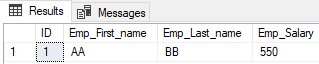
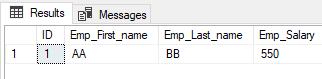
Now, if you try to update an existing record in the parent table using the UPDATE T-SQL statement below:
UPDATE TriggerDemo_Parent SET Emp_Salary=550 WHERE ID=1
And check the execution plan generated by executing the previous UPDATE statement, you will see that the update operation will be followed by an insert operation affecting two different tables; the parent table will be updated with the value specified in the UPDATE statement and the insert operation into the history table due to firing the AFTER UPDATE trigger, as shown in the execution plan below:
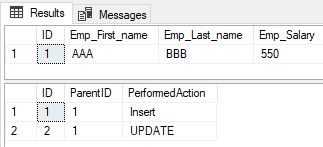
Checking both the parent and the history table records using the SELECT statements below:
SELECT * FROM TriggerDemo_Parent
GO
SELECT * FROM TriggerDemo_History
You will see that the update statement will modify the Emp_Salary value in the parent table with the value specified in the UPDATE statement, and the update log that contains the ID of the updated record and the operation performed will be inserted into the history table, as shown in the result below:
In the last scenario of the AFTER DML trigger, we will track the deletion of an existing record from the parent table using the DELETE T-SQL statement below:
DELETE FROM TriggerDemo_Parent WHERE ID=1
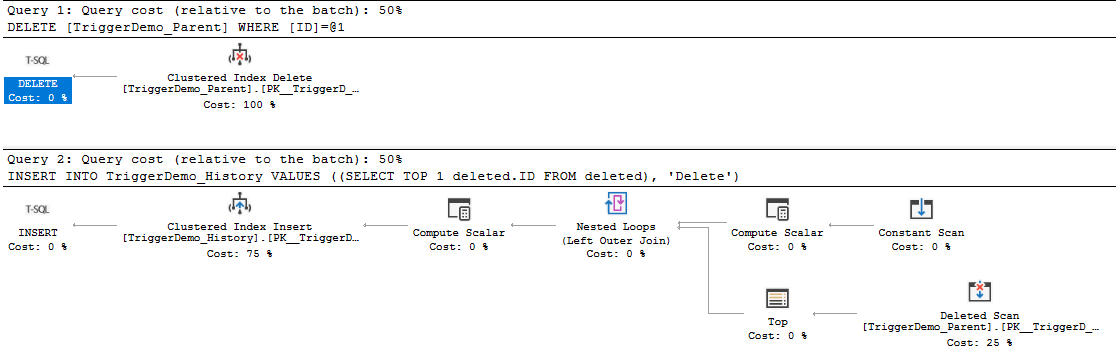
Then check the execution plan generated by executing the previous DELETE statement, you will see that the DELETE operation will be followed by the insert operation, affecting two different tables; the parent table from which the record with the provided ID in the WHERE clause of the DELETE statement will be deleted and the insert operation into the history table due to firing the AFTER DELETE trigger, as shown in the execution plan below:
If you check both the parent and the history table records using the SELECT statements below:
SELECT * FROM TriggerDemo_Parent
GO
SELECT * FROM TriggerDemo_History
You will see that the record with the ID value equal to 1 was deleted from the parent table that is provided in the DELETE statement, and the delete log that contains the ID of the deleted record and the operation performed will be inserted into the history table, as shown in the result below:
INSTEAD OF… DML Trigger
The second type of DML triggers is the INSTEAD OF DML trigger. As mentioned previously, the INSTEAD OF trigger will override the statement of the action that fires the trigger with the statement provided in the trigger. Assume that we need to log the DML actions that users are trying to perform on a specific table, without allowing them to perform that action. The CREATE TABLE T-SQL statements below can be used to create both the source and alternative tables:
CREATE TABLE TriggerDemo_NewParent
(
   ID INT IDENTITY (1,1) PRIMARY KEY,
   Emp_First_name VARCHAR (50),
   Emp_Last_name VARCHAR (50),
   Emp_Salary INT
  )
GO


CREATE TABLE TriggerDemo_InsteadParent
(
   ID INT IDENTITY (1,1) PRIMARY KEY,
   ParentID INT,
   PerformedAction VARCHAR (50),
  )
GO
After creating the two tables, we will insert a single record into the source table for our demo using the INSERT INTO statement below:
INSERT INTO TriggerDemo_NewParent VALUES ('AA','BB', 500)
For this demo, we will create three triggers to override the INSERT, UPDATE, and DELETE operations. The first trigger will be used to prevent any insert operation on the parent table and the log that change into the alternative table. The trigger is created using the CREATE TRIGGER T-SQL statement below:
CREATE TRIGGER InsteadOfInsertTrigger
ON TriggerDemo_NewParent
INSTEAD OF INSERT
AS
INSERT INTO TriggerDemo_InsteadParent VALUES ((SELECT TOP 1  inserted.ID FROM inserted), 'Trying to Insert new ID')
GO
The second trigger is used to prevent any update operation on the parent table and the log that change into the alternative table. This trigger is created as below:
CREATE TRIGGER InsteadOfUpdateTrigger
ON TriggerDemo_NewParent
INSTEAD OF UPDATE
AS
INSERT INTO TriggerDemo_InsteadParent VALUES ((SELECT TOP 1  inserted.ID FROM inserted), 'Trying to Update an existing ID')
GO
The last trigger will be used to prevent any delete operation on the parent table and the log that change into the alternative table. This trigger is created as follows:
CREATE TRIGGER InsteadOfDeleteTrigger
ON TriggerDemo_NewParent
INSTEAD OF DELETE
AS
INSERT INTO TriggerDemo_InsteadParent VALUES ((SELECT TOP 1  inserted.ID FROM inserted), 'Trying to Delete an existing ID')
GO
The two tables and the three triggers are ready now. If you try to insert a new value into the parent table using the INSERT INTO T-SQL statement below:
INSERT INTO TriggerDemo_NewParent VALUES ('CCC','DDD',500)
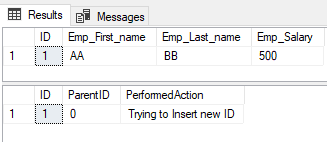
Then check both the parent and the alternative table records using the SELECT statements below:
SELECT * FROM TriggerDemo_NewParent
GO
SELECT * FROM TriggerDemo_InsteadParent
Due to the fact that we have the INSTEAD OF INSERT trigger in the parent table, you will see from the result that no new record is inserted into the parent table, and a log for the insert operation is inserted into the alternative table, as shown in the result below:
Trying to update an existing record in the parent table using the UPDATE T-SQL statement below:
UPDATE TriggerDemo_NewParent SET Emp_Salary=550 WHERE ID=1
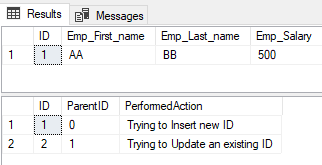
Then checking both the parent and the alternative table records using the SELECT statements below:
SELECT * FROM TriggerDemo_NewParent
GO
SELECT * FROM TriggerDemo_InsteadParent
You will see from the result that the Emp_Salary value of the record with the ID value equal to 1 from the parent table will not be changed, and the log for the update operation is inserted into the alternative table due to having the INSTEAD OF UPDATE trigger in the parent table, as shown in the result below:
Finally, if we try to delete an existing record from the parent table using the DELETE T-SQL statement below:
DELETE FROM TriggerDemo_NewParent WHERE ID=1
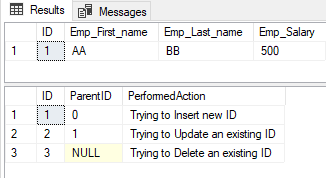
And check both the parent and the alternative table records using the SELECT statements below:
SELECT * FROM TriggerDemo_NewParent
GO
SELECT * FROM TriggerDemo_InsteadParent
It will be clear from the result that the record with the ID value equal to 1 from the parent table will not be deleted, and the log for the delete operation is inserted into the alternative table due to having the INSTEAD OF DELETE trigger in the parent table, as shown in the result below:
AFTER… DML Trigger with Messages
The AFTER trigger can be used also to raise a warning message for a user. In this case, the query will be an informational message that will not prevent executing the statement that fires that trigger. Let us drop the previously created INSTEAD OF UPDATE trigger and replace it with another AFTER UPDATE trigger that will raise a warning error after performing any update operation using the DROP/CREATE TRIGGER T-SQL statements below:
DROP TRIGGER InsteadOfUpdateTrigger
CREATE TRIGGER ReminderTrigger
ON TriggerDemo_NewParent
AFTER  UPDATE
AS RAISERROR ('An Update is performed on the TriggerDemo_NewParent table', 16, 10);
GO
If you try to update the Emp_Salary value of the employee with the ID value equal to 1 using the UDPATE statement below:
UPDATE TriggerDemo_NewParent SET Emp_Salary=550 WHERE ID=1
An error message will be raised in the Messages tab, that contains the message provided in the created trigger, as shown below:

Checking the parent table data using the SELECT statement below:
SELECT * FROM TriggerDemo_NewParent
You will see from the result that the Emp_Salary is updated successfully, as shown below:
If you need the AFTER UPDATE trigger to stop the update operation after raising the error message, the ROLLBACK statement can be added to the trigger in order to rollback the update operation that fired that trigger, recalling that the trigger and the statement that fires the trigger will be executed in the same transaction. This can be achieved using the ALTER TRIGGER T-SQL statement, see:
ALTER TRIGGER ReminderTrigger
ON TriggerDemo_NewParent
AFTER  UPDATE
AS RAISERROR ('An Update is performed on the TriggerDemo_NewParent table', 16, 10);
ROLLBACK
GO
If you try to update the Emp_Salary value of the employee with the ID equal to 1 using the UPDATE statement below:
UPDATE TriggerDemo_NewParent SET Emp_Salary=700 WHERE ID=1
Again, an error message will be displayed in the Messages tab, but this time, the update operation will be rolled back completely, as shown in the error messages below:

Checking the value from the source table using the SELECT statement below:
SELECT * FROM TriggerDemo_NewParent
You will see that the Emp_Salary value has not changed, as the AFTER UPDATE trigger rolled back the overall transaction after raising the error message, as shown in the table result below:
Trigger Disadvantages
With all the mentioned advantages of the SQL Server triggers, the triggers increase the complexity of the database. If the trigger is badly designed or overused, it will lead to major performance issues, such as blocked sessions, due to extending the life of the transaction for longer time, extra overhead on the system due to executing it each time an INSERT, UPDATE or DELETE action is performed or it may lead to data loss issues. Also, it is not easy to view and trace the database triggers, especially if there is no documentation about it as it is invisible to developers and the applications.
Trigger Alternatives … Enforce Integrity
If it is found that the triggers are harming the performance of your SQL Server instance, you have to replace them with other solutions. For example, rather than using the triggers to enforce the entity integrity, it should be enforced at the lowest level by using the PRIMARY KEY and UNIQUE constraints. The same is applied to the domain integrity that should be enforced through CHECK constraints, and the referential integrity that should be enforced through the FOREIGN KEY constraints. You can use the DML triggers only if the features supported by a specific constraint cannot meet your application requirements.
Let us compare between enforcing the domain integrity using DML triggers and using the CHECK constraints. Assume that we need to enforce inserting positive values only to the Emp_Salary column. We will start with creating a simple table using the CREATE TABLE T-SQL statement below:
CREATE TABLE EmployeeSalaryTrigger
(
   ID INT IDENTITY (1,1) PRIMARY KEY,
   Emp_First_name VARCHAR (50),
   Emp_Last_name VARCHAR (50),
   Emp_Salary INT
  )
GO
Then define the AFTER INSERT DML trigger that ensures that you insert a positive value to the Emp_Salary column by rolling back the transaction if a user inserts a negative salary value, using the CREATE TRIGGER T-SQL statement below:
CREATE TRIGGER TRGR_EmployeeSalary ON EmployeeSalaryTrigger
AFTER INSERT
AS
DECLARE @EmpSal AS INT
SET @EmpSal = (SELECT TOP 1 inserted.Emp_Salary FROM inserted)
IF @EmpSal<0
BEGIN
 RAISERROR  ('Cannot insert negative salary',16,10);
  ROLLBACK
END
For comparison purposes, we will create another simple table, with the same schema, and define a CHECK constraint within the CREATE TABLE statement to accept only positive values in the Emp_Salary column, as shown below:
CREATE TABLE EmployeeSalaryConstraint
(
   ID INT IDENTITY (1,1) PRIMARY KEY,
   Emp_First_name VARCHAR (50),
   Emp_Last_name VARCHAR (50),
   Emp_Salary INT CONSTRAINT EmpSal CHECK (Emp_Salary >=0)
  )
GO
If you try to insert the below record that contains negative Emp_Salary value into the first table that has a predefined trigger, using the INSERT INTO statement below:
INSERT INTO EmployeeSalaryTrigger VALUES('Ali', 'Fadi',-4)
GO
The INSERT statement will fail raising an error message showing that you can’t insert a negative value to the Emp_Salary column and rollback the overall transaction due to having an AFTER INSERT trigger, as shown in the error message below:

Also, if you try to insert the same record that contains a negative Emp_Salary value into the second table that has a predefined CHECK constraint using the INSERT INTO statement below:
INSERT INTO EmployeeSalaryConstraint VALUES ('Ali', 'Fadi',-4)
The INSERT statement will fail again showing that you are trying to insert the value that conflicts with the CHECK constraint condition, as shown in the error message below:

From the previous results, you see that both the trigger and the CHECK constraint methods achieve the goal by preventing you from inserting negative Emp_Salary values. But which one is better? Let us compare the performance of the two methods by checking the execution plan weight for each one. From the generated execution plans after executing the two queries, you will see that the trigger method weight is three times the CHECK constraint method weight, as shown in the execution plan comparison below:
Also, to compare the execution time consumed by each one, let us run each one 1000 times using the T-SQL statements below:
INSERT INTO EmployeeSalaryTrigger VALUES('Ali', 'Fadi',-4)
GO 10000
INSERT INTO EmployeeSalaryConstraint VALUES ('Ali', 'Fadi',-4)
GO 10000
You will see that the first method that is using the trigger will take about 31ms to be executed completely, where the second method that is using the CHECK constraint will take only 17ms, which is about 0.5 the time required in the method using the trigger. This is due to the fact that the trigger will extend the transaction life and will rollback the query that fires the trigger after executing it when an integrity violation is found, causing a performance degradation due to the rollback process. The case is different when using the CHECK constraint, where the constraint will do its job before doing any modification in the data, requiring no rollback in the case of violation.
Trigger Alternatives … Auditing
As we mentioned previously, the triggers can be also used to audit and track the changes performed on a specific table. If this auditing method causes a performance degradation in your SQL Server instance, you can easily replace it with the OUTPUT clause. The OUTPUT clause returns information about each row affected by the INSERT, UPDATE or DELETE operation, in the shape of a confirmation message or a value that can be inserted into the historical table. The OUTPUT clause method provides us also with more control on the executed code, as it will be added to the data insertion, modification or deletion statement itself whenever you want, opposite to the trigger that will be always executed.
Let us compare between logging the data insertion and modification into the history table using DML triggers and using the OUTPUT clause. We will start with creating the below production and history tables using the CREATE TABLE T-SQL statement below:
CREATE TABLE TriggerDemo_Prod
(
   ID INT IDENTITY (1,1) PRIMARY KEY,
   Emp_First_name VARCHAR (50),
   Emp_Last_name VARCHAR (50),
   Emp_Salary INT
  )
GO


CREATE TABLE TriggerDemo_ProdHistory
(
   ID INT IDENTITY (1,1) PRIMARY KEY,
   ProdID INT,
   ProdSalary INT,
   TS DATETIME,
  )
GO
Once both tables are created successfully, we will create the AFTER INSERT, UPDATE DML trigger that will write a record into the history table if any new row is inserted into the production table or an existing record is modified using the CREATE TRIGGER T-SQL statement below:
CREATE TRIGGER ProdHistory
ON TriggerDemo_Prod
AFTER INSERT, UPDATE
AS
INSERT INTO TriggerDemo_ProdHistory  VALUES ( (SELECT TOP 1  inserted.ID FROM inserted),(SELECT TOP 1  inserted.Emp_Salary FROM inserted), GETDATE())
GO
To compare logging the changes using the trigger method and the OUTPUT clause, we need to create two new simple tables, the production and the history tables, with the same schema as the previous two tables, but this time without defining a trigger, using the CREATE TABLE T-SQL statements below:
CREATE TABLE OutputDemo_Prod
(
   ID INT IDENTITY (1,1) PRIMARY KEY,
   Emp_First_name VARCHAR (50),
   Emp_Last_name VARCHAR (50),
   Emp_Salary INT
  )
GO


CREATE TABLE OutputDemo_ProdHistory
(
   ID INT IDENTITY (1,1) PRIMARY KEY,
   ProdID INT,
   ProdSalary INT,
   TS DATETIME,
  )

GO
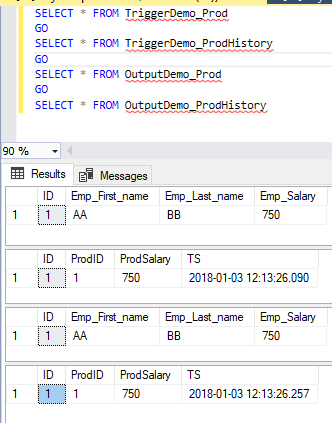
Now the four tables are ready for the testing. We will insert one record into the first production table that has a trigger using the INSERT INTO T-SQL statement below:
INSERT INTO TriggerDemo_Prod values('AA','BB', 750)
GO
Then we will insert the same record into the second production table using the OUTPUT clause. The below INSERT INTO statement will act as two insert statements; the first one will insert the same record into the production table and the second insert statement beside the OUTPUT clause will insert the insertion log into the history table:
INSERT INTO OutputDemo_Prod  OUTPUT inserted.ID, inserted.Emp_Salary, GETDATE()
INTO OutputDemo_ProdHistory	values('AA','BB', 750)
GO
Checking the data inserted into the four production and history tables, you will see that both methods, the trigger and OUTPUT methods, will write the same log into the history table successfully and in the same way, as shown in the result below:
From the generated execution plans after executing the two queries, you will see that the trigger method weight is about (21%+36%) 57% of the overall weight, where the OUTPUT method weight is about 43%, with a small weight difference, as shown in the execution plans comparison below:

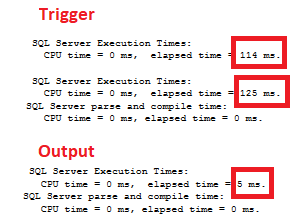
The performance difference is clear when comparing the execution time consumed by each method, where logging the changes using the trigger method will consume (114+125) 239ms to be executed completely, and the method that is using the OUTPUT clause method consumes only 5ms, which is 2% of the time used in the trigger method, as shown clearly from the Time Statistics below:
It is clear now from the previous result that using the OUTPUT method is better than using triggers for changes auditing.
Useful Links:
- CREATE TRIGGER (Transact-SQL) https://docs.microsoft.com/en-us/sql/t-sql/statements/create-trigger-transact-sql
- DML Triggers https://docs.microsoft.com/en-us/sql/relational-databases/triggers/dml-triggers
- DDL Triggers https://docs.microsoft.com/en-us/sql/relational-databases/triggers/ddl-triggers
- OUTPUT Clause (Transact-SQL) https://docs.microsoft.com/en-us/sql/t-sql/queries/output-clause-transact-sql