
Introduction
Sooner or later, any information system gets a database, often – more than one. With time, that database gathers very much data, from several GBs to dozens of TBs. To understand how the functionals will perform with the data volumes increasing, we need to generate the data to fill that database.

All scripts presented and implemented will execute on the JobEmplDB database of a recruiting service. The database realization is available here.
Approaches to the data filling in databases for testing and development
The database development and testing involve two primary approaches to filling in data:
- To copy the entire database from the production environment with personal and other sensitive data changed. This way, you ensure the data and erase confidential data.
- To generate synthetic data. It means generating the test data similar to the real data in look, properties, and interconnections.
The advantage of Approach 1 is that it approximates the data and their distribution by different criteria to the production database. It allows us to analyze everything precisely and, therefore, to make conclusions and prognosis accordingly.
However, this approach does not let you increase the database itself many times. It becomes problematic to predict changes in the entire information system’s functionality in the future.
On the other way, you can analyze impersonal sanitized data taken from the production database. Basing on them, you can define how to generate the test data that would be like the real data by their looks, properties, and interrelations. This way, Approach 1 produces Approach 2.
Now, let’s review in detail both the approaches to the data filling in databases for testing and development.
Data copying and altering in a production database
First, let’s define the general algorithm of copying and changing the data from the production environment.
The general algorithm
The general algorithm is as follows:
- Create a new empty database.
- Create a scheme in that newly created database – the same system as that from the production database.
- Copy the necessary data from the production database into the newly created database.
- Sanitize and change the secret data in the new database.
- Make a backup of the newly created database.
- Deliver and restore the backup in the necessary environment.
However, the algorithm becomes more complicated after step 5. For instance, step 6 requires a specific, protected environment for preliminary testing. That stage must ensure that all data are impersonal, and the secret data are changed.
After that stage, you can return to step 5 again for the tested database in the protected non-production environment. Then, you forward the tested backup to the necessary environments to restore it and use it for development and testing.
We’ve presented the general algorithm of the production database’s data copying and changing. Let’s describe how to implement it.
Realization of the general algorithm
A new empty database creation
You can make an empty database with the help of the CREATE DATABASE construction as here.
The database is named JobEmplDB_Test. It has three filegroups:
- PRIMARY – it is the primary filegroup by default. It defines two files: JobEmplDB_Test1(path D:\DBData\JobEmplDB_Test1.mdf), and JobEmplDB_Test2 (path D:\DBData\JobEmplDB_Test2.ndf). Each file’s initial size is 64 Mb, and the growth step is 8 Mb for each file.
- DBTableGroup – a custom filegroup that determine two files: JobEmplDB_TestTableGroup1 (path D:\DBData\JobEmplDB_TestTableGroup1.ndf) and JobEmplDB_TestTableGroup2 (path D:\DBData\JobEmplDB_TestTableGroup2.ndf). The initial size of each file is 8 Gb, and the growth step is 1 Gb for each file.
- DBIndexGroup – a custom filegroup that determines two files: JobEmplDB_TestIndexGroup1 (path D:\DBData\JobEmplDB_TestIndexGroup1.ndf), and JobEmplDB_TestIndexGroup2 (path D:\DBData\JobEmplDB_TestIndexGroup2.ndf). The initial size is 16 Gb for each file, and the growth step is 1 Gb for each file.
Also, this database includes one journal of transactions: JobEmplDB_Testlog, path E:\DBLog\JobEmplDB_Testlog.ldf. The initial size of the file is 8 Gb, and the growth step is 1 Gb.
Copying of the scheme and the necessary data from the production database into a newly created database
To copy the scheme and the necessary data from the production database into the new one, you can use several tools. First, it is the Visual Studio (SSDT). Or, you can use third-party utilities like:
- DbForge Schema Compare and DbForge Data Compare
- ApexSQL Diff and Apex Data Diff
- SQL Compare Tool and SQL Data Compare Tool
Making scripts for data changes
Essential requirements for the data changes’ scripts
1. It must be impossible to restore the real data using that script.
e.g., The lines’ inversion won’t suit, as it allows us to restore the real data. Usually, the method is to replace each character or byte by a pseudorandom character or byte. The same applies to the date and time.
2. The data changing must not alter the selectivity of their values.
It won’t work to assign NULL to the table’s field. Instead, you have to ensure that the same values in the real data would remain the same in the altered data. For instance, in real data, you have a value of 103785 found 12 times in the table. When you change this value in the altered data, the new value must remain 12 times in the same fields of the table.
3. The size and length of the values should not differ significantly in the altered data. E.g., you replace each byte or character with a pseudorandom byte or character. The initial string remains the same in size and length.
4. Interrelations in the data must not be broken after the changes. It relates to the external keys and all other cases where you refer to the altered data. Changed data must stay in the same relations as the real data were.
Data changes scripts implementation
Now, let’s review the particular case of the data changing to depersonalize and hide the secret information. The sample is the recruitment database.
The sample database includes the following personal data that you need to depersonalize:
- Last and first name;
- Date of birth;
- The ID-card issue date;
- The remote access certificate as the bytes sequence;
- The service fee for resume promotion.
First, we’ll check simple examples for each type of the altered data:
- Date and time change;
- Numerical value change;
- Changing the byte sequences;
- Character data change.
Date and time change
You can get a random date and time using the following script:
DECLARE @dt DATETIME;

SET @dt = CAST(CAST(@StartDate AS FLOAT) + (CAST(@FinishDate AS FLOAT) - CAST(@StartDate AS FLOAT)) * RAND(CHECKSUM(NEWID())) AS DATETIME);
Here, @StartDate and @FinishDate are the start and end values of the range. They correlate respectively for the pseudorandom date and time generation.
To generate these data, you use the system functions RAND, CHECKSUM, and NEWID.
UPDATE [dbo].[Employee]
SET [DocDate] = CAST(CAST(CAST(CAST([BirthDate] AS DATETIME) AS FLOAT) + (CAST(GETDATE() AS FLOAT) - CAST(CAST([BirthDate] AS DATETIME) AS FLOAT)) * RAND(CHECKSUM(NEWID())) AS DATETIME) AS DATE);
The [DocDate] field stands for the document issue date. We replace it with a pseudorandom date, keeping in mind the dates’ ranges and their limitations.
The “bottom” limit is the candidate’s date of birth. The “upper” edge is the current date. We don’t need the time here, so the time and date format transformation to the necessary date comes in the end. You can get pseudorandom values for any part of the date and time in the same way.
Numerical value change
You can get a random integer with the help of the following script:
DECLARE @Int INT;

SET @Int = CAST(((@MaxVal + 1) - @MinVal) *
    RAND(CHECKSUM(NEWID())) + @MinVal AS INT);
@MinVal и @MaxVal are the start and end range’s values for the pseudorandom number generation. We generate it using the system functions RAND, CHECKSUM, and NEWID.
UPDATE [dbo].[Employee]
SET [CountRequest] = CAST(((@MaxVal + 1) - @MinVal) *
    RAND(CHECKSUM(NEWID())) + @MinVal AS INT);
The [CountRequest] field stands for the number of requests that companies make for this candidate’s resume.
Similarly, you can get pseudorandom values for any numerical value. E.g., have a look at the random number of the decimal type (18,2) generation:
DECLARE @Dec DECIMAL(18,2);

SET @Dec=CAST(((@MaxVal + 1) - @MinVal) *
    RAND(CHECKSUM(NEWID())) + @MinVal AS DECIMAL(18,2));
Thus, you can update the resume promotion service fee in the following way:
UPDATE [dbo].[Employee]
SET [PaymentAmount] = CAST(((@MaxVal + 1) - @MinVal) *
    RAND(CHECKSUM(NEWID())) + @MinVal AS DECIMAL(18,2));
Changing the byte sequences
You can get a random byte sequence using the following script:
DECLARE @res VARBINARY(MAX);

SET @res = CRYPT_GEN_RANDOM(@Length, CAST(NEWID() AS VARBINARY(16)));
@Length stands for the sequence’s length. It defines the number of bytes returned. Here, @Length must not be larger than 16.
Generation is done with the help of the system functions CRYPT_GEN_RANDOM and NEWID.
E.g., you can update the remote access certificate for each candidate in the following way:
UPDATE [dbo].[Employee]
SET [RemoteAccessCertificate] = CRYPT_GEN_RANDOM(CAST(LEN([RemoteAccessCertificate]) AS INT), CAST(NEWID() AS VARBINARY(16)));
We generate a pseudorandom byte sequence of the same length present in the [RemoteAccessCertificate] field at the time of the change. We suppose that the byte sequence length does not exceed 16.
Similarly, we can create our function that will return pseudorandom byte sequences of any length. It will put the results of the system function CRYPT_GEN_RANDOM work together using the simple “+” addition operator. But 16 bytes are usually enough in practice.
Let’s make a sample function returning the pseudorandom byte sequence of the definite length, where it will be possible to set the length of more than 16 bytes. For this, make the following presentation:
CREATE VIEW [test].[GetNewID]
AS
SELECT NEWID() AS [NewID];
GO
We need it to evade the limitation forbidding us to use NEWID within the function.
In the same way, create the next presentation for the same purpose:
CREATE VIEW [test].[GetRand]
AS
SELECT RAND(CHECKSUM((SELECT TOP(1) [NewID] FROM [test].[GetNewID]))) AS [Value];
GO
Create one more presentation:
CREATE VIEW [test].[GetRandVarbinary16]
AS
SELECT CRYPT_GEN_RANDOM(16, CAST((SELECT TOP(1) [NewID] FROM [test].[GetNewID]) AS VARBINARY(16))) AS [Value];
GO
All three functions’ definitions are here. And here is the implementation of the function that returns a pseudorandom byte sequence of the definite length.
First, we define if the necessary function is present. If not – we create a stud first. In any case, the code involves changing the function’s definition appropriately. In the end, we add the function’s description via the extended properties. More details on the database’s documentation are in this article.
To update the remote access certificate for each candidate, you can do as follows:
UPDATE [dbo].[Employee]
SET [RemoteAccessCertificate] = [test].[GetRandVarbinary](CAST(LEN([RemoteAccessCertificate]) AS INT));
As you see, there are no limitations to the byte sequence length here.
Data Changing – Character Data Change
Here, we take an example for the English and Russian alphabets, but you can do it for any other alphabet. The only condition is that its characters must be present in the NCHAR types.
We need to create a function that accepts the line, replaces every character with a pseudorandom character, and then puts the result together and returns it.
However, we need first to understand which characters we need. For that, we can execute the following script:
DECLARE @tbl TABLE ([ValueInt] INT, [ValueNChar] NCHAR(1), [ValueChar] CHAR(1));

DECLARE @ind int=0;
DECLARE @count INT=65535;

WHILE(@count>=0)
BEGIN
	INSERT INTO @tbl ([ValueInt], [ValueNChar], [ValueChar])
	SELECT @ind, NCHAR(@ind), CHAR(@ind)

	SET @ind+=1;
	SET @count-=1;
END

SELECT *
INTO [test].[TblCharactersCode]
FROM @tbl;
We are making the [test].[TblCharacterCode] table that includes the following fields:
- ValueInt – the numerical value of the character;
- ValueNChar – the NCHAR-type character;
- ValueChar – the CHAR-type character.
Let’s review the contents of this table. We need the following request:
SELECT [ValueInt]
      ,[ValueNChar]
      ,[ValueChar]
  FROM [test].[TblCharactersCode];
The numbers are in the range of 48 to 57:
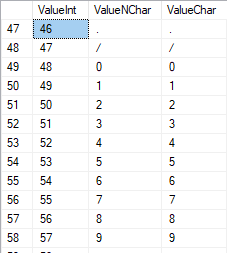
The Latin characters in the uppercase are in the range of 65 to 90:
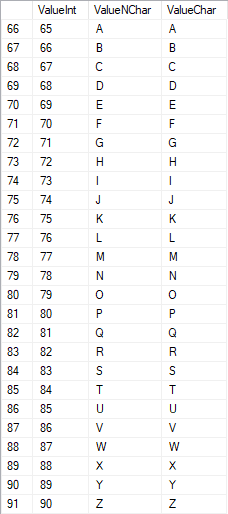
Latin characters in the lower care are in the range of 97 to 122:
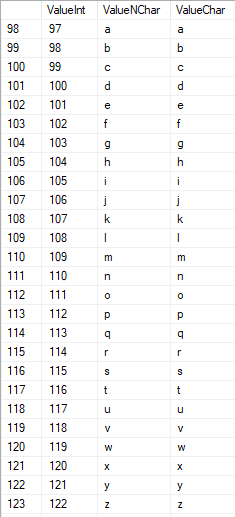
Russian characters in the uppercase are in the range of 1040 to 1071:

Russian characters in the lower case are in the range of 1072 to 1103:


And, characters in the range of 58 to 64:

We select the necessary characters and put them into the [test].[SelectCharactersCode] table in the following way:
SELECT
	[ValueInt]
   ,[ValueNChar]
   ,[ValueChar]
   ,CASE
		WHEN ([ValueInt] BETWEEN 48 AND 57) THEN 1
		ELSE 0
	END AS [IsNumeral]
   ,CASE
		WHEN (([ValueInt] BETWEEN 65 AND 90) OR
			([ValueInt] BETWEEN 1040 AND 1071)) THEN 1
		ELSE 0
	END AS [IsUpperCase]
   ,CASE
		WHEN (([ValueInt] BETWEEN 65 AND 90) OR
			([ValueInt] BETWEEN 97 AND 122)) THEN 1
		ELSE 0
	END AS [IsLatin]
   ,CASE
		WHEN (([ValueInt] BETWEEN 1040 AND 1071) OR
			([ValueInt] BETWEEN 1072 AND 1103)) THEN 1
		ELSE 0
	END AS [IsRus]
   ,CASE
		WHEN (([ValueInt] BETWEEN 33 AND 47) OR
			([ValueInt] BETWEEN 58 AND 64)) THEN 1
		ELSE 0
	END AS [IsExtra]
INTO [test].[SelectCharactersCode]
FROM [test].[TblCharactersCode]
WHERE ([ValueInt] BETWEEN 48 AND 57)
OR ([ValueInt] BETWEEN 65 AND 90)
OR ([ValueInt] BETWEEN 97 AND 122)
OR ([ValueInt] BETWEEN 1040 AND 1071)
OR ([ValueInt] BETWEEN 1072 AND 1103)
OR ([ValueInt] BETWEEN 33 AND 47)
OR ([ValueInt] BETWEEN 58 AND 64);
Now, let’s examine the contents of this table using the following script:
SELECT [ValueInt]
      ,[ValueNChar]
      ,[ValueChar]
      ,[IsNumeral]
      ,[IsUpperCase]
      ,[IsLatin]
      ,[IsRus]
      ,[IsExtra]
  FROM [test].[SelectCharactersCode];
We receive the following result:

This way, we have the [test].[SelectCharactersCode] table, where:
- ValueInt – the numerical value of the character
- ValueNChar – the NCHAR-type character
- ValueChar – the CHAR-type character
- IsNumeral – the criterion of a character being a digit
- IsUpperCase – the criterion of a character in the uppercase
- IsLatin – the criterion of a character being a Latin character;
- IsRus – the criterion of a character being a Russian character
- IsExtra – the criterion of a character being an additional character
Now, we can get the code for the necessary characters’ insertion. For instance, this is how to do it for the Latin characters in the lower case:
SELECT 'SELECT '+CAST([ValueInt] AS NVARCHAR(255))+' AS [ValueInt], '+''''+[ValueNChar]+''''+' AS [ValueNChar], '+''''+[ValueChar]+''''+' AS [ValueChar] UNION ALL'
  FROM [test].[SelectCharactersCode]
  WHERE [IsUpperCase]=0
    AND [IsLatin]=1;
We receive the following result:

It is the same for the Russian characters in the lower case:
SELECT 'SELECT '+CAST([ValueInt] AS NVARCHAR(255))+' AS [ValueInt], '+''''+[ValueNChar]+''''+' AS [ValueNChar], '+COALESCE(''''+[ValueChar]+'''', 'NULL')+' AS [ValueChar] UNION ALL'
  FROM [test].[SelectCharactersCode]
  WHERE [IsUpperCase]=0
    AND [IsRus]=1;
We get the following result:

It is the same for the characters:
SELECT 'SELECT '+CAST([ValueInt] AS NVARCHAR(255))+' AS [ValueInt], '+''''+[ValueNChar]+''''+' AS [ValueNChar], '+''''+[ValueChar]+''''+' AS [ValueChar] UNION ALL'
  FROM [test].[SelectCharactersCode]
  WHERE [IsNumeral]=1;
The result is as follows:

So, we have codes to insert the following data separately:
- The Latin characters in the lower case.
- The Russian characters in the lower case.
- The digits.
It works for both the NCHAR and CHAR types.
Similarly, we can prepare an insertion script for any set of characters. Besides, each set will get its own tabulation function.
To be simple, we implement the common tabulation function that will return the necessary dataset for the previously selected data in the following way:
SELECT
	'SELECT ' + CAST([ValueInt] AS NVARCHAR(255)) + ' AS [ValueInt], '
	+ '''' + [ValueNChar] + '''' + ' AS [ValueNChar], '
	+ COALESCE('''' + [ValueChar] + '''', ‘NULL’) + ' AS [ValueChar], '
	+ CAST([IsNumeral] AS NCHAR(1)) + ' AS [IsNumeral], ' +
	+CAST([IsUpperCase] AS NCHAR(1)) + ' AS [IsUpperCase], ' +
	+CAST([IsLatin] AS NCHAR(1)) + ' AS [IsLatin], ' +
	+CAST([IsRus] AS NCHAR(1)) + ' AS [IsRus], ' +
	+CAST([IsExtra] AS NCHAR(1)) + ' AS [IsExtra]' +
	+' UNION ALL'
FROM [test].[SelectCharactersCode];
The final result is as follows:

The ready script is wrapped up in the tabulation function [test].[GetSelectCharacters].
It is important to remove an extra UNION ALL in the end of the script generated, and in the [ValueInt]=39, we need to change ”’ to ””:
SELECT 39 AS [ValueInt], '''' AS [ValueNChar], '''' AS [ValueChar], 0 AS [IsNumeral], 0 AS [IsUpperCase], 0 AS [IsLatin], 0 AS [IsRus], 1 AS [IsExtra] UNION ALLThis tabulation function returns the following set of fields:
- Num – the line number in the returned set of data;
- ValueInt – the numerical value of the character;
- ValueNChar – the NCHAR-type character;
- ValueChar – the CHAR-type character;
- IsNumeral – the criterion of the character being a digit;
- IsUpperCase – the criterion defining that the character is in the uppercase;
- IsLatin – the criterion defining that the character is a Latin character;
- IsRus – the criterion defining that the character is a Russian character;
- IsExtra – the criterion defining that the character is an extra one.
For the input, you have the following parameters:
- @IsNumeral – if it should return the numbers;
- @IsUpperCase:
- 0 – it must return only the lower case for letters;
- 1 – it must return only the uppercase letters;
- NULL – it must return letters in all cases.
- @IsLatin – it must return the Latin characters
- @IsRus – it must return the Russian characters
- @IsExtra – it must return additional characters.
All flags are used according to the logical OR. E.g., if you need to have digits and Latin characters in the lower case returned, you call the tabulation function in the following way:
We get the following result:
declare
@IsNumeral BIT=1
   ,@IsUpperCase BIT=0
   ,@IsLatin BIT=1
   ,@IsRus BIT=0
   ,@IsExtra BIT=0;

SELECT *
FROM [test].[GetSelectCharacters](@IsNumeral, @IsUpperCase, @IsLatin, @IsRus, @IsExtra);
We get the following result:

We implement the [test].[GetRandString] function that will replace the line with pseudorandom characters, keeping the initial string length. This function must include the possibility of operating those characters only that are digits. E.g., it can be useful when you alter the ID-card’s series and number.
When we implement the [test].[GetRandString] function, we first get the set of characters necessary to generate a pseudorandom line of the specified length in the input parameter @Length. The rest of the parameters work as described above.
Then, we put the received set of data into the tabulation variable @tbl. This table saves the fields [ID] – the order number in the resulting table of characters, and [Value] – the character’s presentation in the NCHAR type.
After that, in a cycle, it generates a pseudorandom number in the range of 1 to the cardinality of the @tbl characters received earlier. We put this number into the [ID] of the tabulation variable @tbl for search. When the search returns the line, we take the [Value] character and “glue” it to the resulting line @res.
When the cycle’s work ends, the line received gets back via the @res variable.
You can change both the first and last names of the candidate in the following way:
UPDATE [dbo].[Employee]
SET [FirstName] = [test].[GetRandString](LEN([FirstName])),
        [LastName] = [test].[GetRandString](LEN([LastName]));
Thus, we’ve examined the function’s implementation and its usage for the NCHAR and NVARCHAR types. We can do the same easily for the CHAR and VARCHAR types.
Sometimes, however, we need to generate a line according to the characters set, not the alphabetical characters or numbers. In this way, we first need to use the following multi-operator function [test].[GetListCharacters].
The [test].[GetListCharacters] function gets the two following parameters for the input:
- @str – the line of characters itself;
- @IsGroupUnique – it defines if it needs to group unique characters in the line.
With the recursive CTE, the input line @str is transformed into the table of characters – @ListCharacters. That table contains the following fields:
- ID – the order number of the line in the resulting table of characters;
- Character – the presentation of the character in NCHAR(1)
- Count – the number of the character’s repetitions in the line (it is always 1 if the parameter @IsGroupUnique=0)
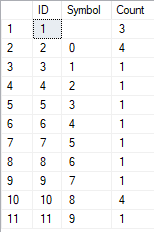
Let’s take two examples of this function’s usage to understand its work better:
- Transformation of the line into the list of non-unique characters:
SELECT *
FROM [test].[GetListCharacters]('123456888  789 0000', 0);
We get the result:

This example shows that the line is transformed into the list of characters “as is,” without grouping it by the characters’ uniqueness (the [Count] field always contains 1).
- The transformation of the line into the list of unique characters
SELECT *
FROM [test].[GetListCharacters]('123456888  789 0000', 1);
The result is as follows:
This example shows that the line is transformed into the list of characters grouped by their uniqueness. The [Count] field displays the number of findings of each character in the input line.
Basing on the multi-operator function [test].[GetListCharacters], we create a scalar function [test].[GetRandString2].
The definition of the new scalar function shows its alikeness to the [test].[GetRandString] scalar function. The only difference is that it uses the [test].[GetListCharacters] multi-operator function instead of the [test].[GetSelectCharacters] tabulation function.
Here, let’s review two examples of the implemented scalar function usage:
We generate a pseudorandom line of 12 characters length from the input line of characters not grouped by uniqueness:
SELECT [test].[GetRandString2](12, '123456789!!!!!!!!0!!!', DEFAULT);The result is:
64017!!5!!!7
The keyword is DEFAULT. It states that the default value sets the parameter. Here, it is zero (0).
Or
We generate a pseudorandom line in 12 characters length from the input line of characters grouped by uniqueness:
SELECT [test].[GetRandString2](12, '123456789!!!!!!!!0!!!', 1);The result is:
35792!428273
Implementation of the general script for data sanitization and the secret data changes
We’ve examined simple examples for each type of altered data:
- Changing the date and time;
- Changing the numerical value;
- Changing the byte sequence;
- Changing the characters’ data.
However, these examples don’t meet the criteria 2 and 3 for the data altering scripts:
- Criterion 2: the selectivity of values won’t change significantly in the altered data. You can’t use NULL for the table’s field. Instead, you have to ensure that the same real data values stay the same in the altered data. E.g., if the real data contain the 103785 value 12 times in a table’s field subject to changes, the modified data must include a different (changed) value found 12 times in the same field of the table.
- Criterion 3: the length and size of values should not be changed significantly in the altered data. E.g., you replace each character/byte with a pseudorandom character/byte.
Thus, we need to create a script taking the values’ selectivity in the table’s fields into consideration.
Let’s have a look at our database for the recruiting service. As we see, personal data are present in the candidates’ table only [dbo].[Employee].
Assume that the table includes the following fields:
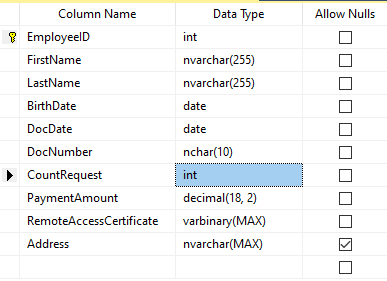
Descriptions:
- FirstName – name, line NVARCHAR(255)
- LastName – last name, line NVARCHAR(255)
- BirthDate – date of birth, DATE
- DocNumber – the ID-card number with two digits at the beginning for the passport series, and the next seven digits are the document’s number. Between them, we have a hyphen as the NCHAR(10) line.
- DocDate – the issue date of the ID-card, DATE
- CountRequest – the number of requests for that candidate during the searching for resume, the integer INT
- PaymentAmount – the resume promotion service fee received, the decimal number (18,2)
- RemoteAccessCertificate – the remote access certificate, byte sequence VARBINARY
- Address – the residential address or the registration address, line NVARCHAR(MAX)
Then, to keep the initial selectivity, we need to implement the following algorithm:
- Extract all unique values for each field and keep the results in temporary tables or tabulation variables;
- Generate a pseudorandom value for each unique value. This pseudorandom value must not differ significantly in length and size from the original value. Save the result in the same place where we saved the point 1 results. Each newly generated value must have a unique current value correlated.
- Replace all values in the table with new values from point 2.
In the beginning, we depersonalize the first and last names of candidates. We assume that the last and first names are always present, and they are no less than two characters long in each field.
First, we select unique names. Then, it generates a pseudorandom line for each name. The name’s length remains the same; the first character is in the uppercase, and the other characters are in the lower case. We use the previously created [test].[GetRandString] scalar function to generate a pseudorandom line of the specific length according to the characters’ criteria defined.
Then, we update the names in the candidates’ table according to their unique values. It is the same for the last names.
We depersonalize the DocNumber field. It is the ID-card (passport) number. The first two characters stand for the document’s series, and the last seven digits are the number of the document. The hyphen is between them. Then we perform the sanitization operation.
We collect all unique documents’ numbers and generate a pseudorandom line for each one. The line’s format is ‘XX-XXXXXXX,’ where X is the digit in the range of 0 to 9. Here, we use the previously created [test].[GetRandString] scalar function to generate a pseudorandom line of the specified length according to the characters’ parameters set.
After that, the [DocNumber] field is updated in the candidates’ table [dbo].[Employee].
We depersonalize the DocDate field (the ID-card issue date) and the BirthDate field (the candidate’s date of birth).
First, we select all the unique pairs made of “date of birth & date of the ID-card issue.” For each such pair, we create a pseudorandom date for the date of birth. The pseudorandom date of the ID-card issue is made according to that “date of birth” – the date of the document’s issue must not be earlier than the date of birth.
After that, these data are updated in the respective fields of the candidates’ table [dbo].[Employee].
And, we update the remaining fields of the table.
The CountRequest value stands for the number of requests made for that candidate by companies during the resume search.
The PaymentAmount is the final amount of the resume promotion service fee paid. We calculate these numbers similarly to the previous fields.
Note that it generates a pseudorandom integer for the first case and a pseudorandom decimal for the second case. In both cases, the pseudorandom number generation occurs in the range of “two times less than original” to “two times more than original.” The selectivity of values in the fields is not changed too much.
After that, it writes the values into the fields of the candidates’ table [dbo].[Employee].
Further, we collect unique values of the RemoteAccessCertificate field for the remote access certificate. We generate a pseudorandom byte sequence for each such value. The length of the sequence must be the same as the original. Here, we use the previously created [test].[GetRandVarbinary] scalar function to generate the pseudorandom byte sequence of the specified length.
Then recording into the respective field [RemoteAccessCertificate] of the [dbo].[Employee] candidates’ table takes place.
The last step is the collection of the unique addresses from the [Address] field. For each value, we generate a pseudorandom line of the same length as the original. Note that if it was NULL originally, it must be NULL in the generated field. It allows you to keep NULL and don’t replace it with an empty line. It minimizes the selectivity values’ mismatch in this field between the production database and the altered data.
We use the previously created [test].[GetRandString] scalar function to generate the pseudorandom line of the specified length according to the characters’ parameters defined.
It then records the data into the respective [Address] field of the candidates’ table [dbo].[Employee].
This way, we get the full script for depersonalization and altering of the confidential data.
Finally, we get the database with altered personal and confidential data. The algorithms we used make it impossible to restore the original data from the altered data. Also, the values’ selectivity, length, and size aren’t changed significantly. So, the three criteria for the personal and secret data altering scripts are ensured.
We won’t review the criterion 4 separately here. Our database contains all the data subject to change in one candidates’ table [dbo].[Employee]. The data conformity is needed within this table only. Thus, criterion 4 is also here. However, we need to remember this criterion 4 claiming that all interrelations must remain the same in the altered data.
We often see other conditions for personal and confidential data altering algorithms, but we won’t review them here. Besides, the four criteria described above are always present. In many cases, it is enough to estimate the functionality of the algorithm suitable to use it.
Now, we need to make a backup of the created database, check it by restoring on another instance, and transfer that copy into the necessary environment for development and testing. For this, we examine the full database backup creation.
Full database backup creation
We can make a database backup with construction BACKUP DATABASE as in our example.
Make a compressed full backup of the database JobEmplDB_Test. The checksum calculation takes place in the file E:\Backup\JobEmplDB_Test.bak. Further, we check the backup created.
Then, we check the backup created by restoring the database for it. Let’s examine the database restoring.
Restoring the database
You can restore the database with the help of RESTORE DATABASE construction in the following way:
USE [master]
RESTORE DATABASE [JobEmplDB_Test]
FROM  DISK = N'E:\Backup\JobEmplDB_Test.bak' WITH  FILE = 1,
MOVE N'JobEmplDB' TO N'E:\DBData\JobEmplDB.mdf',
MOVE N'JobEmplDB_log' TO N'F:\DBLog\JobEmplDB_log.ldf',
NOUNLOAD,
REPLACE,
STATS = 5;
GO
We restore the JobEmplDB_Test database of the E:\Backup\JobEmplDB_Test.bak backup. The files will be overwritten, and the data file will be transferred into the file E:\DBData\JobEmplDB.mdf, while the transactions log file will be moved into F:\DBLog\JobEmplDB_log.ldf.
After we successfully check how the database is restored from the backup, we forward the backup to the development and testing environments. It will be restored again with the same method as described above.
We’ve examined the first approach to the data populating into the database for testing and development. This approach implies copying and altering the data from the production database. Now, we’ll examine the second approach – the synthetic data generation.
Synthetic data generation
The General algorithm for the synthetic data generation is following:
- Make a new empty database or clear a previously created database by purging all data.
- Create or renew a scheme in the newly created database – the same as that of the production databases.
- Copy of renew guidelines and regulations from the production database and transfer them into the new database.
- Generate synthetic data into the necessary tables of the new database.
- Make a backup of a new database.
- Deliver and restore the new backup in the necessary environment.
We already have the JobEmplDB_Test database to practice, and we have reviewed the means of creating a schema in the new database. Let’s focus on the tasks that are specific to this approach.
Clean up the database with the data purge
To clear the database off all its data, we need to do the following:
- Keep the definitions of all external keys.
- Disable all limitations and triggers.
- Delete all external keys.
- Clear the tables using the TRUNCATE construction.
- Restore all the external keys deleted in point 3.
- Enable all the limitations disabled in point 2.
You can save the definitions of all external keys with the following script:
1. The external keys’ definitions are saved in the tabulation variable @tbl_create_FK
2. You can disable the limitations and triggers with the following script:
EXEC sp_MSforeachtable "ALTER TABLE ? NOCHECK CONSTRAINT ALL";
EXEC sp_MSforeachtable "ALTER TABLE ? DISABLE TRIGGER ALL";
To enable the limitations and triggers, you can use the following script:
EXEC sp_MSforeachtable "ALTER TABLE ? WITH CHECK CHECK CONSTRAINT ALL";
EXEC sp_MSforeachtable "ALTER TABLE ? ENABLE TRIGGER ALL";
Here, we use the saved procedure sp_MSforeachtable that applies the construction to all the database’s tables.
3. To delete external keys, use the special script. Here, we receive the information about the external keys through the INFORMATION_SCHEMA.TABLE_CONSTRAINTS system presentation. We delete external keys through the cursor, one by one, using the formed dynamic script T-SQL, transferring the request into the system saved procedure sp_executesql.
4. To clear the tables with the TRUNCATE construction, use the dedicated script. The script works in the same way as above, but it receives the data for tables, and then it clears the tables one by one through the cursor, using the TRUNCATE construction.
5. Restoring the external keys is possible with the below script (earlier, we saved the external keys’ definitions in the tabulation variable @tbl_create_FK):
DECLARE @tsql NVARCHAR(4000);

DECLARE FK_Create CURSOR LOCAL FOR SELECT
	[Script]
FROM @tbl_create_FK;

OPEN FK_Create;

FETCH NEXT FROM FK_Create INTO @tsql;

WHILE (@@fetch_status = 0)
BEGIN
	EXEC sp_executesql @tsql = @tsql;
	FETCH NEXT FROM FK_Create INTO @tsql;
END

CLOSE FK_Create;
DEALLOCATE FK_Create;
The script works in the same way as the two other scripts we mentioned above. But it restores the external keys’ definitions through the cursor, one for each iteration.
A particular case of data purging in the database is the current script. To get this output, we need the below construction in the scripts:
EXEC sp_executesql @tsql = @tsql;Before this construction, or instead of it, we need to write the generated construction output. It is necessary to call it manually or via the dynamic T-SQL query. We do it via the system saved procedure sp_executesql.
Instead of the below code fragment in all cases:
WHILE (@@fetch_status = 0)
BEGIN
	EXEC sp_executesql @tsql = @tsql;
...

We write:

WHILE (@@fetch_status = 0)
BEGIN
	PRINT @tsql;

	EXEC sp_executesql @tsql = @tsql;
...
Or:
WHILE (@@fetch_status = 0)
BEGIN
	PRINT @tsql;
...
The first case implies both the output of constructions and their execution. The second case if for the output only – it is helpful for the scripts’ debugging.
Thus, we get the general database cleaning script.
Copy guidelines and references from the production database to the new one
Here you can use the T-SQL scripts. Our example database of the recruitment service includes 5 guidelines:
- [dbo].[Company] – companies
- [dbo].[Skill] – skills
- [dbo].[Position] – positions (occupation)
- [dbo].[Project] – projects
- [dbo].[ProjectSkill] – project and skills’ correlations
The “skills” table [dbo].[Skill] serves to show how to make a script for the data insertion from the production database into the test database.
We form the following script:
SELECT 'SELECT '+CAST([SkillID] AS NVARCHAR(255))+' AS [SkillID], '+''''+[SkillName]+''''+' AS [SkillName] UNION ALL'
  FROM [dbo].[Skill]
ORDER BY [SkillID];
We execute it in a copy of the production database that is usually available in read-only mode. It is a replica of the production database.
The result is:
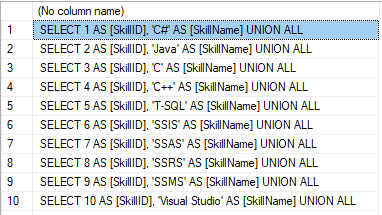
Now, wrap the result up into the script for the data adding as here. We have a script for the skills’ guideline compilation. The scripts for other guidelines are made in the same way.
However, it is much easier to copy the guidelines’ data through the data export and import in SSMS. Or, you can use the data import and export wizard.
Generate synthetic data
We’ve determined the pseudorandom values’ generation for lines, numbers, and byte sequences. It took place when we examined the implementation of the data sanitization and the confidential data altering algorithms for approach 1. Those implemented functions and scripts are also used for the synthetic data generation.
The recruitment service database requires us to fill the synthetic data in two tables only:
- [dbo].[Employee] – candidates
- [dbo].[JobHistory] – a candidate’s work history (experience), the resume itself
We can fill the candidates’ table [dbo].[Employee] with synthetic data using this script.
At the beginning of the script, we set the following parameters:
- @count – the number of lines to be generated
- @LengthFirstName – the name’s length
- @LengthLastName – the last name’s length
- @StartBirthDate – the lower limit of the date for the date of birth
- @FinishBirthDate – the upper limit of the date for the date of birth
- @StartCountRequest – the lower limit for the field [CountRequest]
- @FinishCountRequest – the upper limit for the field [CountRequest]
- @StartPaymentAmount – the lower limit for the field [PaymentAmount]
- @FinishPaymentAmount – the upper limit for the field [PaymentAmount]
- @LengthRemoteAccessCertificate – the byte sequence’s length for the certificate
- @LengthAddress – the length for the field [Address]
- @count_get_unique_DocNumber – the number of attempts to generate the unique document’s number [DocNumber]
The script complies with the uniqueness of the [DocNumber] field’s value.
Now, let’s fill the [dbo].[JobHistory] table with synthetic data as follows.
The start date of work [StartDate] is later than the issuing date of the candidate’s document [DocDate]. The end date of work [FinishDate] is later than the start date of work [StartDate].
It is important to note that the current script is simplified, as it does not deal with parameters of the generated data selectivity configuration.
Make a full database backup
We can make a database backup with the construction BACKUP DATABASE, using our script.
We create a full compressed backup of the database JobEmplDB_Test. The checksum is calculated into the file E:\Backup\JobEmplDB_Test.bak. It also ensures further testing of the backup.
Let’s check the backup by restoring the database from it. We need to examine the database restoring then.
Restore the database
You can restore the database with the help of the RESTORE DATABASE construction, as shown below:
USE [master]
RESTORE DATABASE [JobEmplDB_Test]
FROM  DISK = N'E:\Backup\JobEmplDB_Test.bak' WITH  FILE = 1,
MOVE N'JobEmplDB' TO N'E:\DBData\JobEmplDB.mdf',
MOVE N'JobEmplDB_log' TO N'F:\DBLog\JobEmplDB_log.ldf',
NOUNLOAD,
REPLACE,
STATS = 5;
GO
We restore the database JobEmplDB_Test from the backup E:\Backup\JobEmplDB_Test.bak. The files are overwritten, and the data file is transferred to the file E:\DBData\JobEmplDB.mdf. The transaction log file is transferred to file F:\DBLog\JobEmplDB_log.ldf.
After checking the database restoring from the backup successfully, we transfer the backup to the necessary environments. It will be used for testing and development, and further deployment through the database restoring, as described above.
This way, we’ve examined the second approach to filling the database in with data for testing and development purposes. It is the synthetic data generation approach.
Data generation tools (for external resources)
When we have a job to fill in the database with data for testing and development purposes, it can be much faster and easier with the help of specialized tools. Let’s review the most popular and powerful data generation tools and explore their practical usage.
Full list of tools
Datanamic Data Generator MultiDB
Now, let’s examine one of these tools more precisely.
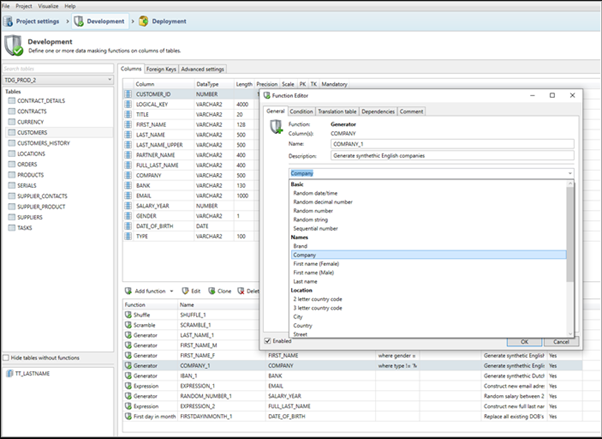
An overview of the employees’ generation by the Data Generator for SQL Server
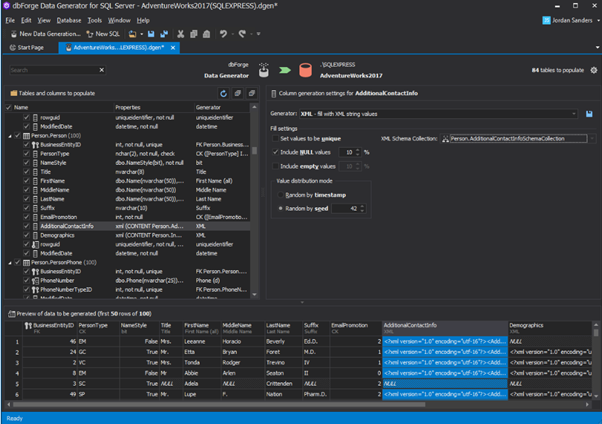
The Data Generator for SQL Server utility is embedded in SSMS, and also it is a part of dbForge Studio. We reviewed this utility here. Let’s now examine how it works for synthetic data generation. As examples, we use the [dbo].[Employee] and the [dbo].[JobHistory] tables.
This generator can quickly generate first and last names of candidates for the [FirstName] and [LastName] fields respectively:

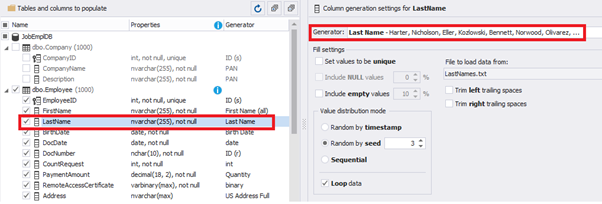
Note that FirstName requires choosing the “First Name” value in the “Generator” section. For LastName, you need to select the “Last Name” value from the “Generator” section.
It is important to note that the generator automatically determines which generation type it needs to apply to every field. The settings above were set by the generator itself, without manual correction.
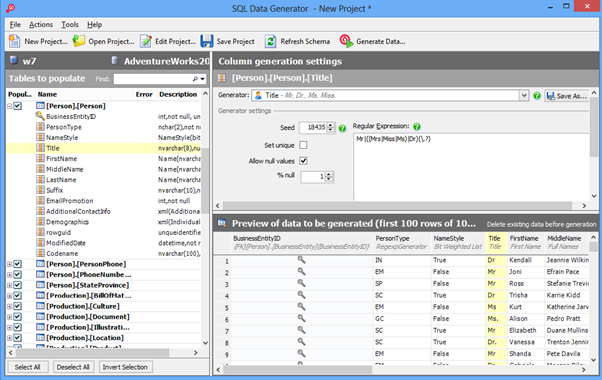
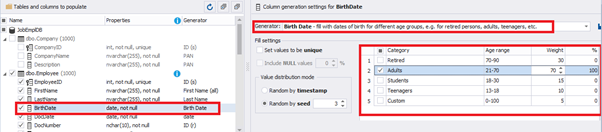
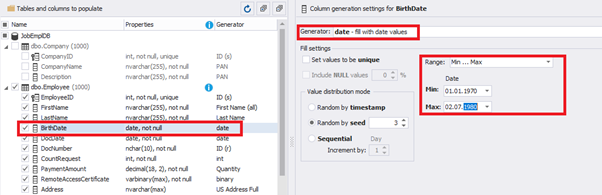
You can configure distribution of values for the date of birth [BirthDate]:
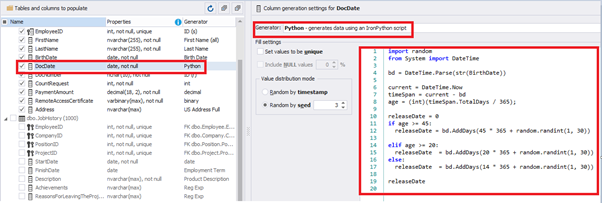
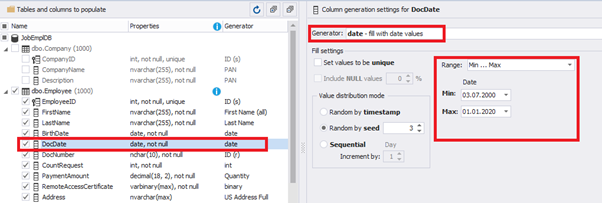
Set the distribution for the document’s date of issue [DocDate] through the Phyton generator using the below script:
import random
from System import DateTime
# receive the value from the Birthday field
bd = DateTime.Parse(str(BirthDate))
# receive the current date
current = DateTime.Now
# calculate the age in years
timeSpan = current - bd
age = (int)(timeSpan.TotalDays / 365);
# passport’s date of issue
releaseDate = 0
if age >= 45:
releaseDate = bd.AddDays(45 * 365 + random.randint(1, 30))
# randomize the issue during the month
elif age >= 20:
  releaseDate  = bd.AddDays(20 * 365 + random.randint(1, 30))
 # randomize the issue during the month
else:
  releaseDate  = bd.AddDays(14 * 365 + random.randint(1, 30))
# randomize the issue during the month
releaseDate
This way, the [DocDate] configuration will look as follows:
For the document’s number [DocNumber], we can select the necessary type of unique data generation, and edit the generated data format, if needed:
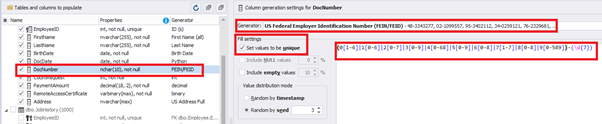
E.g., instead of the format
(0[1-6]|1[0-6]|2[0-7]|3[0-9]|4[0-68]|5[0-9]|6[0-8]|7[1-7]|8[0-8]|9[0-589])-(\d{7})We can set the following format:
(\d{2})-(\d{7})This format means that the line will be generated in format XX-XXXXXXX (X – is a digit in the range of 0 to 9).
We set up the generator for [CountRequest] and [PaymentAmount] fields in the same way, according to the generated data type:
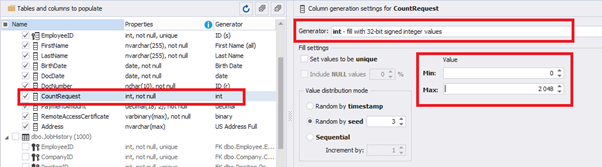
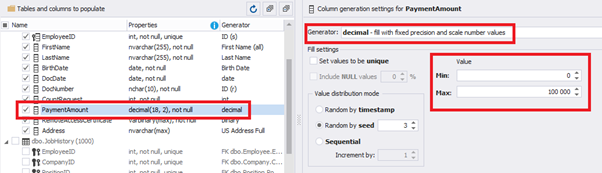
In the first case, we set the values’ range of 0 to 2048 for [CountRequest]. In the second case, it is the range of 0 to 100000 for [PaymentAmount].
We configure generation for [RemoteAccessCertificate] and [Address] fields in the same way:
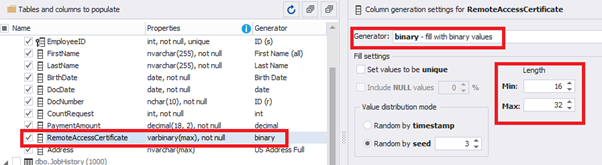
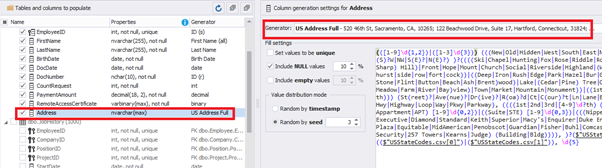
In the first case, we limit the byte sequence [RemoteAccessCertificate] with the range of lengths of 16 to 32. In the second case, we select values for [Address] as real addresses. It makes the generated values looking like the real ones.
This way, we’ve configured the synthetic data generation settings for the candidates’ table [dbo].[Employee]. Let’s now set up the synthetic data generation for the [dbo].[JobHistory] table.
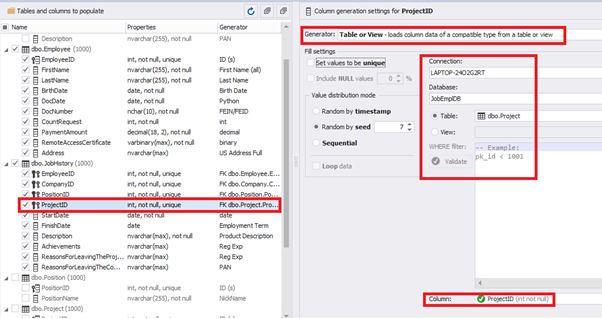
We set it to take the data for the [EmployeeID] field from the candidates’ table [dbo].[Employee] in the following way:
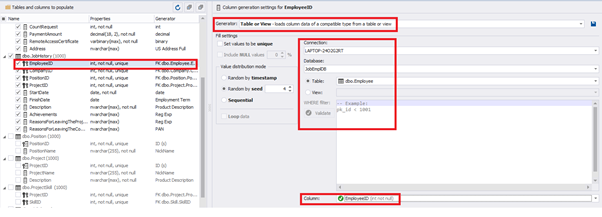
We select the generator’s type from the table or presentation. We then define the sample of MS SQL Server, the database, and the table to take the data from. We can also configure filters in the “WHERE filter” section, and select the [EmployeeID] field.
Here we suppose that we generate the “employees” first, and then we generate the data for the [dbo].[JobHistory] table, basing on the filled [dbo].[Employee] reference.
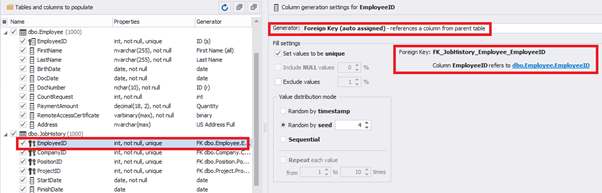
However, if we need to generate the data for both [dbo].[Employee] and [dbo].[JobHistory] at the same time, we need to select “Foreign Key (manually assigned) – references a column from the parent table,” referring to the [dbo].[Employee].[EmployeeID] column:
Similarly, we set up the data generation for the following fields.
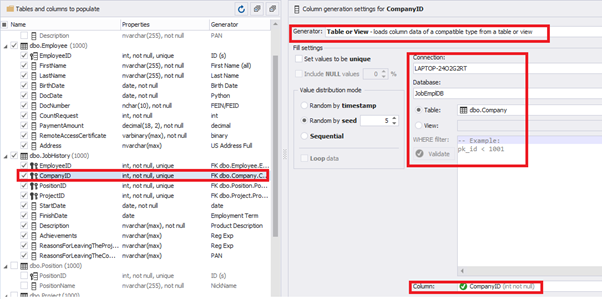
[CompanyID] – from [dbo].[Company], the “companies” table:
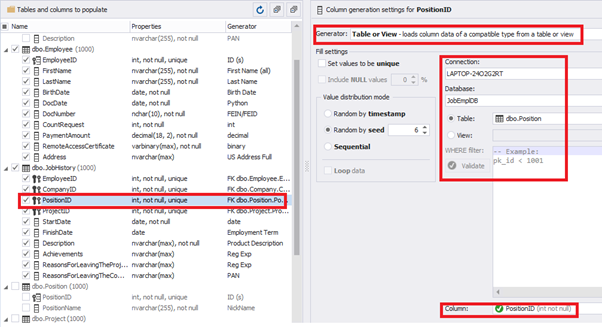
[PositionID] – from the table of positions [dbo].[Position]:
[ProjectID] – from the table of projects [dbo].[Project]:
The tool cannot link the columns from different tables and shift them in some way. However, the generator can shift the date within one table – the “date” generator – fill with date values with Range – Offset from the column. Also, it can use data from a different table, but without any transformation (Table or View, SQL query, Foreign key generators).
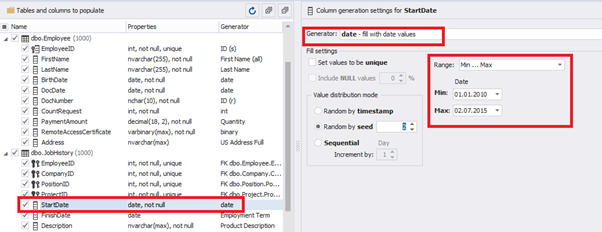
That’s why we resolve the dates’ problem (BirthDate < DocDate и StartDate < DocDate) in a different way. It will be by division of the time range for every column.
E.g., we limit the BirthDate with the 40-50 years’ interval. Then, we restrict the DocDate with 20-40 years’ interval. The StartDate is, respectively, limited with 25-35 years’ interval, and we set up the FinishDate with the offset from StartDate.
We set up the date of birth:
Set up the date of the document’s issue
Then, the StartDate will match the age from 35 to 45:
The simple offset generator sets FinishDate:
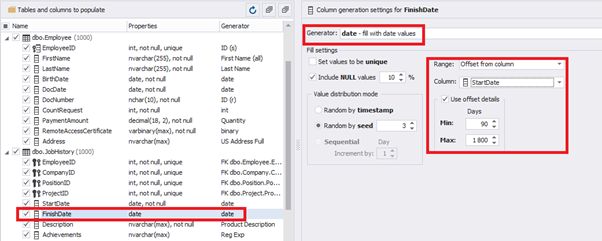
The result is, a person has worked for three months till the current date.
Also, to configure the date of the working end, we can use a small Python script:
import random
from System import DateTime

bd = DateTime.Parse(str(StartDate))

releaseDate = bd.AddDays(random.randint(1, 30))

releaseDate
This way, we receive the below configuration for the dates of work end [FinishDate] data generation:

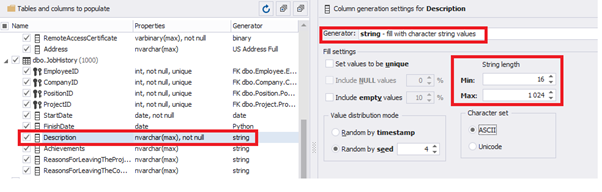
Similarly, we fill in the rest of fields. We set the generator type – string, and set the range for generated lines’ lengths:
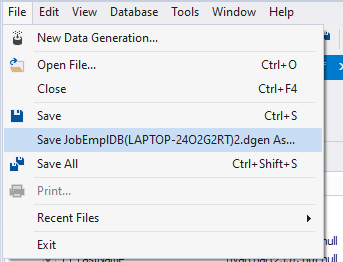
Also, you can save the data generation project as dgen-file consisting of:
- Connection;
- The database name;
- All settings for bases, tables, and columns;
- All settings of generators by columns, etc.
We can save all these settings: it is enough to keep the project’s file and work with the database further, using that file:
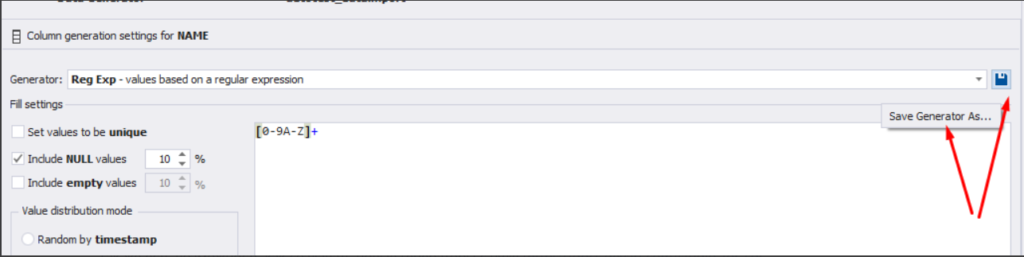
There is also the possibility to both save the new generators from scratch and save the custom settings in a new generator:
Thus, we’ve configured the synthetic data generation settings used for the jobs’ history table [dbo].[JobHistory].
Conclusion
We have examined two approaches to filling the data in the database for testing and development:
- Copying and changing the data from the production database
- Synthetic data generation
We’ve defied the objects for each approach and each script implementation. These objects are here. We’ve also provided scripts for changing the data from the production database and synthetic data generation. An example is the database of recruitment services. In the end, we’ve examined popular data generation tools and explored one of these tools in detail.