
This article will focus on writing SQL queries against the database reference table with a fairly simple structure to understand and implement.
Additionally, we are going to clarify the concepts behind writing effective SQL queries along with some professional life tips.
Before Querying the Database Tables
As this article is about querying database tables with the help of SQL scripts, readers should have a certain background to fully understand the concepts and examples. We need to have the impression of how to reference a table. Also, the necessary equipment must be present:
You need:
- The basic knowledge of relational databases and SQL.
- An SQL database server installed locally or remotely.
- Database management tools such as SQL Server Management Studio or dbForge Studio for SQL Server.
You should be able to create a sample database (with the help of provided scripts), connect to the SQL Server, and run against that sample database.
Before we proceed to run queries against a blank database, you might need to refer to the previous article dedicated to the subject to refresh the knowledge:
How to Write Simple SQL Queries from a Blank Database
Writing SQL Queries Beginning from Reference Tables
We need to write SQL queries against a sample database that contains two tables. The plan is to view the data from one of the tables known as an SQL reference table. Note: The reference table can be any table that does not require data from another table.
First, we need to understand the structure of the sample database to query it accurately.
Database Reference Table Example
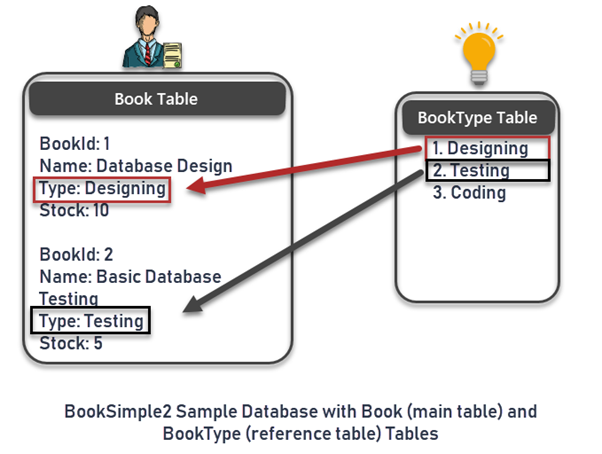
We use a sample BookSimple2 database which consists of two tables, BookType and Book.
The BookType table contains the types of books to be assigned to a book. The Book table contains names, types, and stock (number of available copies) of books.
It is easy to guess that both tables are linked via keys. The type of book stored in the Book table is originally defined in the BookType table. It allows keeping the data consistent and reliable.
Therefore, the BookType table is a reference table – it provides its reference (book type) to the main Book table.
Have a look at the below illustration:
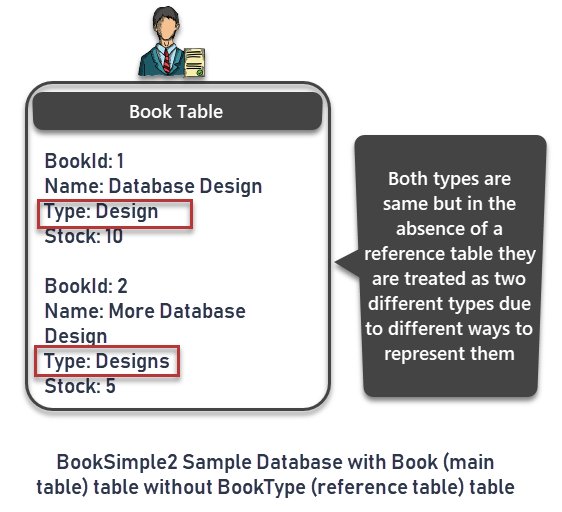
If we do not link the Book table with BookType to get the type of the book, we must define the necessary type each time a new book is stored. As a result, errors will occur soon because we are storing the same type again and again. Moreover, we may end up creating many more types due to spelling mistakes.
Let us say if we ignore the use of reference tables and only create one main table, we may use different ways to represent one type, such as Design, Designing, and Designs. It confuses, especially when querying and understanding the data.
You may also refer to the past article for more information on how tables relate to each other in SQL:
Learn Database Design with SQL Server Management Studio (SSMS) – Part 2
Now that you see the background of using the reference tables and the main tables, we can proceed to examples.
How to Create a Reference Table in SQL
Open the database development tool (it could be SQL Server Management Studio or dbForge Studio for SQL Server) and connect to the installed SQL server instance.
Write the following script against the master database to set up a sample database BookSimple2 with two tables:
-- Create sample database BookSimple2
USE MASTER
GO

CREATE DATABASE BookSimple2
GO

USE BookSimple2

-- Creating a reference table BookType
CREATE TABLE dbo.BookType
(
	BookTypeId INT IDENTITY(1,1),
	Name VARCHAR(50)NOT NULL,
	Detail VARCHAR(200)NULL
	CONSTRAINT PK_BookType_BookTypeId PRIMARY KEY (BookTypeId)
)
GO

-- Populating (adding rows to the) table BookType
SET IDENTITY_INSERT dbo.BookType ON
GO
INSERT INTO dbo.BookType
(
  BookTypeId
 ,Name
 ,Detail
)
VALUES
(
  1  -- ID - INT Primary Key
 ,'Designing' -- Name - varchar(50) NOT NULL
 ,'This is Designing' -- Detail - varchar(200)
),
(
  2  -- ID - INT Primary Key
 ,'Testing' -- Name - varchar(50) NOT NULL
 ,'This is Testing' -- Detail - varchar(200)
),
(
  3  -- ID - INT Primary Key
 ,'Coding' -- Name - varchar(50) NOT NULL
 ,'This is Coding' -- Detail - varchar(200)
);
GO
SET IDENTITY_INSERT dbo.BookType OFF
GO

-- Creating a table Book
CREATE TABLE dbo.Book
(
	BookId INT IDENTITY(1,1),
	Name VARCHAR(50),
	BookTypeId INT,
	Stock INT,
	CONSTRAINT PK_Book_BookId PRIMARY KEY (BookId)
)
GO
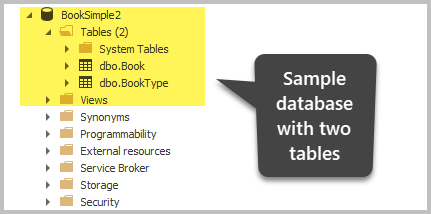
After running the script, you can view the newly created database in the SSMS Object Explorer or the Database Explorer section of dbForge Studio for SQL Server:
How to Reference Two Tables with SQL Foreign Key
I have deliberately excluded the part of the script that creates the relationship between the reference table (BookType) and the main table (Book) in the form of keys.
Execute the following script against the sample database to link the reference table with the main table:
-- Creating foreign key constraint on Book table to get BookTypeId values from BookType table
ALTER TABLE dbo.Book
    ADD CONSTRAINT [FK_Book_BookType_BookTypeId]
FOREIGN KEY ([BookTypeId]) REFERENCES dbo.[BookType] ([BookTypeId]);
Expand the BookSimple2 database > Book table > Keys folder:
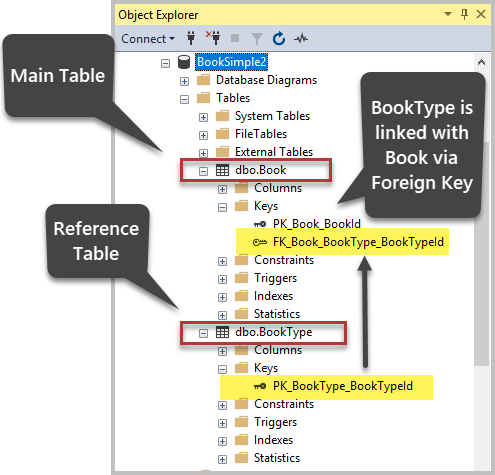
We can see that the two tables are successfully linked.
The above is the screenshot from SQL Server Management Studio. However, the view is exactly the same if you view the database in Database Explorer of dbForge Studio for SQL Server.
An important tip about selecting the desired database: You must ensure that you are running queries against the correct database – the sample database. Hence, select it from the list of available databases or run the following script:
-- Select the sample SQL database to query it
USE BookSimple2
Important! The use of a script to select the database is not applicable if you work with a cloud version of the SQL database known as Azure SQL Database.
Writing First Query
To query the database tables, we only have to in mind the SELECT statement in the following form:
SELECT * FROM <TableName>Replace the <TableName> with the name of an existing table, and the script will return you all records (rows) of that table.
The SELECT statement is a lot more flexible, but for now, we will only focus on seeing all records (rows) of a table.
An important tip about SQL: Remember that SQL (particularly referring to T-SQL) is not case sensitive. It relates to both the SQL-reserved word (SELECT is the same as Select) or user-defined names (BookType is the same as booktype).
View all Rows from the BookType Reference Table
Write the following script against the sample database:
-- View all data from the BookType table
SELECT * FROM dbo.BookType
The output is:
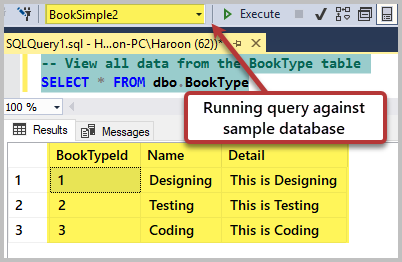
We can see all columns and rows from the table. It is by far the quickest method to get all data from a table.
Important Tip about SELECT *: You should use SELECT * to get all rows and columns from a table only when you check a small table (such as a reference table). Otherwise, it may consume a lot of time, while we might need the data on a few columns and rows from a larger table.
Find all Rows from the BookType Table Using the Table Name
There is a better way to query the table. We name a table and bind it with all columns as shown below:
-- View all data from the BookType table using bt alias
SELECT bt.* FROM dbo.BookType bt
View Selected Columns from Reference Table
Using table names brings more benefits. First, we can quickly select the desired column from the table. Then, it makes using tables and limited columns clearer because in most cases we require only some columns.
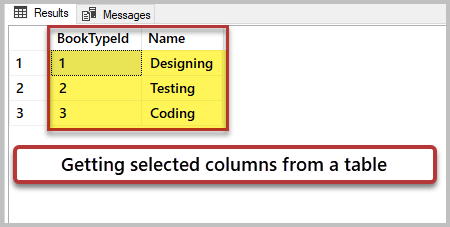
Here is an example of getting IDs and names only from the BookType table:
-- View book type id and name columns from the reference table
SELECT bt.BookTypeId,bt.Name FROM dbo.BookType bt
The result is:
Improving the SELECT Syntax
Thus, based on the information mentioned above, we can improve the SELECT syntax as follows:
SELECT t.<column1>,t.<column2> FROM <TableName> tSort Data by Name Column using the Order By Clause
You can sort the result set based on a specific column or set of columns. Sorting the data gives a different point of view.
The usage of the Order By clause in this case is:
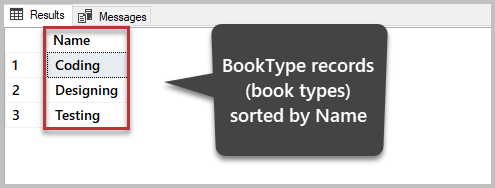
SELECT t.<column1>,t.<column2> FROM <TableName> t order by t.<column1>For example, we want to see the types of books ordered by the type name (alphabetical order). In this case, we use the Order By clause in the SELECT statement script as follows:
-- View book types (name) sorted by type name
SELECT bt.Name FROM dbo.BookType bt ORDER BY bt.Name
The output is:
Sort Data by Name Column in Descending Order
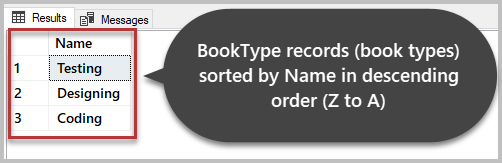
We can also sort the data in descending order as per requirement. For example, we want to see the list of all book types based on the Name column in descending order (Z to A). The syntax will be:
SELECT t.<column1>,t.<column2> FROM <TableName> t order by t.<column1> descThe T-SQL script is as follows:
-- View book types (name) sorted by a type name in descending order (from Z to A)
SELECT bt.Name FROM dbo.BookType bt ORDER BY bt.Name desc
The result set is below:
View TOP N Records from a Table
Finally, we can select the desired number of rows to be pulled from a database by using the TOP clause. After that clause, we must provide the required number:
SELECT Top N t.<column1>,t.<column2> FROM <TableName> t However, the TOP clause without any order is not the best option. We must specify the order of columns to consider when picking the top-n rows.
Here, we can improve the above syntax as follows:
SELECT Top N t.<column1>,t.<column2> FROM <TableName> t order by <column> Desc/AscRemember that we must mention the descending order by using DESC at the end. However, the ascending order is not mandatory to mention – it is the default option.
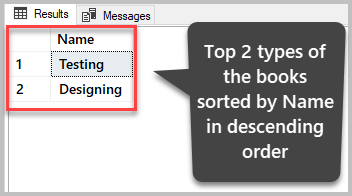
Let us view the top 2 types of books ordered by name in descending order:
--View Top 2 types of the books ordered by name in descending order (from Z to A)
SELECT TOP 2 bt.Name FROM dbo.BookType bt
ORDER BY bt.Name DESC
The output is:
Important Tip about TOP N: use the TOP N clause (with an order by) to view a table rather than viewing all the rows of the table if you want to check the data known as a sneak peek quickly.
In professional life scenarios, the Top N clause serves to update large chunks of data from a big table in steps.
Now, we have successfully queried the table of a SQL database. Besides, we’ve gotten familiar with some tips to run queries like a professional and learned some best practices for SQL query writing.
DB Reference Table Practice
Now you can write, run and boost the effectiveness of SQL queries against any table. Try the following exercises to improve the new skills:
- Try to write a script to view the book type id (BookTypeId) with the details (Detail) columns only.
- Try sorting the reference BookType table by ids (BookTypeId) in descending order (from 3 to 1).
- Try getting the top 2 rows from the BookType table including only id (BookTypeId) and details (Detail) of the book type sorted by the Detail column.