
AWS Athena is a fully managed, popular cloud service provided by Amazon to query structured data in S3. It allows users to write custom SQL queries to retrieve data from CSV or other file formats in S3. This is helpful if you want to query your static data at rest.
Being a pioneer in the cloud computing world, AWS defines Athena as “an interactive query service that makes it easy to analyze data in Amazon S3 using standard SQL.”
- Features of Amazon Athena
- How to Use AWS Athena
- Configuring the AWS Athena Service
- Example of AWS Athena Query Syntax
- Conclusion
Features of Amazon Athena
Serverless. Since Amazon Athena is offered as a fully managed cloud service, customers do not need to take the pain of installing and maintaining separate infrastructures for this. You can start by logging into the AWS Web console and proceeded to Amazon Athena.
Pay Per Query. You only pay for queries you execute. This is very cost-effective, as you can easily figure out your monthly expenses based on your usage pattern. On average, users pay 5 USD for each terabyte of data scanned. This can be further optimized by creating partitions or compressing your dataset.
Interactive Performance. We do not need to worry about the resources that work behind the scenes. When a query is executed, Athena automatically runs the query in parallel across multiple resources, bringing the results faster.
Open Standards and SQL. The underlying technology of Amazon Athena is Presto, an open-source big data query engine that supports native SQL. Amazon Athena uses the Presto engine to query from numerous data sources in S3. In addition to that, Athena can also query from different file formats such as CSV, Avro, Parquet, etc.
Security. All queries that are executed in Amazon Athena are governed by AWS IAM roles and policies. Users that have access to specific buckets in S3 only will be able to query data from them only.
Implement Machine Learning. With the advance of Machine Learning capabilities, Athena now supports integrating Amazon SageMaker to run from within SQL queries. With the help of this feature, users can infer anomaly detection, cohort analysis, etc. from Athena directly.
How to Use AWS Athena
Now that we have some idea about Amazon Athena, let us get started. We’ll upload a source file to the Amazon S3 bucket to use this file as a data source for Athena to connect to and query it.
You can upload any file of your choice, however, to keep things simple, I have created a sample CSV file with few records to analyze the results better. The structure of that CSV file is as follows:
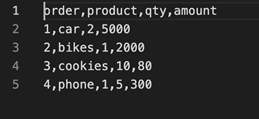
As you can see, we have only four columns and four rows in our CSV file. Create a bucket in Amazon S3 and upload this file.
For this purpose, I have created a bucket with the name cs-athena-demo-1283 and then created a folder named dataset.

Configuring the AWS Athena Service
Once the file has been uploaded to S3, the next step is to configure the Athena service.
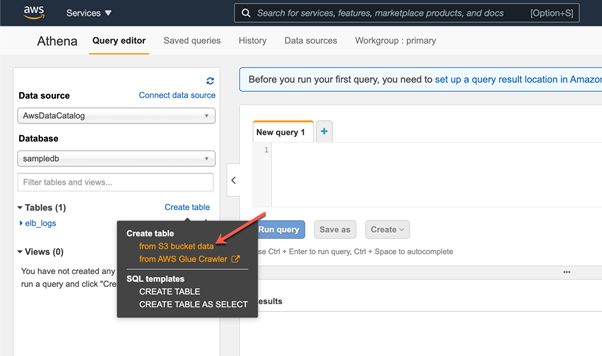
Step 1. Create table
Head over to Amazon Console and search for the Athena service. Click on Athena, and a new window will appear. In that window, click Create Table and select From S3 bucket data because we are going to read the dataset stored in the S3 bucket.
In the next step, we provide the details of our S3 bucket where we have uploaded the dataset.
Step 2. Provide S3 bucket
First of all, you need to provide the database name. This can be reused if you already have created one previously. Else, you can create a new database for this tutorial.
Next, we need to provide a name for the table. It can either be the name of the dataset/CSV file, or it can be the name of the directory where the CSV file resides. It is not obligatory to follow these naming conventions, but I try to keep them similar to understand the structure easier.
Step 3. Set source URL
Finally, we need to provide the source URL of the S3 bucket and the directory from where the system should read the dataset. You can open the directory where you’ve uploaded the sample file and copy the URI from there.
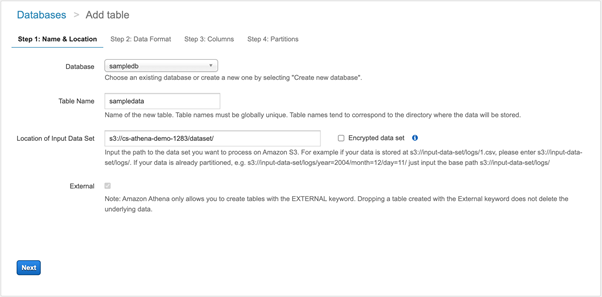
We have provided details for the S3 bucket. Click Next to continue.
Now we need to choose the type of file we are using. In our case, it can be CSV. Click Next.
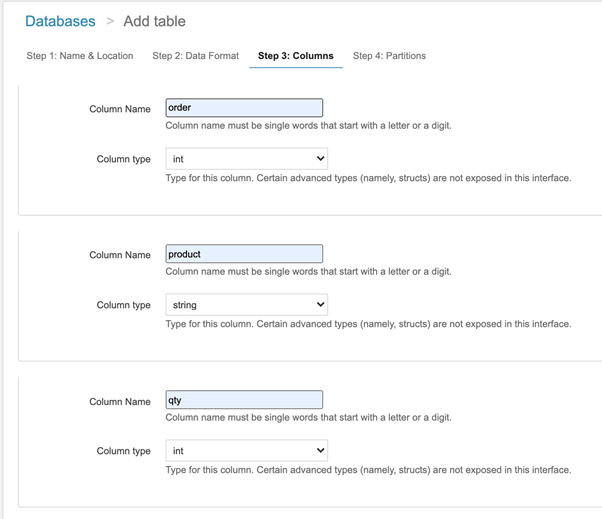
Step 4. Define CSV columns
Here, we need to define the columns from the CSV file that will be defined as the table columns in Amazon Athena. Besides, we need to define the data types for each of the columns. If the associated data types are incorrect, then there might be some issues while fetching the data.
Click Next once done.
Step 5. Define partitions
In the next section, we define partitions to the Amazon Athena table.
Partitioning our data will help us to optimize the cost, as it drastically reduces the amount of data scanned while executing queries. You can choose to partition by days, months, or years, etc. However, to keep things simple, partitioning will be out of the scope for this article. We will skip it for now and click Create Table.
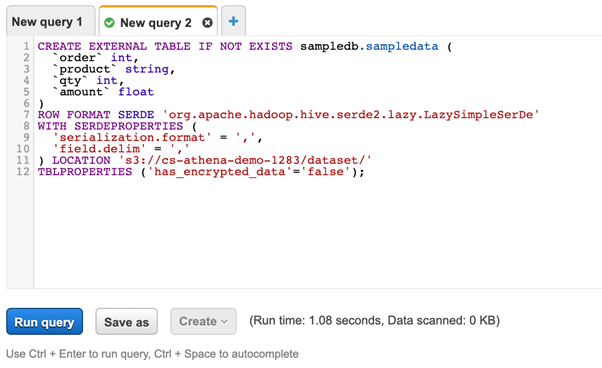
As you can see in the above figure, the script has been generated by Amazon Athena. It can be used to create the table. Click Run query and the table will be created for you.
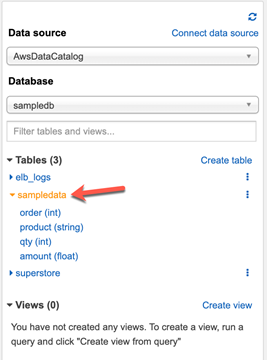
As you run the query, a new table will be created under the sampledata table with all columns we have defined in the previous steps. This is an external table created in Athena that refers to the CSV file stored in our S3 bucket. When we query this table, the data will be fetched from the CSV file.
Example of AWS Athena Query Syntax
Now that the external table has been created, we can start writing simple SQL queries against this table.
Open a new query tab and write a simple SQL query to read data from the sampledata table. Click Run query, and view the results:
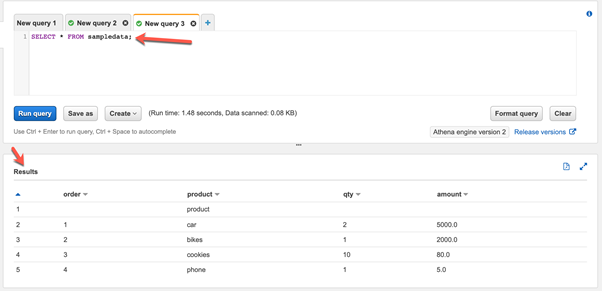
The query might take some time to execute based on the data that has to be scanned and processed to prepare the result.
Conclusion
Thus, we have clarified the essence of Amazon Athena and its main features. We have also learned how to create an Amazon Athena query service and execute queries against files stored in S3 buckets.
Athena provides an interface that can be used to run SQL-based queries directly on files residing in S3 without the need for any database service.
Amazon Athena can be loosely compared to the open-source Apache Hive technology that uses similar technology to query data from distributed data sources.
Tags: amazon, AWS, aws s3, cloud platform Last modified: October 27, 2022