Introduction
Azure DevOps Services provides a lot of space for importing your custom extension. Work items, pipeline tasks, dashboard widgets, and other options can serve this purpose.
This article will be about developing extensions for pipeline tasks – I will describe how to create the easiest sample extension that will help organize your own continuous integration.
But first, let’s describe the whole process of hosting the extension on Azure DevOps and how it works. Then we will discuss its detailed development route.
General Azure DevOps hosting and working scheme
On the picture down below, you can see the general Azure DevOps hosting and working scheme for pipelines.
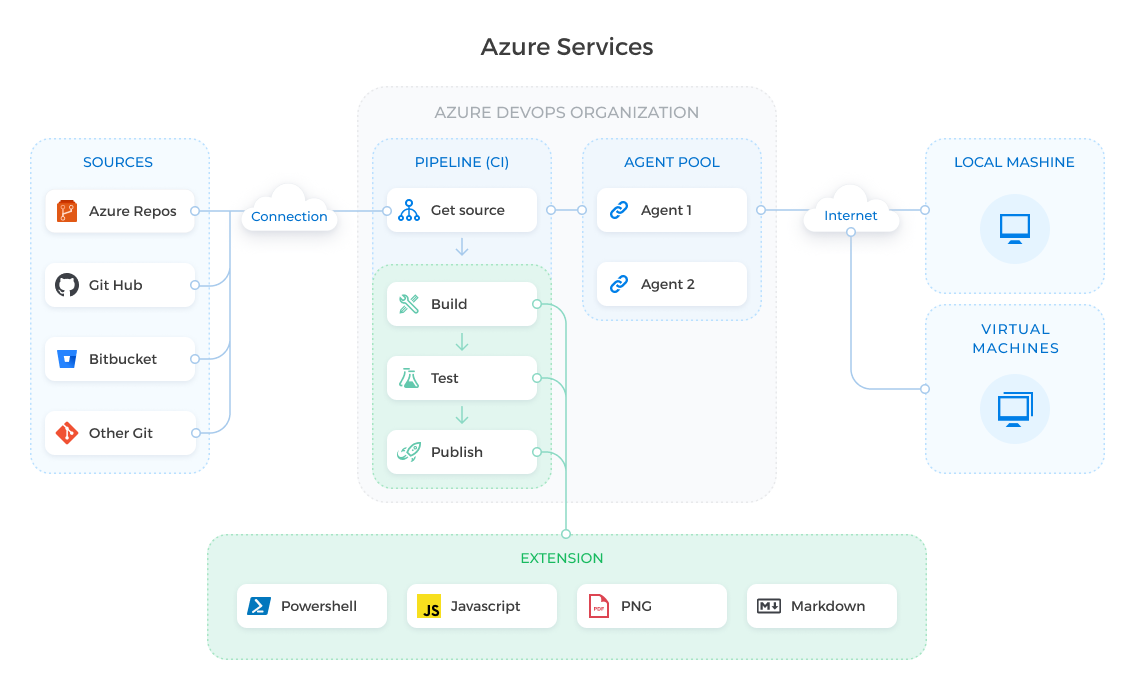
Pic.1. DevOps process organization
As you can see in the picture, the extension is a number of tasks. Each task can be written on one of the languages: TypeScript (that complies with JavaScript) and PowerShell. TypeScript will run on all platforms, whereas PowerShell will only run on the Windows platform. The extension also has a manifest that includes:
- the main extension file
- icons
- markdown file
- supporting modules
- and more
To start using a developed extension in continuous integration, you need to create your own Azure DevOps Organization, then you create Pipeline. Respectively, we create tasks for Pipeline that will be further mapped against tasks from our extension.
As you see in the picture, our pipeline is associated with the source code (it can be GitHub, Bit Bucket, Azure Repos, or something else). We take the source code from the very source – it could be your project on any language or a database script folder from which we will need to deploy this database.
The pipeline is also associated with agent pool. Essentially, this is a connection with a machine on which the pipeline will be executed.
Azure DevOps Extension Anatomy
Our sample Azure DevOps extension will consist of the following files:
- The manifest file (vss-extension.json) is the main extension file.
- The task manifest files (task.json) that describe the task input parameters and the main entry point.
- Powershell.ps1 files. Those are the scripts that are executed as configured in task.json.
Note: you can either choose .js or .ps1 files. In our case, the powershell files will be used. - Secondary modules (for example, VstsTaskSdk).
- Icons (.png).
The picture down below showcases the folders and files structure of our extension.
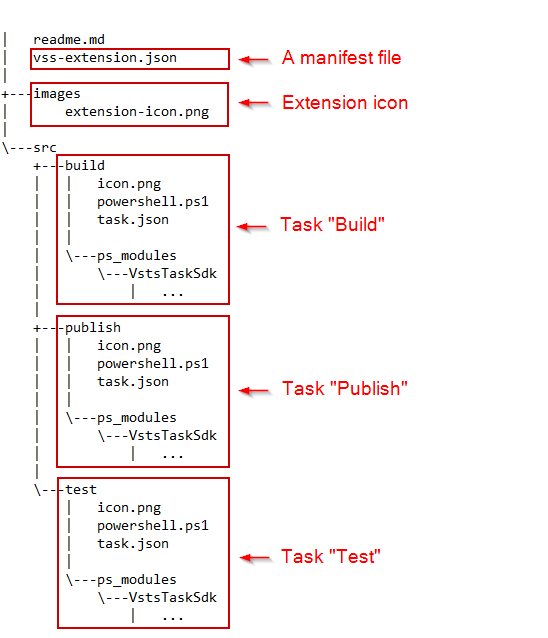
Pic.2. The structure of folders and files
Let’s shortly explain the structure of the picture above.
vss-extension.json manifest file
Vss-extension.json is the plugin basis and it describes general extension values (version, name, publisher, plugin icon, etc.). The manifest file also describes the place inside Azure DevOps where we want to embed our plugin. As it was mentioned, we embed the plugin into “pipeline tasks”.
Task folders
As you see in the picture, every task has its folder whereas task.json is the task’s basis.
The picture shows that our plugin has 3 tasks: Build, Test, and Publish. The number of tasks can be any. For convenience’s sake, each task is located in the folders that have their names. The folder contains 3 main files: task.json, powershell.ps1, and icon.png. Task.json is the very task, it contains its name, version, entry parameters and what it should launch. In our case, it launches a powershell script that is described in a powershell.ps1 file, whereas icon.png is the task’s icon.
Ps_modules folders
These are the folders with secondary modules and we will use the VstsTaskSdk module. We will need it to interact with parameters, in other words, interact with UI.
Readme.md file
This is an unnecessary file. But if you’re going to make your extension public, the file will come handy for describing it that users will see at Azure Marketplace.
Extension creation, publishing, and usage cycles
To make the extension reach its destination – to be used in Azure DevOps in Pipeline Tasks, we need to complete the following steps:
- Create an Azure DevOps extension, a *.vsix file. The extension will get improved and updated further on.
- Create a publisher (this is done just once). It will enable publishing our extension in different versions.
- Upload it to Marketplace.
- Share the extension to a certain organization so it could be used in its pipeline.
In this article, I will focus on creating an Azure DevOps extension for the pipeline. To get more information about creating a publisher or an organization for hosting the extension, you should follow the link.
Preparing for the extension creation
Whether you create an extension for Azure DevOps Services or for Azure Pipeline Tasks, the following software should be installed:
- Install Node.js
- Install the extension packaging tool (TSF Cross-Platform Command-Line Interface) by running npm install -g tfx-cli from a command prompt
- Install the VstsTaskSdk module (by running an Install-Module -Name VstsTaskSdk -AllowClobber command)
Build Scaffolding
Let’s create a root folder for our extension, for example, DevopsExt (the root folder name doesn’t affect the final extension creation). While being in the DevopsExt root place, let’s create the following folder and empty files:
|    readme.md
|    vss-extension.json
|
+---images
|       extension-icon.png
|
\---src
+---build
    |       powershell.ps1
    |       task.json
    |
+---publish
    |       powershell.ps1
    |       task.json
    |
\---test
powershell.ps1
task.json
Designing a vss-extension
As mentioned before, the manifest vss-extension.json file is the main file for the extension creation. To get more info about attributes description, their values, and file limitations, you should follow this link.
Down below you will see the attributes that we use. The following script will show our manifest vss-extension.json file’s content.
{
    "manifestVersion": 1,
    "id": "demo-devOps-extention",
    "name": "Demo devOps Extention",
    "version": "1.0.0",
    "publisher": "demopublisher",
    "targets": [
{
            "id": "Microsoft.VisualStudio.Services"
}
],
    "description": "A demo extension.",
    "categories": [
        "Azure Pipelines"
],
    "icons": {
        "default": "images/extension-icon.png"
},
    "content": {
        "details": {
            "path": "readme.md"
}
},
    "files": [
{
            "path": "src/build",
            "packagePath": "build"
},
{
            "path": "src/publish",
            "packagePath": "publish"
},
{
            "path": "src/test",
            "packagePath": "test"
}
],
    "contributions": [
{
            "id": "build-task",
            "type": "ms.vss-distributed-task.task",
            "targets": [
                "ms.vss-distributed-task.tasks"
],
            "properties": {
                "name": "build"
}
},
{
            "id": "test-task",
            "type": "ms.vss-distributed-task.task",
            "targets": [
                "ms.vss-distributed-task.tasks"
],
            "properties": {
                "name": "test"
}
},
{
            "id": "publish-task",
            "type": "ms.vss-distributed-task.task",
            "targets": [
                "ms.vss-distributed-task.tasks"
],
            "properties": {
                "name": "publish"
}
}
]

}
| Property | Description |
| manifestVersion | A number corresponding to the version of the manifest format (1). |
| id | The extension’s identifier. This is a string that must be unique among extensions from the same publisher. It must start with an alphabetic or numeric character and contain ‘A’ through ‘Z’, ‘a’ through ‘z’, ‘0’ through ‘9’, and ‘-‘ (hyphen). |
| version | A string specifying the version of an extension. It doesn’t need to be the same version as individual tasks in the extension. Should be in the format major.minor.patch, for example, 0.1.2 or 1.0.0. |
| name | A short, human-readable name of the extension. Limited to 200 characters. |
| description | Brief description of the extension. It will be displayed for the plugin when it’s searched in Marketplace. |
| publisher | The identifier of the publisher. This identifier must match the identifier the extension is published under. See Create and manage a publisher. |
| categories | An array of strings representing the categories your extension belongs to. At least one category must be provided and there is no limit to how many categories you may include. Valid values: Azure Repos, Azure Boards, Azure Pipelines, Azure Test Plans, and Azure Artifacts. In our case, it’s Azure Pipelines. |
| targets | The products and services supported by your integration or extension. See installation targets for more details. |
| icons | Dictionary of icons representing the extension. Icon should be 128×128 pixels in size and uploaded in one of these formats: BMP, GIF, EXIF, JPG, PNG or TIFF. |
| files | The files section is where you reference any files you wish to include in your extension. You can add both folders and individual files.
Properties for the Files section:
|
| contributions | Each task MUST have a corresponding contribution.
Each contribution entry has the following properties:
For more information, see the contribution model overview. |
DevOps task anatomy
As the folder structure shows, every task is located within its own subfolder. The task anatomy is the following:
|- SomeTask
|- task.json
|- icon.png
|- powershell.ps1
|- ps_modules
|- VstsTaskSdk
|- ...
Notes:
| File | Description | Notes |
|
icon.png |
The icon image file that will be used to identify your build task in the marketplace and wherever it’s used inside Azure Devops |
It should have a 32*32 size, should only be named as “icon”, and located in the same subfolder where the task.json file is located. |
| task.json | This is the only required file and the most important one. This json file describes the UI input and which scripts to execute. |
It is the main task file that should only be named as task.json. The whole UI (all information entry controls) is created there and it defines which script files should be launched. |
| powershell.ps1 | This is a file that contains powershell script that launches our task |
It contains all values that a user entered in user-UI control, described in task.json. Further on, the values are processed and used in a powershell launch script. |
| ps_modules | This is a special folder that stores secondary modules for task’s functioning. |
Now we’re using the VstsTaskSdk module that helps us get values from UI controls. |
Designing task.json
As you see from in folder structure, we have three task.json files that are in three folders: build, publish, and test – these are the tasks’ manifests.
You can see the build task script down below. The code will look the same for the other tasks, it’s just their identifiers, names, and UI entry fields that will be different.
{
    "$schema": "https://raw.githubusercontent.com/Microsoft/azure-pipelines-task-lib/master/tasks.schema.json",
    "id": "7a3fbeab-c278-458e-94f8-f8cb044d10d9",
    "name": "DemoBuild",
    "friendlyName": "Build a project",
    "instanceNameFormat": "Build a project",
    "description": "Builds your demo project",
    "helpMarkDown": "",
    "category": "Build",
    "author": "Demo Company.",
    "version": {
        "Major": 1,
        "Minor": 0,
        "Patch": 5
},
    "groups": [
{
            "name": "inputGroup",
            "displayName": "Source",
            "isExpanded": true
},
{
            "name": "outputGroup",
            "displayName": "Output",
            "isExpanded": true
}
],
    "inputs": [
{
            "name": "projectFolder",
            "type": "string",
            "label": "Project Folder",
            "defaultValue": "",
            "required": true,
            "helpMarkDown": "Enter a full path to your project",
            "groupName": "inputGroup"
},
{
            "name": "outputFolder",
            "type": "string",
            "label": "Output Folder",
            "defaultValue": "",
            "required": true,
            "helpMarkDown": "Enter output folder",
            "groupName": "outputGroup"
}
],
    "execution": {
        "PowerShell3": {
            "target": "powershell.ps1",
            "platforms": [
                "windows"
],
            "workingDirectory": "$(currentDirectory)"
}
}
}
| Property | Description |
| id | A unique guid of your task |
| name | It’s a build task name that only allows alpha-numeric letters. |
| friendlyName | The name displayed in the Azure DevOps pipeline UI. |
| instanceNameFormat | The initial task name when the task is brought to a pipeline. |
| description | A detailed description of what your task does |
| helpMarkDown | The information about the task displayed after a user presses the question mark icon near the task. |
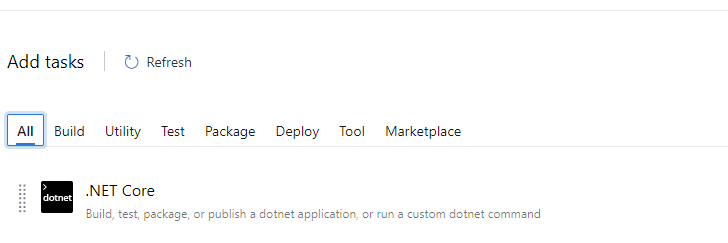
| category | The category of the task.
Currently, we have the Build category installed. There can also be other categories, for example, Utility, Deploy, Package, Tool, etc.
|
| author | The author, you, or your company name. |
| version | It’s a task version. Must be unique every time you upload.
Caution: it’s very important to increment the task during the next Marketplace uploading, otherwise the old task version will be executed. Build tasks are cached based on the version number on the agent, meanwhile the implementation based on the version number stays the same. That’s why when you change the task’s implementation and re-upload, the patch number should also be changed. |
| groups | Allows you to create custom groups for your UI bucket inputs. This is just a groupbox bundle for our controls. |
| inputs | Set the UI controls |
| execution | The scripts the task will execute.
The file name that this task invokes. It can either be a PowerShell script or a JavaScript. In our case, we use the powershell.ps1 file, and there can be a lot of those files. |
Designing powershell.ps1
We have three powershell.ps1 files that are located in three folders: build, publish, and test. These scripts are launched for our tasks.
The powershell.ps1 script lets us get UI parameters and run the list of required powershell commands for the task.
The following script shows a simplified example:
CmdletBinding()]

param()

$projectFolder = Get-VstsInput -Name 'projectFolder'

$outputFolder = Get-VstsInput -Name 'outputFolder'

Write-Host "Initial parameters:"

Write-Host "projectFolder = $projectFolder"

Write-Host "outputFolder = $outputFolder"

# Write your code that builds a project...

# ...

# ...

# ...
As you see in the script, we use Get-VstsInput commands from the VstsTaskSdk module to get UI parameter values. Then we can do any manipulations on these values.
Installing VstsTaskSdk
As it was mentioned, we use the VstsTaskSdk module to get the values from UI and use them in powershell.ps1 scripts. More specifically, we use the Get-VstsInput method.
To install and use this module, we need to create a ps_modules subfolder in our build, publish, and test folders. Once it’s done, your folder structure will look the following way:
|    readme.md
|    vss-extension.json
|
+---images
|        extension-icon.png
|
\---src
+---build
    |   | powershell.ps1
    |   | task.json
    |   |
    |   \---ps_modules
+---publish
    |   | powershell.ps1
    |   | task.json
    |   |
    |   \---ps_modules
\---test
        | powershell.ps1
        | task.json
        |
\---ps_modules
Now we need to install the VstsTaskSdk module from the Powershell Gallery on your computer. To do this, run the following command:
Install-Module -Name VstsTaskSdk -AllowClobber
Then we need to save this module into every ps_modules subfolder. To do this, run the following Powershell Save-Module command:
Save-Module -Name VstsTaskSdk -Path "FullPathToYour_ps_modules_Path" -Force
Once these steps are done, your folder structure will look the following way:
|   readme.md
|   vss-extension.json
|
+---images
|       extension-icon.png
|
\---src
+---build
    | | powershell.ps1
    | | task.json
    | |
    | \---ps_modules
    | \---VstsTaskSdk
    | ...
    |
+---publish
    | | powershell.ps1
    | | task.json
    | |
    | \---ps_modules
    | \---VstsTaskSdk
    | ...
    |
\---test
        | powershell.ps1
        | task.json
        |
\---ps_modules
\---VstsTaskSdk
...
Publishing and updating extensions
Now it’s time for you to start using the extension in Azure DevOps Pipeline. To do this, you need to upload and share the extension for the end-user organizations in Azure DevOps.
The extension upload is done just once, then it will be uploaded and installed in the target organization. The following uploads will only update the extension automatically for the target organization.
You can upload the extension in two ways: manually or using the command prompt. To get the info about manually uploading the extension, please follow this link and see how it’s done.
Down below, you can see how it’s done via the command prompt. It will also be shared with the organization that will use it onwards. The command looks the following way:
tfx extension publish --publisher DemoPublisher --manifest-globs vss-extension.json --token vtl3smppxy99h9erfnjijy6u5tclf5mnbb11n1aosrci2crjibpq --rev-version --share-with demoTargetCompany
Where each parameter has its purpose:
- “publisher” is a parameter that uploads the extension
- “manifest-globs” is where the extension’s manifest name is specified
- “token” is the token name that was created in the publisher’s account. This token allows for uploading the extension. You can see how to create a token here.
- “re-version” indicates that the extension version will be automatically incremented during the next extension creation.
- “share-with” is a parameter for specifying the organization name that should receive our extension. If the company name has already been specified and it installed the extension, the following uploads will update this extension tasks into the pipeline automatically.
Conclusion
The article shows the process of creating an extension for private usage – it doesn’t require validation from Microsoft. It allows you to quickly organize, set up, and use pipelines for your CI process in a seamless manner.
If you want to make the extension publicly available, you’ll need to write a letter to Microsoft and go through the validation process.
Tags: devops, Microsoft Azure Last modified: September 20, 2021


