
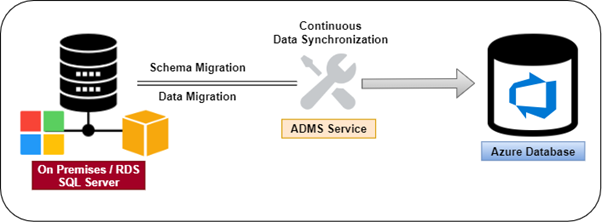
Azure Database Migration Service (ADMS) supports Schema and Data migration from different database technologies to the Azure platform. This article will shed some light on validations, limits, and use cases of migration tasks for SQL Server (RDS & On-Premises) to Azure cloud database with ADMS.
Before creating a first migration project in ADMS, let’s get familiar with the basic requirements of the Azure Database Migration Service.
We can create a migration project in the ADMS with migration parameters chosen only. While adding the project, it asks to select the migration activity type.
There are three primary activity types available on the Azure portal:
Schema Only Migration
The migration project will sync the schema only. For synchronizing the data, users have to create a separate project/activity with Offline Data Migration or Online Data Migration.
Offline Data Migration
Data will be synchronized from source to destination when the user triggers the event. Here, “Offline” defines when the data will be synchronized, and when users execute the migration task.
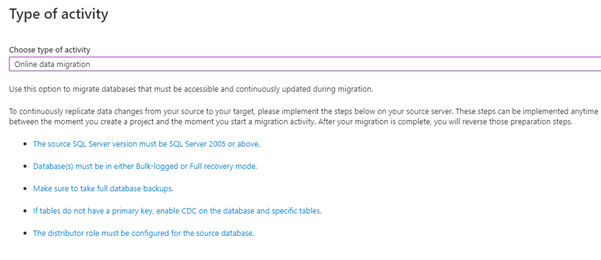
Online Data Migration
Data synchronization continues between the source and the destination, using CDC or Replication. Before setting up the source and destination, you should enable the source database server with replication (Distribution database configuration).
Create Project Only
It’s the default option taking place when the migration type is not defined while creating a project. This way, you can create a project now and determine the migration task later.
Let’s create a first migration project with ADMS.
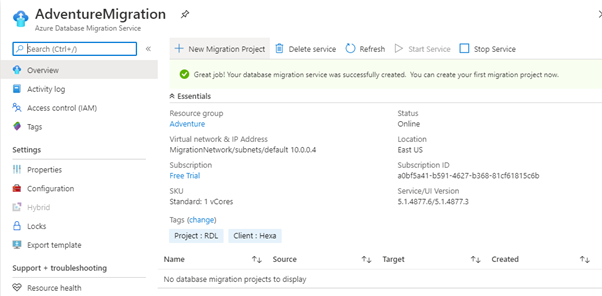
Now, let’s create a project with one existing migration service named AdventureMigration.
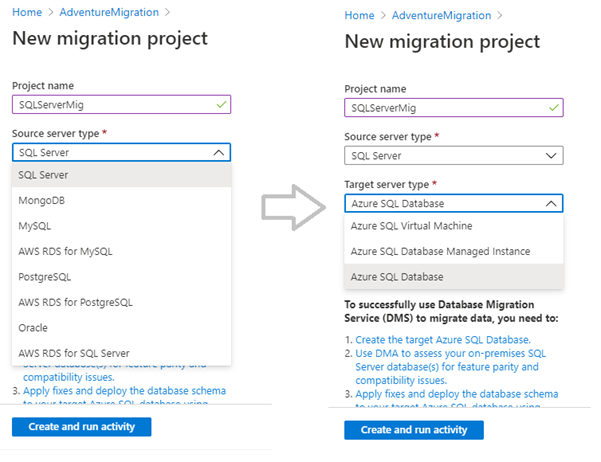
Add a valid project name, source database, and destination database technology.
For the source server type, we choose SQL Server, and for the destination/target server type, we choose the Azure SQL Database.
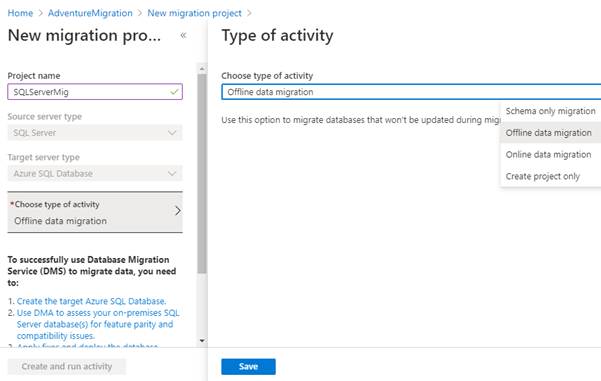
After selecting the Source and the Destination, choose the type of activity for this project.
The type is “Online data migration.”
Before proceeding, we need to follow prerequisites. Here, SQL Server source can be RDS or on-premises SQL Server.
For Online Data Migration, ADMS will not allow RDS to synch the information continuously. The thing is, RDS does not allow creating the sysadmin role, while ADMS requires this sysadmin SQL Server role with SQL login.
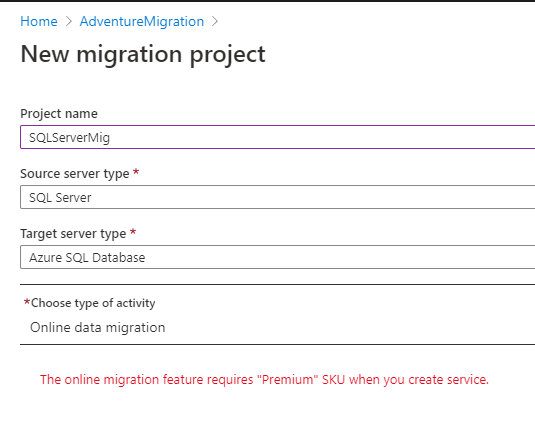
As you see, the ADMS project returns an error as [The online migration feature requires “Premium” SKU when you create service]. The reason is, this ADMS is not configured with premium SKU for online data migration. Instead, the configuration is basic.
Choose the Offline data migration activity type and proceed.
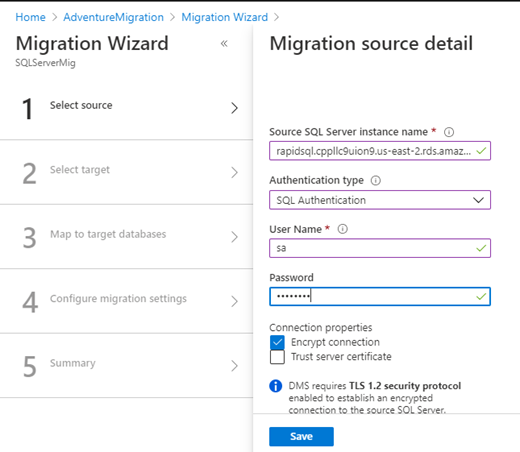
We are adding a source from the AWS RDS instance. We authenticated the SQL Server RDS using sa login.
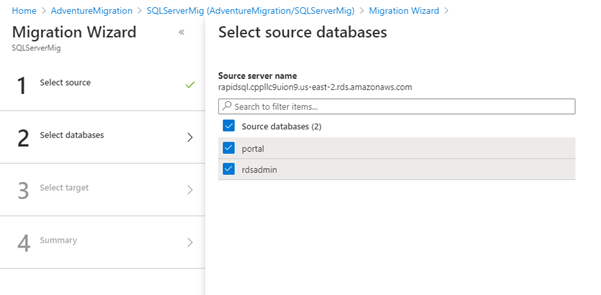
After authentication of sa, select the databases for migration to the Azure platform.
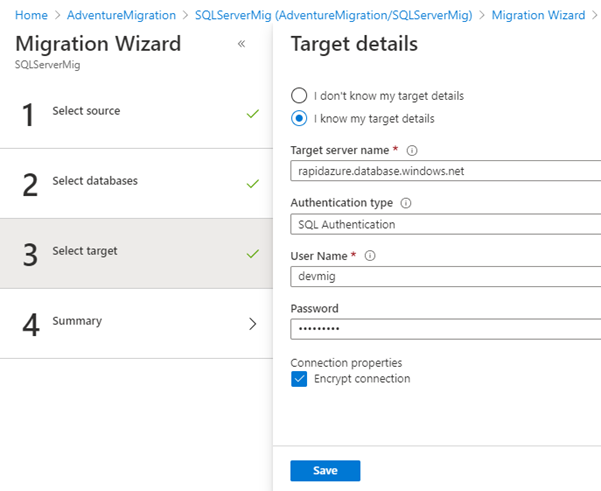
Add a destination site with Azure server host URL. Authenticate it, using devmig user of Azure SQL database.
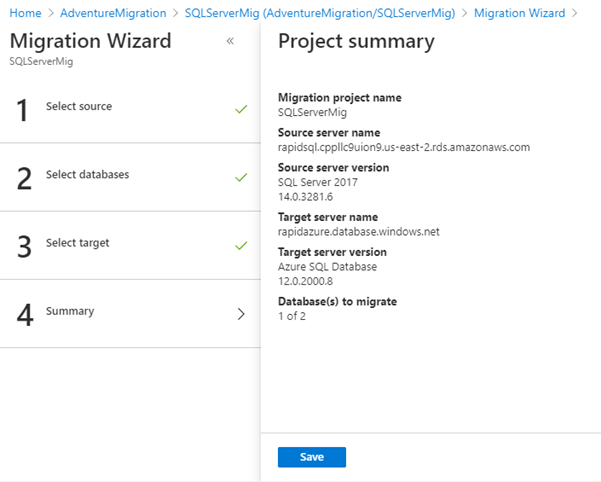
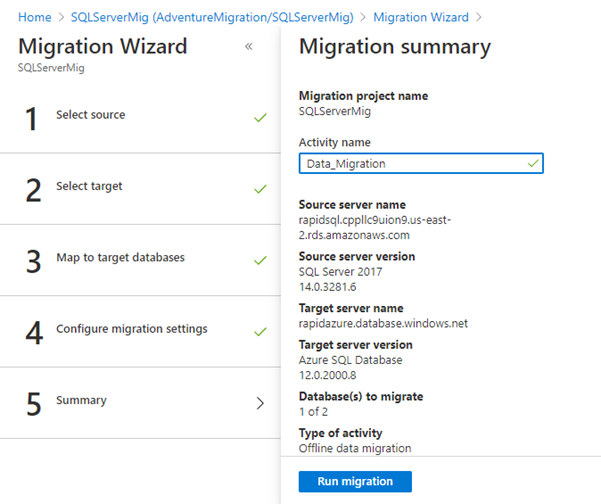
After authentication of the source and destination sites, we see the summary details of the migration project we are creating. To generate the project in ADMS, click Save. Now it allows adding the migration activity for it.
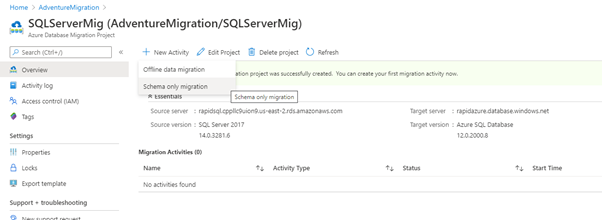
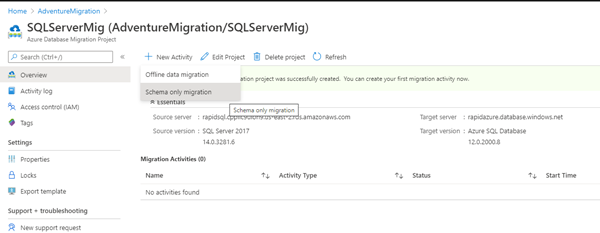
The adventureMigration project is launched inside the ADMS. Users can define activities with online data migration, or “Schema only” migration for offline-based tasks. Note that the schema available in the offline typed project allows the migration activity only. It takes place because the process could require schema deployment if that schema does not exist at the destination before migrating data.
If the schema of the source database object is absent at the destination site, the ADMS activity will return an error for the data migration activity attempt.
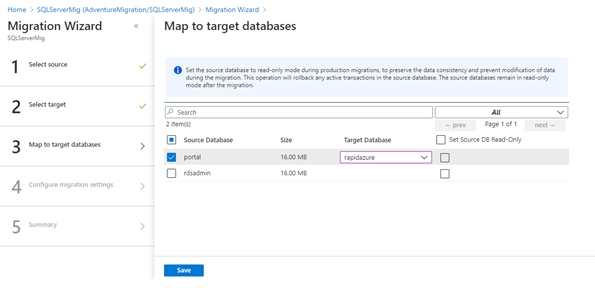
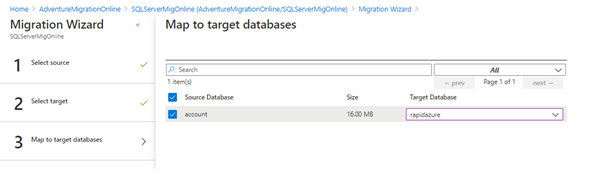
For instance, create a migration activity, having defined the source and destination server. Then, map the source and destination database.
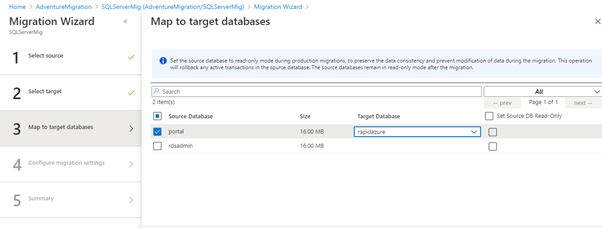
The portal database (Source) of SQL Server RDS and rapidazure database of the Azure database (Destination) are selected.
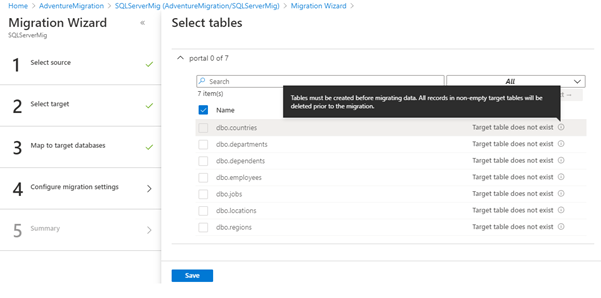
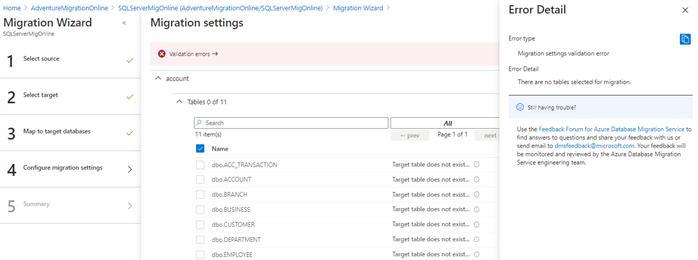
In the next screen, you see the list of tables (RDS-Portal). We select the tables for migrating the data into the Azure database. But it does not allow us to select the tables, and we get the error {Target table does not exist}. It happens because the destination does not have that table.
Create another activity for schema migration, and execute it in the same project.
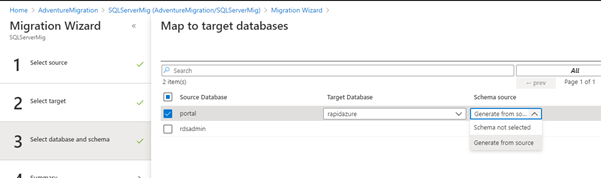
Authenticate the source and destination site. Then, map the source and destination databases for schema migrating.
Note that you have to select the schema source option as {Generate from source} – it validates and generates the destination site’s schema.
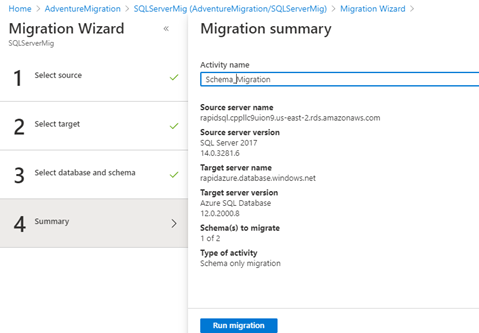
Deploy the schema migration activity by defining the activity name.
Now, we run the schema migration activity. It will take some time.
Generate a script from source >> Validate the schema >> Execute the schema at destination >> Prepare for warnings and errors
The status shows some warning – we need to check it. For this, click the status:
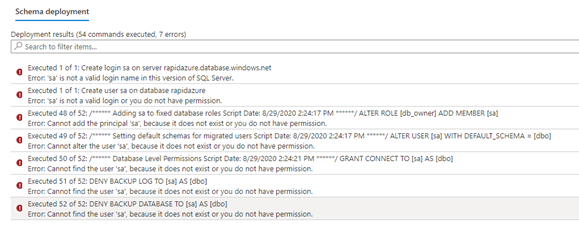
Here, you can see such errors in the schema script execution. Each error is relevant to the SQL Server login sa. The reason is, Azure does not allow login with username sa.
However, the rest of the statements will be executed in the destination site. Check if the table’s schema at destination sites that are migrated or not:
Now, we can see that table schema is copied on the Azure platform.
Thus, we’ve performed the schema migration in Offline based migration project, as schema did not exist on the target site for data migration.
It is time to create an offline migration activity in the same project as defined earlier.
Source and destination servers are authenticated, and the source and target databases are mapped.
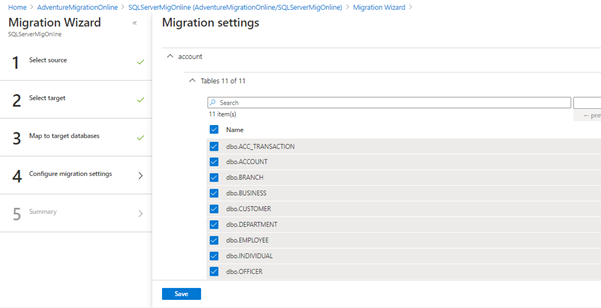
Select the tables in the list for data migration.
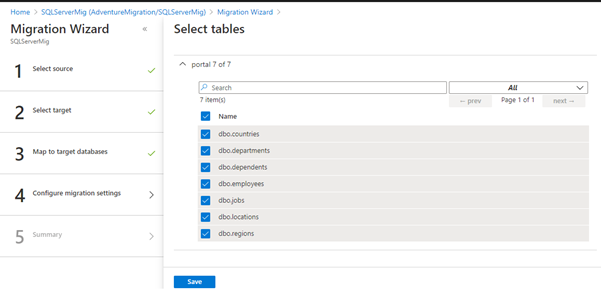
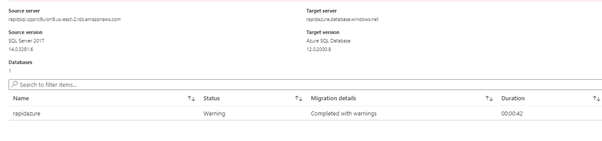
Selected all tables in the item list and run the activity, defining the migration Activity name.
You can check the status of migration activity. The database administrator has to check and resolve errors or validation in them if there are any.
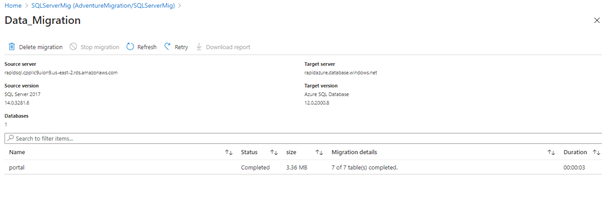
The status is completed, meaning that the data have migrated to the Azure platform successfully.
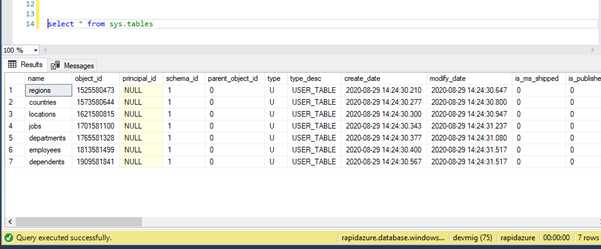
The next step is to check one of the tables in the Azure platform. We can see that rows are transferred to the destination site.
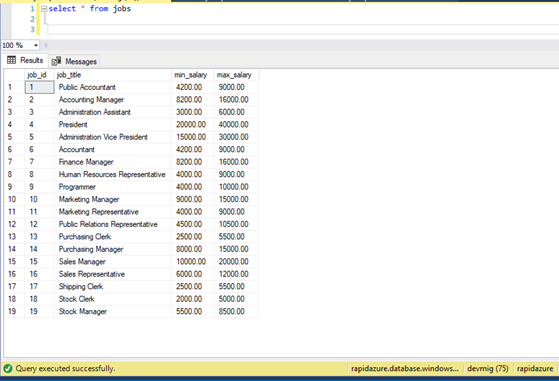
Schema and data exist on the Azure platform in the same way as on RDS.
Then, we set up Online Migration with the same sites for continuous synchronization from source to destination. To ensure the online data migration project validation, we need to configure ADMS with the premium tier.
We create a new Azure Database Migration Service in the premium tier:
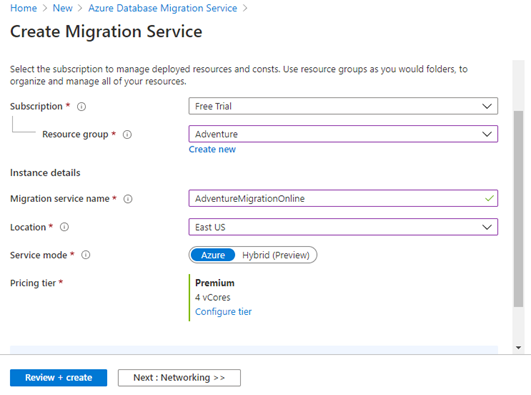
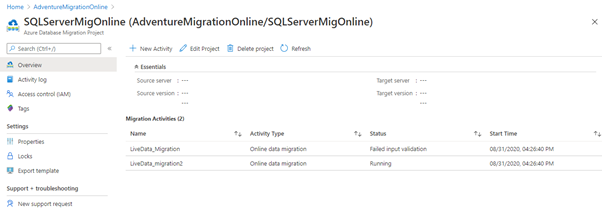
The result is launching a new service named AdventureMigrationOnline. Now, we start a migration project for the online data migration activity.
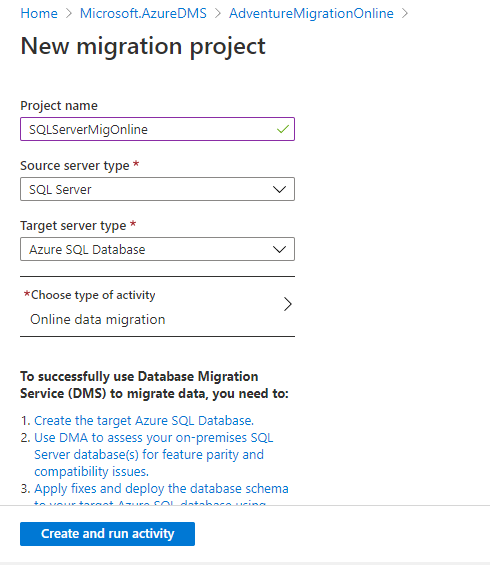
We configure the SQLSererMigOnline project to set up a migration from SQL Server to Azure SQL Database. As of now, RDS does not support online data migration for SQL Server RDS instance. We can check it on the below screen.
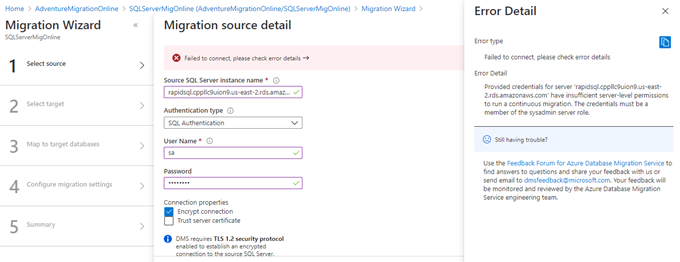
It produces an error that RDS does not have sufficient permission to perform continuous migration. The reason is, RDS does not allow sysadmin access to any SQL login.
Let’s try with the on-premises SQL Server as a source site.
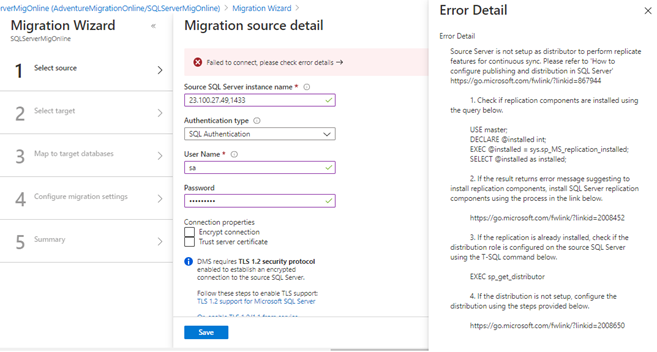
It returns an error, as the distribution database is not configured in the on-premises SQL Server site. The same error occurs due to the distribution database misconfiguring.
We configured the distribution and set up the publisher on the database. For that, we added all articles in the transaction replication at the On-premises SQL Server site.
After configuring the destination as an Azure SQL database, it asks to map the source and destination database.
If the table object schema does not exist at the destination database, the error occurs, as shown below.
We’ve migrated the schema to the destination database. Then, we select tables for online data migration. The user will be allowed to choose the object for continuous migration.
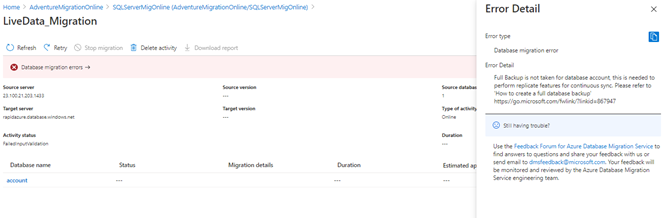
The backup validation step takes place again. It checks the last backup LSN at the on-premises SQL Server (Source site). The process requires a full back up of the source database before the online data migration start. If you don’t generate the backup, the below error occurs:
After taking a full backup, we run the LiveData_migraation2 activity. It takes some time to set up a replication process.
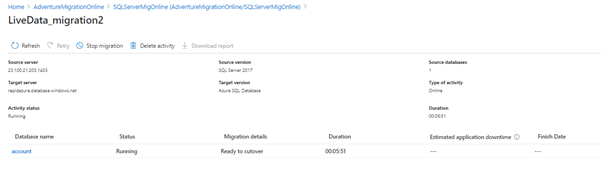
We can check the table’s status for the continuous migration for a full load and incremental data sync.
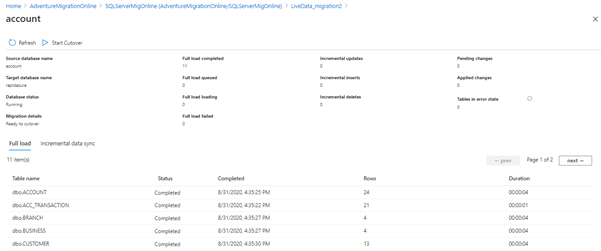
Initially, the table is loaded with data existing in the on-premises SQL Server. In Incremental data sync, the user can see the data changes after initial data loading (in the below screen). We insert one more row in the Department table and check the synchronization status as below.
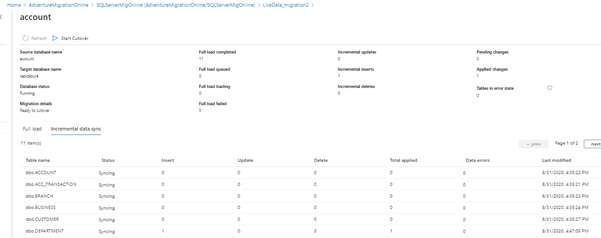
As you see, see the inserts count 1 for the Department table. The row is synchronized at the destination as well.
Now we can see the running status for continuous migration.
Conclusion
We have gone through each activity type of Azure Data Migration Project to showcase real-time issues with appropriate solutions.
Refer to the SQL Azure category and the next article to learn more about the Azure Database Migration Service and MySQL to Azure Database migration.
Tags: azure sql, database administration, Microsoft Azure, sql server Last modified: September 20, 2021