
In my previous article I have explained the basics of SQL Server Collation. I would suggest you first read that article (if you haven’t already). Here, I will show you how to change the server-level collation or the SQL Server instance-level collation of an existing SQL Server instance.
What is Server Level Collation in SQL Server?
Collation determines sorting rules, case, and accent properties for data. It is an important setting that can affect your data inside the database, so it’s not recommended to be changed frequently.
Collation can be configured at 4 layers in SQL Server:
- Server Level
- Database Level
- Column Level
- Expression Level
Note: If you are using SQL Server express edition you cannot change the collation from SQL_Latin1_General_CP1_CI_AS.
Change Server Level Collation of Existing SQL Server Instance
This section will describe the prerequisites and process to change the server-level collation. It will be changed by rebuilding system databases with a new collation name.
Prerequisites
Follow the below points to execute the collation change for a production instance.
- Run a full backup of all databases. If possible, take a VM snapshot before starting this procedure.
- Make sure you have all scripts to create user databases or database objects like tables, logins, users, jobs, etc. We will create all database objects after the collation change.
- Export all data using bcp or any third-party tool.
- Record server-level configuration values and SQL Server instance build number including hotfixes applied to the instance.
- Record all system database files locations. This might be needed if you have moved your system database files to another location.
Let’s have a look at a few scripts which will help you to capture the system details. Copy these outputs to a notepad or an Excel file, or simply take a screenshot and save it for future reference.
Run the below command to get all server-level configurations.
--Get all server level configurations
SELECT * FROM sys.configurations;
Capture the SQL Server build version by executing the below query.
--Fetch SQL Server build version
SELECT @@VERSION
GO

SELECT
SERVERPROPERTY('ProductVersion ') AS ProductVersion,
SERVERPROPERTY('ProductLevel') AS ProductLevel,
SERVERPROPERTY('ResourceVersion') AS ResourceVersion,
Similarly, we should get the system database files location by running the below T-SQL statements.
SELECT name, physical_name AS Database_file_location
FROM sys.master_files
WHERE database_id IN (DB_ID('master'), DB_ID('model'), DB_ID('msdb'), DB_ID('tempdb'));
Next, we will run the below T-SQL scripts to gather collation information of SQL Server instance and all databases in one shot.
--Get existing collation of SQL Server Instance and all databases
SELECT name, collation_name
FROM sys.databases
GO
--Get existing server level collation
SELECT SERVERPROPERTY('Collation') As [Instance Level Collation]
Read my previous article for more information about this script.
Now, generate Create scripts for all logins and jobs created on the SQL Server instance for future reference and validation. Also, you can run the below script to fetch the list of all logins and jobs from the SQL Server instance.
--Get list of logins
Use master
Go
Select * from syslogins

--Get list of Jobs
USE msdb
Go
Select * from sysjobs
Instance Rebuild
Once you have finished the steps mentioned in the prerequisite section, the next step is to start the process for the collation change. As we have taken backups or exported all the data from user databases, we need to detach all user databases from the SQL Server instance. You can also drop them if you want to import the exported data into the new database. I would suggest detaching them to keep one safe copy of your databases so that you can attach them after the collation change.
The process of changing a server-level collation requires the system database rebuild. We need to pass a new collation name while rebuilding system databases. Rebuilding system database operation requires SQL Server installation setup. Let’s start the system database rebuild operation to change the server-level collation.
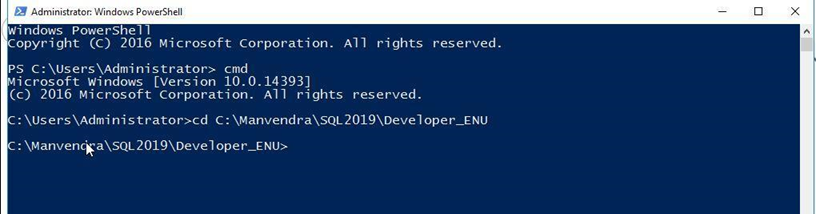
Login to your target system for which you will be changing collation. Open Windows Command prompt or a PowerShell terminal window. Open PowerShell, then type cmd to use a Windows Command prompt utility as shown in the below image. Change your directory location where you have placed your SQL Server installation setup files.
--Open Windows Command prompt
Cmd

--Change directory where you have placed SQL Server setup files
Cd <Full path>

--My location was C:\Manvendra\SQL2019\Developer_ENU so i executed below cmd
cd C:\Manvendra\SQL2019\Developer_ENU
Now I am in the location where the SQL Server installation files are saved.
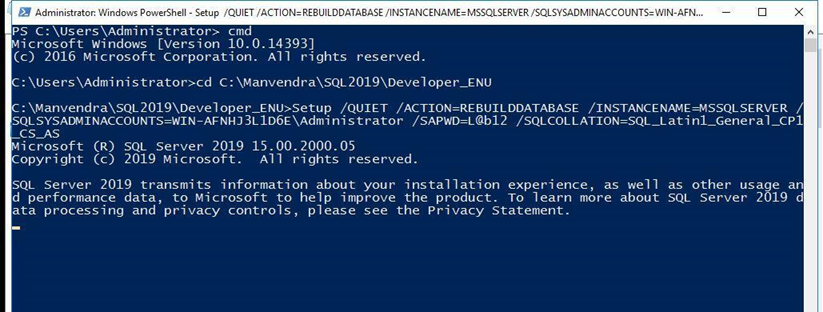
Next, we will run the below command to rebuild all system databases. Additionally, we must run the below command with a new collation parameter to change it for this SQL Server instance and all system databases.
--Rebuild system databases with new collation. Replace all values in <> with your desired value.
Setup /QUIET /ACTION=REBUILDDATABASE /INSTANCENAME=<InstanceName>
/SQLSYSADMINACCOUNTS=<accounts> / SAPWD= <StrongPassword>
/SQLCOLLATION=<CollationName>

--I replaced all values and executed the below command with collation SQL_Latin1_General_CP1_CS_AS
Setup /QUIET /ACTION=REBUILDDATABASE /INSTANCENAME=MSSQLSERVER /SQLSYSADMINACCOUNTS=WIN-AFNHJ3L1D6E\Administrator /SAPWD=L@b12 /SQLCOLLATION=SQL_Latin1_General_CP1_CS_AS
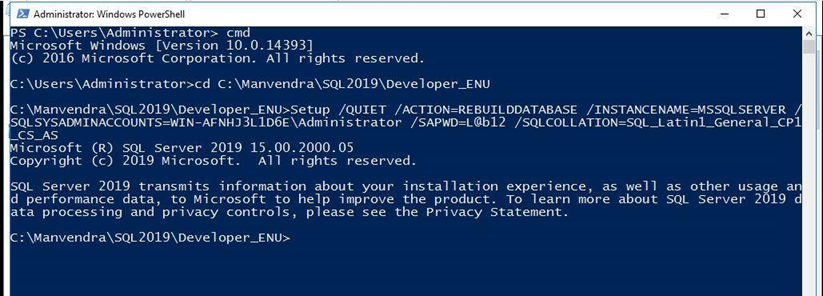
You can see its output in the below screenshot. You should leave the screen as it is and let the screen proceed till you get the working directory.
Here, we have got the prompt. It means the system database has been rebuilt with a new collation for this SQL Server instance. Let’s verify it.
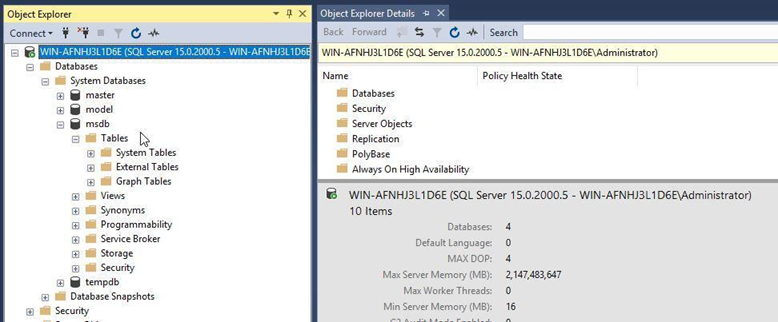
Make sure that SQL Server is running and its services are launched. Now start SQL Server Management Studio or sqlcmd to connect to the SQL Server instance. You can see, I have successfully connected to the SQL Server instance which was rebuilt in the above steps. We can see only system databases in the below image.
Run the below T-SQL statements to gather the database-level and server-level collation details. This step will validate the change of server and system databases collation.
--Get collation of the SQL Server Instance and all databases
SELECT name, collation_name
FROM sys.databases
GO
--Get an existing server-level collation
SELECT SERVERPROPERTY('Collation') As [Instance Level Collation]
Server-level and database-level collation for all system databases use SQL_Latin1_General_CP1_CS_AS in the below screenshot. This step validates that a new collation was configured on this SQL Server instance.

The server-level collation has been changed to the new collation. The next step is to attach all user databases which were detached before rebuilding the system databases. Remember, all existing databases which are to be attached or restored will have the same collation under which they were backed up or detached. You need to manually change it after the server-level collation change. Although, all newly created databases will have a new collation by default.
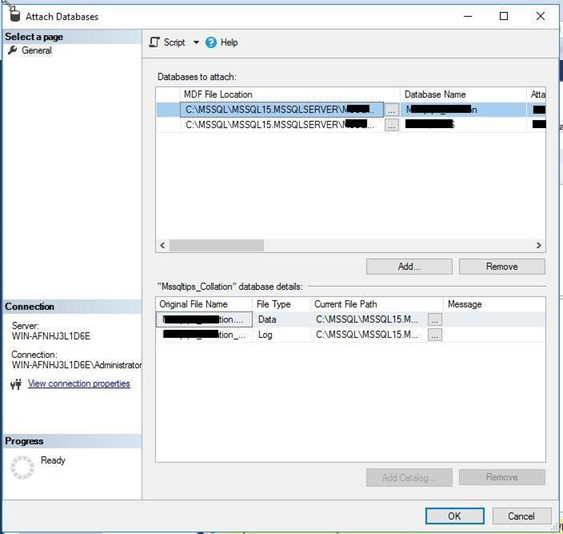
I have attached my user databases as shown in the below image.
Once the databases are attached, you can check the collation of these databases again. If you want to change the collation of these databases, you can read my previous article to get this done.
Conclusion
If you have exported data from the databases, you can execute all scripts which were generated during the prerequisite to create the database objects. Then you can import the exported data in these newly created databases and objects. You can validate and modify server-level configurations as per the details we fetched in the prerequisites section.
You can also move system database files if you want to keep them in a specific location as a system database rebuild will create them in a default location. It is also possible to execute the scripts to create logins and jobs with the help of scripts generated before. Do not restore system databases as it will change the newly-configured collation to the older one for that database.
Please share this article and give us your feedback, so that we can improve.
Tags: collation, SQL Server collation Last modified: March 31, 2023