Why Row Level Security Matters?
Prior to SQL Server 2016, table-level security was the default lowest level of security for a database. In other words, a user could be restricted to access a table as a whole. However, in some cases we need users to have access to a table, but not to specific rows within the table. Prior to SQL Server 2016, this required custom stored procedures to be written for the provision of such fine-grained security. However, such stored procedures are prone to SQL injection and other security caveats.
Using SQL Server Row Level Security Feature on Practice
SQL Server 2016 introduced a new row-level security feature which allows users to have access to a table but restricts them to accessing specific rows within that table. Let’s take a look at how this can be used practically.
Description
There are four steps to implementing row-level security in SQL Server.
- Grant Select permissions to the users on the table on which you want to implement row-level security.
- Next, you have to write an inline-table value function containing a filter predicate. Add the filter logic to the filter predicate.
- Finally, you need to bind the filter predicate that you created in the second step to a security policy.
- Test the row-level security feature.
Before we perform the above steps, we need to create a dummy database with some dummy records. Execute the following script to do so:
CREATE DATABASE University
GO

USE University
GO

USE University
CREATE TABLE Persons
(
Id INT PRIMARY KEY IDENTITY(1,1),
Name VARCHAR (50),
Role VARCHAR (50)
)
GO

USE University
INSERT INTO Persons VALUES ('Sally', 'Principal' )
INSERT INTO Persons VALUES ('Edward', 'Student' )
INSERT INTO Persons VALUES ('Jon', 'Student' )
INSERT INTO Persons VALUES ('Scot', 'Student')
INSERT INTO Persons VALUES ('Ben', 'Student' )
INSERT INTO Persons VALUES ('Isabel', 'Teacher' )
INSERT INTO Persons VALUES ('David', 'Teacher' )
INSERT INTO Persons VALUES ('Laura', 'Teacher' )
INSERT INTO Persons VALUES ('Jean', 'Teacher')
INSERT INTO Persons VALUES ('Francis', 'Teacher' )
In the script, we create a dummy database “University”. Next, we execute the script that creates a table named “Persons”. If you look at the table design, you can see that it contains three columns Id, Name and Role. The Id column is the primary key column with IDENTITY constraint. The Name column contains the name of the person and the Role column contains the role of the person. Finally, we inserted 10 records into the Persons table. The table has 1 Principal, 4 teachers, and 5 students.
Let’s execute a simple SELECT statement to see records in the table:
Use University
SELECT * FROM Persons
The result looks like this:
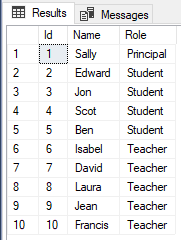
We want the user named Principal to have access to all of the rows in the Persons table. Similarly, a Teacher should have access to only the Teacher records, while Students should have access to only Student records. This is a classic case of row-level security.
To implement the row level security, we will follow the steps that we discussed earlier.
Step 1: Grant Select Permissions to Users on the Table
Let’s create three users with roles Principal, Teacher, and Student and grant them SELECT access to these users on the Persons table. Execute the following script to do so:
CREATE USER Principal WITHOUT LOGIN;
GO
CREATE USER Teacher WITHOUT LOGIN;
GO
CREATE USER Student WITHOUT LOGIN;
GO

Use University
GRANT SELECT ON Persons TO Principal;
GO
GRANT SELECT ON Persons TO Teacher;
GO
GRANT SELECT ON Persons TO Student;
GO
Step 2: Creating Filter Predicate
Once the users have been granted permissions, the next step is to create a filter predicate.
The following script does that:
Use University
GO
CREATE FUNCTION dbo.fn_SP_Person(@Role AS sysname)
    RETURNS TABLE
WITH SCHEMABINDING
AS
    RETURN SELECT 1 AS fn_SP_Person_output
    -- Predicate logic
    WHERE @Role = USER_NAME()
    OR USER_NAME() = 'Principal';
GO
The filter predicate is created inside an inline table-valued function and takes the role of the user as a parameter. It returns those records where the Role value passed as a parameter matches the role value in the Role column. Or if the user role is ‘Principal’, all the roles are returned. If you look at the predicate filter, you will not find the table name for which we are creating the filter. The filter predicate is connected to the table via the security policy that we will see in the next step.
Step 3: Creating a Security Policy
Execute the following script to create a security policy for the filter predicate that we created in the last step:
Use University
Go
CREATE SECURITY POLICY RoleFilter
ADD FILTER PREDICATE dbo.fn_SP_Person(Role)
ON dbo.Persons
WITH (STATE = ON);
GO
In the Security policy, we have simply added the filter predicate we created to the Persons table. To enable the policy, the “STATE” flag should be set to ON.
Step 4: Testing Row-Level Security
We performed all the steps needed to enforce row-level security on the Persons table of the University database. Let’s first try to access the records in the Persons table via default user. Execute the following script:
Use University
SELECT * FROM Persons;
GO
You will see nothing in the output since the default user cannot access the Persons table.
Let’s switch to the Student user that we created earlier and try to SELECT records from the Persons table:
EXECUTE AS USER = 'Student';
Use University
SELECT * FROM Persons; -- Student Records Only
REVERT;
GO
In the script above, we switch to the ‘Student’ user, selected records from the Persons table and revert back to the default user. The output looks like this:
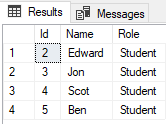
You can see that owing to the row-level security, only records where the Role column has a value of Student are displayed.
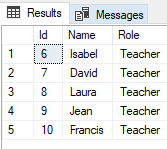
Similarly, the user Teacher will only have access to records where Role column has a value of Teacher. Execute the following script to verify this:
EXECUTE AS USER = 'Teacher';
Use University
SELECT * FROM Persons; -- All Records
REVERT;
GO
In the output, you will the following records:
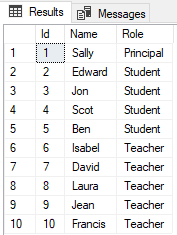
Finally, in our filter predicate, we implemented the logic that the user Principal can access all the records. Let’s verify this by executing the following query:
EXECUTE AS USER = 'Principal';
Use University
SELECT * FROM Persons; -- All Records
REVERT;
GO
In the output, you will see all the records as shown below:
Conclusion
The row-level security feature is extremely useful when you want users to have fine-grained access to specific data. However, the row-level security feature involves inline table-valued function, which may cause you to take a performance hit.
As a rule of thumb, if you plan to use a simple WHERE clause in the predicate function, your performance shouldn’t be impacted. On the other hand, complex join statements involving lookup tables should be avoided when you have implemented row-level security.
Tags: database security, sql server 2016 Last modified: September 22, 2021