An SQL Server database contains primary data files, secondary data files (optional), and transaction log files.
The primary and secondary datafiles contain tables, database objects, schema, and data.
The file extension of the primary database file is *.mdf, and the file extension of the secondary data file is *.ndf.
The transaction log files store all the changes made by the transactions (insert, update, and delete). If the SQL Server restarts unexpectedly or crashes, the database engine rolls the incomplete transaction back before the point of failure using the Transaction log file.
The extension of the transaction log file is *.ldf. You might want to refer to this article to understand the Transaction Log Files architecture.
In this article, I am going to explain how we can manage the database files (MDF files) in SQL Server 2019.
The article will cover the following points:
- View the database file details using DMVs and SQL Server Management Studio.
- Attach and detach the User databases MDF Files.
- Attach and detach the system databases MDF Files.
View database files using dynamic management views
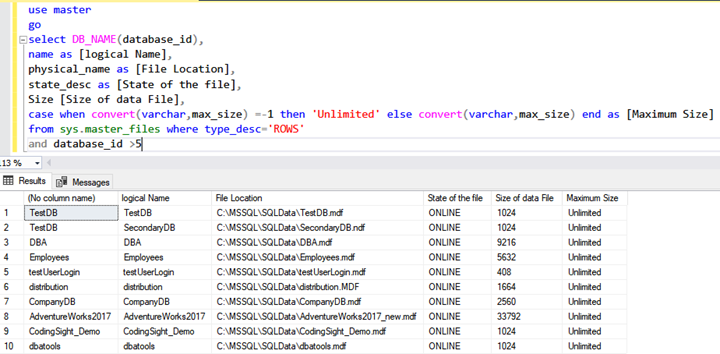
To view the details of the database mdf files, we can use sys.database_files and sys.master_files. The query should be written as follows:
use master
go
select DB_NAME(database_id),
name as [logical Name],
physical_name as [File Location],
state_desc as [State of the file],
Size [Size of data File],
case when convert(varchar,max_size) =-1 then 'Unlimited' else convert(varchar,max_size) end as [Maximum Size]
from sys.master_files where type_desc='ROWS'
and database_id >5
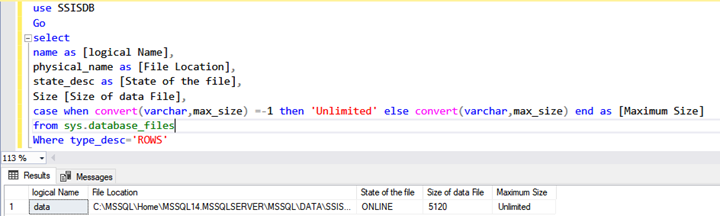
As the example refers to the MDF details for all databases, we need a different code to view the specific database files. For that purpose, we use sys.database_files.
The following script will retrieve the details of the SSISDB database:
use SSISDB
Go
select
name as [logical Name],
physical_name as [File Location],
state_desc as [State of the file],
Size [Size of data File],
case when convert(varchar,max_size) =-1 then 'Unlimited' else convert(varchar,max_size) end as [Maximum Size]
from sys.database_files
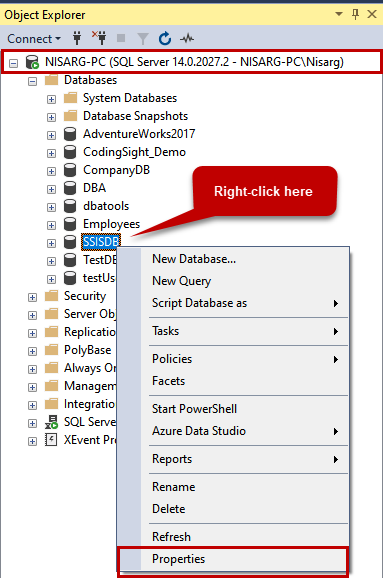
View the database files using SQL Server Management Studio
The option of viewing the MDF files list available in SQL Server Management Studio (SSMS).
In SQL Server Management Studio, connect to the SQL Server instance. Then, expand Databases -> Right-click on any database -> Click Properties:
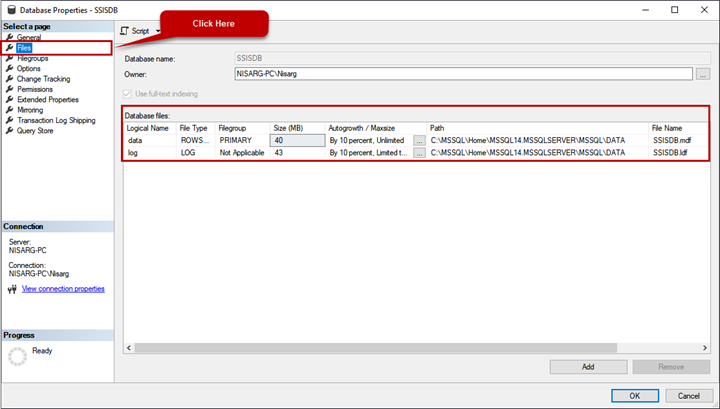
In the Database Properties window, click on Files. It will present the list of the database MDF and LDF files:
Detach and attach the User database MDF files
There are two ways to detach and attach MDF files of the User database:
- Using SQL Server Management Studio.
- Using T-SQL script.
Attach and Detach database using SSMS
Attach the database
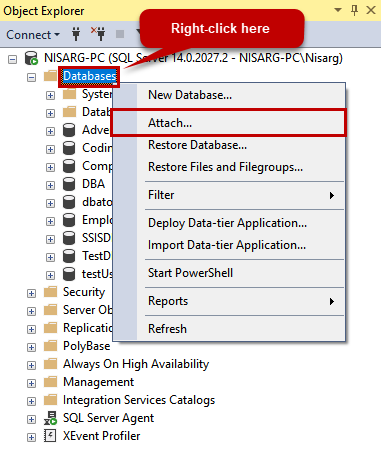
Launch SSMS -> Connect to the SQL Server instance -> Right-click on Database -> Click Attach.
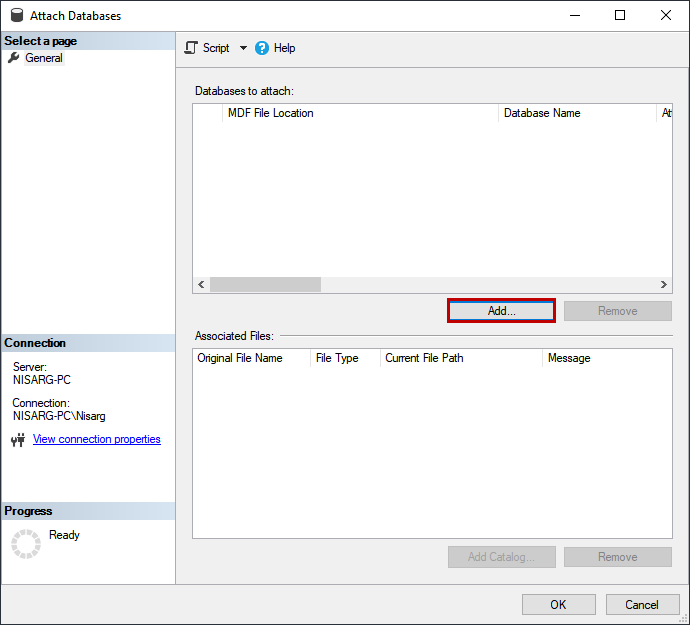
It will open the Attach Databases window. Click Add in that window:
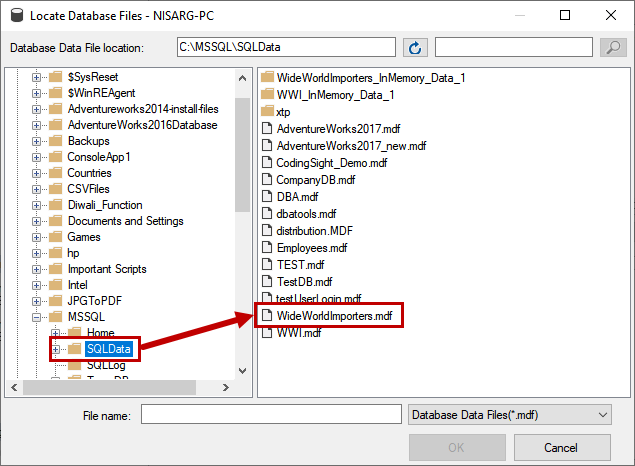
In the new Locate Database Files window, browse the file system to locate the MDF file. Double-click it.
The associated data files and log files are populated in the associated files grid view in the Attach Databases window. Click OK to attach the database.

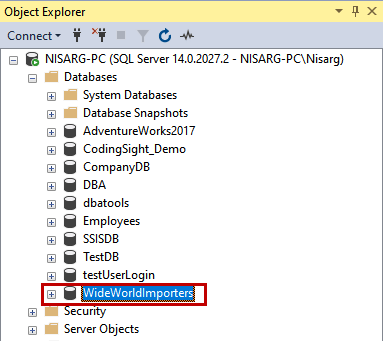
Once the database is attached, you can see it in SQL Server Management Studio:
Detach the database
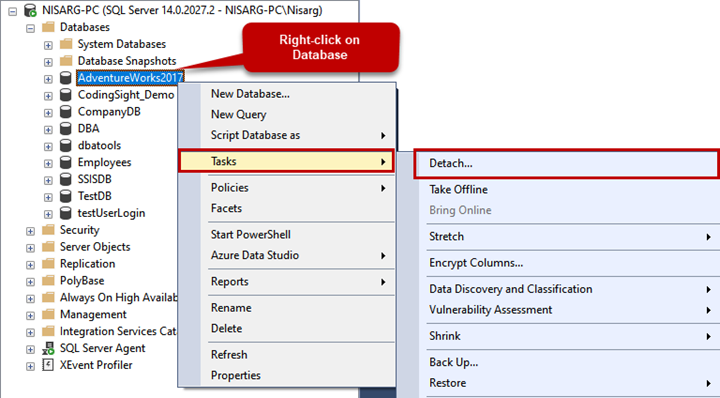
Launch SQL Server management studio and connect to the SQL Server instance. Expand the Databases list.
Right-click on the necessary database -> Tasks -> Click on Detach.
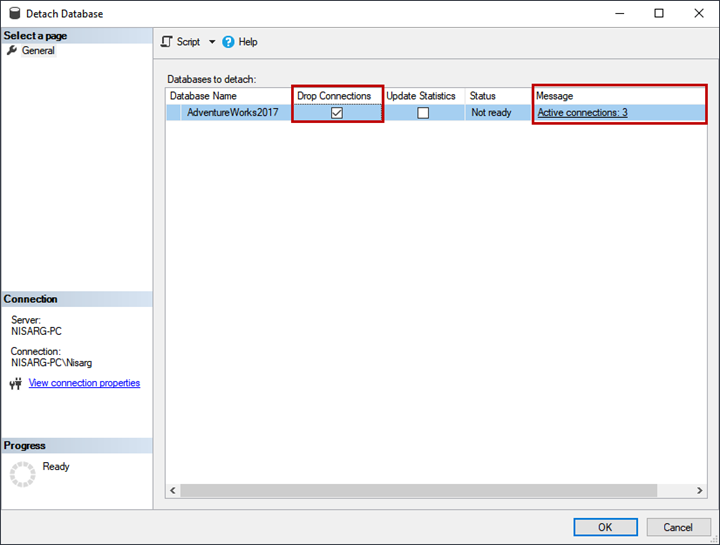
If you want to forcefully disconnect all users and processes connected to the database, you do it in the Detach Database window.
Checkmark the Drop Connections option in the Databases to detach section and click OK.
Attach and Detach the database using T-SQL
We can use CREATE DATABASE WITH ATTACH query with the following syntax:
USE [master]
GO
CREATE DATABASE [DatabaseName] ON
( FILENAME = 'Path of Primary Database file (MDF)' ),
( FILENAME = N'Path of Secondary Database file (NDF)' ),
...
...
( FILENAME = N'Path of Transactional Log file (LDF)' )
 FOR ATTACH
GO
To attach the database, run the following T-SQL query:
USE [master]
GO
CREATE DATABASE [WideWorldImporters] ON
( FILENAME = N'C:\MSSQL\SQLData\WideWorldImporters.mdf' ),
( FILENAME = N'C:\MSSQL\SQLLog\WideWorldImporters.ldf' ),
( FILENAME = N'C:\MSSQL\SQLData\WideWorldImporters_UserData.ndf' )
 FOR ATTACH
GO
Also, we can run the sp_detach_db stored procedure to detach the database.
If you want to disconnect users forcefully, you can use the ALTER DATABASE SET SINGLE_USER command in the following script:
Use [master]
GO
ALTER DATABASE [WideWorldImporters] SET SINGLE_USER WITH ROLLBACK IMMEDIATE
GO
EXEC sp_detach_db [WideWorldImporters]
GO
Manage the System database MDF files
Suppose we want to move the system databases’ MDF files (master, model, msdb, and Tempdb) to another location. Let’s examine the process.
Move the Master Database
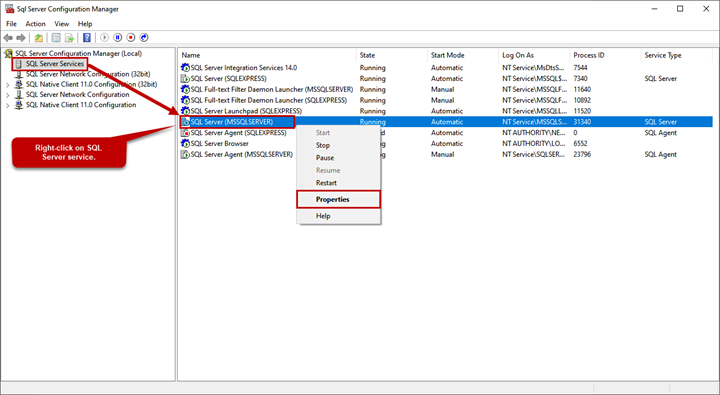
To move the master database, open SQL Server configuration manager -> Click SQL Server Services -> Right-click on the SQL Server service of the desired SQL Server instance (MSSQLSERVER) -> Click on Properties:
To change the master.mdf file location, click on the data file path of the master file.
The master.mdf path value is followed by -d,and mastlog.ldf path value is followed by -l
Replace these values with the following:
Data File: -dD:\MS_SQL\Data\master.mdf
Log File: -lD:\MS_SQL\Log\mastlog.ldf
Once the values get changed, click on Update as shown in the illustration below:
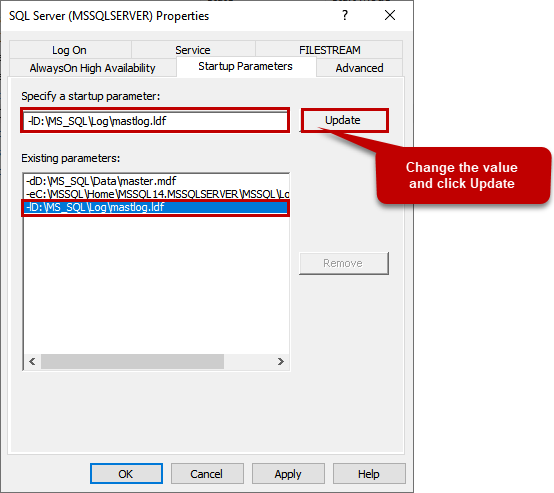
Click OK to save the values.
Then stop the SQL Server services and copy the database files to a new location. After completion, start the SQL Service again.
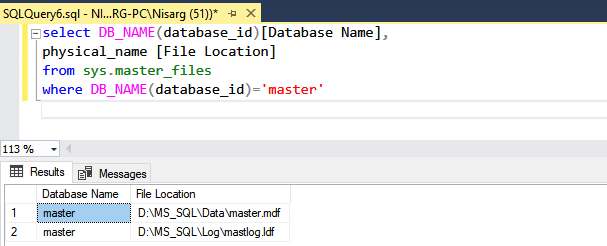
Run the below query to verify the file location.
select DB_NAME(database_id)[Database Name], physical_name [File Location] from sys.master_files
where DB_NAME(database_id)='master'
Move the Model Database
To move the Model database to another drive, we must first run an ALTER DATABASE MODIFY FILE command. It serves to change the location in the SQL Server system catalog.
Run below command:
ALTER DATABASE model
MODIFY FILE (NAME = modeldev, FILENAME = 'D:\MS_SQL\Data\model.mdf');
GO
ALTER DATABASE model
MODIFY FILE (NAME = modellog, FILENAME = 'D:\MS_SQL\Log\modellog.ldf');
GO
Then, stop SQL Server services by executing the below command in PowerShell:
/*Stop SQL Services*/
PS C:\> Stop-Service MSSQLSERVER -Force
/*Start SQL Services*/
PS C:\> Start-Service MSSQLSERVER
Copy the model.mdf and modellog.ldf files to a new location and start the services.
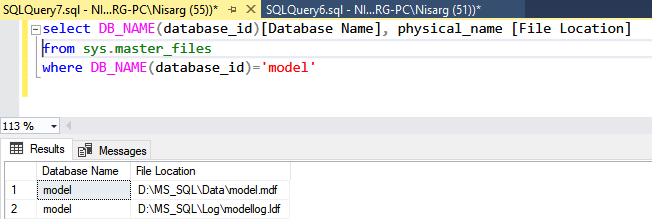
Run the below query to verify the file location:
select DB_NAME(database_id)[Database Name], physical_name [File Location] from sys.master_files
where DB_NAME(database_id)='model'
Move the MSDB Database
To move the MSDB database to another drive, run an ALTER DATABASE MODIFY FILE command first to change the location in the SQL Server system catalog:
ALTER DATABASE msdb
MODIFY FILE (NAME = MSDBData, FILENAME = 'D:\MS_SQL\Data\MSDBData.mdf');
GO
ALTER DATABASE msdb
MODIFY FILE (NAME = MSDBLog, FILENAME = 'D:\MS_SQL\Log\MSDBLog.ldf');
GO
Stop the SQL Server services by executing the following command in PowerShell:
/*Stop SQL Services*/
PS C:\> Stop-Service MSSQLSERVER -Force
/*Start SQL Services*/
PS C:\> Start-Service MSSQLSERVER
Copy the MSDBData.mdf and MSDBLog.ldf files to the new location and start the services.
Run the below query to verify the file location:
select DB_NAME(database_id)[Database Name], physical_name [File Location] from sys.master_files
where DB_NAME(database_id)='msdb'

Move the TempDB Database
To move the TempDB database to another drive, run an ALTER DATABASE MODIFY FILE command first to change the file location in the SQL Server system catalog:
ALTER DATABASE tempdb
MODIFY FILE (NAME = tempdev, FILENAME = 'D:\MS_SQL\Data\tempdb.mdf');
GO
ALTER DATABASE tempdb
MODIFY FILE (NAME = temp2, FILENAME = 'D:\MS_SQL\Data\tempdb_mssql_2.ndf');
GO
ALTER DATABASE tempdb
MODIFY FILE (NAME = temp3, FILENAME = 'D:\MS_SQL\Data\tempdb_mssql_3.ndf');
GO
ALTER DATABASE tempdb
MODIFY FILE (NAME = temp4, FILENAME = 'D:\MS_SQL\Data\tempdb_mssql_4.ndf');
GO
ALTER DATABASE tempdb
MODIFY FILE (NAME = temp5, FILENAME = 'D:\MS_SQL\Data\tempdb_mssql_5.ndf');
GO
ALTER DATABASE tempdb
MODIFY FILE (NAME = temp6, FILENAME = 'D:\MS_SQL\Data\tempdb_mssql_6.ndf');
GO
ALTER DATABASE tempdb
MODIFY FILE (NAME = temp7, FILENAME = 'D:\MS_SQL\Data\tempdb_mssql_7.ndf');
GO
ALTER DATABASE tempdb
MODIFY FILE (NAME = temp8, FILENAME = 'D:\MS_SQL\Data\tempdb_mssql_8.ndf');
GO
ALTER DATABASE tempdb
MODIFY FILE (NAME = templog, FILENAME = 'D:\MS_SQL\Log\templog.ldf');
GO
Restart the SQL Server services by executing the following command in PowerShell:
/*Restart SQL Services*/
PS C:\> Restart-Service MSSQLSERVER -Force
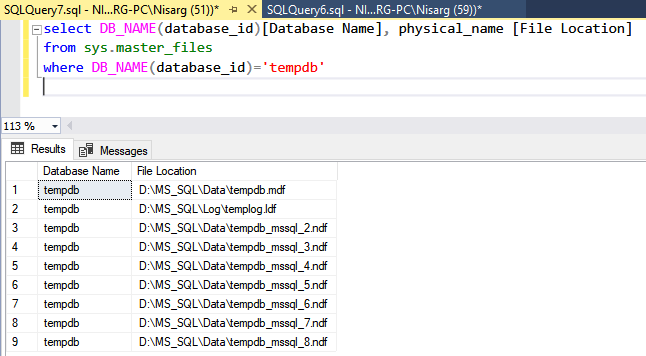
Run the below query to verify the file location:
select DB_NAME(database_id)[Database Name], physical_name [File Location] from sys.master_files
where DB_NAME(database_id)='tempdb'
You can also use the Transaction Log tool from the Devart company – it includes the option of viewing the MDF and LDF files data too.
Summary
This article explained the database files of the SQL Server database and the ways of viewing the MDF file locations. It also described the processes of attaching and detaching the databases and illustrated the step by step process of moving the system databases data files.
Tags: mdf file, sql server 2019, ssms, t-sql Last modified: September 18, 2021