After reading this article, you will be able to the following:
- Create a Linux Docker container using the Docker commands.
- Perform required configuration change to setup Docker.
- Install DBFS FUSE and related dependent packages.
- Mount the file-system and data extraction procedures using the configuration file.
- Run DBFS program to run custom SQL queries.
- Push Docker container image to GitHub repository.
- And more…
The preceding articles showed how to configure and set up a Linux Docker container environment that lets you create and configure DBFS FUSE. This article illustrates the working of DBFS FUSE program to query DMVs and Custom queries remotely using the configuration file.
This article is walk-through of workings of DBFS FUSE file system to access local or remote SQL database instance on Linux CentOS docker containers.
Introduction
This article assumes that the reader has already read the previous article and has knowledge of Docker Containers and SQL Server We will use the image centos7:dbfs in this article. Before we start, let’s check what images are available so that we can proceed with the available configuration.
Getting Ready
Now, the new image centos7:dbfs have the required package and configuration to build FUSE filesystem.
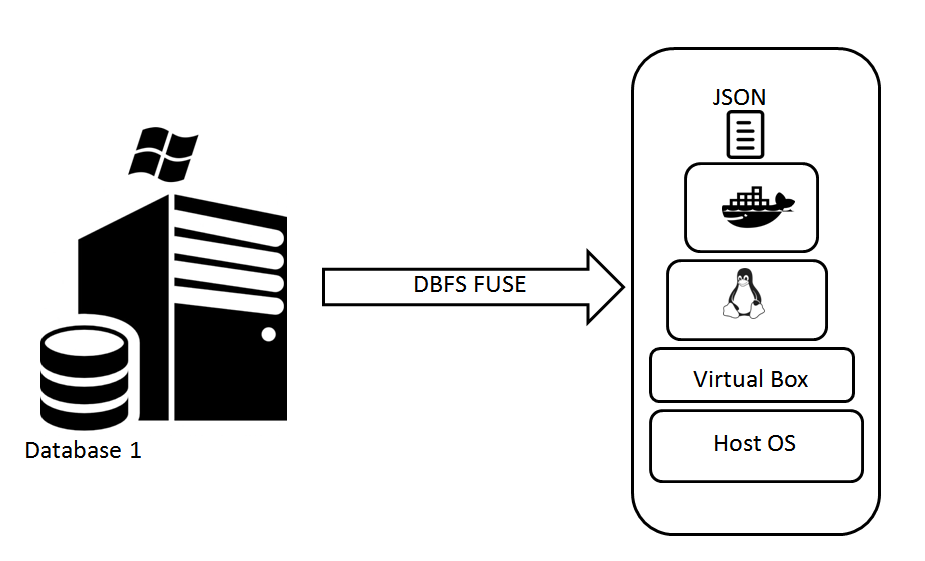
We actually run DBFS program inside what is called as Docker container on top of a Linux Centos VM that acts as Docker host. Docker host is simply a Linux virtual machine that host container running Docker engine.
The following command is executed to launch the container centos:dbfs with bash console
#docker run –it –device /dev/fuse --cap-add SYS_ADMIN centos:dbfs bash
To mount FUSE based file-system, we need to combine both –cap-add and –device options with docker run command. It is possible to mount the FUSE file systems inside a container, but it’s required that the FUSE must be enabled on the host system. Docker will not explicitly enable and load kernel modules on the host.

Let us take a look at the other parameters of the Docker run command:
SYS_ADMIN -> Perform a range of system administration operations
–device flag -> this is to limit access to a specific device that we can use for the container. By default, the container will be able to read and write these devices.
It is recommended that DBFS mount command should not be started as the root user. To start the dbfs, a normal user account needs to be created. Next, go ahead and create the user “docker” using the useradd command. The useradd command is a low-level utility used for adding/creating user accounts in Linux.
The useradd command in Linux performs the following things:
- Edits /etc/passwd, /etc/shadow, /etc/group, and /etc/gshadow files.
- Creates and populate a home directory.
- Set permission and ownership to the home directory.
#useradd docker
#passwd docker

Now, grant the ‘full permissions’ to /tmp folder. Let a user docker to have full read and write access to all files and associated directories and subdirectories in that /tmp directory using the following command.
#mkdir /tmp/dbfs
#mkdir /tmp/dbfs/sql
![]()
#chown -R docker /tmp
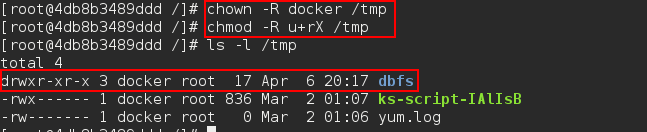
The first command, chown makes the user docker own the /tmp directory. The second command, chmod gives them full read and access permissions. The r gives read permission, the X gives ‘execute’ permission to directories, and not files.
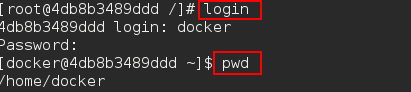
Now, without exiting the session, type login to enter into the user session. The dbfs should always be run at the user privilege. I’m using the docker user credentials which I’d created above to open a user session. We can see that the pwd is set to /home/docker.
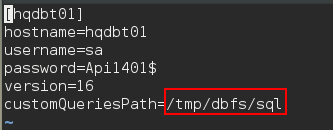
Let’s prepare the configuration file. The configuration file requires the following parameters:
- [Server friendly name]
- hostname=[HOSTNAME]
- username=[DATBASE_LOGIN]
- password=[PASSWORD]
- version=[VERSION]
- customQueriesPath=[PATH_TO_CUSTOM_QUERY_FOLDER]
In the following example, I’m connecting to a SQL instance, the Windows Server, HQDBT01.
- Hqdbt01 is the server’s friendly name.
- The location of the output file or dump directory would be //CustomQueries/. For example, the /tmp/dmv is the mount directory then the path to the dump directory would be /tmp/dmv/hqdbt01/CustomQueries/.
- Hqdbt01 is the hostname of the SQL instance.
- The username and password are the SQL instance access credentials. I would recommend defining a database user and granting them the required permission. In this case, the VIEW SERVER STATE permission is must to enable the user to query the DMVs.
- The version is set to 16 or higher (SQL Server 2016 or later), the fetch the data as JSON. Otherwise, the data would be exported as Tab-Separated Values (TSV).
- CustomQueriesPath is the path of the SQL file to which the custom queries will be written.
[hqdbt01]
hostname=hqdbt01
username=sa
password=Api11401$sd
version=16
customQueriesPath=/tmp/dbfs/sql

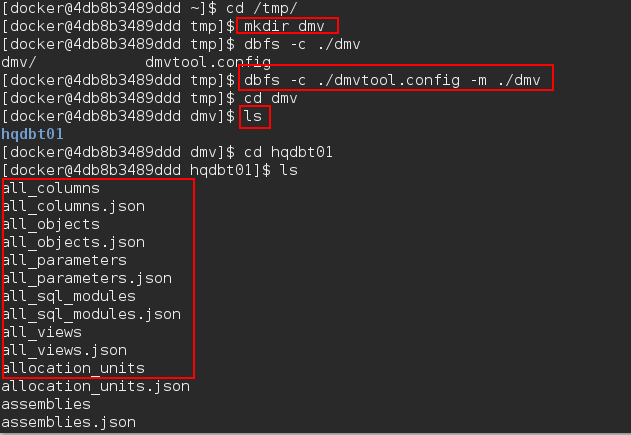
Change the directory to /tmp and create a directory,dmv, the mount directory. Now, FUSE the filesystem as flat files using the dbfs client.
$cd /tmp/
$mkdir dmv
$dbfs –c ./dmvconfig.tool –m ./dmv
[table id=52 /]
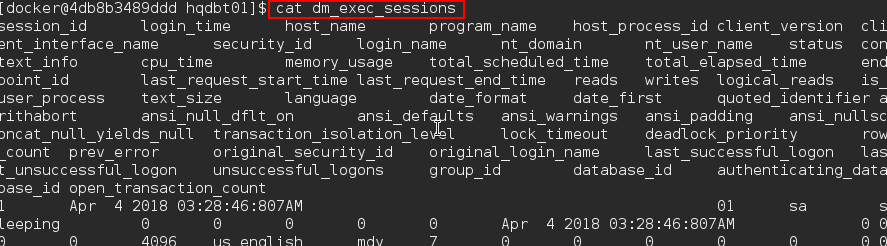
The DMV data can also be accessed using various data extraction commands that will be discussed later in this article.
$cat dm_exec_sessions
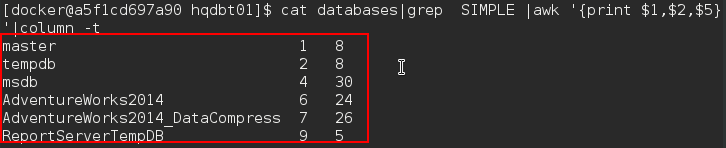
List only those databases where database recovery model set to simple
$cat databases| grep SIMPLE
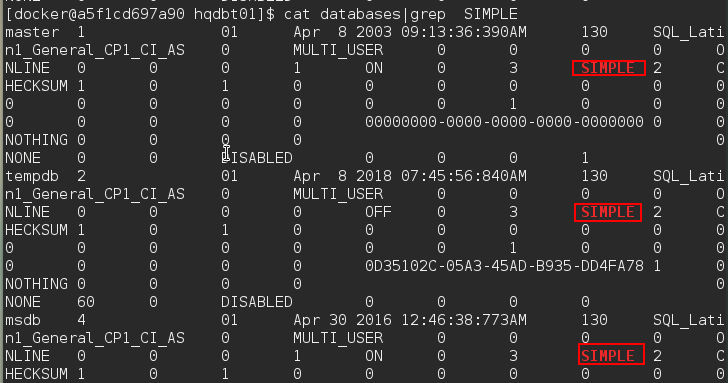
List the database name, database information, and size columns of the database where the recovery model is set to SIMPLE. In this case, we can see that the output of one program is redirected to another program for further processing and output is formatted as tab separated values.
$cat databases| grep SIMPLE | awk ‘{print $1,$2,$5}’| column -t

Configure DBFS to run custom SQL queries
Creating a custom SQL query is pretty straight-forward. As per the configuration file, go to the path /tmp/dbfs/sql and write the SQL Statement in a SQL file, demo.sql.
#vi /tmp/dbfs/sql/demo.sql
Type the following SQL in the demo.sql
SELECT name,user_acces_desc,is_read_only, state_desc,recovery_model_desc from
Sys.databases
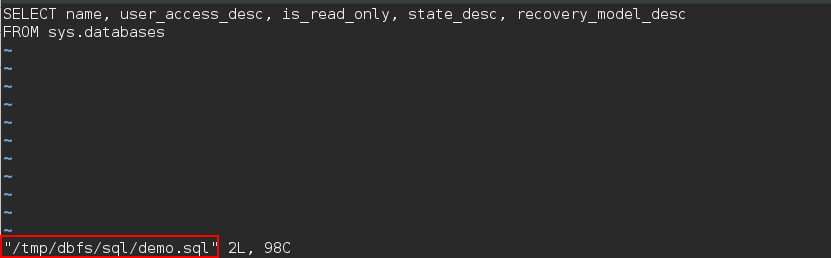
Save the file by pressing escape :wq

The JSON output is then dumped to a file and mounted to a virtual directory. The fact is that we the docker container doesn’t have the SQL tools or any other tools installed on the source image but still, we are able to fetch the SQL data.
Browse to the directory /tmp/dmv/hqdbt01/customQueries
$cd /tmp/dmv/hqdbt01/customQueries/
$cat demo.sql|awk ‘{print $1,$2,$3,$4}’|column -t
The section talks about modifying the custom sql
Let’s update the demo.sql file with the following SQL statements or SQL of your choice:
SELECT c.session_id
, c.auth_scheme
, c.node_affinity
, s.login_name
, db_name(s.database_id) AS database_name
, CASE s.transaction_isolation_level
WHEN 0 THEN 'Unspecified'
WHEN 1 THEN 'Read Uncomitted'
WHEN 2 THEN 'Read Committed'
WHEN 3 THEN 'Repeatable'
WHEN 4 THEN 'Serializable'
WHEN 5 THEN 'Snapshot'
END AS transaction_isolation_level
, s.status
, c.most_recent_sql_handle
FROM sys.dm_exec_connections c
INNER JOIN sys.dm_exec_sessions s
ON c.session_id = s.session_id
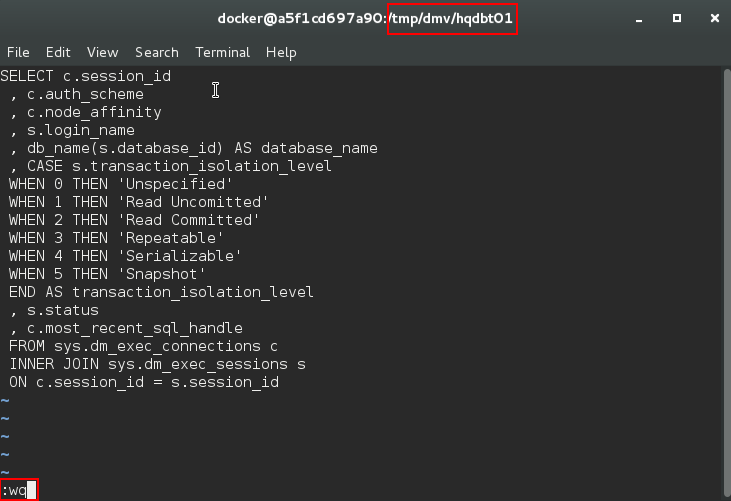
Browse to the directory /tmp/dmv/hqdbt01/customQueries and view the file
$cat demo.sql

That’s all…
The docker image is configured and tested with dbfs FUSE technique to mount the programs as virtual directories on the docker container.
Adding an existing project to GitHub using the command line
The first step is to save the docker image to a compressed file. This is the file that we are uploading to git hub repository.
#docker save centos7:dbfs > centos7_dbfs.tar
![]()
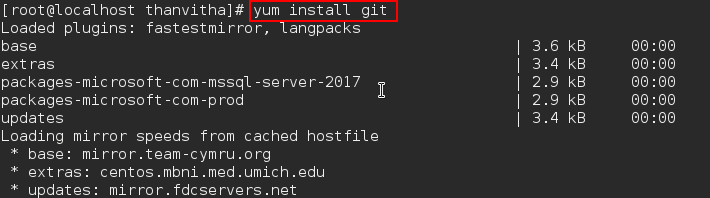
Install Git on CentOS using yum
#yum install git
Let’s initialize or re-initialize the local directory as a Git repository
git init

Add the tar files to the local repository. This stages them for the first commit
git add centos7_dbfs.tar
![]()
Commit the file that we’ve staged in the local repository

git commit -m "centos7 built with dbfs configuration”
Adding the URL for the remote repository where the local repository will be pushed
![]()
git remote add origin <remote repository URL>
Push the changes in your local repository to GitHub.
git push –u origin master

That’s all…
Wrapping Up
In the previous article, we’ve performed the readiness steps by installing Docker engine; provisioning Docker Linux VM; installing DBFS FUSE package. This article is all about understanding the internals of the DBFS FUSE. Thus far, we have seen the complete life cycle of the Docker containers. It is that simple to build, use and test programs using the agile process. Do you agree?
Tags: docker, linux, sql server Last modified: September 22, 2021


