This is an introductory article about the Microsoft Report Builder tool which is used to build and manage paginated reports.
Additionally, you are going to learn how to create SSRS reports by using the report builder tool.
This article also highlights the importance of using standalone report authoring tools for quick management of reports as compared to full-fledged SQL Server Data Tools (SSDT) for designing, developing, testing, and deploying SSRS reports.
About Report Builder
Generally speaking, Report Builder is a standalone report development tool by Microsoft created mainly for power users and IT professionals who would like to create reports quickly and comfortably without getting into the complexities of reporting.
Paginated Reports
According to Microsoft documentation, SSRS reports are also called paginated reports because they fit well on pages and their design is mostly focused on displaying figures on the page.
A paginated report can be shared and printed straight away.
However, paginated reports are represented by .rdl files and contain the definition of the report layout. It is backed up by shared or embedded datasets and data sources which tell the report where to get the data when it’s being processed.
Report Builder is used to design paginated reports by hiding the underlying details.
SQL Server Data Tools (SSDT) vs Report Builder
SQL Server Data Tools (SSDT) offers a complete business intelligence solution for developing, testing, deploying, and version-controlling SSRS reports along with creating and managing the data sources behind these SSRS reports in the form of SQL Database Project.
Not only can developers manage their databases through SQL Server Project (which is part of SQL Server Data Tools), but they can also create and run database unit tests against the reporting objects.
On the other hand, Report Builder helps IT professionals and power users to create and manage paginated (SSRS) reports comfortably and quickly, but does not offer out-of-the-box report development lifecycle management like SQL Server Data Tools (SSDT) does.
To find out more about SSRS, please refer to the following articles:
Publishing Reports with Report Builder
Report builder can publish paginated reports either to an SSRS server or to a Power BI service.
Matrix and Table Support
SSRS reports mostly use a matrix or a table to show the desired results by running data sets. Report Builder, just like Report Server Project in SQL Server Data Tools (SSDT), provides reporting tools such as matrices or tables to be placed on to the designer surface and display report fields.
Create a Report by using Report Builder
Let’s start creating a report with the help of Report Builder.
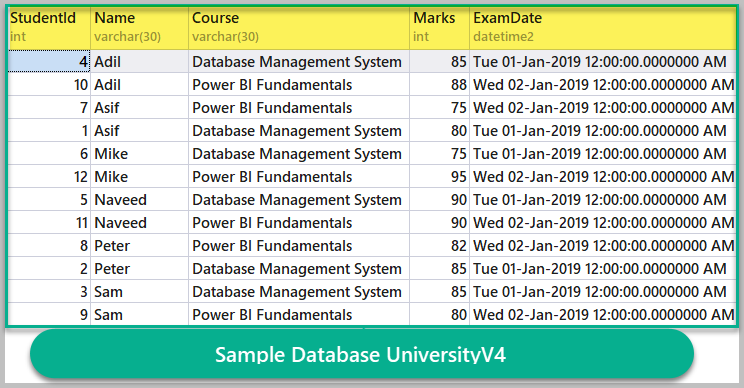
Setup a Sample Database
The first thing we need to do is to setup a sample database named UniversityV4 as follows:
-- (1) Create the University sample database
CREATE DATABASE UniversityV4;
GO

USE UniversityV4

-- (2) Create the Course table
IF EXISTS (SELECT * FROM INFORMATION_SCHEMA.TABLES T WHERE T.TABLE_NAME='Course')
DROP TABLE dbo.Course

CREATE TABLE [dbo].[Course] (
    [CourseId] INT           IDENTITY (1, 1) NOT NULL,
    [Name]     VARCHAR (30)  NOT NULL,
    [Detail]   VARCHAR (200) NULL,
    CONSTRAINT [PK_Course] PRIMARY KEY CLUSTERED ([CourseId] ASC)
);

-- (3) Create the Student table
IF EXISTS (SELECT * FROM INFORMATION_SCHEMA.TABLES T WHERE T.TABLE_NAME='Student')
DROP TABLE dbo.Student

CREATE TABLE [dbo].[Student] (
    [StudentId] INT           IDENTITY (1, 1) NOT NULL,
    [Name]      VARCHAR (30)  NULL,
    [Course]    VARCHAR (30)  NULL,
    [Marks]     INT           NULL,
    [ExamDate]  DATETIME2 (7) NULL,
    CONSTRAINT [PK_Student] PRIMARY KEY CLUSTERED ([StudentId] ASC)
);

-- (4) Populate the Course table
SET IDENTITY_INSERT [dbo].[Course] ON
INSERT INTO [dbo].[Course] ([CourseId], [Name], [Detail]) VALUES (1, N'DevOps for Databases', N'This is about DevOps for Databases')
INSERT INTO [dbo].[Course] ([CourseId], [Name], [Detail]) VALUES (2, N'Power BI Fundamentals', N'This is about Power BI Fundamentals')
INSERT INTO [dbo].[Course] ([CourseId], [Name], [Detail]) VALUES (3, N'T-SQL Programming', N'About T-SQL Programming')
INSERT INTO [dbo].[Course] ([CourseId], [Name], [Detail]) VALUES (4, N'Tabular Data Modeling', N'This is about Tabular Data Modeling')
INSERT INTO [dbo].[Course] ([CourseId], [Name], [Detail]) VALUES (5, N'Analysis Services Fundamentals', N'This is about Analysis Services Fundamentals')
SET IDENTITY_INSERT [dbo].[Course] OFF

-- (5) Populate the Student table
SET IDENTITY_INSERT [dbo].[Student] ON
INSERT INTO [dbo].[Student] ([StudentId], [Name], [Course], [Marks], [ExamDate]) VALUES (1, N'Asif', N'Database Management System', 80, N'2019-01-01 00:00:00')
INSERT INTO [dbo].[Student] ([StudentId], [Name], [Course], [Marks], [ExamDate]) VALUES (2, N'Peter', N'Database Management System', 85, N'2019-01-01 00:00:00')
INSERT INTO [dbo].[Student] ([StudentId], [Name], [Course], [Marks], [ExamDate]) VALUES (3, N'Sam', N'Database Management System', 85, N'2019-01-01 00:00:00')
INSERT INTO [dbo].[Student] ([StudentId], [Name], [Course], [Marks], [ExamDate]) VALUES (4, N'Adil', N'Database Management System', 85, N'2019-01-01 00:00:00')
INSERT INTO [dbo].[Student] ([StudentId], [Name], [Course], [Marks], [ExamDate]) VALUES (5, N'Naveed', N'Database Management System', 90, N'2019-01-01 00:00:00')
INSERT INTO [dbo].[Student] ([StudentId], [Name], [Course], [Marks], [ExamDate]) VALUES (6, N'Mike', N'Database Management System ', 75, N'2019-01-01 00:00:00')
INSERT INTO [dbo].[Student] ([StudentId], [Name], [Course], [Marks], [ExamDate]) VALUES (7, N'Asif', N'Power BI Fundamentals', 75, N'2019-01-02 00:00:00')
INSERT INTO [dbo].[Student] ([StudentId], [Name], [Course], [Marks], [ExamDate]) VALUES (8, N'Peter', N'Power BI Fundamentals', 82, N'2019-01-02 00:00:00')
INSERT INTO [dbo].[Student] ([StudentId], [Name], [Course], [Marks], [ExamDate]) VALUES (9, N'Sam', N'Power BI Fundamentals', 80, N'2019-01-02 00:00:00')
INSERT INTO [dbo].[Student] ([StudentId], [Name], [Course], [Marks], [ExamDate]) VALUES (10, N'Adil', N'Power BI Fundamentals', 88, N'2019-01-02 00:00:00')
INSERT INTO [dbo].[Student] ([StudentId], [Name], [Course], [Marks], [ExamDate]) VALUES (11, N'Naveed', N'Power BI Fundamentals', 90, N'2019-01-02 00:00:00')
INSERT INTO [dbo].[Student] ([StudentId], [Name], [Course], [Marks], [ExamDate]) VALUES (12, N'Mike', N'Power BI Fundamentals', 95, N'2019-01-02 00:00:00')
SET IDENTITY_INSERT [dbo].[Student] OFF;
GO

-- (6) Create the StudentsWithMarks view
CREATE VIEW StudentsWithMarks
 AS
-- View students and their marks in examination
SELECT s.StudentId
      ,s.Name
      ,s.Course
      ,s.Marks
      ,s.ExamDate FROM DBO.Student s
Check the Sample Database
Check the sample database by querying the Student table as follows:
-- View students with their marks
SELECT swm.StudentId
      ,swm.Name
      ,swm.Course
      ,swm.Marks
      ,swm.ExamDate FROM StudentsWithMarks swm
ORDER BY swm.Name
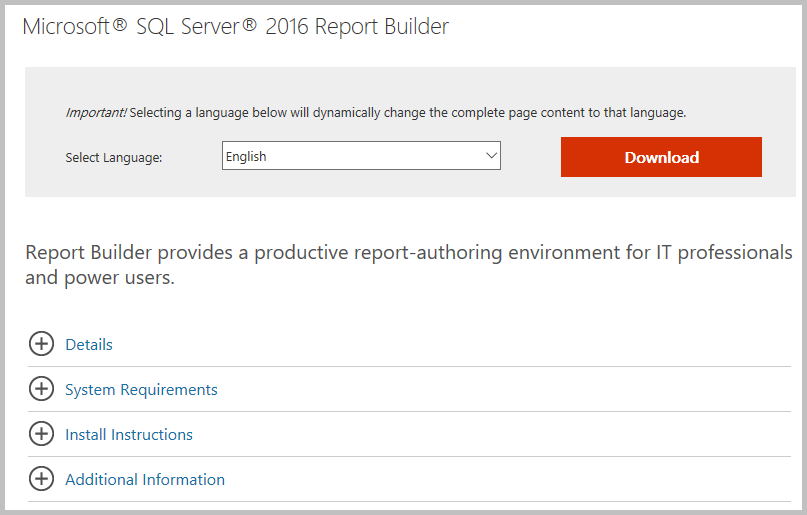
Install Report Builder
Click the link below to download and install Report Builder:
https://www.microsoft.com/en-us/download/details.aspx?id=53613
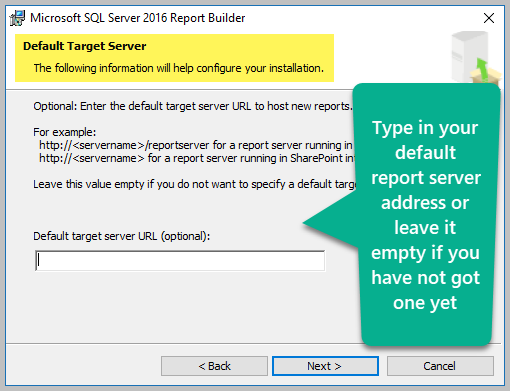
Once the setup file is downloaded, you can run it – this will start the setup wizard.
Setup Default Target Server
After few steps, the setup wizard is going to ask you to type in your default target server name. You can leave this field empty if you haven’t configured any reporting server yet.
Open Report Builder
If you are using Windows 10, Report Builder will appear in the Recently Added menu:
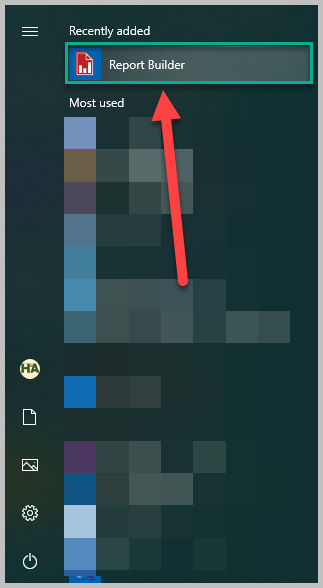
Click the icon to open Report Builder.
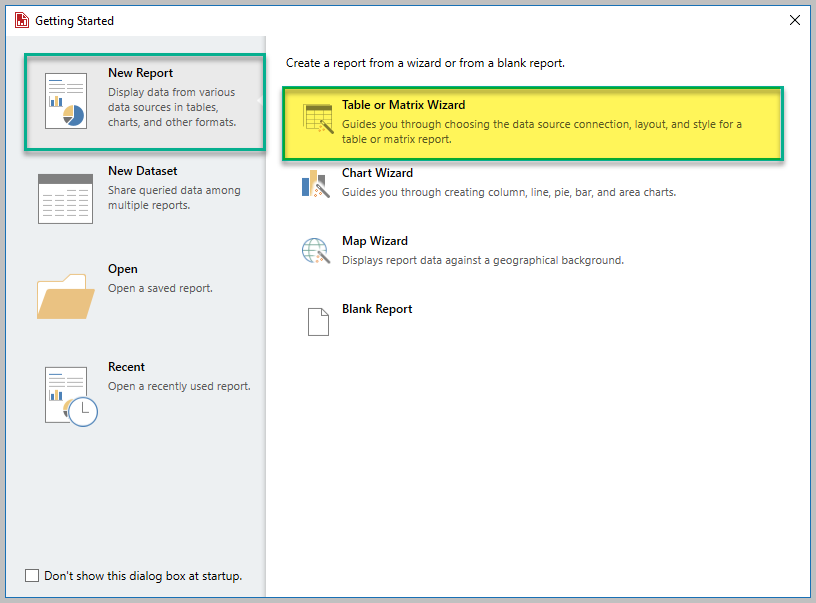
Create New Report
Once Report Builder is opened up, create a new report by selecting Table or Matrix Wizard after making sure New Report from the left navigation menu is selected as shown below:
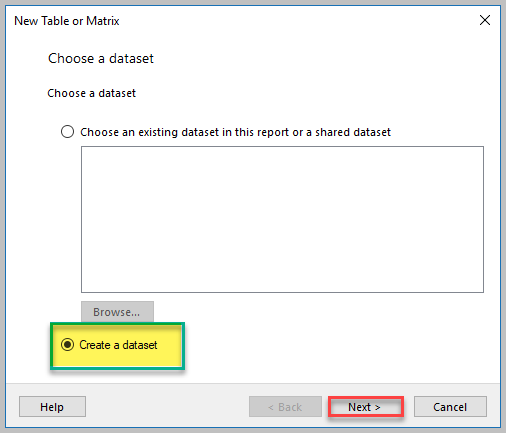
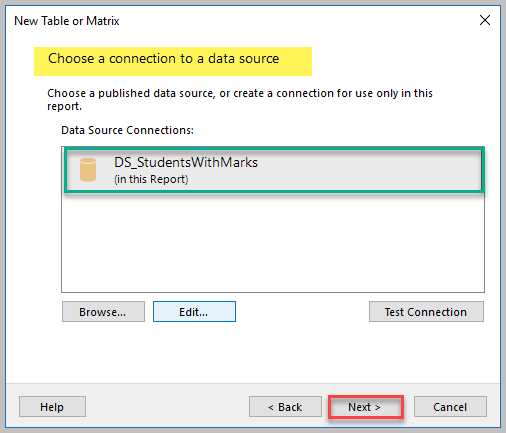
Create a data set
Choose Create a data set and Click Next:
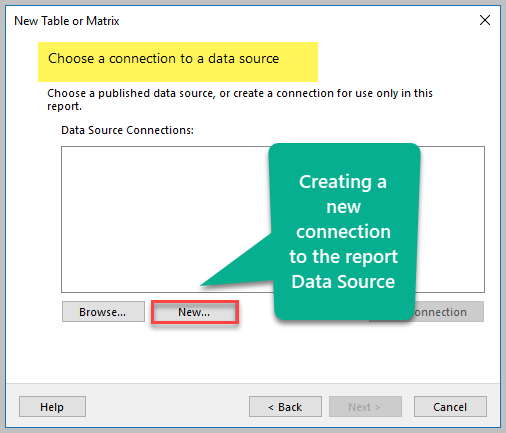
Configure Data Source
Click New to create a new data source connection for the report:
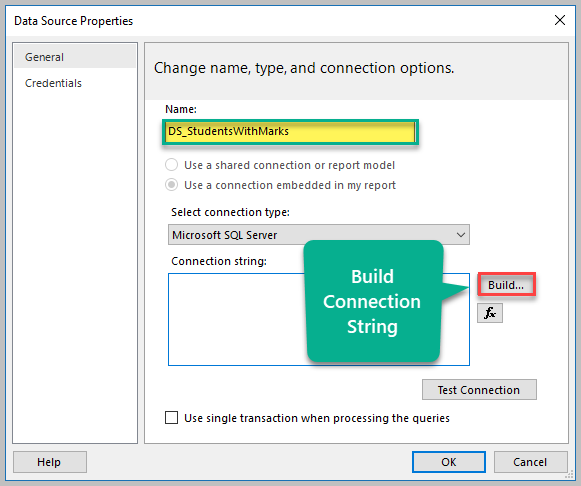
Name the data source ‘DS_StudentsWithMarks’ and then Click Build to build the connection string:
Connect to the database server and select the sample database UniversityV4:
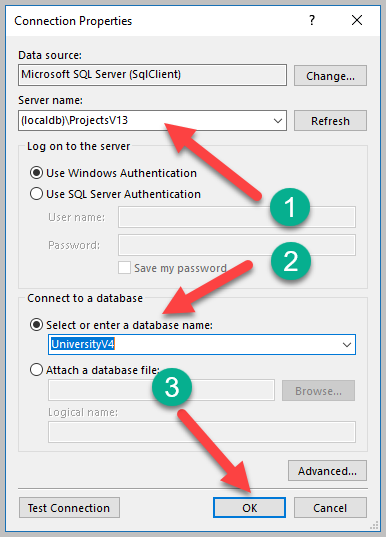
Click Next when you see that the data source is ready:
Build Query
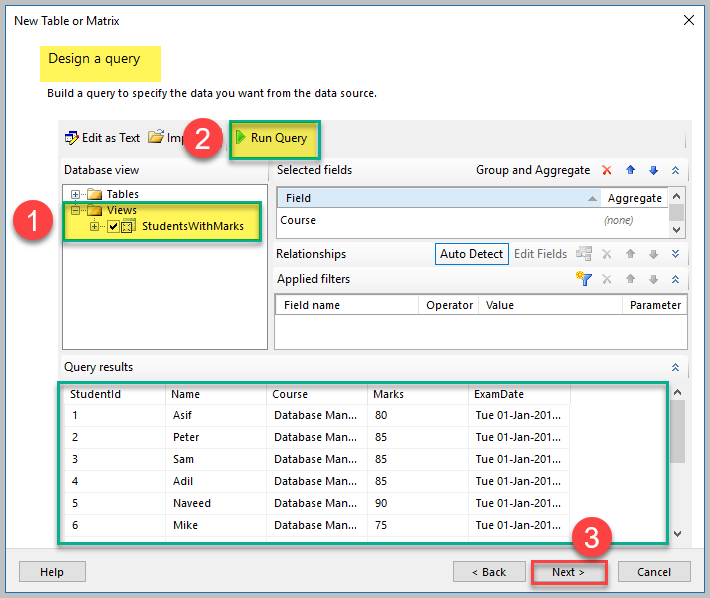
In the next step, you are going to build the query that runs behind the report in Report Builder.
Let’s suppose that a SQL developer has already created the required SQL view, so you will just have to select it.
On the left side of the Database view section, click Views, expand the node, and then select the StudentsWithMarks view. There, click Run Query and then Next as shown below:
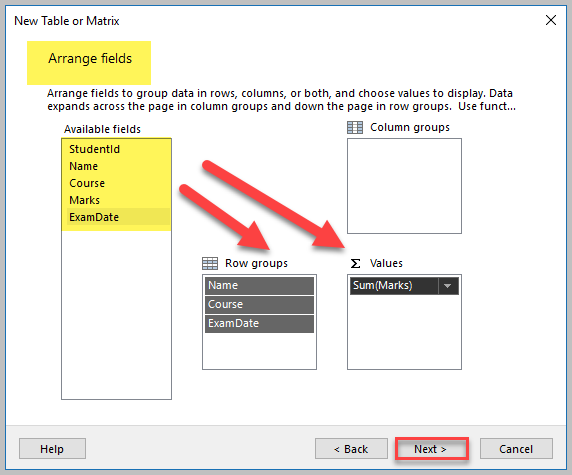
Arrange Fields
Drag and drop Name, Course, and ExamDate fields from the left side onto the Row Group Section. The Marks field must be dropped onto the Values box. When this is done, click Next:
Choose the Layout
Now you’ll need to choose the layout. Here, we are unchecking Show Totals and Grand Totals. When the layout is chosen, click Next and then Finish.
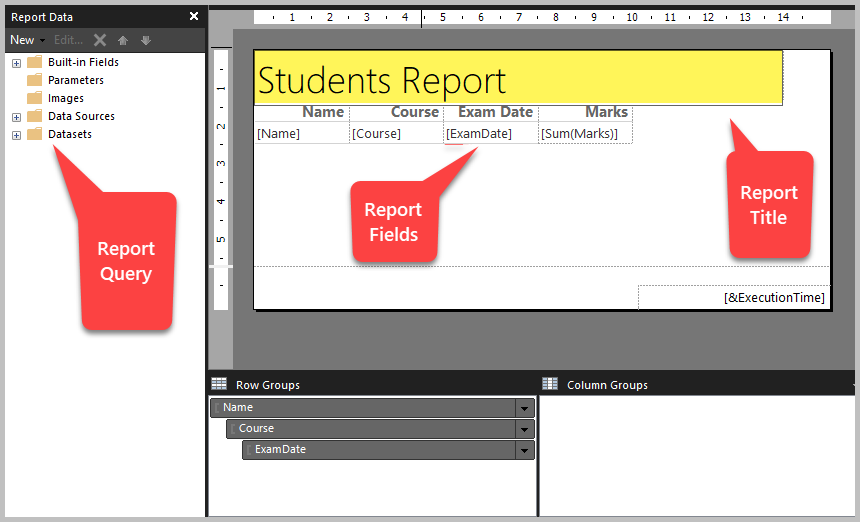
Update Report Title
Update the report title as Students Report as shown below:
Run the Report
Click Run the report on the top left corner. Now, expand the student names in the resulting report:
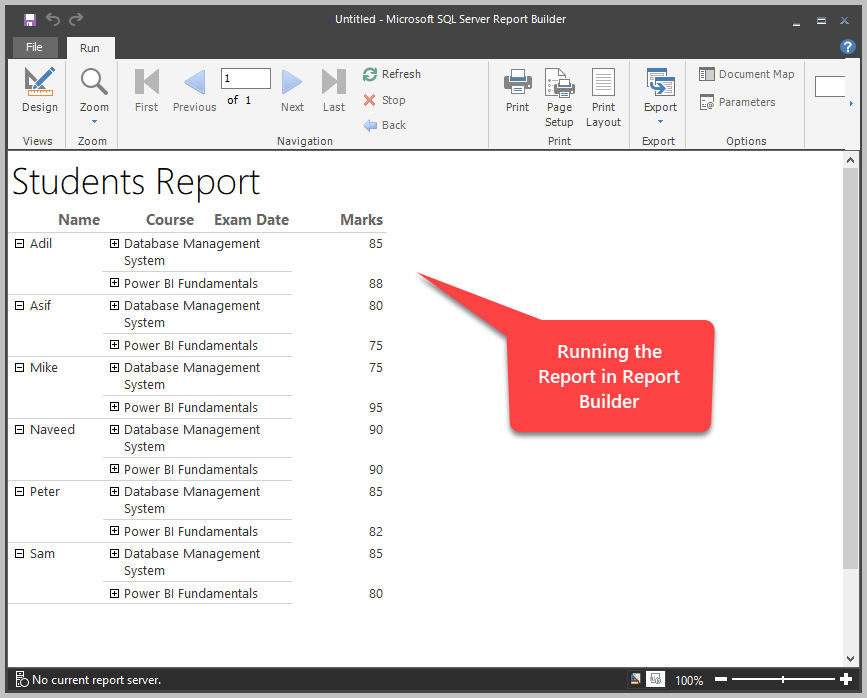
You can further expand the Course names to see the Exam Dates.
Save the report for future reference if you would like to keep it.
Congratulations! You have successfully completed the walkthrough of creating and running a report based on SQL view in the Report Builder.
Things to do
Now that you can create reports by using Report Builder, please try the following things to improve your skills:
- Create a report of all available technical courses by using Report Builder
- Create a report to see top 3 students with highest marks in the exam.
- Modify the database by creating separate Student and Course tables and then add another table called Exam. In this table, StudentId and CourseId are passed as foreign keys. Next, add more data to all these tables and create an exam report based on the Exam table resolving the foreign key references such that the final output shows student name and course name along with the marks obtained by that student.


