
The right application of the DELETE statement for data removal is crucial, and it involves lots of issues. Still, there are standard practices of the DELETE statement usage that simplify all such tasks.
This article will explore some of the professional life scenarios to equip you with the most helpful tips to use the DELETE statement correctly. You can remove data from a table in different ways. Explore the difference between DELETE and TRUNCATE in SQL Server that has been covered with practical examples.
T-SQL Delete Command Basics
First of all, we should get familiar with the T-SQL Delete statement in the simplest manner possible.
The Delete statement, as the name indicates, is a statement that helps us to delete data from the database table.
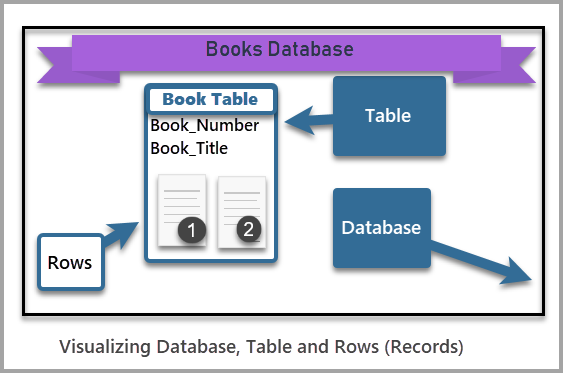
A table is a structure that you create in a database to store your data. For example, we can have a table of books to store records related to those books.
A database is an organized collection of data and the data structures to hold that data. In other words, data can be stored inside the database in the form of tables.
How to Delete One Row or Multiple Rows
We can delete one or more records (commonly known as rows) from a table using the delete statement.
The Delete statement removes some or all data (rows) from a table.
According to Microsoft documentation, the Delete statement removes one or more rows from a table or view in SQL Server.
One might wonder how the statement defines whether to remove some or all of the data (rows) from a table. The answer lies in the criteria or conditions specifying what needs to be removed.
Delete Command in SQL Server
The simplest syntax of the statement is as follows:
Delete FROM <TableName> WHERE <Condition>You need to provide the table name and the criteria/condition for the data (rows) deletion from the table.
Note: It is crucial to use the DELETE statement with a condition (WHERE Clause) although the condition requirement is not a must.
If you execute the DELETE table command without the WHERE condition, you will end up deleting all the rows (data) from the table. Hence, make it a habit to use the WHERE condition unless you want to remove all rows.
Compatibility
This statement is compatible with many versions of SQL Server, including the following:
- SQL Server 2012 and upward versions.
- Cloud-based SQL Server Database (Azure SQL Database).
- Cloud-based SQL Data Warehouse (Azure Synapse Analytics).
Step-by-step Checklist to Remove Rows from the Table
Now we are going to explore the Delete statement usage with several practical scenarios.
The Summary of Steps
- Setup a Sample Database.
- View the data.
- Delete the data.
- Insert more data back into the table.
- View the data before deletion.
- How to delete data in a column based on a condition.
- View the data after deletion.
- Insert more data back into the table.
- View the data before deletion.
- Delete the data based on another condition.
- View the data after deletion.
- Insert the data back into the table.
- Delete the data based on two conditions this time.
- View the data after deletion.
Setup Sample Database (BooksSample)
We need a sample database to test and run the scripts. First, we need to set that sample database up, covering the following steps:
- Create a sample database.
- Create a table in the sample database.
- Insert the data (two rows) into the database table.
Open SQL Server Management Studio or dbForge Studio for SQL Server and execute the following script to set up the sample database:
-- Connect to the 'master' database to run this snippet
USE master
GO
-- Create a new database if it does not already exist
IF NOT EXISTS (
    SELECT [name]
FROM sys.databases
WHERE [name] = N'BooksSample'
)
CREATE DATABASE BooksSample
GO

USE BooksSample

-- Create the table book
CREATE TABLE [dbo].[Book]
(
    [BookNumber] INT NOT NULL PRIMARY KEY,-- Primary Key column
    [Title] VARCHAR(150) NOT NULL,
    [Stock] SMALLINT NOT NULL

);
GO

-- Insert rows into table 'Book'
INSERT INTO [dbo].[Book]
    ( -- Columns to insert data into
    [BookNumber], [Title], [Stock]
    )
VALUES
    ( -- First row: values for the columns in the list above
        1, 'Learn SQL in 7 Days', 50
),
    ( -- Second row: values for the columns in the list above
        2, 'Creating Databases in Minutes', 50
);

GO
View the data (Book table)
Let us view the recently created and populated table in the database. Run the below script:
-- View data (rows) from the table (Book)
SELECT b.BookNumber, b.Title, b.Stock FROM dbo.Book b
The output is:
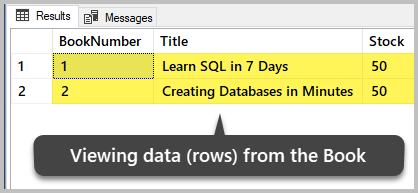
We can see the two rows of the table (Book). At the moment, these are all the data present in this table.
Delete the Data
As we remember, there is a risk of deleting all rows in a table if we forget to mention the condition/criteria for the correct deletion.
Always use the WHERE Clause with the Delete statement to avoid accidental data loss. The only exception should be the case when you need to delete all data intentionally.
To remove all data (rows) from the sample database table, run the following script:
-- Delete all the data (rows) from the table Book
DELETE FROM dbo.Book
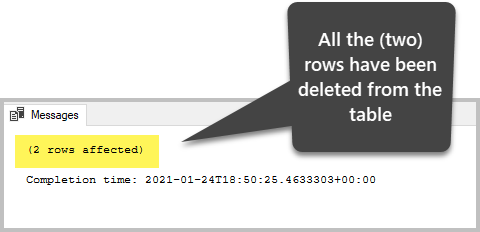
The output is:
View the data after the deletion
Now, we need to check if all the rows have been deleted:
-- View data (rows) from the table (Book)
SELECT b.BookNumber, b.Title, b.Stock FROM dbo.Book b
The results are:
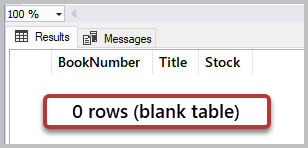
This way, we have successfully deleted all the rows from the Book table. For that, we applied the DELETE statement without any deletion criteria/conditions.
Insert Data Back into the Table (with the Same Title)
We can insert the data (rows) back into the table and then apply the DELETE statement based on some conditions/criteria.
This time, we choose to insert more rows, but deliberately having the same title:
-- Insert rows into table 'Book'
INSERT INTO [dbo].[Book]
    ( -- Columns to insert data into
    [BookNumber], [Title], [Stock]
    )
VALUES
    ( -- First row: values for the columns in the list above
        1, 'Learn SQL in 7 Days', 50
),
    ( -- Second row: values for the columns in the list above
        2, 'Creating Databases in Minutes', 50
),
	( -- Third row: values for the columns in the list above
        3, 'Creating Databases in Minutes', 50
),
    ( -- Fourth row: values for the columns in the list above
        4, 'Creating Databases in Minutes', 50
);

GO
The output is as follows:
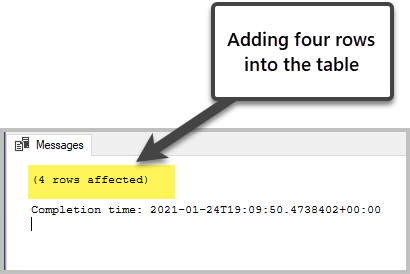
Note: To restore the deleted or changed data, you can use the dedicated software solutions. The dbForge Transaction Log solution allows you both to restore those data and view who and when deleted or altered them.
View the data before deletion
To view the data, execute the following script:
-- View data (rows) from the table (Book)
SELECT b.BookNumber, b.Title, b.Stock FROM dbo.Book b
The output is:
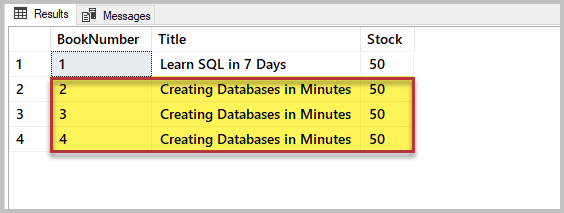
The output demonstrates that we have inserted three rows with the same book title by mistake. It is a problem. The simple solution is to remove the unnecessary rows, applying the specific condition for removing rows with duplicate titles.
How to Delete Data in SQL Column Based on a Condition (BookNumber)
Important: We may consider one of the following ways to solve this problem:
- Delete by BookNumber
- Delete by Title
In my scenario, I choose not to delete by Title. If we delete by Title, we end up deleting all rows containing that title including those we need to keep. Hence, the recommended approach is to remove the table based on the BookNumber column.
If we look at the result set, we can easily understand that BookNumber: 3 and BookNumber: 4 are duplicate rows. Previously, it was explained in detail how to remove duplicates in SQL. We must delete them to keep the database consistent.
Again, the following options arise:
- Delete where book number (BookNumber) is greater than 2.
- Delete where BookNumber is 3 and 4.
Let us choose the first option. However, remember that it is only valid if there are no rows after the duplicate rows we are aware of.
Execute the following script:
-- Delete all the data (rows) from the table Book where BookNumber is greater than 2
DELETE FROM dbo.Book
WHERE BookNumber>2
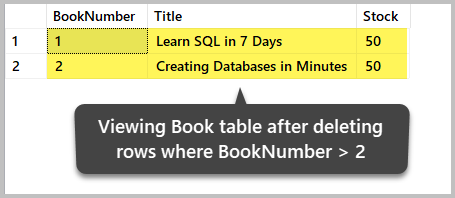
View the data after the deletion
Let’s check the table after deleting the data:
-- View data (rows) from the table (Book)
SELECT b.BookNumber, b.Title, b.Stock FROM dbo.Book b
The output is:
Insert more Data into the Table (more Stock)
To put more data (row) related to the stock, we use the below script:
-- Insert rows into table 'Book'
INSERT INTO [dbo].[Book]
    ( -- Columns to insert data into
    [BookNumber], [Title], [Stock]
    )
VALUES
    ( -- First row: values for the columns in the list above
        3, 'Basic Data Structures', 60
),
    ( -- Second row: values for the columns in the list above
        4, 'Advanced Data Structures', 0
)
GO
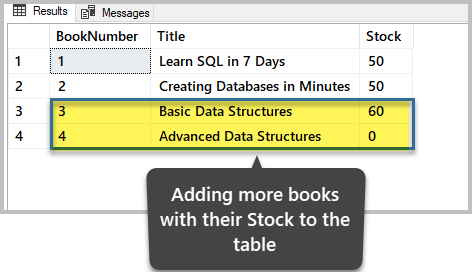
View data before deletion
Have a look at the table:
-- View data (rows) from the table (Book)
SELECT b.BookNumber, b.Title, b.Stock FROM dbo.Book b
The output is:
Delete the Data based on a Different Condition
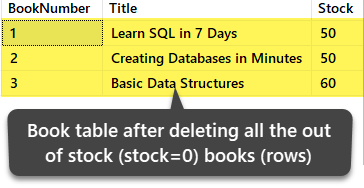
Assume that we need to remove out of stock books to keep more accurate information in the database. To do this, we should look for those rows with the Stock is 0.
We can use the DELETE statement with the condition based on the Stock column value 0:
-- Delete all the out of stock (Where Stock is 0) books (rows) from the table Book
DELETE FROM dbo.Book
WHERE Stock=0
View the data after the deletion
-- View data (rows) from the table (Book)
SELECT b.BookNumber, b.Title, b.Stock FROM dbo.Book b
Insert More Data into Table (More Titles and Stock)
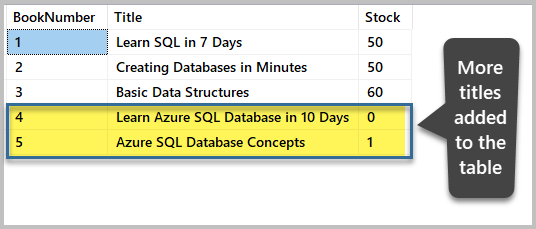
We are adding two more rows into the table:
-- Insert rows into table 'Book'
INSERT INTO [dbo].[Book]
    ( -- Columns to insert data into
    [BookNumber], [Title], [Stock]
    )
VALUES
    ( -- First row: values for the columns in the list above
        4, 'Learn Azure SQL Database in 10 Days', 0
),
    ( -- Second row: values for the columns in the list above
        5, 'Azure SQL Database Concepts', 1
)
GO
View the data before deletion
Check the rows before deleting anything further, based on the requirement:
-- View data (rows) from the table (Book)
SELECT b.BookNumber, b.Title, b.Stock FROM dbo.Book b
The table output is:
Delete the Data Based on Two Conditions
This time, we need to delete all books (rows) where titles contain the word SQL and they are out of stock (their stock value is 0).
In other words, we delete all the SQL-related out of stock books.
In this case, we must specify more than one condition with the DELETE statement. We have to ensure we are only deleting the out of stock books and only those books having the word SQL in their title.
View the following script:
-- Delete all the out of stock (Where Stock is 0) SQL related (Title contains SQL) books (rows) from the table Book
DELETE FROM dbo.Book
WHERE Title LIKE '%SQL%' and Stock=0
View the data after the deletion
We view the data for the final time:

Important Tip: Before you delete the data, run the SELECT statement based on the same condition you are going to use for deletion. This way, you ensure that your deleting activities will apply to the correct data.
For example, run the SELECT query first to ensure that you are only getting those rows that are meant for deletion:
SELECT * FROM dbo.Book
WHERE Title LIKE '%SQL%' and Stock=0
Once you are confident, you can turn your SELECT into the DELETE statement:
DELETE FROM dbo.Book
WHERE Title LIKE '%SQL%' and Stock=0
Congratulations!
You have successfully mastered the task of removing (deleting) one or more rows from a table according to the requirements.
Stay in touch for advanced deletion scenarios and other professional tips regarding the DELETE statement usage.
Things to Do
Now that you can remove rows from a table successfully, you can train and improve your skills further:
- Try to remove rows where there is only one item in the stock.
- Delete all the books where the title contains the word Structure.
- Delete all the books (rows) except for book number (BookNumber) 1.
Discover more advanced scenarios about the SQL DELETE statement.
Tags: sql delete, sql server, t-sql, t-sql statements Last modified: September 17, 2021