Introduction
This tutorial includes information about SQL (DDL, DML) that I have gathered during my professional life. This is the minimum you need to know while working with databases. If there is a need to use complex SQL constructions, then usually I surf the MSDN library, which can be easily found on the internet. To my mind, it is very difficult to keep everything in your head and, by the way, there is no need for this. I recommend that you should know all the main constructions used in most relational databases such as Oracle, MySQL, and Firebird. Still, they may differ in data types. For example, to create objects (tables, constraints, indexes, etc.), you may simply use integrated development environment (IDE) to work with databases and there is no need in studying visual tools for a particular database type (MS SQL, Oracle, MySQL, Firebird, etc.). This is convenient because you can see the whole text, and you do not need to look through numerous tabs to create, for example, an index or a constraint. If you are constantly working with databases, creating, modifying, and especially rebuilding an object using scripts is much faster than in a visual mode. Besides, in my opinion, in the script mode (with due precision), it is easier to specify and control rules for naming objects. In addition, it is convenient to use scripts when you need to transfer database changes from a test database to a production database.
SQL is divided into several parts. In my article, I will review the most important ones:
DDL – Data Definition Language
DML – Data Manipulation Language, which includes the following constructions:
- SELECT – data selection
- INSERT – new data insertion
- UPDATE – data update
- DELETE – data deletion
- MERGE – data merging
I will explain all the constructions in study cases. In addition, I think that a programming language, especially SQL, should be studied in practice for better understanding.
This is a step-by-step tutorial, where you need to perform examples while reading it. However, if you need to know command in details, then surf the Internet, for example, MSDN.
When creating this tutorial, I have used the MS SQL Server database, version 2014, and MS SQL Server Management Studio (SSMS) to execute scripts.
Briefly about MS SQL Server Management Studio (SSMS)
SQL Server Management Studio (SSMS) is the Microsoft SQL Server utility for configuring, managing and administering database components. It includes a script editor and a graphics program that works with server objects and settings. The main tool of SQL Server Management Studio is Object Explorer, which allows a user to view, retrieve, and manage server objects. This text is partially taken from Wikipedia.
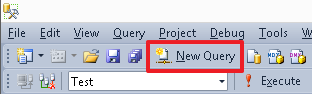
To create a new script editor, use the New Query button:
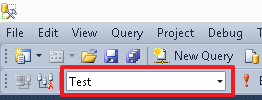
To switch from the current database, you can use the drop-down menu:
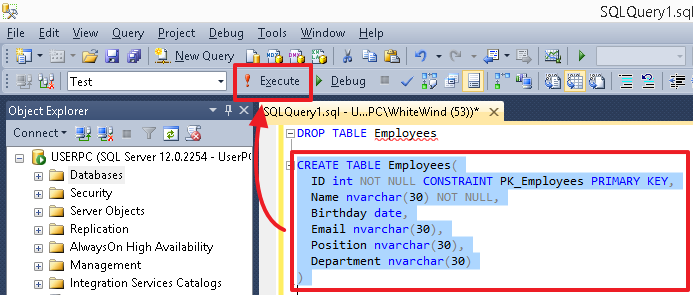
To execute a particular command or set of commands, highlight it and press the Execute button or F5. If there is only one command in the editor or you need to execute all commands, then do not highlight anything.
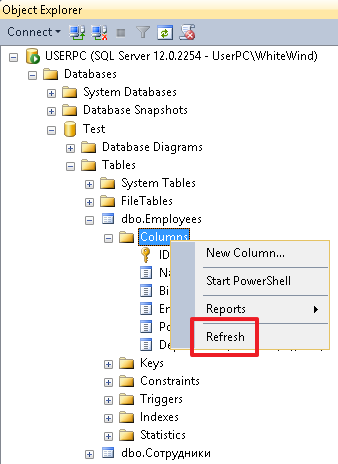
After you have executed scripts that create objects (tables, columns, indexes), select the corresponding object (for example, Tables or Columns) and then click Refresh on the shortcut menu to see the changes.
Actually, this is all you need to know to execute the examples provided herein.
Theory
A relational database is a set of tables linked together. In general, a database is a file that stores structured data.
Database Management System (DBMS) is a set of tools to work with particular database types (MS SQL, Oracle, MySQL, Firebird, etc.).
Note: As in our daily lives, we say “Oracle DB” or just “Oracle” actually meaning “Oracle DBMS”, then in this tutorial, I will use the term “database”.
A table is a set of columns. Very often, you can hear the following definitions of these terms: fields, rows, and records, which mean the same.
A table is the main object of the relational database. All the data is stored row by row in table columns.
For each table as well as for its columns, you need to specify a name, according to which you can find a required item.
The name of the object, table, column, and index may have the minimum length – 128 symbols.
Note: In Oracle databases, an object name may have the minimum length – 30 symbols. Thus, in a particular database, it is necessary to create custom rules for object names.
SQL is a language that allows executing queries in databases via DBMS. In a particular DBMS, an SQL language may have its own dialect.
DDL and DML – the SQL sublanguage:
- The DDL language serves for creating and modifying a database structure (table and link deletion);
- The DML language allows manipulating table data, its rows. It also serves for selecting data from tables, adding new data, as well as updating and deleting current data.
It is possible to use two types of comments in SQL (single-line and delimited):
-- single-line comment
and
/* delimited comment */
That’s all as to the theory.
DDL – Data Definition Language
Let’s consider a sample table with data about employees represented in a manner familiar to a person who is not a programmer.
| Employee ID | Full Name | Birthdate | Position | Department | |
| 1000 | John | 19.02.1955 | [email protected] | CEO | Administration |
| 1001 | Daniel | 03.12.1983 | [email protected] | programmer | IT |
| 1002 | Mike | 07.06.1976 | [email protected] | Accountant | Accounts dept |
| 1003 | Jordan | 17.04.1982 | [email protected] | Senior programmer | IT |
In this case, the columns have the following titles: Employee ID, Full Name, Birthdate, E-mail, Position, and Department.
We can describe each column of this table by its data type:
- Employee ID – integer
- Full Name – string
- Birthdate – date
- E-mail – string
- Position – string
- Department – string
A column type is a property that specifies what data type each column can store.
To start with, you need to remember the main data types used in MS SQL:
| Definition | Designation in MS SQL | Description |
| Variable-length string | varchar(N) and nvarchar(N) |
Using the N number, we can specify the maximum possible string length for a particular column. For example, if we want to say that the value of the Full Name column can contain 30 symbols (at the most), then it is necessary to specify the type of nvarchar(30).
The difference between varchar from nvarchar is that varchar allows storing strings in the ASCII format, while nvarchar stores strings in the Unicode format, where each symbol takes 2 bytes. |
| Fixed-length string | char(N) and nchar(N) |
This type differs from the variable-length string in the following: if the string length is less than N symbols, then spaces are always added to the N length on the right. Thus, in a database, it takes exactly N symbols, where one symbol takes 1 byte for char and 2 bytes for nchar. In my practice, this type is not used much. Still, if anyone uses it, then usually this type has the char(1) format, i.e when a field is defined by 1 symbol. |
| Integer | int | This type allows us to use only integer (both positive and negative) in a column. Note: a number range for this type is as follows: from 2 147 483 648 to 2 147 483 647. Usually, it is the main type used to вуашту identifiers. |
| Floating-point number | float | Numbers with a decimal point. |
| Date | date | It is used to store only a date (date, month, and year) in a column. For example, 02/15/2014. This type can be used for the following columns: receipt date, birthdate, etc., when you need to specify only a date or when time is not important to us and we can drop it. |
| Time | time | You can use this type if it is necessary to store time: hours, minutes, seconds, and milliseconds. For example, you have 17:38:31.3231603 or you need to add the flight departure time. |
| Date and time | datetime | This type allows users to store both date and time. For example, you have the event on 02/15/2014 17:38:31.323. |
| Indicator | bit | You can use this type to store values such as ‘Yes’/’No’, where ‘Yes’ is 1, and ‘No’ is 0. |
In addition, it is not necessary to specify the field value, unless it is forbidden. In this case, you can use NULL.
To execute examples, we will create a test database named ‘Test’.
To create a simple database without any additional properties, run the following command:
CREATE DATABASE Test
To delete a database, execute this command:
DROP DATABASE Test
To switch to our database, use the command:
USE Test
Alternatively, you can select the Test database from the drop-down menu in the SSMS menu area.
Now, we can create a table in our database using descriptions, spaces, and Cyrillic symbols:
CREATE TABLE [Employees](
[EmployeeID] int,
[FullName] nvarchar(30),
[Birthdate] date,
[E-mail] nvarchar(30),
[Position] nvarchar(30),
[Department] nvarchar(30)
)
In this case, we need to wrap names in square brackets […].
Still, it is better to specify all object names in Latin and not to use spaces in the names. In this case, every word starts with a capital letter. For example, for the “EmployeeID” field, we could specify the PersonnelNumber name. You can also use numbers in the name, for example, PhoneNumber1.
Note: In some DBMSs, it is more convenient to use the following name format «PHONE_NUMBER». For example, you can see this format in ORACLE databases. In addition, the field name should not coincide with the keywords used in DBMS.
For this reason, you can forget about the square brackets syntax and can delete the Employees table:
DROP TABLE [Employees]
For example, you can name the table with employees as “Employees” and set the following names for its fields:
- ID
- Name
- Birthday
- Position
- Department
Very often, we use ‘ID’ for the identifier field.
Now, let’s create a table:
CREATE TABLE Employees(
ID int,
Name nvarchar(30),
Birthday date,
Email nvarchar(30),
Position nvarchar(30),
Department nvarchar(30)
)
To set the mandatory columns, you can use the NOT NULL option.
For the current table, you can redefine the fields using the following commands:
-- ID field update

ALTER TABLE Employees ALTER COLUMN ID int NOT NULL

-- Name field update

ALTER TABLE Employees ALTER COLUMN Name nvarchar(30) NOT NULL
Note: The general concept of the SQL language for most DBMSs is the same (from my own experience). The difference among DDLs in different DBMSs is mainly in the data types (they can differ not only by their names but also by their specific implementation). In addition, the specific SQL implementation (commands) are the same, but there may be slight differences in the dialect. Knowing SQL basics, you can easily switch from one DBMS to another. In this case, you will only need to understand the specifics of implementing commands in a new DBMS.
Compare the same commands in the ORACLE DBMS:
-- create table
CREATE TABLE Employees(
ID int, -- In ORACLE the int type is a value for number(38)
Name nvarchar2(30), -- in ORACLE nvarchar2 is identical to nvarchar in MS SQL Birthday date,
Email nvarchar2(30),
Position nvarchar2(30),
Department nvarchar2(30)
);

-- ID and Name field update (here we use MODIFY(…) instead of ALTER COLUMN
ALTER TABLE Employees MODIFY(ID int NOT NULL,Name nvarchar2(30) NOT NULL);
-- add PK (in this case the construction is the same as in the MS SQL)
ALTER TABLE Employees ADD CONSTRAINT PK_Employees PRIMARY KEY(ID);
ORACLE differs in implementing the varchar2 type. Its format depends on the DB settings and you can save a text, for example, in UTF-8. In addition, you can specify the field length both in bytes and symbols. To do this, you need to use the BYTE and CHAR values followed by the length field. For example:
NAME varchar2(30 BYTE) – field capacity equals 30 bytes
NAME varchar2(30 CHAR) -- field capacity equals 30 symbols
The value (BYTE or CHAR) to be used by default when you merely indicate varchar2(30) in ORACLE will depend on the DB settings. Often, you can be easily confused. Thus, I recommend explicitly specifying CHAR when you use the varchar2 type (for example, with UTF-8) in ORACLE (since it is more convenient to read the string length in symbols).
However, in this case, if there is any data in the table, then to successfully execute commands, it is necessary to fill in the ID and Name fields in all the table rows.
I will show it in a particular example.
Let’s insert data in the ID, Position, and Department fields using the following script:
INSERT Employees(ID,Position,Department) VALUES
(1000,’CEO,N'Administration'),
(1001,N'Programmer',N'IT'),
(1002,N'Accountant',N'Accounts dept'),
(1003,N'Senior Programmer',N'IT')
In this case, the INSERT command also returns an error. This happens because we have not specified the value for the mandatory field Name.
If there were some data in the original table, then the “ALTER TABLE Employees ALTER COLUMN ID int NOT NULL” command would work, while the “ALTER TABLE Employees ALTER COLUMN Name int NOT NULL” command would return an error that the Name field has NULL values.
Let’s add values in the Name field:
INSERT Employees(ID,Position,Department,Name) VALUES (1000,N'CEO',N'Administration',N'John'),
(1001,N'Programmer',N'IT',N'Daniel'),
(1002,N'Accountant',N'Accounts dept',N'Mike'),
(1003,N'Senior Programmer',N'IT',N'Jordan’)
In addition, you can use NOT NULL when creating a new table with the CREATE TABLE statement.
At first, let’s delete a table:
DROP TABLE Employees
Now, we are going to create a table with the ID and Name mandatory fields:
CREATE TABLE Employees( ID int NOT NULL, Name nvarchar(30) NOT NULL, Birthday date, Email nvarchar(30), Position nvarchar(30), Department nvarchar(30) )
Also, you can specify NULL after a column name implying that NULL values are allowed. This is not obligatory, as this option is set by default.
If you need to make the current column non-mandatory, use the following syntax:
ALTER TABLE Employees ALTER COLUMN Name nvarchar(30) NULL
Alternatively, you can use this command:
ALTER TABLE Employees ALTER COLUMN Name nvarchar(30)
In addition, with this command, we can either modify the field type to another compatible one or change its length. For example, let’s extend the Name field to 50 symbols:
ALTER TABLE Employees ALTER COLUMN Name nvarchar(50)
Primary key
When creating a table, you need to specify a column or a set of columns unique for each row. Using this unique value, you can identify a record. This value is called the primary key. The ID column (that contains «an employee’s personal number» – in our case this is the unique value for each employee and cannot be duplicated) can be the primary key for our Employees table.
You can use the following command to create a primary key for the table:
ALTER TABLE Employees ADD CONSTRAINT PK_Employees PRIMARY KEY(ID)
‘PK_Employees’ is a constraint name defining the primary key. Usually, the name of a primary key consists of the ‘PK_’ prefix and the table name.
If the primary key contains several fields, then you need to list these fields in brackets separated by a comma:
ALTER TABLE table_name ADD CONSTRAINT constraint_name PRIMARY KEY(field1,field2,…)
Keep in mind that in MS SQL, all fields of the primary key should be NOT NULL.
Besides, you can define a primary key when creating a table. Let’s delete the table:
DROP TABLE Employees
Then, create a table using the following syntax:
CREATE TABLE Employees( ID int NOT NULL, Name nvarchar(30) NOT NULL, Birthday date, Email nvarchar(30), Position nvarchar(30), Department nvarchar(30), CONSTRAINT PK_Employees PRIMARY KEY(ID) – describe PK after all the fileds as a constraint )
Add data to the table:
INSERT Employees(ID,Position,Department,Name) VALUES (1000,N'CEO',N'Administration',N'John'),
(1001,N'Programmer',N'IT',N'Daniel'),
(1002,N'Accountant',N'Accounts dept',N'Mike'),
(1003,N'Senior programmer',N'IT',N'Jordan')
Actually, you do not need to specify the constraint name. In this case, a system name will be assigned. For example, «PK__Employee__3214EC278DA42077»:
CREATE TABLE Employees(
ID int NOT NULL,
Name nvarchar(30) NOT NULL,
Birthday date,
Email nvarchar(30),
Position nvarchar(30),
Department nvarchar(30),
PRIMARY KEY(ID) )
or
CREATE TABLE Employees( ID int NOT NULL PRIMARY KEY, Name nvarchar(30) NOT NULL, Birthday date, Email nvarchar(30), Position nvarchar(30), Department nvarchar(30) )
Personally, I would recommend explicitly specifying the constraint name for permanent tables, as it is easier to work with or delete an explicitly defined and clear value in the future. For example:
ALTER TABLE Employees DROP CONSTRAINT PK_Employees
Still, it is more comfortable to apply this short syntax, without constraint names when creating temporary database tables (the name of a temporary table begins with # or ##.
Summary:
We have already analyzed the following commands:
- CREATE TABLEtable_name (listing of fields and their types, as well as constraints) – serves for creating a new table in the current database;
- DROP TABLEtable_name – serves for deleting a table from the current database;
- ALTER TABLEtable_name ALTER COLUMN column_name … – serves for updating the column type or for modifying its settings (for example, when you need to set NULL or NOT NULL);
- ALTER TABLEtable_name ADD CONSTRAINT constraint_name PRIMARY KEY(field1, field2,…) – used to add a primary key to the current table;
- ALTER TABLEtable_name DROP CONSTRAINT constraint_name – used to delete a constraint from the table.
Temporary tables
Abstract from MSDN. There are two types of temporary tables in MS SQL Server: local (#) and global (##). Local temporary tables are visible only to their creators before the instance of SQL Server is disconnected. They are automatically deleted after the user is disconnected from the instance of SQL Server. Global temporary tables are visible to all users during any connection sessions after creating these tables. These tables are deleted once users are disconnected from the instance of SQL Server.
Temporary tables are created in the tempdb system database, which means that we do not flood the main database. Additionally, you can delete them using the DROP TABLE command. Very often, local (#) temporary tables are used.
To create a temporary table, you can use the CREATE TABLE command:
CREATE TABLE #Temp( ID int, Name nvarchar(30) )
You can delete the temporary table with the DROP TABLE command:
DROP TABLE #Temp
In addition, you can create a temporary table and fill it in with the data using the SELECT … INTO syntax:
SELECT ID,Name INTO #Temp FROM Employees
Note: In different DBMSs, the implementation of temporary databases can vary. For example, in the ORACLE and Firebird DBMSs, the structure of temporary tables should be defined in advance by the CREATE GLOBAL TEMPORARY TABLE command. Also, you need to specify the way of storing data. After this, a user sees it among common tables and works with it as with a conventional table.
Database normalization: splitting into subtables (reference tables) and defining table relationships
Our current Employees table has a drawback: a user can type any text in the Position and Department fields, which may returns mistakes, as for one employee he can specify “IT” as a department, while for another employee, he can specify “IT department”. As a result, it will be unclear what the user meant, whether these employees work for the same department or whether there is a misspell and there are 2 different departments. Moreover, in this case, we will not be able to correctly group the data for a report, where we need to show the number of employees for each department.
Another drawback is storage volume and its duplication, i.e. you need to specify a full name of the department for each employee, which requires space in databases to store each symbol of the department name.
The third disadvantage is the complexity of updating field data when you need to modify a name of any position – from programmer to junior programmer. In this case, you will need to add new data in every table row where the Position is “Programmer”.
To avoid such situations, it is recommended to use database normalization – splitting into subtables – reference tables.
Let’s create 2 reference tables “Positions” and “Departments”:
CREATE TABLE Positions( ID int IDENTITY(1,1) NOT NULL CONSTRAINT PK_Positions PRIMARY KEY, Name nvarchar(30) NOT NULL ) CREATE TABLE Departments( ID int IDENTITY(1,1) NOT NULL CONSTRAINT PK_Departments PRIMARY KEY, Name nvarchar(30) NOT NULL )
Note that here we have used a new property IDENTITY. It means that data in the ID column will be automatically listed starting with 1. Thus, when adding new records, the values 1, 2, 3, etc. will be assigned sequentially. Usually, these fields are called autoincrement fields. Only one field with the IDENTITY property can be defined as a primary key in a table. Usually, but not always, such field is the primary key of the table.
Note: In different DBMSs, implementation of fields with an incrementer may differ. In MySQL, for example, such a field is defined by the AUTO_INCREMENT property. In ORACLE and Firebird, you could emulate this functionality by sequences (SEQUENCE). But as far as I know, the GENERATED AS IDENTITY property has been added in ORACLE.
Let’s fill in these tables automatically based on the current data in the Position and Department fields of the Employees table:
-- fill in the Name field of the Positions table with unique values from the Position field of the Employees table
 INSERT Positions(Name) SELECT DISTINCT Position FROM Employees WHERE Position IS NOT NULL – drop records where a position is not specified
You need to do the same steps for the Departments table:
INSERT Departments(Name) SELECT DISTINCT Department FROM Employees WHERE Department IS NOT NULL
Now, if we open the Positions and Departments tables, then we will see a numbered list of values in the ID field:
SELECT * FROM Positions
| ID | Name |
| 1 | Accountant |
| 2 | CEO |
| 3 | Programmer |
| 4 | Senior Programmer |
SELECT * FROM Departments
| ID | Name |
| 1 | Administration |
| 2 | Accounts dept |
| 3 | IT |
These tables will be the reference tables to define positions and departments. Now, we will refer to identifiers of positions and departments. At first, let’s create new fields in the Employees table to store the identifiers:
-- add a field for the ID position
ALTER TABLE Employees ADD PositionID int
-- add a field for the ID department
ALTER TABLE Employees ADD DepartmentID int
The type of reference fields should be the same as in the reference tables, in this case, it is int.
In addition, you can add several fields using one command by listing the fields separated by commas:
ALTER TABLE Employees ADD PositionID int, DepartmentID int
Now, we will add reference constraints (FOREIGN KEY) to these fields, so that a user cannot add any values that are not the ID values of the reference tables.
ALTER TABLE Employees ADD CONSTRAINT FK_Employees_PositionID FOREIGN KEY(PositionID) REFERENCES Positions(ID)
The same steps should be done for the second field:
ALTER TABLE Employees ADD CONSTRAINT FK_Employees_DepartmentID FOREIGN KEY(DepartmentID) REFERENCES Departments(ID)
Now, users can only insert in these fields the ID values from the corresponding reference table. Thus, to use a new department or position, a user must add a new record in the corresponding reference table. As positions and departments are stored in reference tables in one copy, then in order to change their name, you need to change it only in the reference table.
The name of a reference constraint is usually compound. It consists of prefix «FK» followed by a table name and a field name that refers to the reference table identifier.
The identifier (ID) is usually an internal value used only for links. It does not matter what value it has. Thus, do not try to get rid of gaps in the sequence of values that appear when you work with the table, for example, when you delete records from the reference table.
In some cases, it is possible to build a reference from several fields:
ALTER TABLE table ADD CONSTRAINT constraint_name FOREIGN KEY(field1,field2,…) REFERENCES reference table(field1,field2,…)
In this case, a primary key is represented by a set of several fields (field1, field2, …) in table “reference_table”.
Now, let’s update the PositionID and DepartmentID fields with the ID values from the reference tables.
To do this, we will use the UPDATE command:
UPDATE e SET PositionID=(SELECT ID FROM Positions WHERE Name=e.Position), DepartmentID=(SELECT ID FROM Departments WHERE Name=e.Department) FROM Employees e
Run the following query:
SELECT * FROM Employees
| ID | Name | Birthday | Position | Department | PositionID | DepartmentID | |
| 1000 | John | NULL | NULL | CEO | Administration | 2 | 1 |
| 1001 | Daniel | NULL | NULL | Programmer | IT | 3 | 3 |
| 1002 | Mike | NULL | NULL | Accountant | Accounts dept | 1 | 2 |
| 1003 | Jordan | NULL | NULL | Senior programmer | IT | 4 | 3 |
As you can see, the PositionID and DepartmentID fields match positions and departments. Thus, you can delete the Position and Department fields in the Employees table by executing the following command:
ALTER TABLE Employees DROP COLUMN Position,Department
Now, run this statement:
SELECT * FROM Employees
| ID | Name | Birthday | PositionID | DepartmentID | |
| 1000 | John | NULL | NULL | 2 | 1 |
| 1001 | Daniel | NULL | NULL | 3 | 3 |
| 1002 | Mike | NULL | NULL | 1 | 2 |
| 1003 | Jordan | NULL | NULL | 4 | 3 |
Therefore, we do not have information overload. We can define the names of positions and departments by their identifiers using the values in the reference tables:
SELECT e.ID,e.Name,p.Name PositionName,d.Name DepartmentName FROM Employees e LEFT JOIN Departments d ON d.ID=e.DepartmentID LEFT JOIN Positions p ON p.ID=e.PositionID
| ID | Name | PositionName | DepartmentName |
| 1000 | John | CEO | Administration |
| 1001 | Daniel | Programmer | IT |
| 1002 | Mike | Accountant | Accounts dept |
| 1003 | Jordan | Senior programmer | IT |
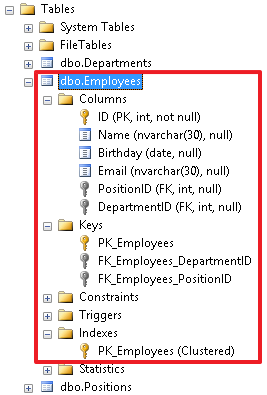
In the object inspector, we can see all the objects created for this table. Here we can also manipulate these objects in different ways, for example, rename or delete the objects.
In addition, it should be noted that it is possible to create a recursive reference.
Let’s consider this particular example.
Let’s add the ManagerID field to the table with employees. This new field will define an employee to whom this employee is subordinated.
ALTER TABLE Employees ADD ManagerID int
This field permits the NULL value as well.
Now, we will create a FOREIGN KEY for the Employees table:
ALTER TABLE Employees ADD CONSTRAINT FK_Employees_ManagerID FOREIGN KEY (ManagerID) REFERENCES Employees(ID)
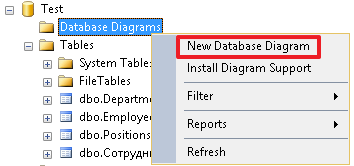
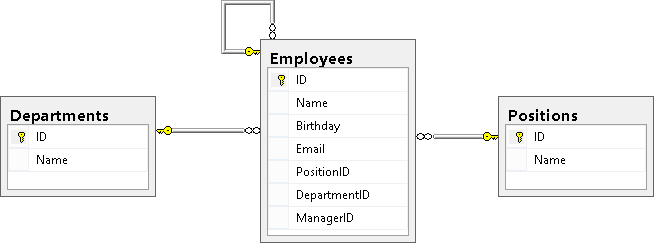
Then create a diagram and check how our tables are linked:
As you can see, the Employees table is linked with the Positions and Departments tables and is a recursive reference.
Finally, I would like to note that reference keys can include additional properties such as ON DELETE CASCADE and ON UPDATE CASCADE. They define the behavior when deleting or updating a record that is referenced from the reference table. If these properties are not specified, then we cannot change the ID of the record in the reference table referenced from the other table. Also, we cannot delete this record from the reference table until we remove all the rows that refer to this record or update the references to another value in these rows.
For example, let’s re-create the table and specify the ON DELETE CASCADE property for FK_Employees_DepartmentID:
DROP TABLE Employees CREATE TABLE Employees( ID int NOT NULL, Name nvarchar(30), Birthday date, Email nvarchar(30), PositionID int, DepartmentID int, ManagerID int, CONSTRAINT PK_Employees PRIMARY KEY (ID), CONSTRAINT FK_Employees_DepartmentID FOREIGN KEY(DepartmentID) REFERENCES Departments(ID) ON DELETE CASCADE, CONSTRAINT FK_Employees_PositionID FOREIGN KEY(PositionID) REFERENCES Positions(ID), CONSTRAINT FK_Employees_ManagerID FOREIGN KEY (ManagerID) REFERENCES Employees(ID) ) INSERT Employees (ID,Name,Birthday,PositionID,DepartmentID,ManagerID)VALUES (1000,N'John','19550219',2,1,NULL), (1001,N'Daniel','19831203',3,3,1003), (1002,N'Mike','19760607',1,2,1000), (1003,N'Jordan','19820417',4,3,1000)
Let’s delete the department with identifier ‘3’ from the Departments table:
DELETE Departments WHERE ID=3
Let’s view the data in table Employees:
SELECT * FROM Employees
| ID | Name | Birthday | PositionID | DepartmentID | ManagerID | |
| 1000 | John | 1955-02-19 | NULL | 2 | 1 | NULL |
| 1002 | Mike | 1976-06-07 | NULL | 1 | 2 | 1000 |
As you can see, data of Department ‘3’ has been deleted from the Employees table as well.
The ON UPDATE CASCADE property has similar behavior, but it works when updating the ID value in the reference table. For example, if we change the position ID in the Positions reference table, then DepartmentID in the Employees table will receive a new value, which we have specified in the reference table. But in this case this cannot be demonstrated, because the ID column in the Departments table has the IDENTITY property, which will not allow us to execute the following query (change the department identifier from 3 to 30):
UPDATE Departments SET ID=30 WHERE ID=3
The main point is to understand the essence of these 2 options ON DELETE CASCADE and ON UPDATE CASCADE. I apply these options very rarely, and I recommend that you think carefully before you specify them in the reference constraint, because If an entry is accidentally deleted from the reference table, this can lead to big problems and create a chain reaction.
Let’s restore department ‘3’:
-- we permit to add or modify the IDENTITY value
SET IDENTITY_INSERT Departments ON
INSERT Departments(ID,Name) VALUES(3,N'IT')
-- we prohibit to add or modify the IDENTITY value
SET IDENTITY_INSERT Departments OFF
We completely clear the Employees table using the TRUNCATE TABLE command:
TRUNCATE TABLE Employees
Again, we will add data using the INSERT command:
INSERT Employees (ID,Name,Birthday,PositionID,DepartmentID,ManagerID)VALUES (1000,N'John','19550219',2,1,NULL),
(1001,N'Daniel','19831203',3,3,1003),
(1002,N'Mike','19760607',1,2,1000),
(1003,N'Jordan','19820417',4,3,1000)
Summary:
We have described the following DDL commands:
• Adding the IDENTITY property to a field allows to make this field automatically populated (count field) for the table;
• ALTER TABLE table_name ADD field_list with_features – allows you to add new fields to the table;
• ALTER TABLE table_name DROP COLUMN field_list – allows you to delete fields from the table;
• ALTER TABLE table_name ADD CONSTRAINT constraint_name FOREIGN KEY (fields) REFERENCES reference_table – allows you to determine the relationship between a table and a reference table.
Other constraints – UNIQUE, DEFAULT, CHECK
Using the UNIQUE constraint, you can say that the values for each row in a given field or in a set of fields must be unique. In the case of the Employees table, we can apply this restriction to the Email field. Let’s first fill the Email values, if they are not yet defined:
UPDATE Employees SET Email='[email protected]' WHERE ID=1000 UPDATE Employees SET Email='[email protected]' WHERE ID=1001 UPDATE Employees SET Email='[email protected]' WHERE ID=1002 UPDATE Employees SET Email='[email protected]' WHERE ID=1003
Now, you can impose the UNIQUE constraint on this field:
ALTER TABLE Employees ADD CONSTRAINT UQ_Employees_Email UNIQUE(Email)
Thus, a user will not be able to enter the same email for several employees.
The UNIQUE constraint has the following structure: the «UQ» prefix followed by the table name and a field name (after the underscore), to which the restriction applies.
When you need to add the UNIQUE constraint for the set of fields, we will list them separated by commas:
ALTER TABLE table_name ADD CONSTRAINT constraint_name UNIQUE(field1,field2,…)
By adding a DEFAULT constraint to a field, we can specify a default value that will be inserted if, when inserting a new record, this field is not listed in the list of fields in the INSERT command. You can set this restriction when creating a table.
Let’s add the HireDate field to the Employees table and set the current date as a default value:
ALTER TABLE Employees ADD HireDate date NOT NULL DEFAULT SYSDATETIME()
If the HireDate column already exists, then we can use the following syntax:
ALTER TABLE Employees ADD DEFAULT SYSDATETIME() FOR HireDate
To specify the default value, execute the following command:
ALTER TABLE Employees ADD CONSTRAINT DF_Employees_HireDate DEFAULT SYSDATETIME() FOR HireDate
As there was no such column before, then when adding it, the current date will be inserted into each entry of the HireDate field.
When creating a new record, the current date will be also automatically added, unless we explicitly specify it, i.e. specify in the list of columns. Let’s demonstrate this with an example, where we will not specify the HireDate field in the list of the values added:
INSERT Employees(ID,Name,Email)VALUES(1004,N'Ostin',' [email protected]')
To check the result, run the command:
SELECT * FROM Employees
| ID | Name | Birthday | PositionID | DepartmentID | ManagerID | HireDate | |
| 1000 | John | 1955-02-19 | [email protected] | 2 | 1 | NULL | 2015-04-08 |
| 1001 | Daniel | 1983-12-03 | [email protected] | 3 | 4 | 1003 | 2015-04-08 |
| 1002 | Mike | 1976-06-07 | [email protected] | 1 | 2 | 1000 | 2015-04-08 |
| 1003 | Jordan | 1982-04-17 | [email protected] | 4 | 3 | 1000 | 2015-04-08 |
| 1004 | Ostin | NULL | [email protected] | NULL | NULL | NULL | 2015-04-08 |
The CHECK constraint is used when it is necessary to check the values being inserted in the fields. For example, let’s impose this constraint on the identification number field, which is an employee ID (ID). Let’s limit the identification numbers to be in the range from 1000 to 1999:
ALTER TABLE Employees ADD CONSTRAINT CK_Employees_ID CHECK(ID BETWEEN 1000 AND 1999)
The constraint name is usually as follows: the «CK_» prefix first followed by the table name and a field name, for which constraint is imposed.
Let’s add an invalid record to check if the constraint is working properly (we will get the corresponding error):
INSERT Employees(ID,Email) VALUES(2000,'[email protected]')
Now, let’s change the value being inserted to 1500 and make sure that the record is inserted:
INSERT Employees(ID,Email) VALUES(1500,'[email protected]')
We can also create UNIQUE and CHECK constraints without specifying a name:
ALTER TABLE Employees ADD UNIQUE(Email)
ALTER TABLE Employees ADD CHECK(ID BETWEEN 1000 AND 1999)
Still, this is a bad practice and it is desirable to explicitly specify the constraint name so that users can see what each object defines:

A good name gives us more information about the constraint. And, accordingly, all these restrictions can be specified when creating a table, if it does not exist yet.
Let’s delete the table:
DROP TABLE Employees
Let’s re-create the table with all the specified constraints using the CREATE TABLE command:
CREATE TABLE Employees( ID int NOT NULL, Name nvarchar(30), Birthday date, Email nvarchar(30), PositionID int, DepartmentID int, HireDate date NOT NULL DEFAULT SYSDATETIME(),
-- I have an exception for DEFAULT
CONSTRAINT PK_Employees PRIMARY KEY (ID), CONSTRAINT FK_Employees_DepartmentID FOREIGN KEY(DepartmentID) REFERENCES Departments(ID), CONSTRAINT FK_Employees_PositionID FOREIGN KEY(PositionID) REFERENCES Positions(ID), CONSTRAINT UQ_Employees_Email UNIQUE (Email), CONSTRAINT CK_Employees_ID CHECK (ID BETWEEN 1000 AND 1999) )
Finally, let’s insert our employees in the table:
INSERT Employees (ID,Name,Birthday,Email,PositionID,DepartmentID)VALUES
(1000,N'John','19550219',' [email protected] ',2,1),
(1001,N'Daniel','19831203',' [email protected] ',3,3),
(1002,N'Mike','19760607',' [email protected] ',1,2),
(1003,N'Jordan','19820417',' [email protected]',4,3)
Some words about the indexes created with the PRIMARY KEY and UNIQUE constraints
When creating the PRIMARY KEY and UNIQUE constraints, the indexes with the same names (PK_Employees and UQ_Employees_Email) are automatically created. By default, the index for the primary key is defined as CLUSTERED, and for other indexes, it is set as NONCLUSTERED.
It should be noted that the clustered index is not used in all DBMSs. A table can have only one clustered (CLUSTERED) index. It means that the records of the table will be ordered by this index. In addition, we can say that this index has direct access to all the data in the table. This is the main index of the table. A clustered index can help with the optimization of queries. If we want to set the clustered index for another index, then when creating the primary key, we should specify the NONCLUSTERED property:
ALTER TABLE table_name ADD CONSTRAINT constraint_name PRIMARY KEY NONCLUSTERED(field1,field2,…)
Let’s specify the PK_Employees constraint index as nonclustered, while the UQ_Employees_Email constraint index – as clustered. At first, delete these constraints:
ALTER TABLE Employees DROP CONSTRAINT PK_Employees ALTER TABLE Employees DROP CONSTRAINT UQ_Employees_Email
Now, create them with the CLUSTERED and NONCLUSTERED indexes:
ALTER TABLE Employees ADD CONSTRAINT PK_Employees PRIMARY KEY NONCLUSTERED (ID) ALTER TABLE Employees ADD CONSTRAINT UQ_Employees_Email UNIQUE CLUSTERED (Email)
Once it is done, you can see that records have been sorted by the UQ_Employees_Email clustered index:
SELECT * FROM Employees
| ID | Name | Birthday | PositionID | DepartmentID | HireDate | |
| 1003 | Jordan | 1982-04-17 | [email protected] | 4 | 3 | 2015-04-08 |
| 1000 | John | 1955-02-19 | [email protected] | 2 | 1 | 2015-04-08 |
| 1001 | Daniel | 1983-12-03 | [email protected] | 3 | 3 | 2015-04-08 |
| 1002 | Mike | 1976-06-07 | [email protected] | 1 | 2 | 2015-04-08 |
For reference tables, it is better when a clustered index is built on the primary key, as in queries we often refer to the identifier of the reference table to obtain a name (Position, Department). The clustered index has direct access to the rows of the table, and hence it follows that we can get the value of any column without additional overhead.
It is recommended that the clustered index should be applied to the fields that you use for selection very often.
Sometimes in tables, a key is created by the stubbed field. In this case, it is a good idea to specify the CLUSTERED index for an appropriate index and specify the NONCLUSTERED index when creating the stubbed field.
Summary:
We have analyzed all the constraint types that are created with the «ALTER TABLE table_name ADD CONSTRAINT constraint_name …» command:
- PRIMARY KEY;
- FOREIGN KEYcontrols links and data referential integrity;
- UNIQUE– serves for setting a unique value;
- CHECK– allows monitoring the correctness of added data;
- DEFAULT– allows specifying a default value;
- The «ALTER TABLE table_name DROP CONSTRAINT constraint_name» command allows deleting all the constraints.
Additionally, we have reviewed the indexes: CLUSTERED and UNCLUSTERED.
Creating unique indexes
I am going to analyze indexes created not for the PRIMARY KEY or UNIQUE constraints.
It is possible to set indexes by a field or a set of fields using the following command:
CREATE INDEX IDX_Employees_Name ON Employees(Name)
Also, you can add the CLUSTERED, NONCLUSTERED, and UNIQUE properties as well as specify the order: ASC (by default) or DESC.
CREATE UNIQUE NONCLUSTERED INDEX UQ_Employees_EmailDesc ON Employees(Email DESC)
When creating the nonclustered index, the NONCLUSTERED property can be dropped as it is set by default.
To delete the index, use the command:
DROP INDEX IDX_Employees_Name ON Employees
You can create simple indexes and constraints with the CREATE TABLE command.
At first, delete the table:
DROP TABLE Employees
Then, create the table with all the constraints and indexes using the CREATE TABLE command:
CREATE TABLE Employees( ID int NOT NULL, Name nvarchar(30), Birthday date, Email nvarchar(30), PositionID int, DepartmentID int, HireDate date NOT NULL CONSTRAINT DF_Employees_HireDate DEFAULT SYSDATETIME(), ManagerID int, CONSTRAINT PK_Employees PRIMARY KEY (ID), CONSTRAINT FK_Employees_DepartmentID FOREIGN KEY(DepartmentID) REFERENCES Departments(ID), CONSTRAINT FK_Employees_PositionID FOREIGN KEY(PositionID) REFERENCES Positions(ID), CONSTRAINT FK_Employees_ManagerID FOREIGN KEY (ManagerID) REFERENCES Employees(ID), CONSTRAINT UQ_Employees_Email UNIQUE(Email), CONSTRAINT CK_Employees_ID CHECK(ID BETWEEN 1000 AND 1999), INDEX IDX_Employees_Name(Name) )
Finally, add information about our employees:
INSERT Employees (ID,Name,Birthday,Email,PositionID,DepartmentID,ManagerID)VALUES (1000,N'John','19550219',' [email protected] ',2,1,NULL),
(1001,N'Daniel','19831203',' [email protected] ',3,3,1003),
(1002,N'Mike','19760607',' [email protected] ',1,2,1000),
(1003,N'Jordan','19820417',' [email protected]',4,3,1000)
Keep in mind that it is possible to add values with the INCLUDE command in the nonclustered index. Thus, in this case, the INCLUDE index is a clustered index where the necessary values are linked to the index, rather than to the table. These indexes can improve the SELECT query performance if there are all the required fields in the index. However, it may lead to increasing the index size, as field values are duplicated in the index.
Abstract from MSDN. Here is how the syntax of the command to create indexes looks:
CREATE [ UNIQUE ] [ CLUSTERED | NONCLUSTERED ] INDEX index_name ON <object> ( column [ ASC | DESC ] [ ,...n ] ) [ INCLUDE ( column_name [ ,...n ] ) ]
Summary
Indexes can simultaneously improve the SELECT query performance and lead to poor speed for modifying table data. This happens, as you need to rebuild all the indexes for a particular table after each system modification.
The strategy on creating indexes may depend on many factors such as frequency of data modifications in the table.
Conclusion
As you can see, the DDL language is not as difficult as it may seem. I have provided almost all the main constructions. I wish you good luck with studying the SQL language.
Tags: indexes, oracle, sql, sql constraints, sql server, ssms Last modified: September 21, 2021


