Before publishing a new version of the Azure DevOps module for a public user on Marketplace, the following steps must be performed:
- Creating an account on Marketplace.
- Performing preparatory actions with the extension.
- Publishing the extension manually.
- Publishing with the command line.
Creating an account on Marketplace
All Azure DevOps extensions are under publisher. Thus, before publishing an extension, you need to create a publisher. If you haven’t created the publisher yet, you can do it at the Marketplace management portal. Once you get to the portal, you will be prompted to create a publisher. For more detailed instructions on creating the publisher, refer to Develop a web extension for Azure DevOps Services.
Performing preparatory actions with the extension
Before publishing on the marketplace, you should make sure that the basic info for the extension is set correctly. Below, the chief checkpoints are provided.
Note: Since this article is dedicated to preparatory actions before publishing an extension on the marketplace, the technical details of the extension are beyond the scope of the articles. To learn more about the creation of the Azure DevOps application from scratch, refer to the Developing Azure DevOps Extension article. It also features a more detailed description of the attributes, their values, and their limitations.
Checking the ‘publisher’ attribute
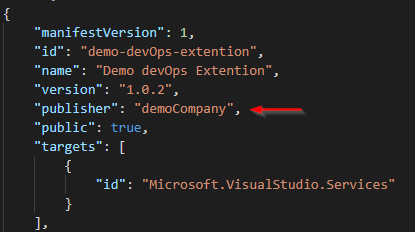
In the main file of the extension, vss-extension.json, check the value of the ‘’publisher” attribute: it must coincide with the name of the publisher at Marketplace. In our case, the publisher name is “demoCompany”. The images below illustrate the match between the publisher’s name in the vss-extension.json extension file and the name in the marketplace site publisher.
Checking the ‘public’ attribute
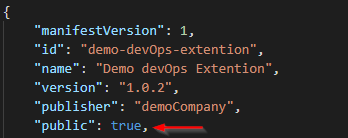
Since we publish the extension for the public use, the ‘public’ attribute set to true must be present in the main file of the vss-extension.json extension.
Note: If this flag is absent, the extension will be private.
Upgrading the extension version
Install the new required version of the extension.
Note: If publishing is executed by the means of the command prompt using the “–rev-version” flag, the minor version will be automatically upgraded in the extension.
Checking the ‘links’ attribute for correct work
If the links attribute (optional parameter) is specified in the extension, you need to ensure all the links it contains have been correctly specified. Also, it is a good idea to check all the keys for the links for validity. The accessible values are the following: getstarted, learn, license, support, privacypolicy. For more information, refer to Extension manifest reference.
Checking the ‘categories’ attribute
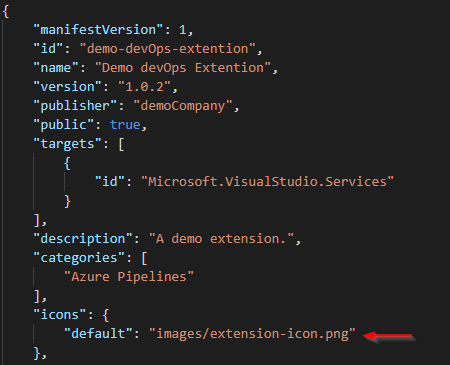
The ‘categories’ attribute is an array with categories that specify what your extension relates to. At least one category must be specified. There is no limitation on the maximum number of categories. The acceptable values are the following: Azure Repos, Azure Boards, Azure Pipelines, Azure Test Plans, and Azure Artifacts. The following image shows one category, Azure Pipelines, specified. For more information, refer to Extension manifest reference.
Checking the size of the extension main icon
Make sure that the dimension of the main icon of an extension is 128×128 px. Also, check that the icon file type is one of the following ones: BMP, GIF, EXIF, JPG, PNG, or TIFF.
Checking icon size for tasks
Make sure that your choice for icons for tasks is thematically correct and the icon dimension is 32×32 px.
Checking contents of readme.md
Make sure the description in the *.md file is valid and up-to-date. Pay attention to the list of tasks in the description. If this list is in the file, check if it corresponds to the actual list of the extension tasks.
Manual publication
To upload an extension manually to the marketplace, first, you need to create a *.VSIX file. To create an extension (a *.VSIX file), use the ‘tfx extension create…’ command. For more information about the command, refer to this link. When the extension creation is complete (a *.VSIX file), you need to go to the Extension Management page of a required publisher, select the New Extension option, and then Azure DevOps, as shown below:
Click to upload the extension.
Note: If you publish an extension for public use for the first time, you need first to submit a request for approval for making an extension public. For this, on the Details page of the publisher at the very bottom of the page, you need to check the combo box to submit the request. For more information on requirements that you need to comply with, in order to make an extension public, refer to Make your extension or integration public.
Publishing with the command line
If public publishing is approved, or an extension is already on the website, it’s convenient to upload (or update) with the help of the command line. The following is an example of the command that simultaneously creates and publishes an extension on the marketplace:
extension.json —token yourToken —rev–version
Parameter values explained:
- “publisher” is a publisher that publishes an extension
- “manifest-globs” is used to specify the extension manifest filename
- “token” is a token name that is created in the publisher account. This token should allow publishing of an extension. To learn how to make a token, refer to the Authenticate access with personal access tokens article.
- “rev-version” parameter identifies that the extension version will be automatically incremented at the next deletion of the extension.
Conclusion
To sum up, in this article, I have described the key aspects you should take into account when preparing an extension before publishing for public use. In addition, I have covered the ways to publish your application on the marketplace. Please also note that the article is not an extensive tutorial. Lots of aspects related to the creation of an extension have not been covered in this article. To learn more about the aspects of the extension creation, refer to the Developing Azure DevOps Extension article.
Tags: devops, Microsoft Azure Last modified: September 20, 2021


