INTRODUCTION
The master database contains records of the structure/configuration for both the current instance and all other databases. When you run sp_configure, you are writing data to the master database. It also contains most of the dynamic management views that are necessary to monitor the instance.
The importance of the master database is crucial. First, it has the information necessary for opening all other databases and has to be opened first. Then, it involves all instance level principals for the current instance.
It is crucial to back up the master database daily. Equally important is to know how to restore the master database to the instance. The most frequent cases are the database crash or the necessity to restore the master database to another instance when no longer use the source instance. In this article, we will examine the specific case of moving the master database to another instance.
CHECK THE STATUS OF APPLICATION SERVICES
Restoring the master database to another instance will involve starting the instance in the single user mode. Thus, it is essential to make sure that the active session is the only one controlling the instance.
For that, stop all application services from accessing the instance, especially if such applications have privileged access. Problems can occur if you start the instance in the single-user mode while the application has already established a session. In this case, you will not be able to proceed with an interactive session from SQL Server Management Studio.
STOP SQL SERVER SERVICES
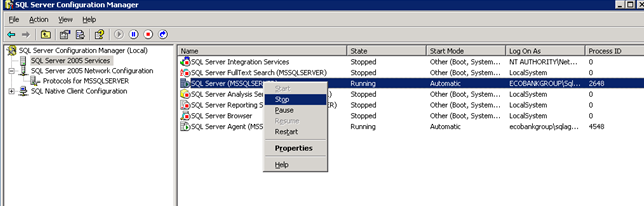
Stop all SQL Server Services with the SQL Server Configuration Manager: right-click each service and select Stop from the context menu (see fig. 2).
START SQL SERVER IN THE SINGLE USER MODE
To restore the master database, you need the SQL Server instance in the single user mode. Take the following steps:
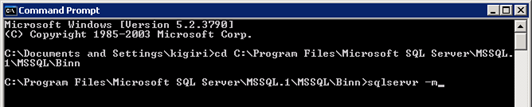
- Open CMD Prompt
- Navigate to C:\Program Files\Microsoft SQL Server\MSSQL.1\MSSQL\Binn
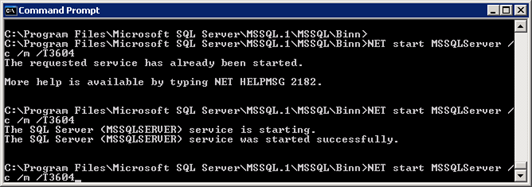
- Issue sqlservr –m OR NET start MSSQLServer /c /m /T3604
OR
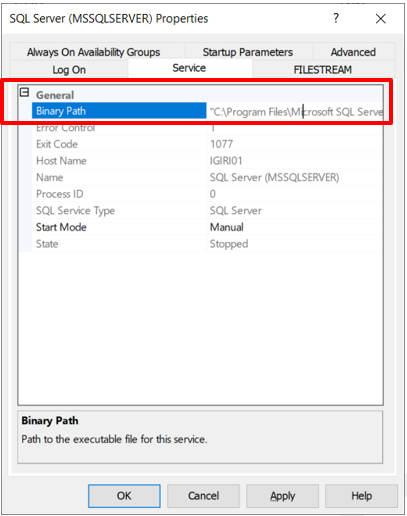
Note that step 2 refers to the Binn directory location. It can be different in your installation.
You can find the necessary directory by checking the Service tab of SQL Server service properties in SQL Server Configuration Manager (See Figure 4):
RESTORE MASTER
When you restore master from one instance to another, you get new principals and new values in system catalogs containing such values as the instance name and even the tempdb location.
Before restoring master, ensure that the destination server’s paths are available for TempDB files as defined in the source server. Otherwise, the new instance will not start up successfully after the restore is complete.
- Open SQL Server Management Studio
- Run the code in Listing 1 in SQL Server Management Studio
-- Listing 1: Restore Master Database
restore database master from disk ='<full_path_of_backup>' with replace;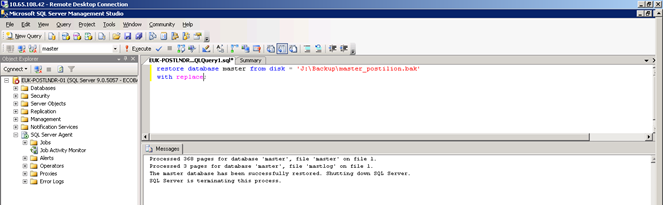
NB: The instance will shut down once the restore is complete.
SERVICE ACCOUNT CHANGE
To start up SQL Server after the restore is complete, do the following:
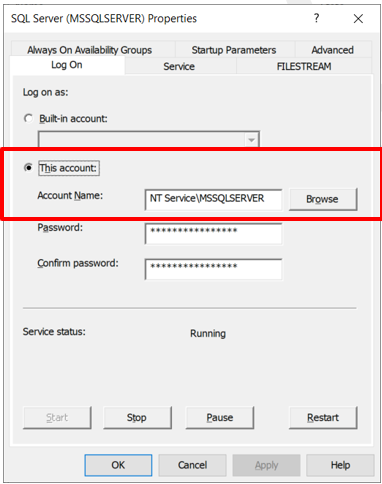
- Change the SQL Server Service Account to the currently logged on account.
- Open Start > All Programs > Microsoft SQL Server 2005 > Configuration Tools > SQL Server Configuration Manager
- Right-Click each service and select Properties
- In the Log On tab, enter the desired Account Name and the corresponding password.
SERVER NAME
The master database contains the name of the instance where it is located. Since the backup restored in this scenario is from a different instance, you need to update the server name using stored procedures, as shown in Listing 2.
-- Listing 2: Change the Instance Name for a SQL Server Instance
-- Check the current server name

select @@SERVERNAME

-- Change the server name as seen by the database

sp_dropserver 'EUK-POSTSVR-01'--Present Server name goes here
go
sp_addserver 'EUK-POSTBKP-01','local'--New Server name goes here
go
Restart SQL Server from SQL Server Configuration Manager for the name change to take effect.
SERVICE LOGINS
The master database also records all logins associated with the source instance. In the new instance, you need to clean up unnecessary logins. After that, you can add the local default SQL Server Groups to the current instance.
-- Listing 3: Remove Unnecessary Logins
drop login [EUK-POSTSVR-01\SQLServer2005MSSQLUser$EUK-POSTSVR-01$MSSQLSERVER]
drop login [EUK-POSTSVR-01\SQLServer2005MSFTEUser$EUK-POSTSVR-01$MSSQLSERVER]
drop login [EUK-POSTSVR-01\SQLServer2005SQLAgentUser$EUK-POSTSVR-01$MSSQLSERVER]

-- Listing 4: Add local default SQL Server Groups
create login [EUK-POSTBKP-01\SQLServer2005MSSQLUser$EUK-POSTBKP-02$MSSQLSERVER] from windows;
create login [EUK-POSTBKP-01\SQLServer2005SQLAgentUser$EUK-POSTBKP-02$MSSQLSERVER] from windows;
create login [EUK-POSTBKP-01\SQLServer2005MSFTEUser$EUK-POSTBKP-02$MSSQLSERVER] from windows;
NB: Ensure that the server and agent service accounts belong to their respective groups on the OS level and that these OS groups have the required permissions. Table 1 shows permissions for SQL Server Service accounts.
| S/No | Privilege | Required By |
| 1. | Log on as a service | SQL Server Service Account SQL Agent Service Account Integration Service Account |
| 2. | Act as part of the operating system | SQL Server Service Account SQL Agent Service Account |
| 3 | Log on as a batch job | SQL Server Service Account SQL Agent Service Account |
| 4. | Replace a process-level token | SQL Server Service Account SQL Agent Service Account |
| 5. | Bypass traverse checking | SQL Server Service Account SQL Agent Service Account Integration Service Account |
| 6. | Adjust memory quotas for a process | SQL Server Service Account SQL Agent Service Account |
| 7. | Create global objects | Integration Service Account |
| 8. | Lock pages in Memory (AWE) | SQL Server Service Account |
Table 1. OS Privileges Required by SQL Server Service Accounts
Once the housekeeping is complete at the database level, revert to the regular service account. Restart the instance one more time from the SQL Server Configuration Manager.
At this point, you can start the application services.
CONCLUSIONS
During the execution of the above scenario, errors can take place. Below, you’ll see the information about these errors.
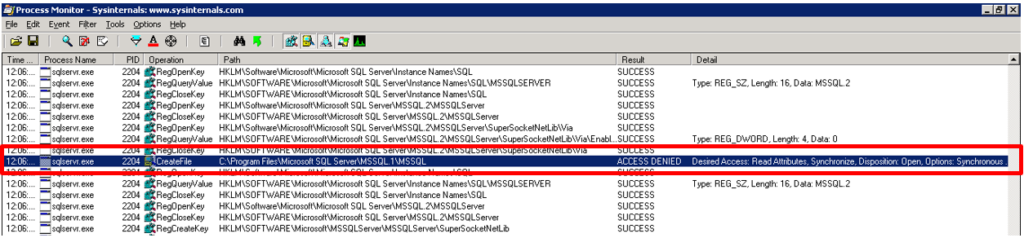
If you troubleshoot the issues, you might use tools like SysInternal’s ProcMon. They isolate the file permission issues when starting SQL Server (See Figure 7).
| S/N | Error | Cause/Solution |
| 1. | SQLServerAgent could not be started (reason: Unable to connect to server ‘(local)’; SQLServerAgent cannot start). | Create logins for all local service accounts |
| 2. | Server local connection provider failed to listen on [ \\.\pipe\SQLLocal\MSSQLSERVER ]. Error: 0x5 TDSSNIClient initialization failed with error 0x5, status code 0x40. TDSSNIClient initialization failed with error 0x5, status code 0x1. SQL Server could not spawn FRunCM thread. Check the SQL Server error log and the Windows event logs for information about possible related problems. Could not start the network library because of an internal error in the network library. To determine the cause, review the errors immediately preceding this one in the error log. | SQL Server was started previously with a different service account and was terminated forcefully. It occurs during the restoration of the master database. To correct this, start up the instance with the service account used in step 3 and then stop the service gracefully. After that, you can start with the regular service account. |
| 3. | SQLServerAgent could not be started (reason: Error creating a new session). | Grant appropriate permissions to the SQL Agent Account |