This article briefly explains creating a new database with the New Database wizard of SQL Server Management Studio (SSMS).
The SQL Server Management Studio is a graphical interface tool for creating, configuring, and administrating SQL Server engines and databases. You can download it from here.
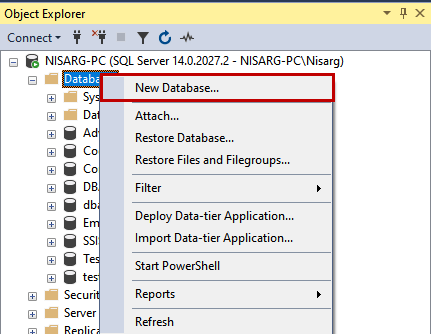
To create a database, connect to the SQL Server instance -> Right-click on Databases -> New Database.
A New Database dialog box opens. There, you will see three different sections:
- General.
- Options.
- Filegroups.
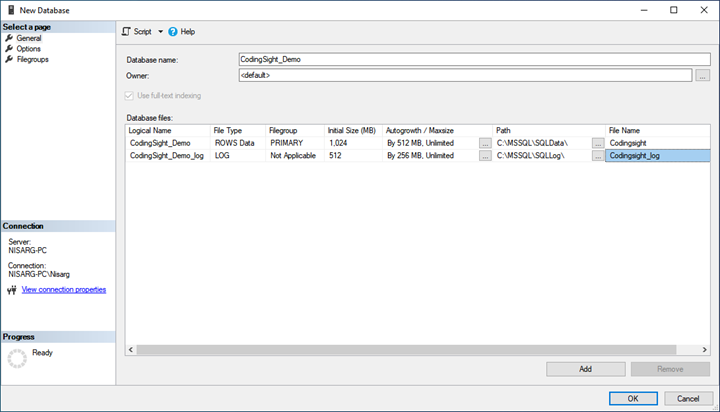
The General Screen of New Database dialog box.
In the general screen, you can specify the database name in the respective textbox. The owner textbox serves to specify the database owner. By default, it is the user who created the database.
If you want to add another database file during the database creation process, click Add, and it will include a new row in the database files grid view.
The Database files grid allows you to specify the following database files details:
- Logical Names of the database files.
- File Types of the database files. This option helps when you add secondary database files. The valid values are:
- ROWS data
- Log
- FILESTREAM.
- Filegroups – choose the filegroup to keep the database files. The valid options are:
- Primary
- Secondary / Name of the filegroup.
- Initial Size – specify the Initial Size of the database file and log file.
- Autogrowth / Maxsize – specify the Autogrowth and maximum file size values. To change the value, click on eclipse – it opens a new dialog window:
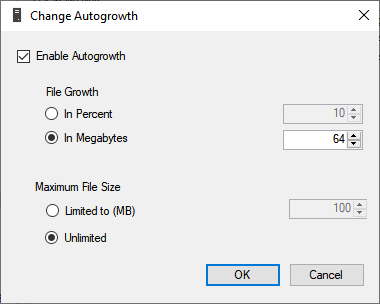
Here, you can enable or disable the File Growth parameter and specify the File Growth value. In the Maximum File Size section, you can limit the data file’s size – set the maximum value in the Limited to (MB) field. If you do not want to limit the data file/log file size, select Unlimited.
6. Path – specify the database file’s physical location. If you want to save the database files to other than the default location, click on eclipse. A dialog box opens. There, choose the desired folder and click OK.
7. File Name – specify the actual name of the database file.
In the demo, we are going to create the codingsite_demo database:
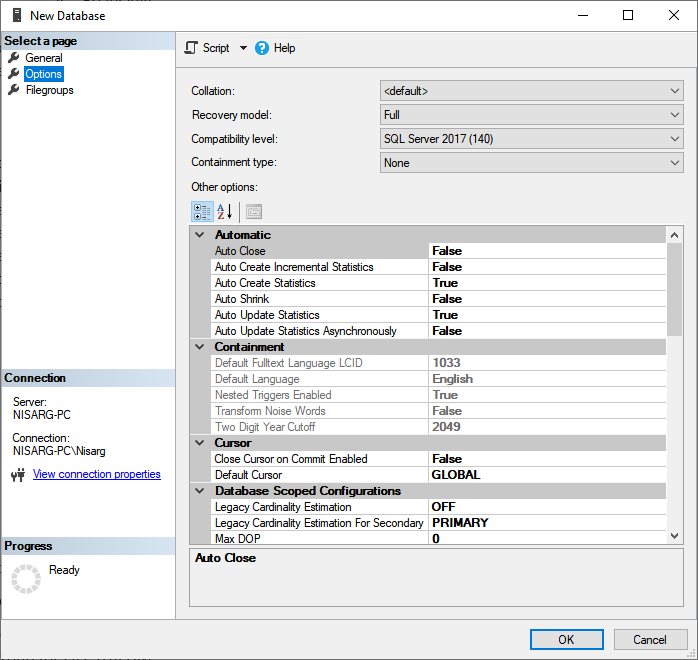
The Options Screen of the New Database dialog box.
On the Options page of the New Database dialog box, you can configure advanced options:
- Collation. Specify the database collation.
- Recovery model. Choose the desired database recovery model:
- Full
- Simple
- Bulk-logged.
- Compatibility level. The SQL server’s latest compatibility level is 150 (SQL Server 2019), and the oldest compatibility level is 100 (SQL Server 2008).
- Containment type. If you want to designate your database as a contained database, choose Partial. The default selection is None.
Other advanced options belong to the following categories:
- Automatic.
- Enable or disable the Auto Close parameter.
- Enable or disable the Auto Create Incremental statistics option.
- Enable or disable the Auto Create and Auto Update Statistics option.
- Enable or disable the behavior of updating the outdated statistics during query compilation.
- Cursor
- Close the cursor when the transaction is committed. The valid values are True and False.
- The default behavior of the cursor. The valid values are True and False. When the selected value is True, the default cursor declaration is LOCAL. If the selected value is False, the default is GLOBAL.
- Database Scoped configuration
- Enable or disable the Legacy Cardinality Estimator.
- Enable or disable the Legacy Cardinality Estimator for secondary.
- Specify the maximum degree of parallelism (Max DOP).
- Specify the maximum degree of parallelism (Max DOP) for secondary.
- Enable or disable parameter sniffing.
- Enable or disable parameter sniffing for secondary.
- Enable or disable the query optimizer hotfixes.
- Enable or disable the query optimizer hotfixes for secondary.
- FILESTREAM
- Specify the FILESTREAM directory.
- Specify the non-transactional access to the FILSTREAM:
- None
- READONLY
- FULL
- Recovery.
- Choose the page verification method:
- None
- CHECKSUM
- TORN_PAGE_DETECTION
- Specify the Target Recovery time. The unit is second.
- Choose the page verification method:
- Service broker. Enable or disable the service broker of the SQL Server database.
- State
- Mark the SQL Database as Read-only.
- Enable or disable encryption in the database.
- Restrict user access to the database:
- MULTI_USER
- SINGLE_USER
- RESTRICTED_USER
Note: you can read this article to get more information about the database options.
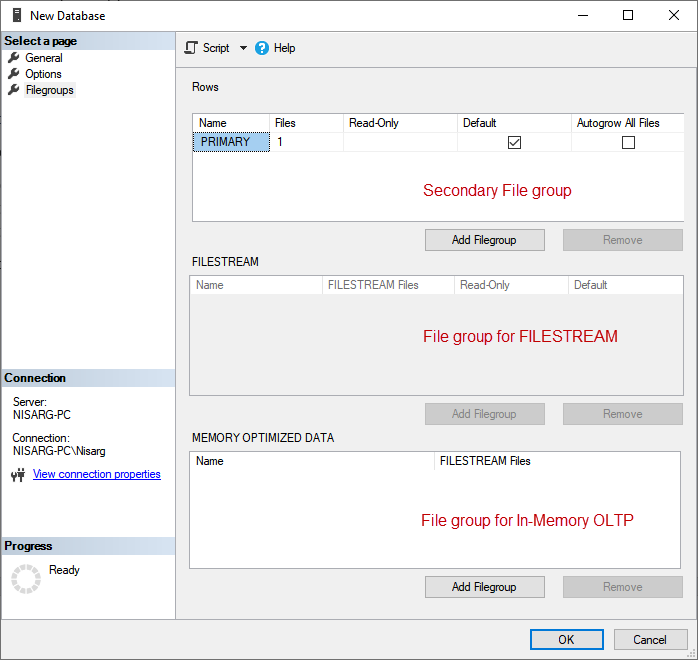
The Filegroups Screen of the New Database dialog box.
On the Filegroups screen, you can specify the following filegroups:
- Secondary database filegroup.
- Filegroup for FILESTREAM.
- Filegroup for In-Memory OLTP.
The screen looks like the following image:
Generate Script to Create a database
Once the database is created, you can generate a Create database script.
To do that, click on the Script button on top of the New Database dialog box, and click Script action to the new query window:
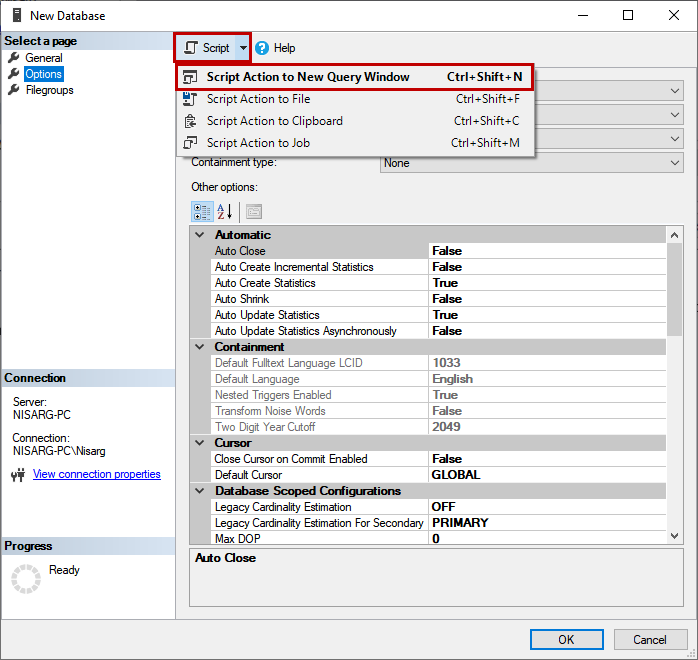
The generated script is the following:
CREATE DATABASE [CodingSight_Demo]
 CONTAINMENT = NONE
 ON  PRIMARY
( NAME = N'CodingSight_Demo', FILENAME = N'C:\MSSQL\SQLData\CodingSight_Demo.mdf' , SIZE = 8192KB , FILEGROWTH = 65536KB )
 LOG ON
( NAME = N'CodingSight_Demo_log', FILENAME = N'C:\MSSQL\SQLLog\CodingSight_Demo_log.ldf' , SIZE = 8192KB , FILEGROWTH = 65536KB )
GO
ALTER DATABASE [CodingSight_Demo] SET COMPATIBILITY_LEVEL = 140
GO
ALTER DATABASE [CodingSight_Demo] SET ANSI_NULL_DEFAULT OFF
GO
ALTER DATABASE [CodingSight_Demo] SET ANSI_NULLS OFF
GO
ALTER DATABASE [CodingSight_Demo] SET ANSI_PADDING OFF
GO
ALTER DATABASE [CodingSight_Demo] SET ANSI_WARNINGS OFF
GO
ALTER DATABASE [CodingSight_Demo] SET ARITHABORT OFF
GO
ALTER DATABASE [CodingSight_Demo] SET AUTO_CLOSE OFF
GO
ALTER DATABASE [CodingSight_Demo] SET AUTO_SHRINK OFF
GO
ALTER DATABASE [CodingSight_Demo] SET AUTO_CREATE_STATISTICS ON(INCREMENTAL = OFF)
GO
ALTER DATABASE [CodingSight_Demo] SET AUTO_UPDATE_STATISTICS ON
GO
ALTER DATABASE [CodingSight_Demo] SET CURSOR_CLOSE_ON_COMMIT OFF
GO
ALTER DATABASE [CodingSight_Demo] SET CURSOR_DEFAULT  GLOBAL
GO
ALTER DATABASE [CodingSight_Demo] SET CONCAT_NULL_YIELDS_NULL OFF
GO
ALTER DATABASE [CodingSight_Demo] SET NUMERIC_ROUNDABORT OFF
GO
ALTER DATABASE [CodingSight_Demo] SET QUOTED_IDENTIFIER OFF
GO
ALTER DATABASE [CodingSight_Demo] SET RECURSIVE_TRIGGERS OFF
GO
ALTER DATABASE [CodingSight_Demo] SET  DISABLE_BROKER
GO
ALTER DATABASE [CodingSight_Demo] SET AUTO_UPDATE_STATISTICS_ASYNC OFF
GO
ALTER DATABASE [CodingSight_Demo] SET DATE_CORRELATION_OPTIMIZATION OFF
GO
ALTER DATABASE [CodingSight_Demo] SET PARAMETERIZATION SIMPLE
GO
ALTER DATABASE [CodingSight_Demo] SET READ_COMMITTED_SNAPSHOT OFF
GO
ALTER DATABASE [CodingSight_Demo] SET  READ_WRITE
GO
ALTER DATABASE [CodingSight_Demo] SET RECOVERY FULL
GO
ALTER DATABASE [CodingSight_Demo] SET  MULTI_USER
GO
ALTER DATABASE [CodingSight_Demo] SET PAGE_VERIFY CHECKSUM
GO
ALTER DATABASE [CodingSight_Demo] SET TARGET_RECOVERY_TIME = 60 SECONDS
GO
ALTER DATABASE [CodingSight_Demo] SET DELAYED_DURABILITY = DISABLED
GO
USE [CodingSight_Demo]
GO
ALTER DATABASE SCOPED CONFIGURATION SET LEGACY_CARDINALITY_ESTIMATION = Off;
GO
ALTER DATABASE SCOPED CONFIGURATION FOR SECONDARY SET LEGACY_CARDINALITY_ESTIMATION = Primary;
GO
ALTER DATABASE SCOPED CONFIGURATION SET MAXDOP = 0;
GO
ALTER DATABASE SCOPED CONFIGURATION FOR SECONDARY SET MAXDOP = PRIMARY;
GO
ALTER DATABASE SCOPED CONFIGURATION SET PARAMETER_SNIFFING = On;
GO
ALTER DATABASE SCOPED CONFIGURATION FOR SECONDARY SET PARAMETER_SNIFFING = Primary;
GO
ALTER DATABASE SCOPED CONFIGURATION SET QUERY_OPTIMIZER_HOTFIXES = Off;
GO
ALTER DATABASE SCOPED CONFIGURATION FOR SECONDARY SET QUERY_OPTIMIZER_HOTFIXES = Primary;
GO
USE [CodingSight_Demo]
GO
IF NOT EXISTS (SELECT name FROM sys.filegroups WHERE is_default=1 AND name = N'PRIMARY') ALTER DATABASE [CodingSight_Demo] MODIFY FILEGROUP [PRIMARY] DEFAULT
GO
You will see the new database created under the Databases folder of the SQL Server Management Studio:
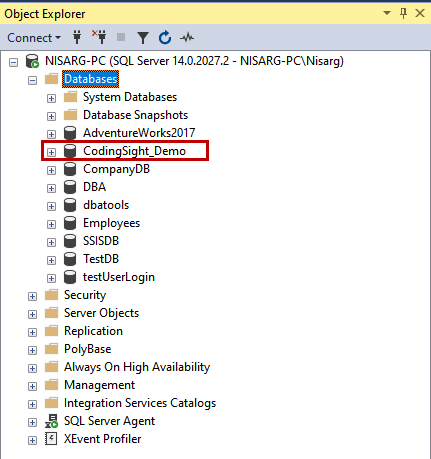
The database has been created successfully on the SQL Server.
Summary
This article explained creating and configuring a new database using the New Database wizard of SQL Server Management Studio.
Read also
Database Design Concepts with SQL Server Management Studio (SSMS) Part 1
Learn Database Design with SQL Server Management Studio (SSMS) – Part 2
Tags: sql database, ssms, t-sql Last modified: September 17, 2021