Maintenance plans in SQL Server give us an easy way to organize, configure, and schedule tasks that ensure that the database engine and the databases that are hosted therein are kept in shape.
Maintenance Plans offer a database administrator an opportunity to configure key tasks like indexing, statistics updates, backups, log cleanups, and others. In previous article we’ve already discussed how to create a basic maintenance plan to perform database consistency check. In this article, we shall do a walkthrough of creating a maintenance plan for a database instance that is hosting small databases. In the course of the walkthrough, I will explain the key choices made in each step in the context of an instance with a moderately large number of small databases. The idea is to configure maintenance for these databases without having to do it one by one. The focus on small databases is intended to avoid the performance overhead associated with maintenance operations.
Maintenance Plan for Weekly Tasks
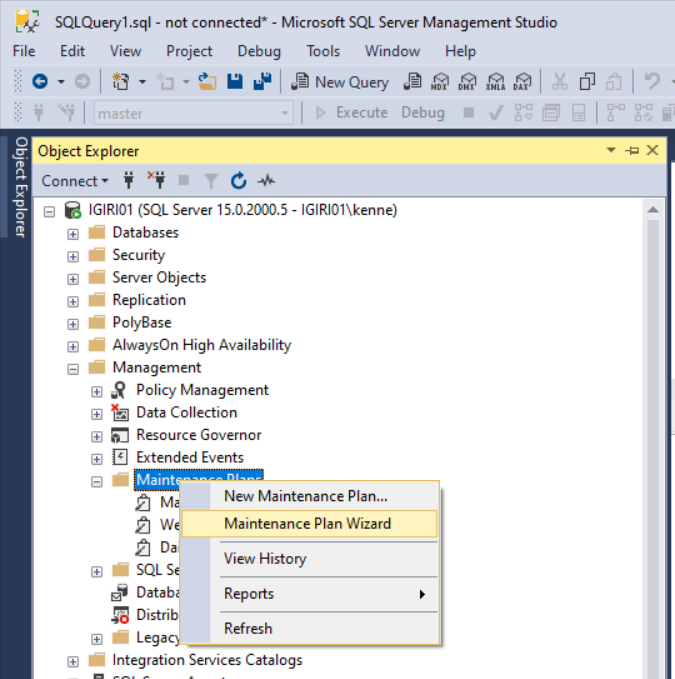
Figure 1: Launch Maintenance Plan Wizard
We launch the Maintenance Plan Wizard from Object Explorer>[Instance Name]>Management>Maintenance Plans (See Figure 1). The first page of the wizard gives us an overview of those tasks that can be configured. While there are other ways to accomplish these tasks using code and job scheduling, the Maintenance Plan Wizard makes it quite easy to accomplish when dealing with a large number of databases hosted on one instance.
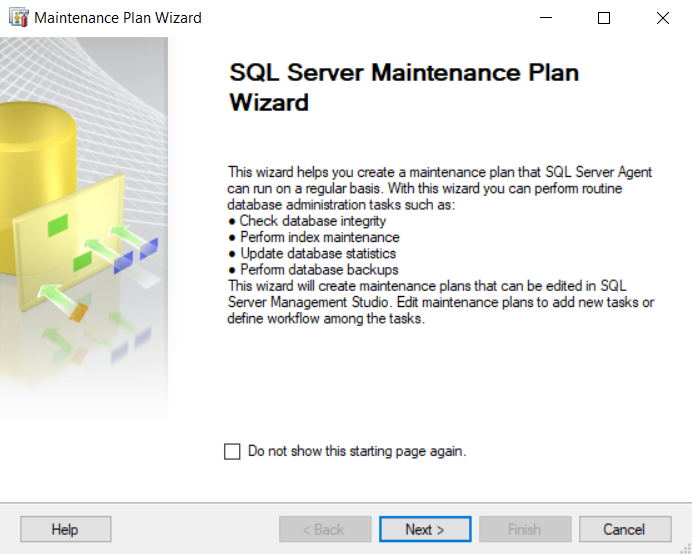
Figure 2: Maintenance Plan Wizard
In Figure 3, we see SQL Server exposing fields for us to name and describe the Maintenance Plan. Entering a description of the plan makes sense for documentation purposes. Imagine taking over a new SQL Server instance at a new company. It would be useful if you find descriptions of SQL Server objects in the objects. You should do the same for others. Please note the description I have given is meant to simply illustrate the point. A more detailed description will be desirable in a production environment.
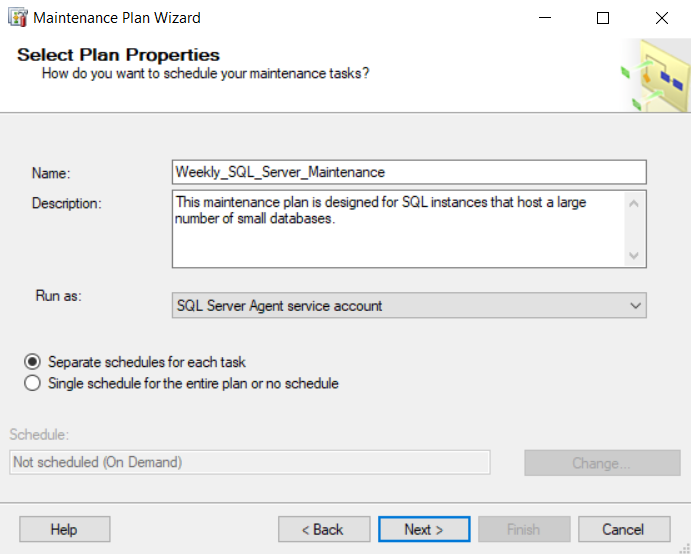
Figure 3: Naming the Maintenance Plan
Note that in Figure 3 we have the option to choose whether we want to use a single schedule for all tasks or a separate schedule for each task. I have chosen to use separate schedules to have the flexibility of staggering the tasks. We would not want too many maintenance operations running concurrently or back to back over a long time to avoid the risk of overwhelming server resources. The decision you take at this point may also depend on the capacity of resources available to you and the maintenance window available. Some people have sufficient capacity and would want to get the task over with quickly during each run. In the scenario covered by this article, we are assuming the instance in question is not used during the weekend.
In Figure 4, we choose the tasks we want to execute. One of the great things about SQL Server is that each task is described at the bottom of the window. It pays when working as a DBA to understand what you are doing even when working on “Windows”. In my experience, many “administrators” have the habit of simply clicking “NEXT, NEXT, NEXT” because they are in a hurry to get the functionality working. But taking the time to understand the impact of the next “NEXT” helps ensure you are doing something that will add value, not cause new problems.
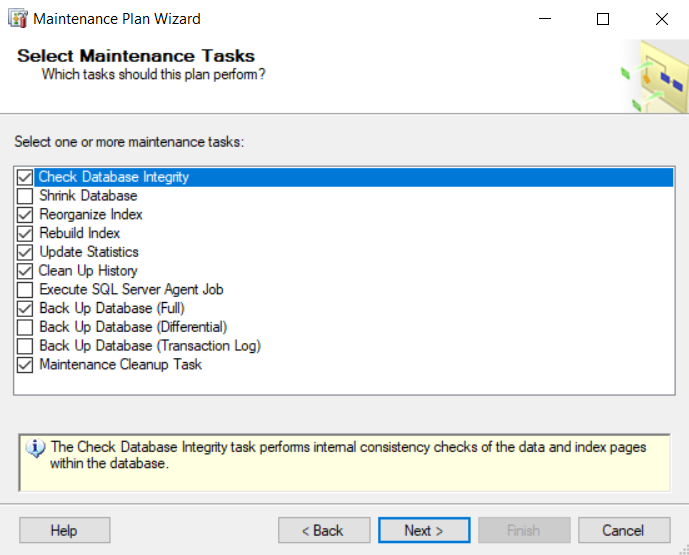
Figure 4: Selecting Maintenance Tasks
The tasks we have selected are described as follows:
The Check Database Integrity task performs internal consistency checks of the data and index pages within the database.
The Reorganize Index task defragments and compacts clustered and non-clustered indexes on tables and views. This will improve index-scanning performance.
The Rebuild Index task reorganizes data on the data and index pages by rebuilding indexes. This improves performance of index scans and seeks. This task also optimizes the distribution of data and free space on the index pages, allowing faster future growth.
The Update Statistics task ensures the query optimizer has up-to-date information about the distribution of data values in the tables. This allows the optimizer to make better judgments about data access strategies.
The History Cleanup task deletes historical data about Backup and Restore, SQL Server Agent, and Maintenance Plan operations. This wizard allows you to specify the type and age of the data to be deleted.
The Back Up Database (Full) task allows you to specify the source databases, destination files or tapes and overwrite options for a full backup.
The Maintenance Cleanup task removes files left over from executing a maintenance plan.
Figure 5 shows where we select the order in which these tasks are executed. This is important for a few reasons. For example, it does not make sense to perform an index statistics update after an Index Rebuild since an Index rebuild also performs index statistics update in SQL Server. We shall see later in the article how we handle this given the order we have chosen. Another possible consideration is that you may decide that it makes more sense to perform a backup first before proceeding with certain kinds of maintenance.

Figure 5: Order of Tasks
In Figure 6, we choose which databases we want to apply the first maintenance task to. We have to do this for each of the subsequent tasks as well. This is important in the sense that some databases may need to be exempted from such operations. For example, where you have a mix of Very Large Databases (VLDBs) and very small databases in the same instance (a bad idea itself), you might need to exclude the VLDBs from outright blind index rebuilds. In such a case, you need to identify the key tables in that VLDB and focus the rebuilds and other intensive maintenance operations on key tables. In this example, I have excluded system databases since I can carefully plan maintenances for them separately. I believe it is safer to handle system databases separately, given that any damage to them might impact the entire instance.
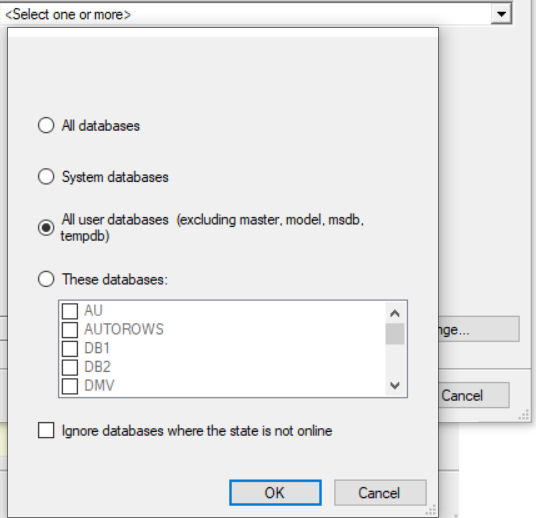
Figure 6: Determine the Scope
Each maintenance operation has its own set of options. Figure 7 shows the options we have to decide on for DBCC CHECKDB. I have deviated from the default settings slightly by increasing the MAXDOP to 2. In Figure 8, we choose to run this task at 1:00 AM on Saturday and Sunday nights.
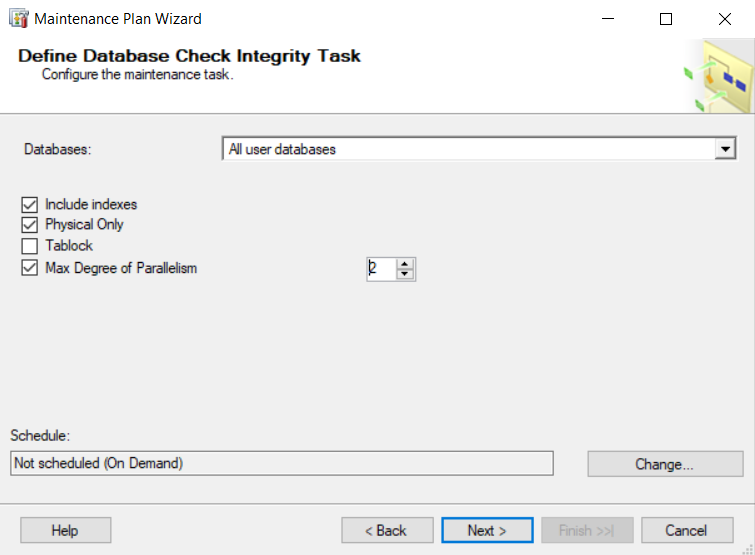
Figure 7: DBCC Options
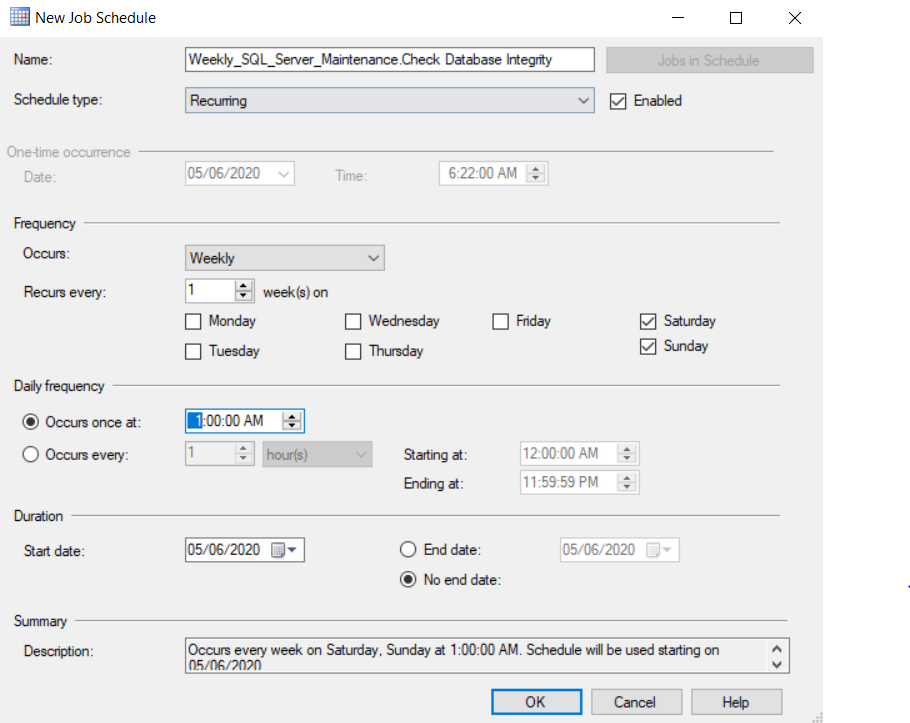
Figure 8: DBCC Schedule
The Reorganize Index task also has a specific set of options. Worth mentioning is the set of conditions that will determine whether an index should be reorganized or not – 30% Fragmentation, 1000+ page count, and last used at most 28 days again. This window underscores the need to understand the options we are making. In order to make these options correctly, you need to understand indexes and indexing to a reasonable extent. Note that similar choices will need to be made in the Rebuild Index Task. Also, take note that the recommended fragmentation threshold for Index Reorganization is actually 15% and not 30%.
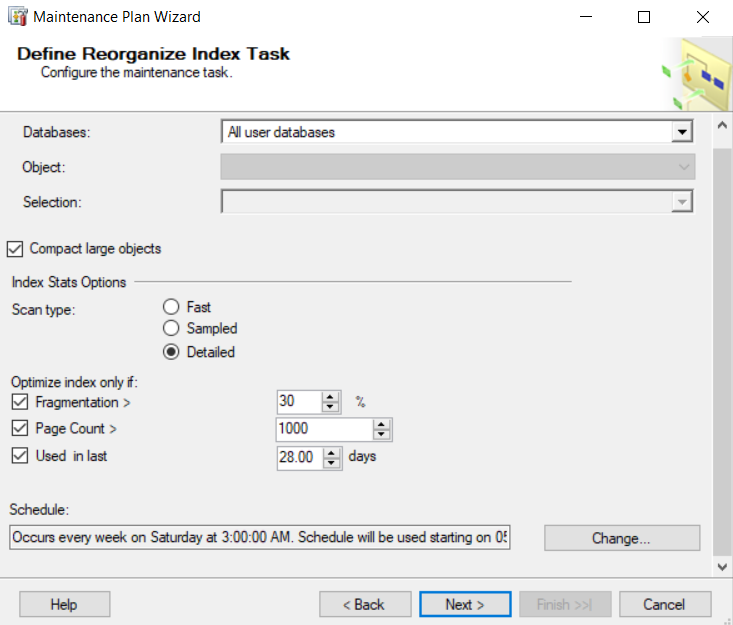
Figure 9: Reorganize Index Options
The Rebuild Index Task offers a few other options asides those for Index Reorganization. (See Figure 10). Notice that I have chosen to sort results in TempDB. For this choice to be effective, it is important to tune TempDB appropriately since the choice implies that sorting for this operation in ALL databases will happen in TempDB. Additionally, we have to set up the schedule for Index Rebuild. I have also set MAXDOP to 2 for this task.
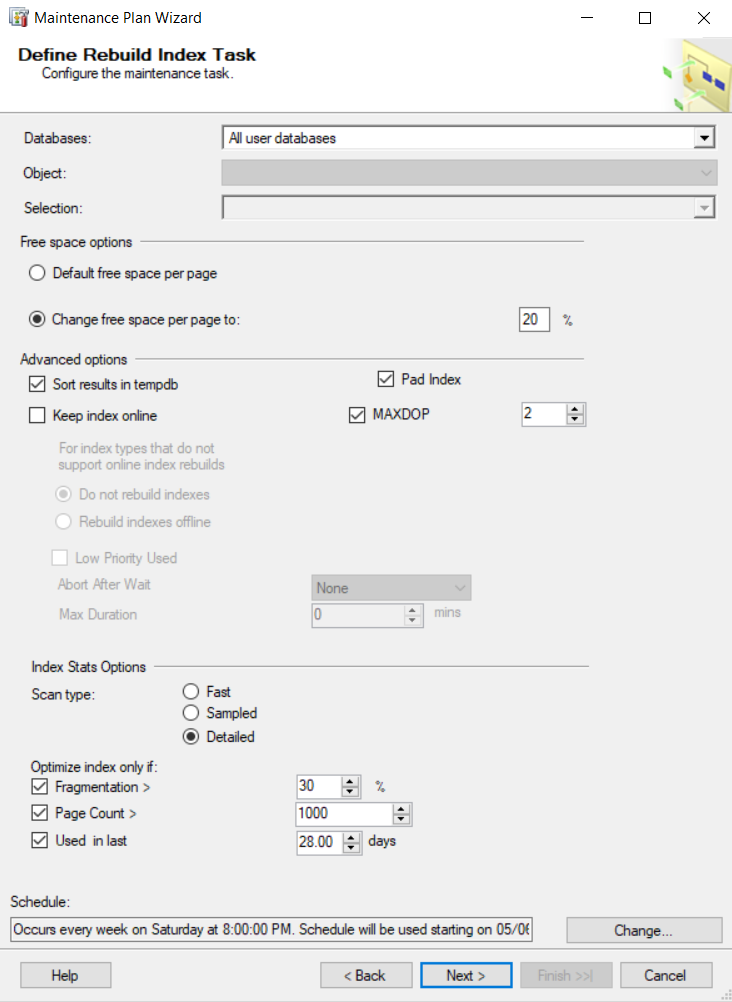
Figure 10: Rebuild Index Options
We mentioned earlier that when an Index Rebuild is invoked in SQL Server, stats update on indexes is also invoked by default. So, when we configure the Statistics Update Task, we choose to update only column statistics (Figure 11). This window also gives us the option of either doing a full scan or sampling. Since the context is small databases, we choose the full scan option. Again, this calls for some understanding of statistics.
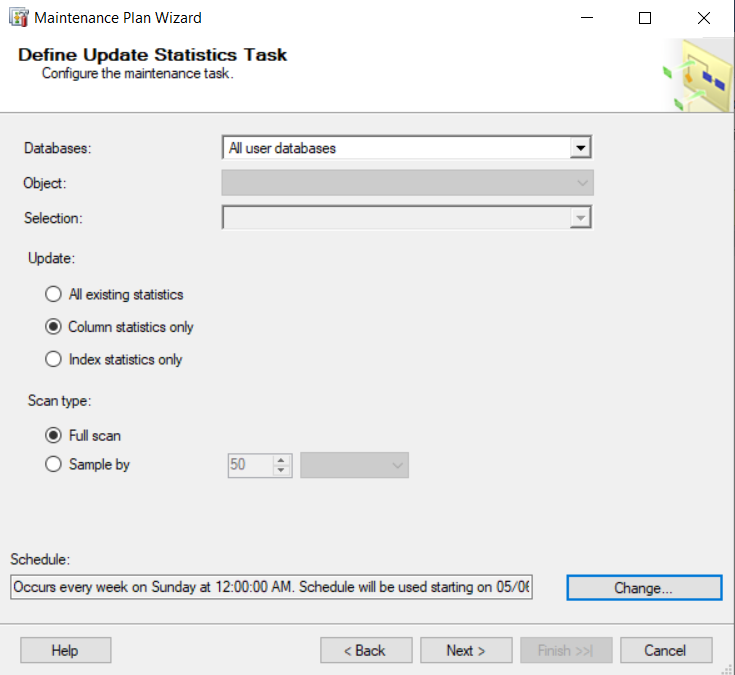
Figure 11: Statistics Update Task
We choose to configure the cleanup job to delete any data older than 4 weeks, as shown in Figure 12.
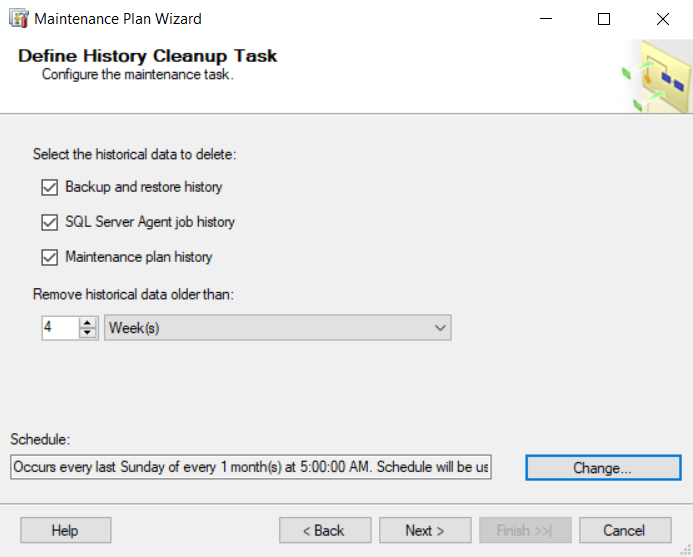
Figure 12: History Cleanup Task
The Backup Task exposes quite a number of configuration options in three tabs! Figure 13 shows that we choose to limit this backup task to user databases. We schedule it for 3:00 AM on Sundays, and we go further to choose the backup destination as E:\MSSQL\Backup (See Figure 14). In the third tab (Figure 15), we make choices to verify the backup and also perform a checksum, so we are closer to being sure the backup is reliable.
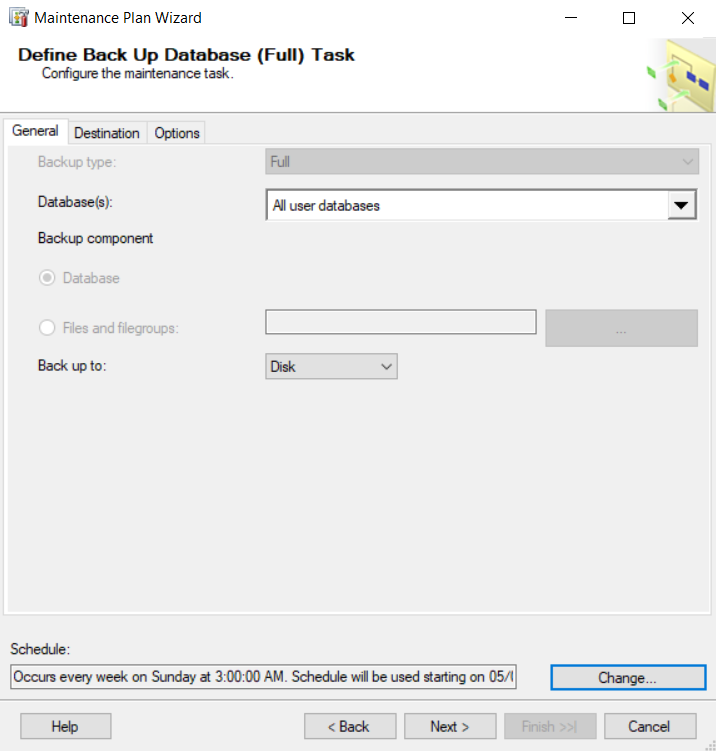
Figure 13: Backup Database Task
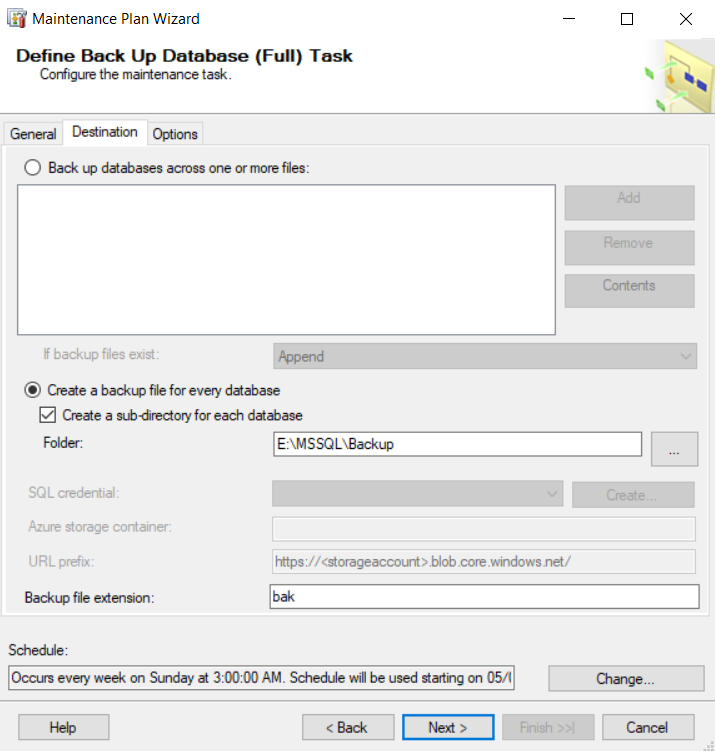
Figure 14: Backup Destination
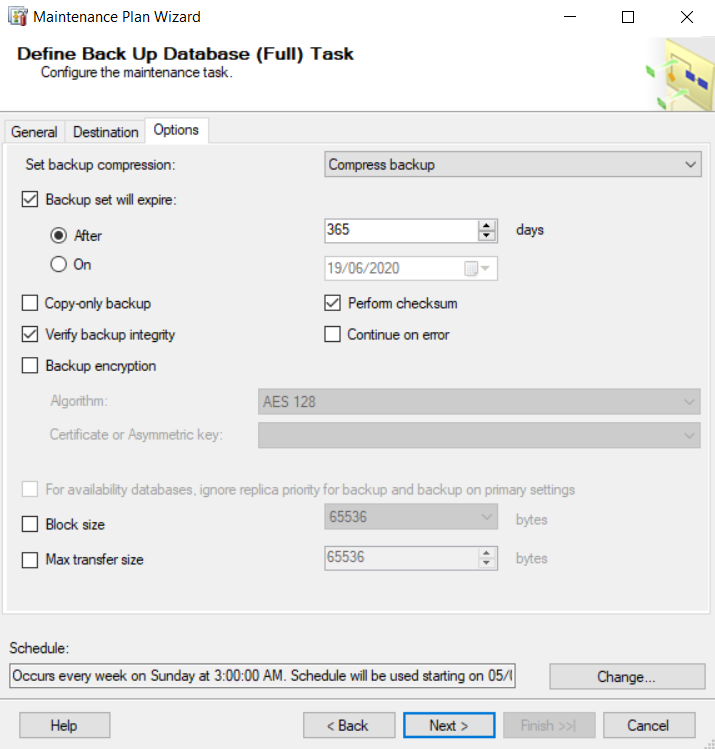
Figure 15: Backup Options
Finally, we configure a task that will manage the retention of our Maintenance Plan log. (Figure 16). Again, we choose to delete any log records older than 4 weeks. Figure 17 shows the options we select to ensure the Maintenance Plan activities are log as well as mailed to the Database Admin group. Of course, for this last option to work, we must have configured Database Mail and set up operators correctly.
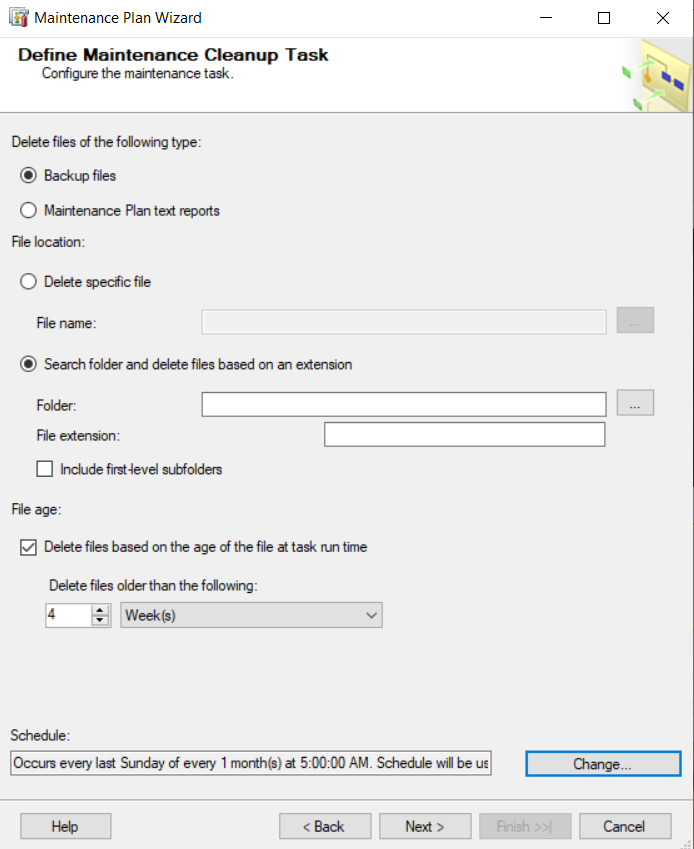
Figure 16: Maintenance Plan Cleanup Task
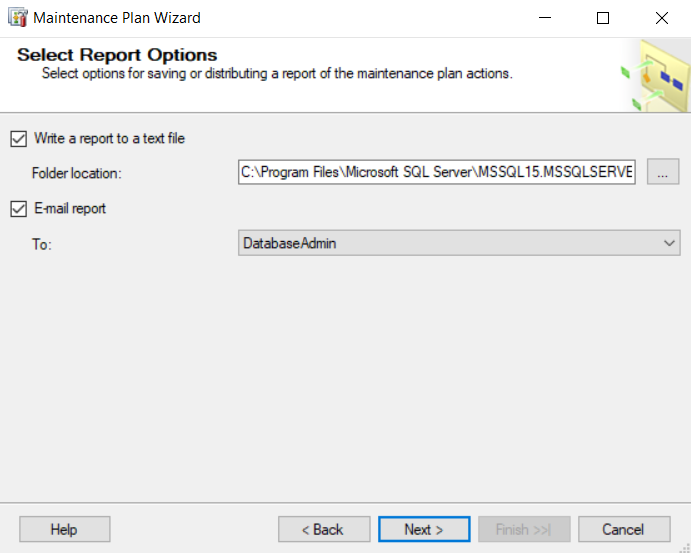
Figure 17: Report Options
Figures 18 and 19 show a summary of the tasks we have configured and feedback on the successful completion of the wizard.
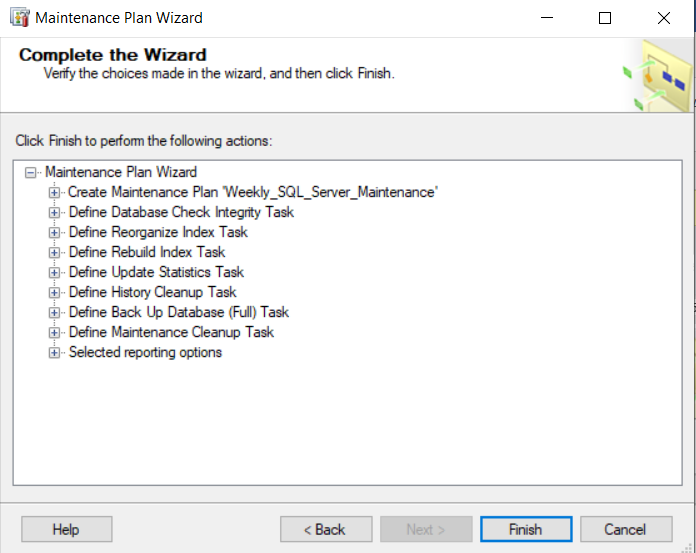
Figure 18: Summary of Options
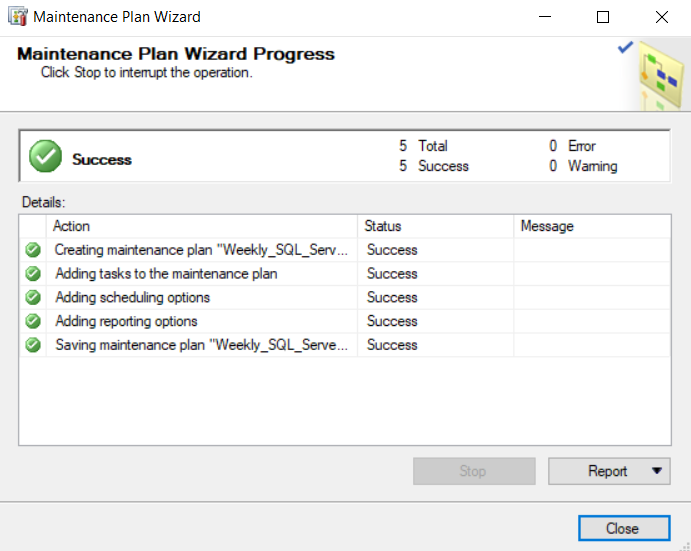
Figure 19: Wizard Completion
Maintenance Plan for Daily Tasks
We can also set up separate maintenance Plans for other purposes, such as simply being organized. We do not need to set up a separate plan for Daily Tasks since we can configure the schedules separately for each task. One reason we may want to set up a separate plan could be to select a different set of tasks targeted at a different set of databases (actually, we may still be able to do this in the existing plan as well).
In the following example, let us assume we have another set of large databases within the same instance having different Recovery Point Objectives. We then need to use a different backup strategy – a daily Differential Backup schedule and an hourly Transaction Log Backup schedule in addition to a weekly full backup in order to ensure an RPO of 1 hour. (See Figures 21 and 22).
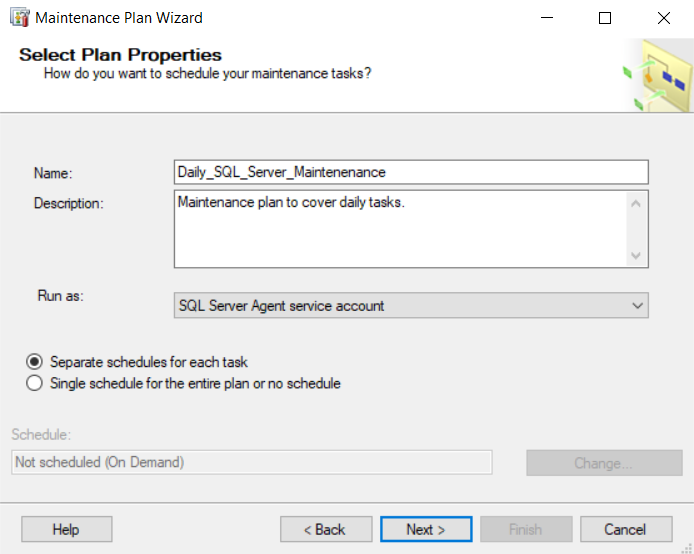
Figure 20: Daily Task Maintenance Plan
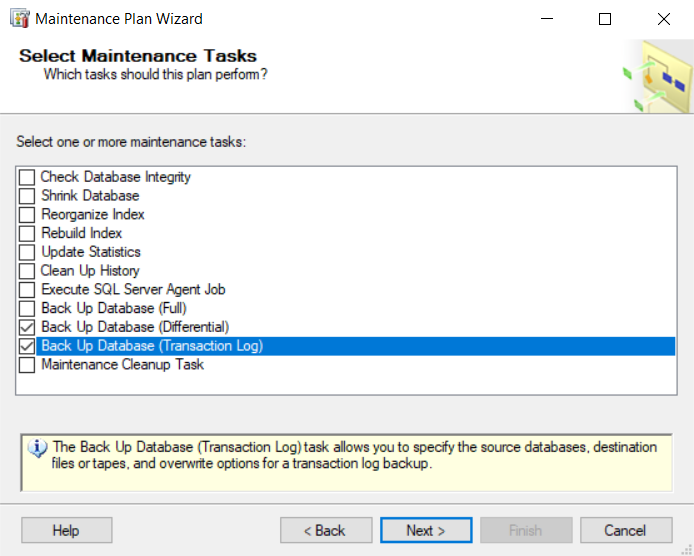
Figure 21: Differential and Tlog Backup Tasks
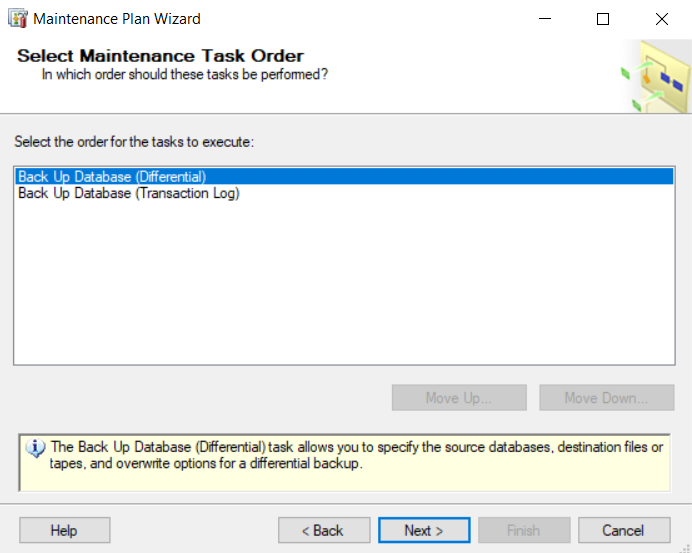
Figure 22: Daily Maintenance Plan Task Order
For the Differential Backup, we choose a daily schedule which is triggered at 2:00 AM daily. (See Figure 23). And choose the same backup options as we did for the Full Weekly Backup configured earlier.
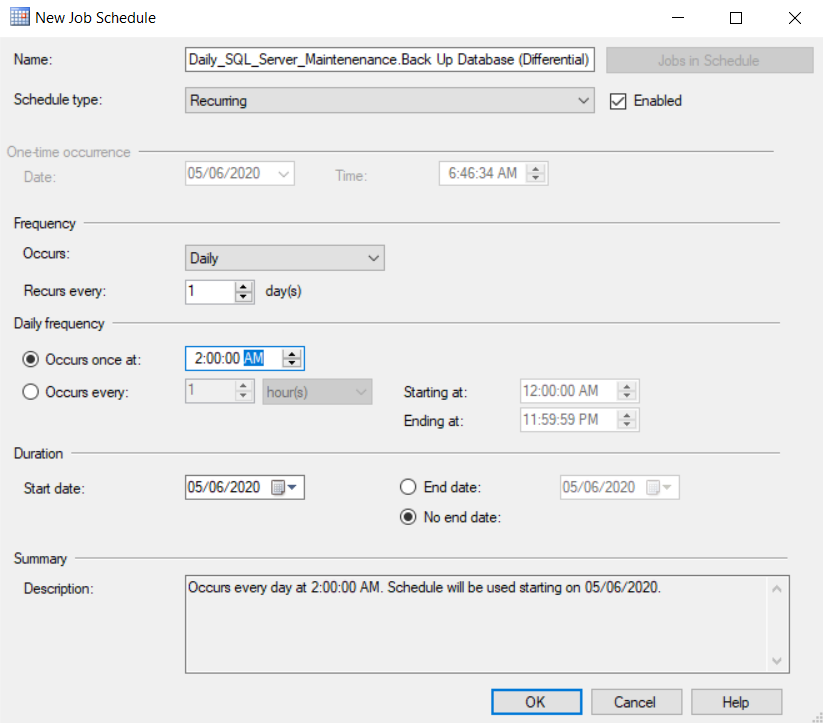
Figure 23: Daily Maintenance Plan Schedule
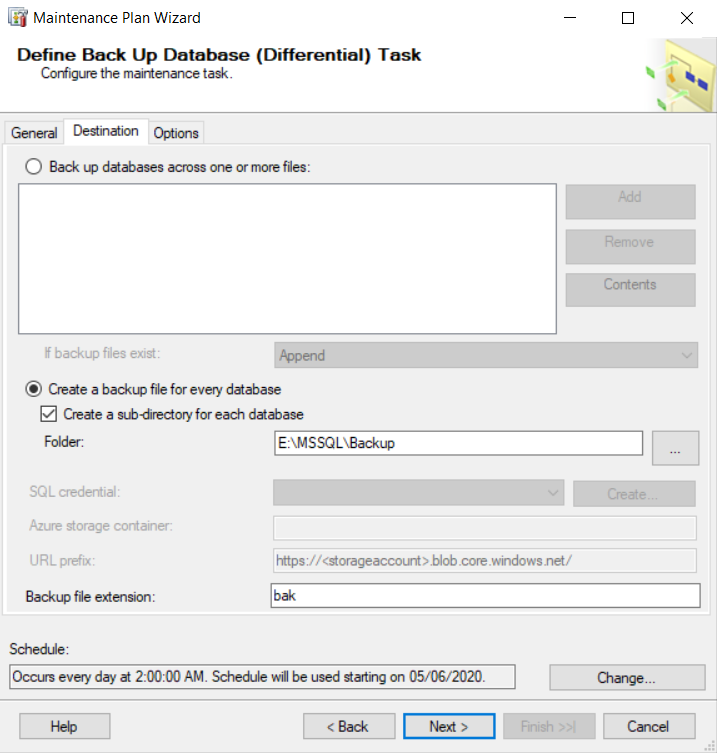
Figure 24: Differential Backup Location
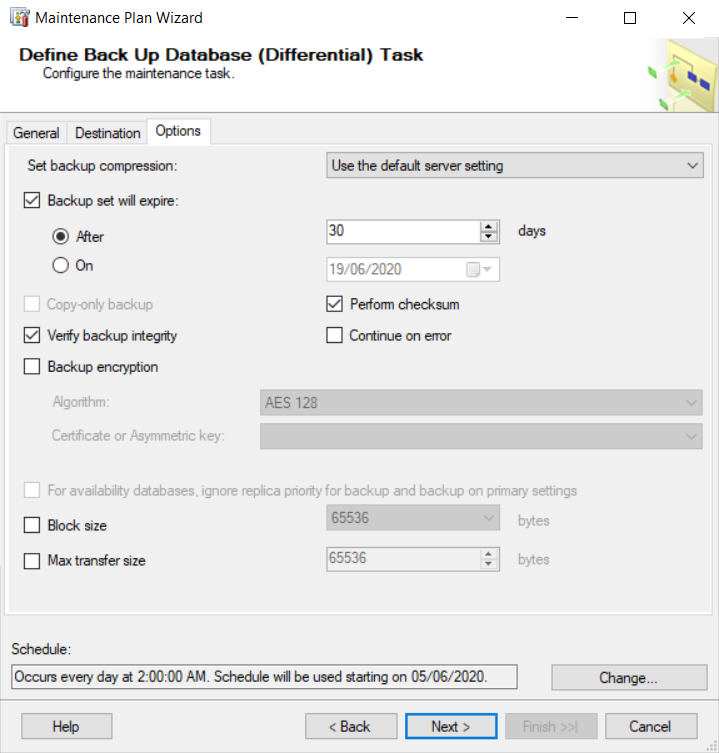
Figure 25: Differential Backup Options
On the other hand, we choose to schedule the differential backup to occur every hour of every day. We also ensure each database backup set is stored in a directory having its own name. The rest of the wizard is much the same as the previous walkthrough.
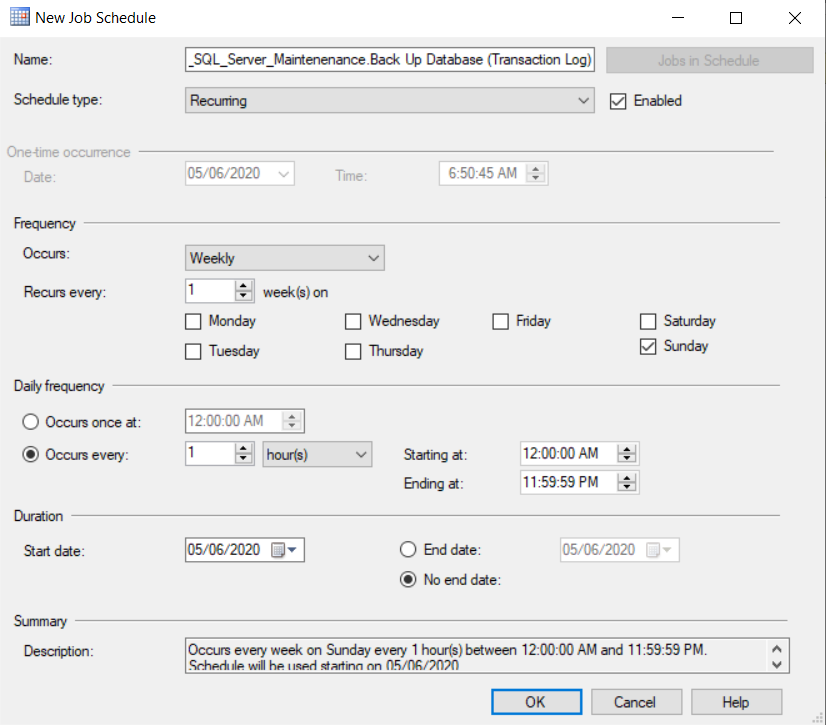
Figure 26: Transaction Log Backup Schedule

Figure 27: Transaction Log Backup Location
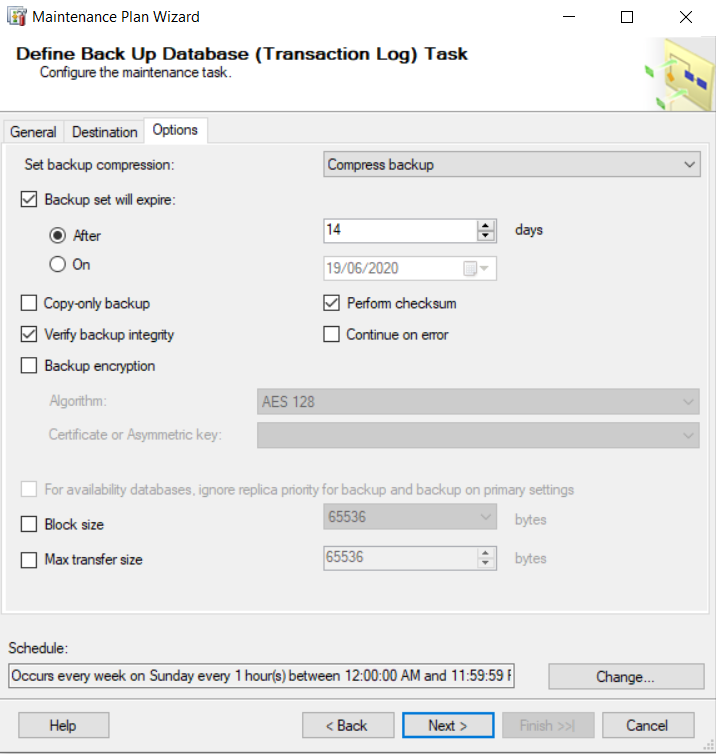
Figure 28: Transaction Log Backup Options
Conclusion
On completing the Maintenance Plan Wizard, we end up with a Maintenance Plan and a corresponding set of SQL Agent Jobs (See Figure 29). Essentially, the Maintenance Plan is a collection of SSIS packages, and when you examine the scheduled jobs, you will find that the job step executed in each sub-plan job is an SSIS Package (See Figure 30).
In a subsequent example, we will show that we can execute the sub-plan jobs annually. We will also review the results of the execution of the maintenance plan and troubleshoot errors related to executing the job steps. We shall also examine the Maintenance Plan Log.
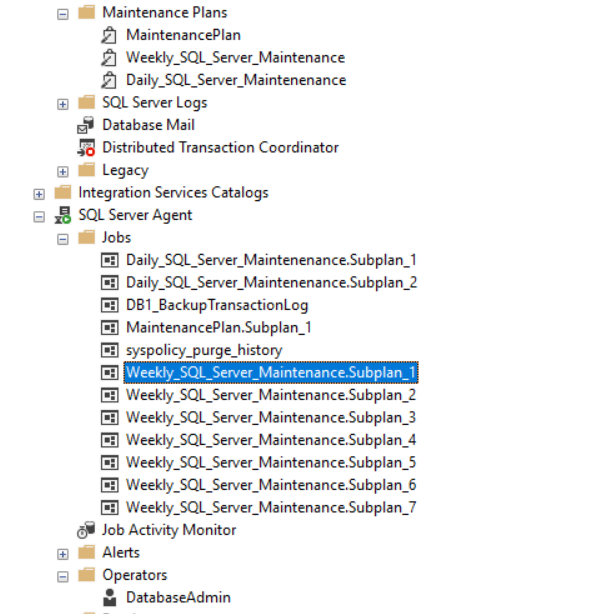
Figure 29: Resulting SQL Agent Jobs
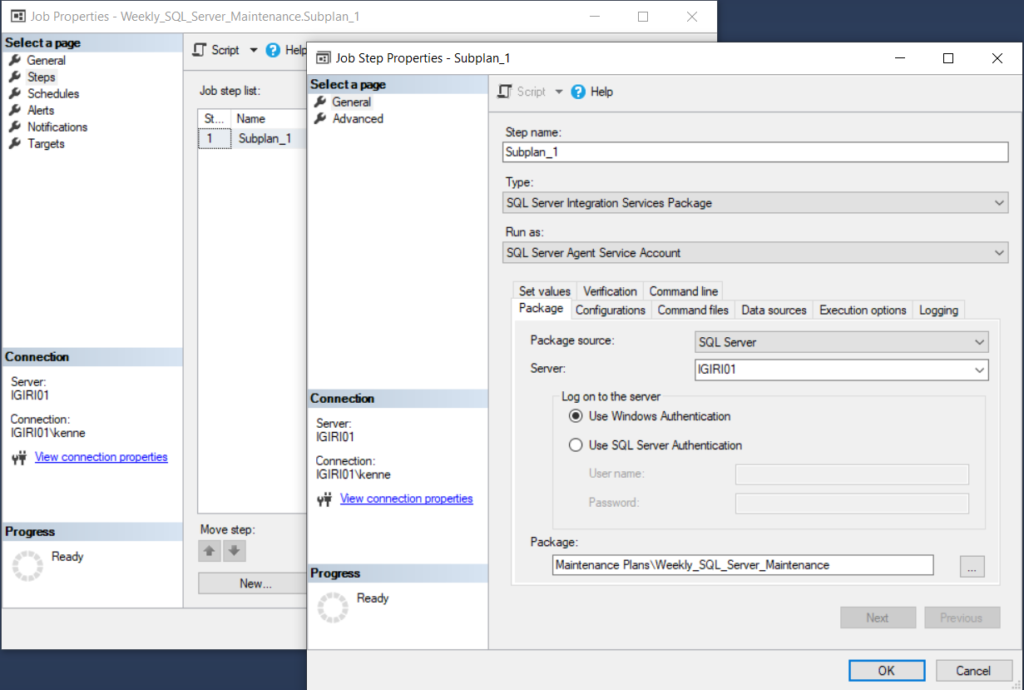
Figure 30: SSIS Package Job Step
Tags: database administration, database backup, indexes, sql server, ssis, transaction log Last modified: September 20, 2021