
Database mirroring is a SQL Server high availability solution provided by Microsoft, with the following components.
- Principal database server: a source database that you configure for the mirroring.
- Mirror database server: a destination database that you must restore with NORECOVERY. Ideally, a mirrored database should be on a separate server.
- Witness Server: an optional component that you can set up to configure the mirror with automatic failover.
- Endpoint: the communication medium used by the principal and mirror server. The mirror listens on port number 5022; however, you can change it during the configuration.
The Prerequisites to configure the database mirroring are:
- Principal and mirror instance must be running on SQL Server 2005 SP1 and later edition.
- SQL Server version and edition must be the same on the principal and mirror instance.
- Principal and mirror databases must have the same name and database collation. Both databases must be running in the FULL recovery model.
- You need to restore a full backup and at least one transaction log backup on the mirrored database. For the mirrored database restore, you must use NORECOVARY.
- If you want to configure the automatic failover, then you must set up a witness server. A witness server can be any version of SQL Server. For cost savings, you can use SQL Server Express edition as a witness server.
Now, let’s see it step by step how to configure the database mirror.
Configure the database mirror
To understand the configuration, I have set up a virtual lab on my workstation. The lab has three virtual machines, and I have installed Windows Server 2016 and SQL Server 2019 on them all:
| Hostname | Role | SQL Server version |
| SQL01 | Principal | SQL Server 2017 |
| SQL02 | Mirror | SQL Server 2017 |
| ISCSI | witness | SQL Server 2017 express edition |
| DC.Local | Network share to copy the database backups | NA |
To configure the mirror of AdventureWorks2017, connect to SQL01 and Generate a full backup and transaction log backup of it. Then, restore it on SQL02.
Execute the following command on SQL01 to generate the backup:
USE [master]
BACKUP DATABASE [AdventureWorks2017] TO  DISK = N'\\DC.Local\Backup\AdventureWorks2017.bak' WITH  COMPRESSION,  STATS = 5
GO
USE [master]
BACKUP Log [AdventureWorks2017] TO  DISK = N'\\DC.Local\Backup\ Adv_Logbackup.trn' WITH  COMPRESSION,  STATS = 5
GO
Execute the following command on SQL02 to restore the database with NORECOVARY:
USE [master]
RESTORE DATABASE [AdventureWorks2017] FROM  DISK = N'\\DC.Local\Backup\AdventureWorks2017.bak' WITH  FILE = 1,  NOUNLOAD,  STATS = 5
GO


RESTORE LOG [AdventureWorks2017] FROM  DISK = N'\\DC.Local\Backups\Adv_Logbackup.trn' WITH  FILE = 1,  NORECOVERY,  NOUNLOAD,  STATS = 10
GO
Now, connect to the SQL01 server and open SQL Server Management Studio.
Expand SQL Server instance > Expand databases > Right-click on AdventureWorks2017 > Hover on Tasks > Select Mirror.

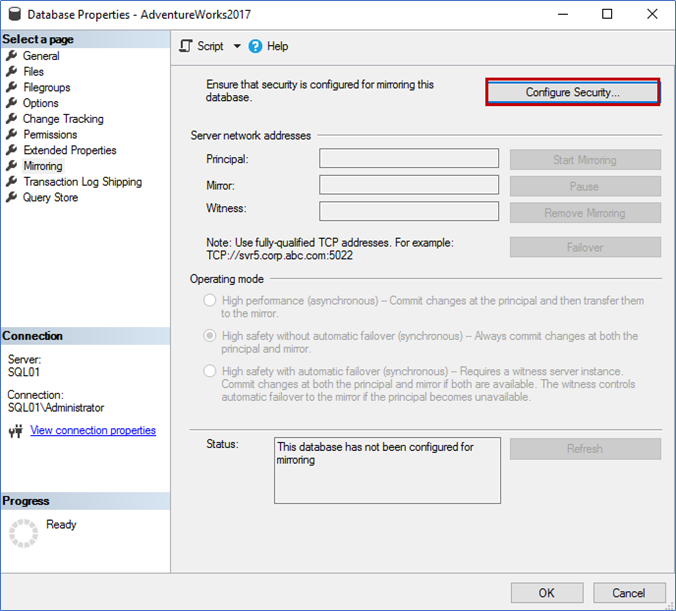
On the Database Properties dialog box, click on Configure Security:
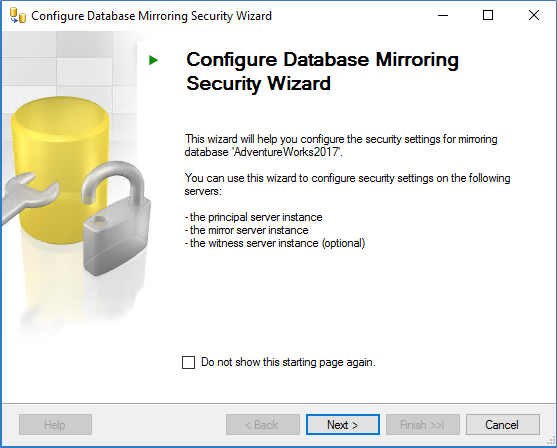
The Configure Database Mirroring Security Wizard opens.
On the first screen, you can view the details and the list of tasks performed by the wizard.
Click Next.
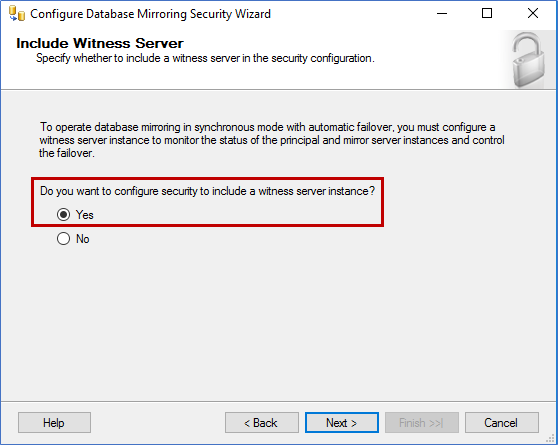
On the Include witness Server screen, you can choose to include the witness server in the mirroring configuration.
We are going to use the witness server in the configuration. Therefore, choose Yes.
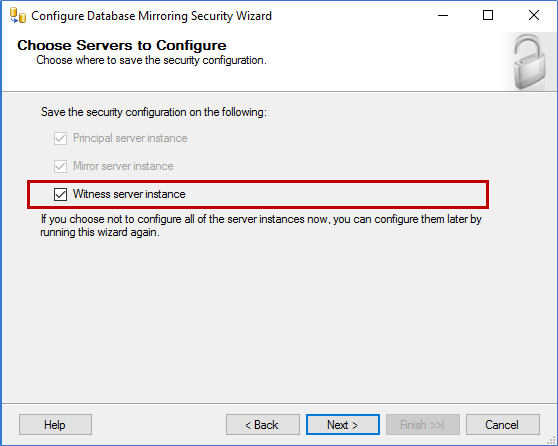
On Choose Servers to Configure screen, you can define the server to save the security configurations on. We are using the Witness server instance.
Select the Witness server instance and click Next.
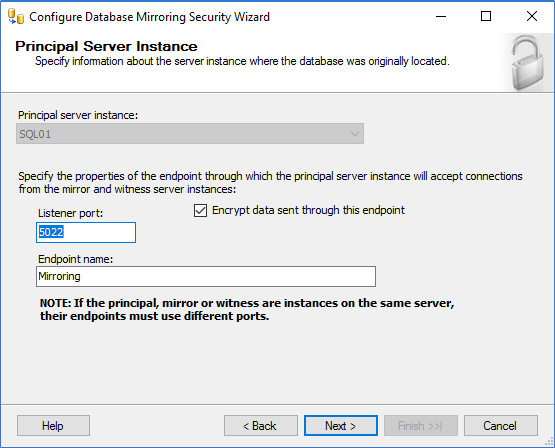
On the Principal Server Instance screen, specify the principal server’s hostname, Listener port, and Endpoint name.
You can choose to encrypt the data sent through the configured endpoints by clicking on Encrypt data send through this endpoint option.
Click on Next.
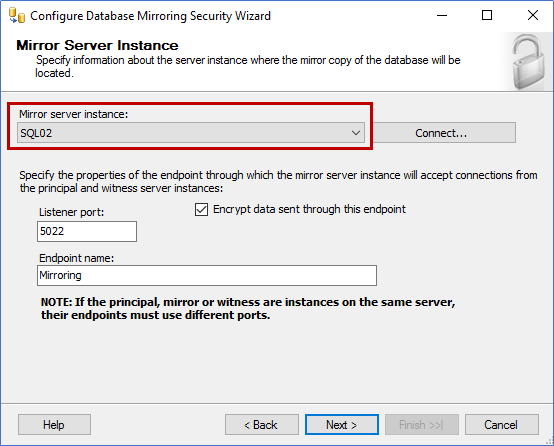
On the Mirror server instance screen, choose the mirrored instance. Select SQL02 from Mirror server instance drop-down box, provide Listener port and Endpoint name. Click Next.
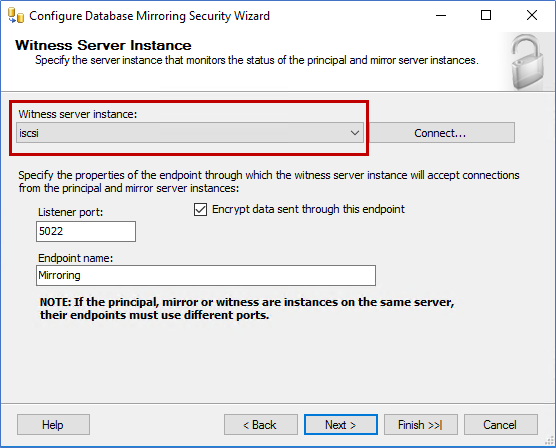
On the Witness Server Instance screen, choose the witness instance to support automatic failover.
From the Witness server instance drop-down box, select iSCSI, provide the Listener port, and Endpoint name. Click Next.
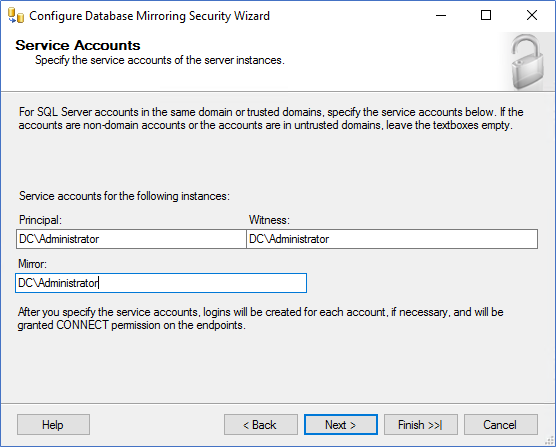
On the Service Accounts screen, provide the SQL login accounts to connect Principal, witness, and mirrored instances.
We have created a domain account and given the sysadmin permission to those domain accounts.
Enter the services accounts in Principal, Witness, and Mirror text boxes and click Next.
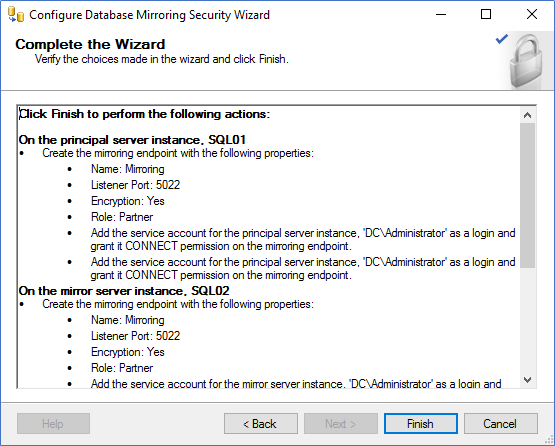
On the Complete the Wizard screen, review the list of actions that the wizard will perform on Principal, Witness, and Mirrored instance.
Review the list of actions. If it requires any changes, you can go back to previous screens and adjust the settings.
Once the configuration is complete, click Finish.
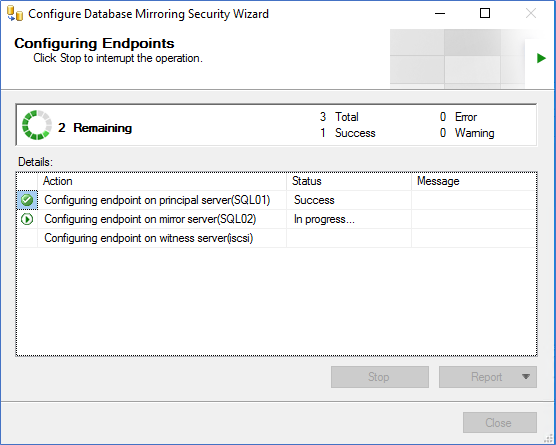
The wizard starts the configuration on all servers.
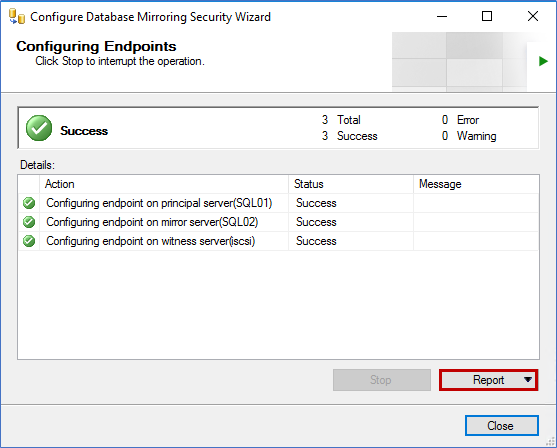
After the successful completion of the Endpoint configuration, close the dialog box.
You can review and export the wizard log by clicking on the Report button.
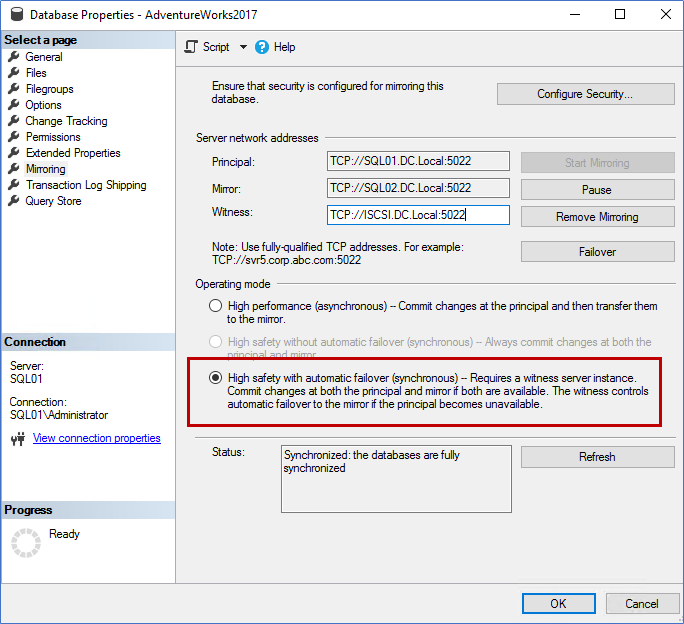
Return to the Database Properties screen. A message box opens there.
In the message box, you can see the network address of the Principal, Witness, and Mirrored instances. Along with that, you can see the Operating mode of the mirror.
To start mirroring between the principal and mirror database server, click Start mirroring.

If you’ve configured the entire setup correctly, the database mirroring will start at once.
You can view the database mirror synchronization status from the SQL Server Management Studio:
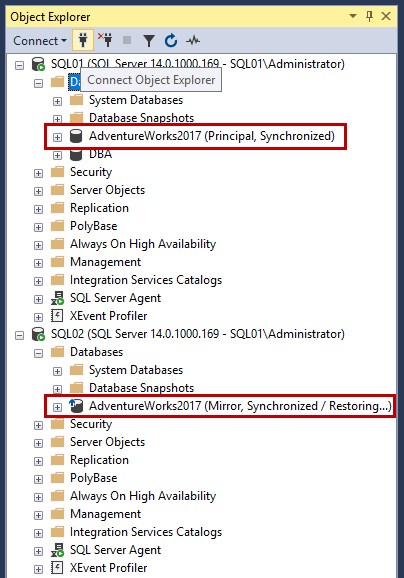
View the status by executing the following T-SQL Query:
SELECT
   d.name  as [Mirrored database],
   mirroring_state_desc as [Mirrored database state],
   mirroring_role_desc as [Mirrored database role],
   mirroring_partner_instance as [Mirrored database instance],
   case(m.mirroring_witness_state_desc) when 'Unknown' then 'No Witness Server Configured'
      else m.mirroring_witness_name end as 'Witness Server'
FROM
  sys.database_mirroring M inner join SYS.DATABASES d
  on m.database_id = d.database_id
WHERE mirroring_state_desc is not null
ORDER BY d.name,mirroring_state_desc
Output:

Test the failover
I have created an employee table and inserted some data by executing the following script:
/*Create demo table*/
CREATE TABLE [Person](
	[BusinessEntityID] [int] NOT NULL,
	[PersonType] [nchar](2) NOT NULL,
	[NameStyle] [dbo].[NameStyle] NOT NULL,
	[Title] [nvarchar](8) NULL,
	[FirstName] [dbo].[Name] NOT NULL,
	[MiddleName] [dbo].[Name] NULL,
	[LastName] [dbo].[Name] NOT NULL,
	[Suffix] [nvarchar](10) NULL,
	[EmailPromotion] [int] NOT NULL
 CONSTRAINT [PK_Person_BusinessEntityID] PRIMARY KEY CLUSTERED
(
	[BusinessEntityID] ASC
)WITH (PAD_INDEX = OFF, STATISTICS_NORECOMPUTE = OFF, IGNORE_DUP_KEY = OFF, ALLOW_ROW_LOCKS = ON, ALLOW_PAGE_LOCKS = ON) ON [PRIMARY]
) ON [PRIMARY] TEXTIMAGE_ON [PRIMARY]
GO
/*Insert Data*/

insert into person (BusinessEntityID,PersonType,NameStyle,Title,FirstName,MiddleName,LastName,Suffix,EmailPromotion)
select BusinessEntityID,PersonType,NameStyle,Title,FirstName,MiddleName,LastName,Suffix,EmailPromotion from Person.Person
Where Title is not null

/*Output */
(1009 rows affected)
Now, we perform the following steps:
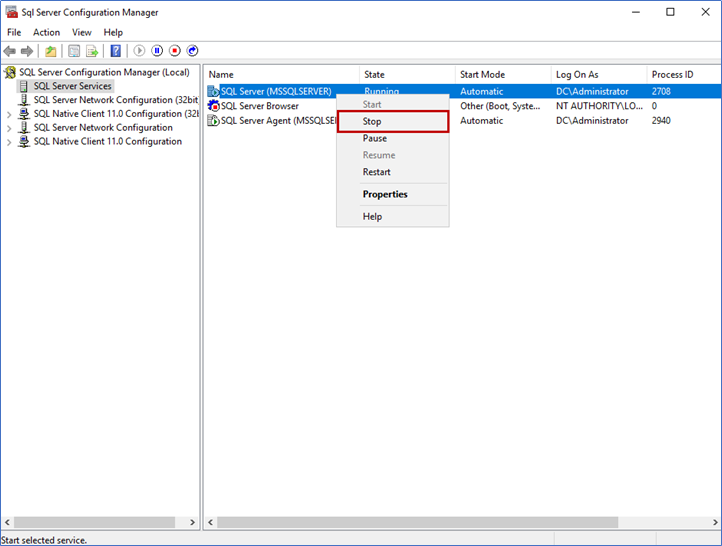
- Stop the SQL Server services on SQL01.dc.local.
- Insert demo records in employee tables.
- Start the SQL Server services on SQL01.dc.local.
To stop the services on SQL Server, RDP to SQL01 > Open SQL Server configuration manager > right-click on SQL Server services > Click Stop.
Now, let’s see the status of the principal and mirrored instance:
SELECT
   d.name  as [Mirrored database],
   mirroring_state_desc as [Mirrored database state],
   mirroring_role_desc as [Mirrored database role],
   mirroring_partner_instance as [Mirrored database instance],
   case(m.mirroring_witness_state_desc) when 'Unknown' then 'No Witness Server Configured'
      else m.mirroring_witness_name end as 'Witness Server'
FROM
  sys.database_mirroring M inner join SYS.DATABASES d
  on m.database_id = d.database_id
WHERE mirroring_state_desc is not null
ORDER BY d.name,mirroring_state_desc
Output:

Execute the following query to insert more data in the table:
select Top 100 BusinessEntityID,PersonType,NameStyle,Title,FirstName,MiddleName,LastName,Suffix,EmailPromotion from Person.Person
Where Title is null

/*Output */
(100 rows affected)
Start the SQL Server services on SQL01 from the SQL Server configuration manager, and execute the following T-SQL query to make it principal:
ALTER DATABASE [AdventureWorks2017] SET PARTNER FAILOVERRun the following query to verify that data has been inserted on the principal database:
Select * from person where title is nullOutput:
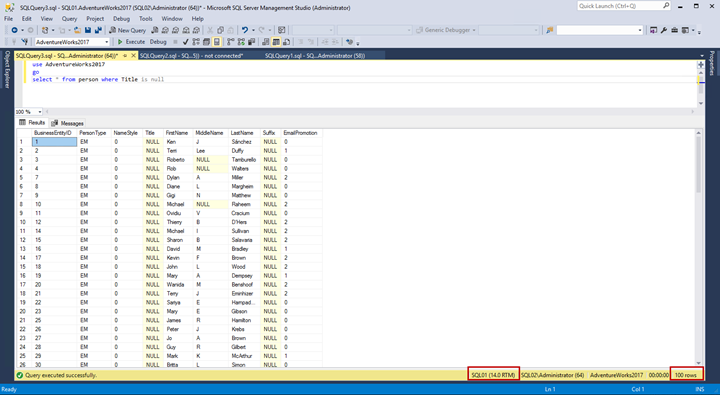
The query has returned 100 records that indicate the correct mirror setup.
This way, you can see how to configure a SQL Server database mirroring.
Tags: database administration, database backup, sql server Last modified: September 20, 2021