In this article, I will explain how we can divide and export data of an Oracle database table into multiple worksheets of an Excel file with help of the SQL Server integration service package.
Often, DBAs asked to generate Ad-Hoc reports from a database. Recently I have been asked to generate a report from the database. They want me to provide a report in multiple worksheets of an Excel file. There are different ways to do it but the query was resource-intensive. Hence I want to extract data from the database with one execution and decided to use the SQL Server integration services package. SQL Server data tools have one component called Conditional Split Transformation which can be used to achieve the task.
Using SQL Server data tools, we can retrieve data from various database platform by using the ODBC connection. Most of the database platforms provide their connectivity drivers which can be used to configure a connection between application and database.
What is conditional Split Transformation
The Conditional Split transformation can route data rows to different outputs depending on the content of the data. The implementation of the Conditional Split transformation is like a CASE decision structure in a programming language. It evaluates expressions, and based on the results, directs the data row to the specified output. This transformation also provides a default output, so that if a row matches no expression, it is directed to the default output. (MSDN Reference: https://docs.microsoft.com/en-us/sql/integration-services/data-flow/transformations/conditional-split-transformation?view=sql-server-2017) .
Demo Setup
I have installed Oracle 11g express edition on my machine. I have created a table called EMPLOYEESDATA in the HR schema of the XE database and added some dummy records from the AdventureWorks2014 database.
The code below will create a table:
  CREATE TABLE "HR"."EMPLOYEE_DATA"
   (	"BusinessEntityID" NUMBER(*,0),
	"Title" NVARCHAR2(8),
	"FirstName" NVARCHAR2(50),
	"MiddleName" NVARCHAR2(50),
	"LastName" NVARCHAR2(50),
	"Suffix" NVARCHAR2(10),
	"JobTitle" NVARCHAR2(50),
	"PhoneNumber" NVARCHAR2(25),
	"PhoneNumberType" NVARCHAR2(50),
	"EmailAddress" NVARCHAR2(50),
	"EmailPromotion" NUMBER(*,0),
	"AddressLine1" NVARCHAR2(60),
	"AddressLine2" NVARCHAR2(60),
	"City" NVARCHAR2(30),
	"StateProvinceName" NVARCHAR2(50),
	"PostalCode" NVARCHAR2(15),
	"CountryRegionName" NVARCHAR2(50)
   ) SEGMENT CREATION IMMEDIATE
  PCTFREE 10 PCTUSED 40 INITRANS 1 MAXTRANS 255 NOCOMPRESS LOGGING
  STORAGE(INITIAL 65536 NEXT 1048576 MINEXTENTS 1 MAXEXTENTS 2147483645
  PCTINCREASE 0 FREELISTS 1 FREELIST GROUPS 1 BUFFER_POOL DEFAULT FLASH_CACHE DEFAULT CELL_FLASH_CACHE DEFAULT)
  TABLESPACE "USERS" ) ;
To connect Oracle database using SSDT, we need to install the Oracle client software. SQL Server data tools works in the 32bit mode hence the 32bit version of ODBC drivers for Oracle should be installed. You can download Oracle Client from here.
I have created an Excel file called ‘HRData.xls’ that has two worksheets called Australia and Canada. Data will be divided based on the value of the CountryRegionName column. If the column value of the CountryRegionName column is Canada then it will be stored in the Canada worksheet and if the column value of CountryRegionName is Australia then it will be stored in the Australia worksheet.
As we all know how to create an SSIS package, I will directly explain how to create a data flow task.
Create Data Flow Task
In the Data flow task, we are going to use the following three components:
- ADO.NET Source to populate data from Oracle database.
- Conditional Split to divide data into multiple sets.
- Excel destination with two workbooks called “Australia” and “Canada”.
Configure ADO.NET Source
Drag and drop ADO.NET Source from SSIS Toolbox to the Data Flow windows and name it Employee Data as shown in the following image:

Double-click Employee Data. The ADO.NET Source Editor dialog box will open. Here, we did not create any connection yet, hence the ADO.NET connection manager drop-down box is empty. We will create a new connection. To do that, click New in that dialog box. After this, another dialog box, Configure Connection Manager, will open as shown in the image below:
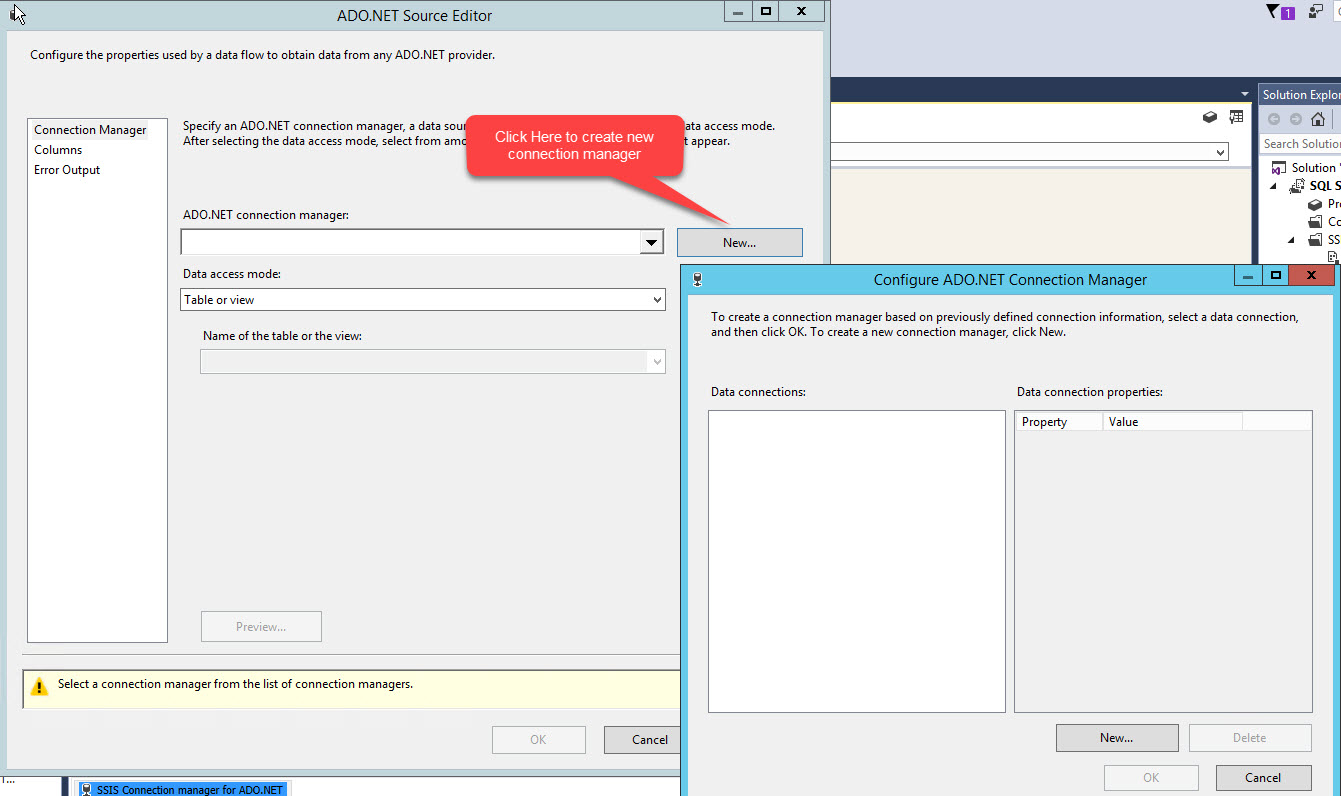
In the Configure ADO.NET Connection Manager dialog box, click New. Another dialog box, Connection Manager, will open.
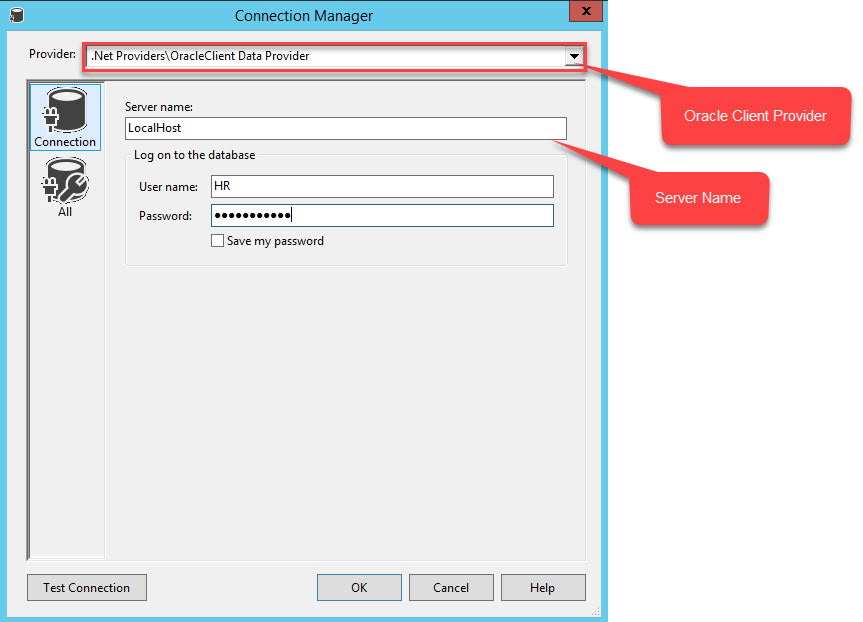
By default, .Net Providers\SQLClient Data Provider will be selected in the Provider drop-down box. As we are populating data from the Oracle database, we will select OracleClient Data Provider.
In Server Name text box, enter name or IP-Address of the server on which Oracle 11g is installed. User Name and Password will be used to connect the Oracle database. I had installed Oracle on my local VM hence server name will be localhost. I am going to connect database using the HR user hence username will be HR. Provided the appropriate password and click OK. See the following image:
Once the configuration is completed, click Test Connection to verify the connectivity with the database and click OK.
We have configured the ADO.NET connection manager hence default connection manager will be selected automatically in the ADO.NET Connection Manager drop-down list box. We are going to retrieve data from table hence select Table or View in the data access mode drop-down box. I have already created the EMPLOYEESDATA table in the HR Schema of the Oracle database, hence select HR.EmployeesData in the Name of the table or the view drop-down box as shown in the image below:

Configure Conditional Split
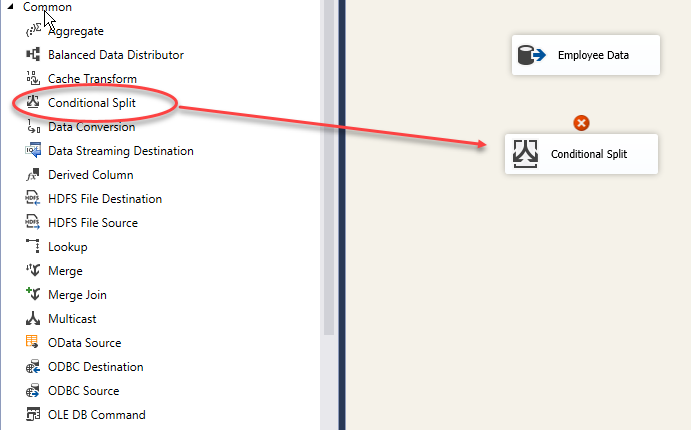
Now, to export data in different worksheets of Excel based on a condition, we will use the conditional split transformation. Drag the conditional split component from the SSIS toolbox to the Data Flow window as shown in the image below.
I mentioned earlier, the output of data of the HR.EmployeeData table will be exported in multiple worksheets based on the condition defined in the Conditional Split component.
First, we will connect ADO.Net source to Conditional split transformation. To do that, click the blue arrow on the data flow path at bottom of the Employees Data component and drag it to conditional split transformation as shown in the image below.
![]()
Now we will configure conditional split transformation. As I mentioned previously, we will divide data of HR.EmployeesData table based on the value of the CountryRegionName column and store them in different worksheets.
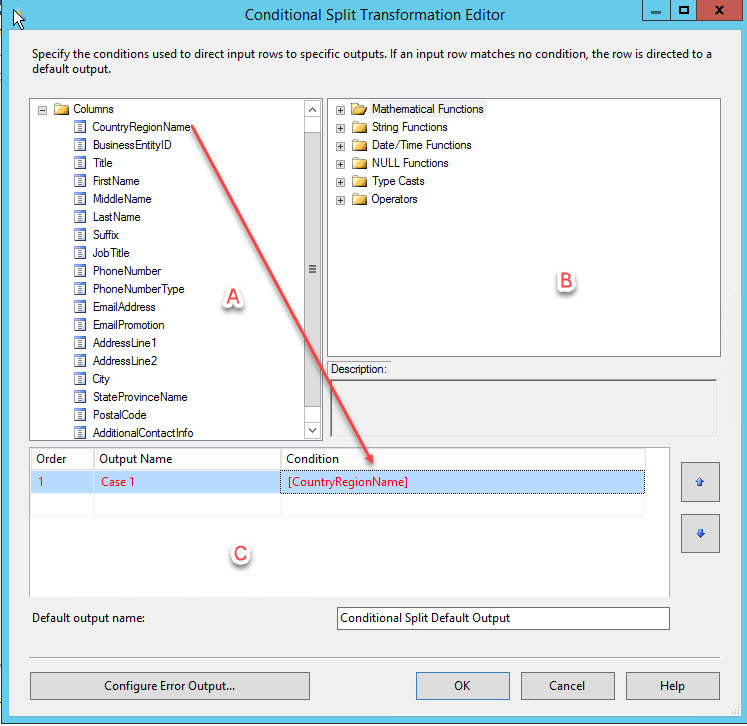
To do this, double-click Conditional Split Transformation Editor. The Conditional Split Transformation Editor dialogue box will open as shown in the following image:
![]()
As you can see in above image, Conditional split transformation editor has three sections which determine how data will be routed to the next components.
Section A: In this section, under the Columns folder list of the output columns, derived from the ADO.Net source component will be listed which can be used to define conditions to split the data.
Section B: In this section, various functions will be listed that can be used to convert output in the different format and used to define conditions to split data.
Section C: In this section, you can create a condition that can divide the output of the ADO.Net source into multiple result sets.
We will add the condition in Section-C. So first expand the column node and drag the CountryRegionName column (Section A) and drop it in the grid (Section C) as shown in the following image:
For this example, we’ll define our condition based on the CountryRegionName column. List of employees from “Canada” will be stored in the Excel worksheet named Canada and a list of employees from Australia will be stored in the Australia worksheet. Based on the condition, we are going to use the equals to (==) operator. The equation will be as the following:
[CountryRegionName]=="Australia"
[CountryRegionName]=="Canada"
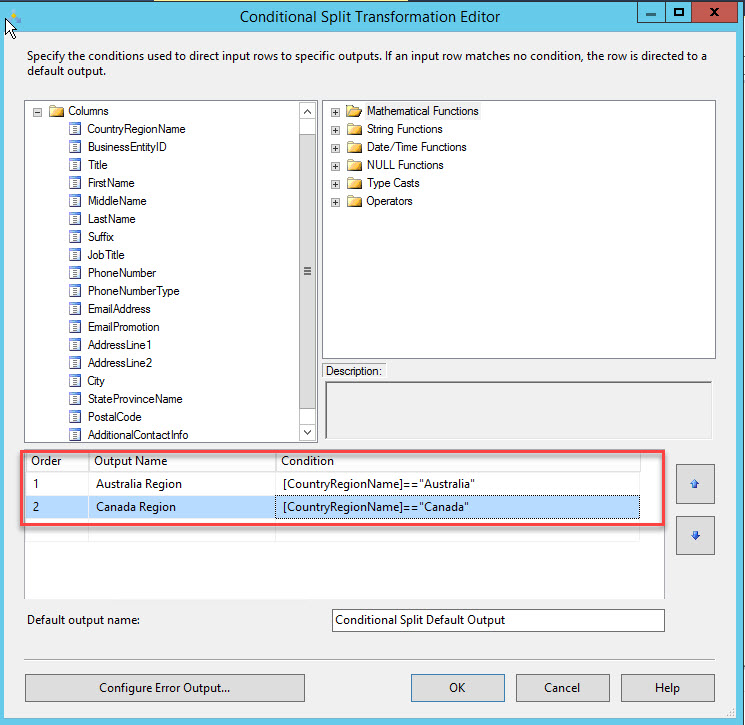
Once conditions defined, click OK to save and close the dialog box.
Configuring Excel Destination
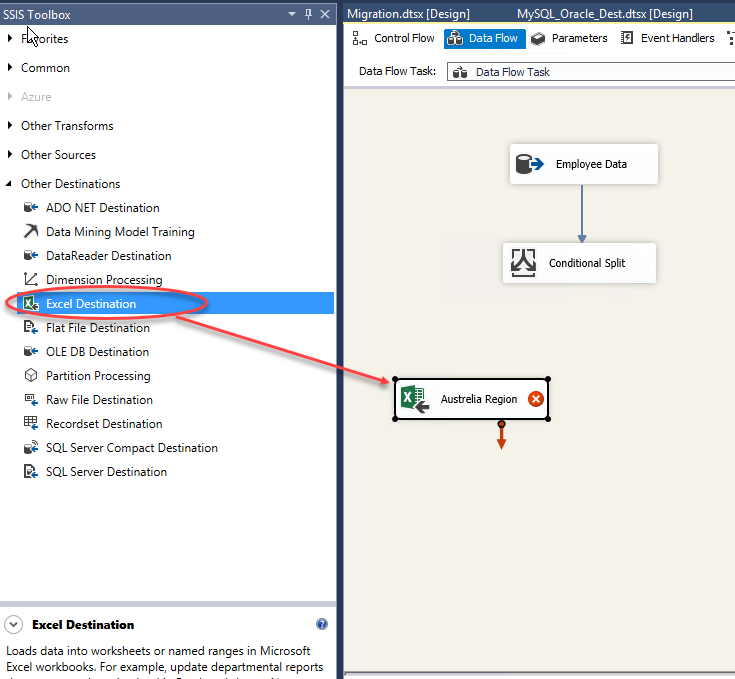
Now that we have split data flow in multiple paths, we are going to add a destination for each path. As we are going to export table data in different Excel worksheets, so we need to create two Excel destinations. To do that, drag and drop the Excel connection from SSIS Toolbox, as shown in the image below:
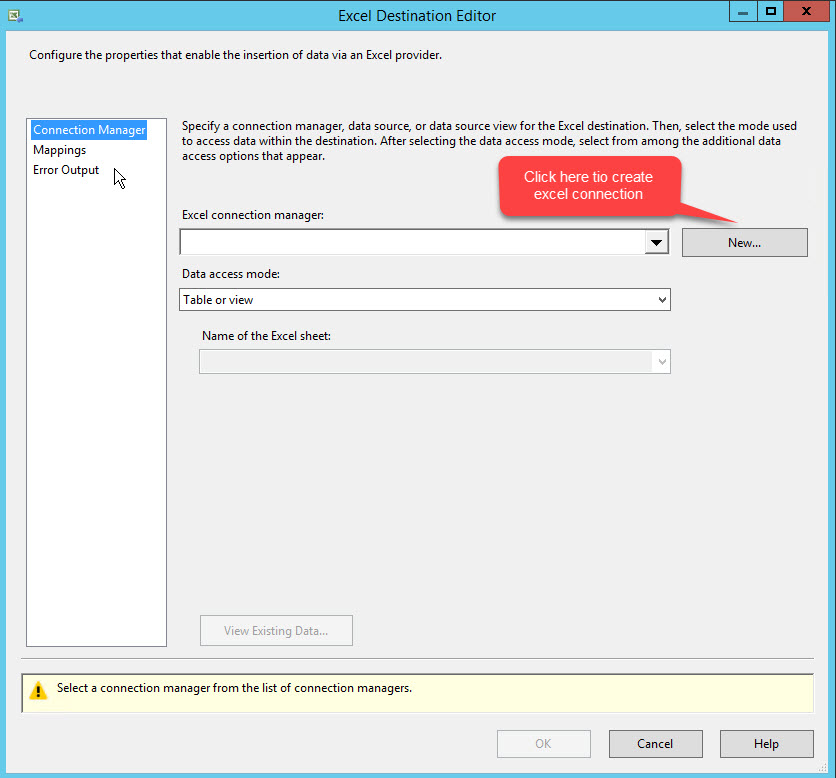
To configure excel destination, double-click Excel Destination. The Excel connection manager dialog box will open. In that dialog box, click New as shown in the following image:
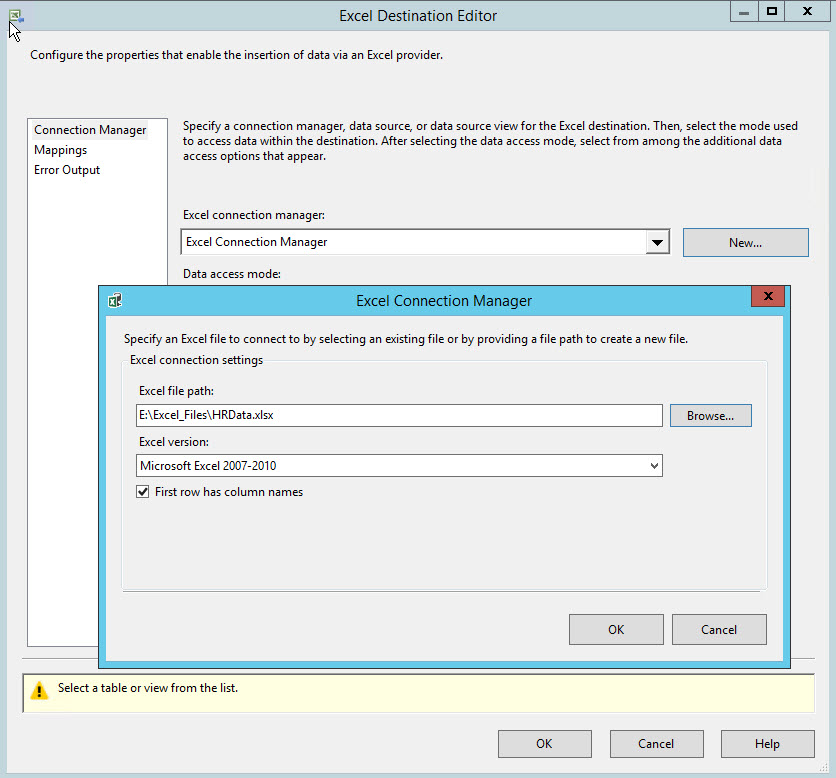
Another dialog box called Excel Connection Manager will open. In this dialog box, we will provide a path where the Excel file is located. I have created the Employee Data file on my desktop. We will traverse through the file system and select the file and click OK as shown in below image:
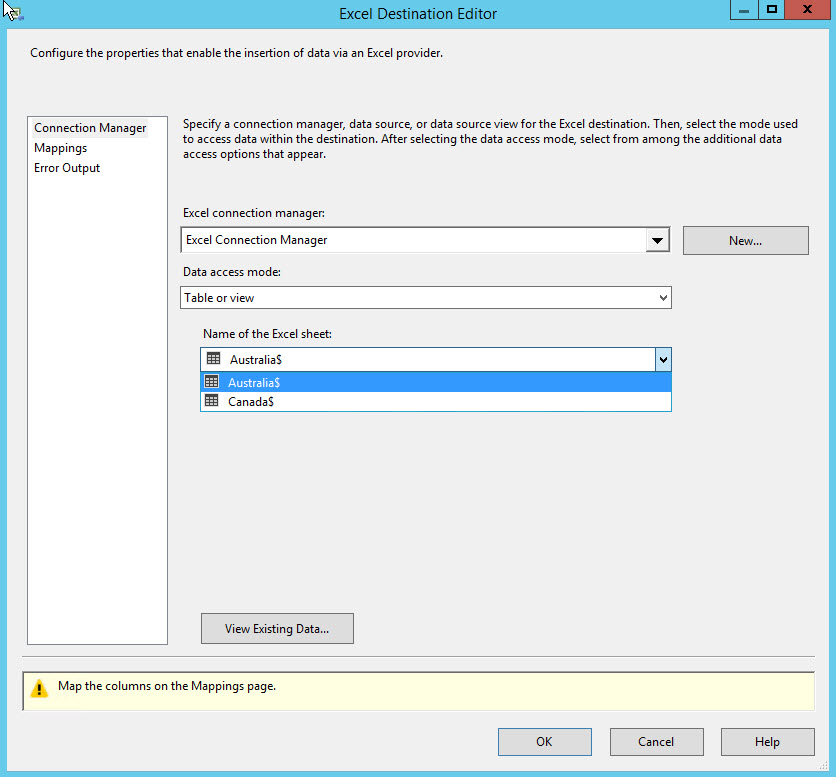
Now, in the Data access mode drop-down box, select Table Or View and in the Name of the Excel sheet drop-down box, select Australia$, as shown in the image below:
Now I am going to configure the data path. To do that drag the blue data path arrow from the conditional split transformation to the Australia Employees excel destination component. When you connect the data path to Excel destination, a dialog box will appear to choose to output we want to direct toward the selected destination. The dialog box will look as the following:
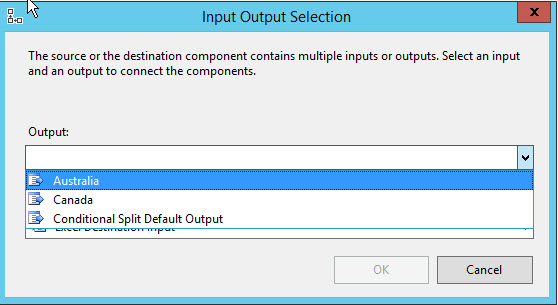
The dialog box includes all outputs in the drop-down list, which is available from conditional split transformation. In this case, drop down list will include two options.
- Australia
- Canada
- Default Output
Double-click the excel destination component to map the table columns with the Excel columns. To do that, double-click the Excel destination component and in the Excel Destination Editor dialog box, select the Mapping option located at the left pane of the dialog box, as shown in the image below:
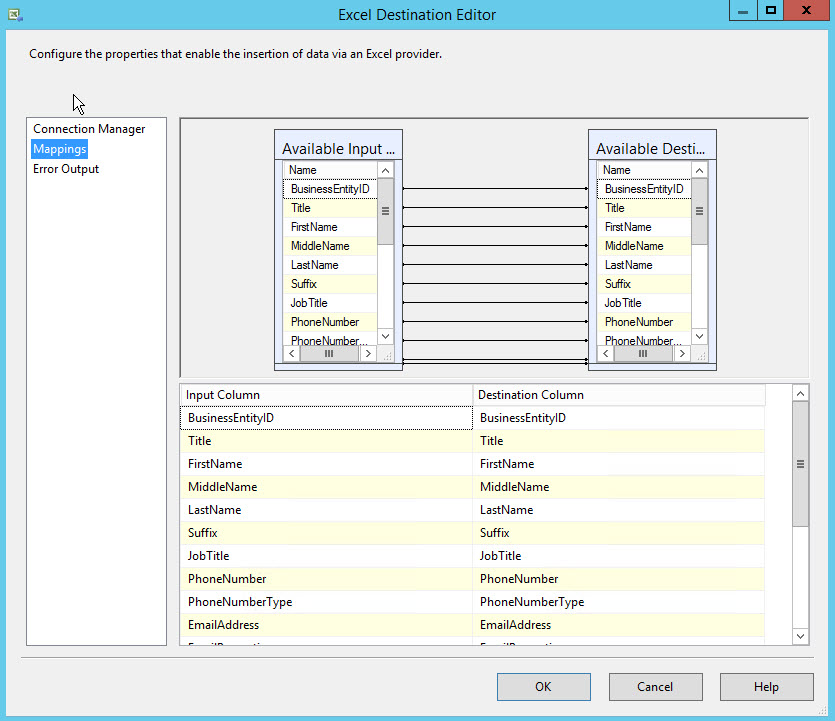
In the above image, Input Column is the column name of the Oracle table and Destination Column will be the column name of the Excel sheet. In this demo, the column name of the table and Excel file are the same. So Excel Destination Editor will automatically map input and output columns.
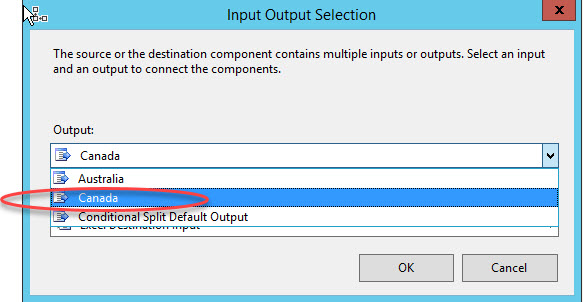
In the same way, I will repeat the data flow configuration process for the Canada data path.
- We need to select Canada in the Input Output Selection dialog box, as shown in the image below.

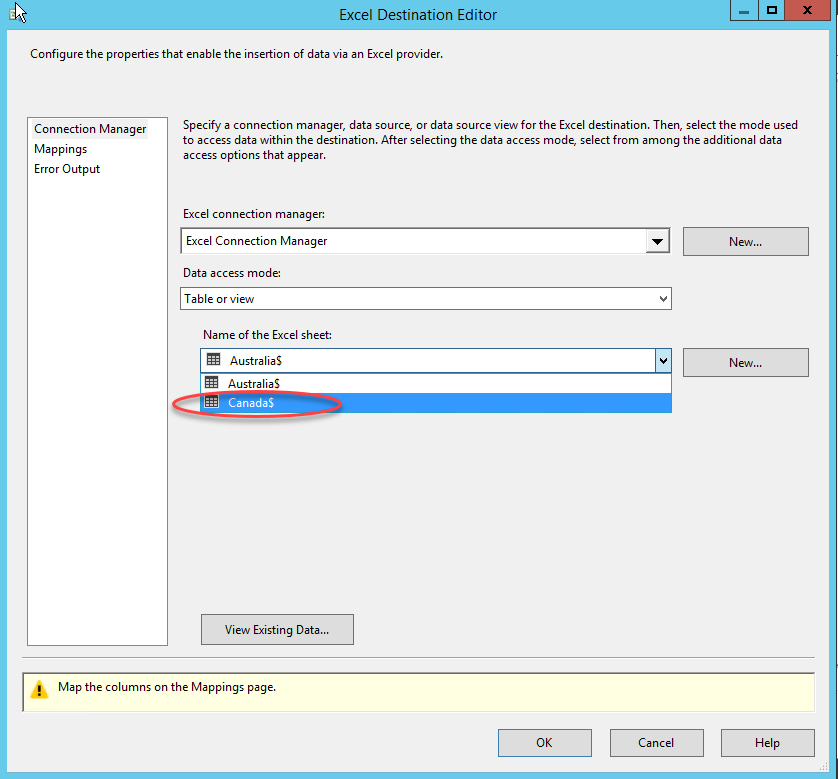
- In Excel Destination Editor, select Canada$ in the Name of the Excel sheet drop-down box as shown in the image below.

Once all configurations get completed, the entire data flow task will look like the following:

Testing SSIS Package
Now let’s run the package and see how it worked. To do that, click the Start button on the menu bar. If the package completes the execution successfully, it should look like the following:
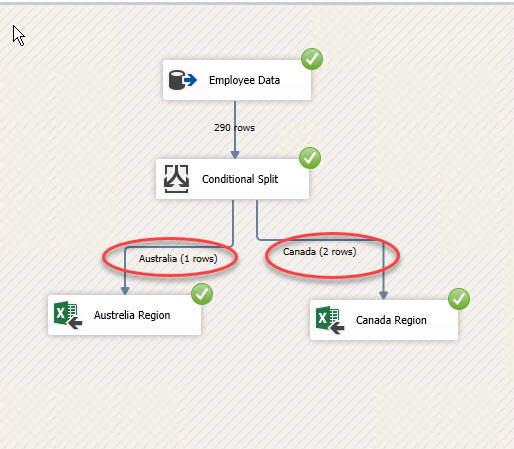
As the image above indicates, the package inserted 1 record in the Australia Region worksheet and 2 records in the Canada Region worksheet.
Summary
In this article, we created an SSIS package with a single data flow. We added a Conditional Split transformation to the data flow to split the data into multiple paths. We then directed each of those data paths to different excel worksheets.
References:
Export SQL Data to multiple workbooks of an excel file.
Useful tools:
Devart SSIS Data Flow Components – allow you to integrate database and cloud data via SQL Server Integration Services.
Devart ODBC Drivers – provide high-performance and feature-rich connectivity solutions for ODBC-based applications.
Tags: oracle, ssis Last modified: September 22, 2021