
Have you made a rookie mistake when you add or insert a new column in your MySQL table?
“But what’s the big deal? Adding or inserting a new column is totally painless.”, you may say.
That’s true. Adding a column is as easy as adding a topping to a pizza or ice cream. But if you’re experiencing errors, query hiccups, and the like, you may need to go back to basics. On the other hand, if you’re new to MySQL, you can learn and avoid MySQL ADD COLUMN mistakes.
And you’re not alone. Experts have become newbies too. So, embarrassing as it may seem, we have to move on. And the good news is it’s avoidable.
So, what are these rookie mistakes? And how can we fix this?
Here’s how we will tackle this:
- What are the MySQL ADD COLUMN rookie mistakes?
- How to add or insert a new column in MySQL tables in less than a minute
- 6 Real-World MySQL ADD COLUMN Examples you can use now
Before we start, note the MySQL version I’m using: 8.0.33-0ubuntu0.22.04.2.
Let’s begin.
What are the MySQL ADD COLUMN Rookie Mistakes?
Here are the ‘Oops!’ when adding or inserting columns in MySQL tables. Note that this article discusses adding or inserting physical columns to a table. Adding on-the-fly columns in a query, like pivoting results, does not apply here.
Check out some of the common mistakes below.
MySQL ADD COLUMN Syntax Errors
This is the most common and obvious one. For example, the following code will trigger a syntax error:
ALTER TABLE students
 ADD COLUMN address NOT NULL
Compare the above with the correct syntax later. Then, you will see that the data type is not present. It is a necessary part of the syntax and it’s not there. So, MySQL will flag this as an error.
You may forget some needed syntax. Even more when you’re using the MySQL command line interface. You can minimize the problem if you’re using a GUI tool like dbForge Studio for MySQL and other GUI tools. Their table designer or code editor helps you avoid this mistake.
But, even if your syntax is perfect, the problem doesn’t end there.
Not Using the Appropriate Types
MySQL has different data types covering various scenarios. For whole numbers, you have INT, BIGINT, TINYINT, and more. They are all integers, but their storage and memory requirements differ. There are also types of fixed and floating-point numbers.
But why have several types of numbers?
Let’s explain this with an example. For example, you have a column named particle_count with an INT type. That means the maximum positive number you can put in this column is 2,147,483,647. So, if your app accepts more than that, you will receive this embarrassing error:
Data truncation: Out of range value for column ‘particle_count’
To correct this, you will now issue an ALTER TABLE MODIFY COLUMN.
UNSIGNED INT with a maximum value of 4,294,967,295 may be the right type. Or, maybe bigger like BIGINT. It depends on your requirements. The bigger the type, the higher the storage and memory requirements. And you can’t make it smaller than INT by using MEDIUMINT.
Now, this is for integers only. There are more data types in MySQL. The point? Use the data type appropriate to your requirements. Or suffer errors. So, you might think of using the biggest data type to avoid the out-of-range error in the long run.
But you’re making another mistake.
Not Knowing the Impact on Query Performance
If you think you can get away by using the widest-ranged data types, you’re in for a big surprise.
Yes, you will get rid of the out-of-range error. Your app will continue to read and write to your MySQL database. But you’re forgetting the purpose of having several types. If you think you’re right and still proceed, wait until your queries run slower than expected. Remember that the wider-ranged data types consume more storage and memory.
Note also that there are row size limits in MySQL. MySQL stores data in pages and in InnoDB, there is the innodb_page_size. Consider a very large VARCHAR column. If a row doesn’t fit a page because of it, MySQL will store the remaining row data off-page. This will impact query performance.
To explain the off-page storage further, let’s say you have a column with VARCHAR(10000). That’s quite big for a VARCHAR column. If you consume all 10,000 bytes of data, let’s assume MySQL wrote the data off the page. But the following UPDATE statement only consumed 50 bytes. MySQL will fit it to the default page size and remove it from the off-page storage. The back-and-forth reading and writing from off-page storage makes your query slower.
So, you can’t just use the maximum VARCHAR, BIGINT, etc. when adding new columns. Think about your requirements and the performance impact on the entire system.
Disregarding Existing Data
Do you have a MySQL table with a billion rows or more? Adding a new column may feel like a billion years to finish. Try it on a table with 100,000 rows only. You can feel the lag compared to just hundreds of rows.
So, if you’re adding a new column consider if you need to announce a downtime period to your users. You can’t just do it at will.
In the end, you need to plan ahead when there’s a new column requirement. Syntax is important. But the right data types and sizes, performance impact, and existing data merits more attention.
How to Add or Insert a New Column in MySQL in Less Than a Minute
You can add a column with the name and data type. You also need to set the size for VARCHAR and DECIMAL data types. That’s it.
But there’s more to column definitions. You can also set its default value, NULL constraints, make it a primary key, and more. Knowing their syntax will improve the column definition and avoid invalid data.
Adding or inserting new columns uses ALTER TABLE. Then, the ADD COLUMN and the column definition. See the following easy syntax:
ALTER TABLE table_name
   ADD [COLUMN] column_name data_type(size)
       [NULL/NOT NULL]
       [DEFAULT default_value]
       [AUTO_INCREMENT]
       [PRIMARY KEY]
       [CHARACTER SET charset_name]
       [COLLATE collation_name]
       [GENERATED ALWAYS AS (formula) STORED|VIRTUAL]
       [FIRST | AFTER existing_column_name]
MySQL Column Definition
MySQL requires the keywords and values without the square brackets. The rest are optional. Notice that even the keyword COLUMN is optional. You will only use the optional keywords when you need it. For example, you need a column that is not null. Then, that’s the time you will specify NOT NULL.
The following are the descriptions of each:
column_name
Required. The name you want for the table column.
data_type(size)
Required. Specify the data type of the column. Common data types you can give a column are VARCHAR, INT, DATE, and DECIMAL. For data types like VARCHAR, you need to specify the size or length in bytes. For DECIMAL, you need to set the precision and scale.
NULL/NOT NULL
Optional. The default value is NULL. You let a column have a required value or not with this setting.
DEFAULT default_value
Optional. With this, you let the column have a default value. The default value should be compatible with its data type. For example, you can set a default of zero for integer columns but not a blank string.
AUTO_INCREMENT
Optional. This works for integer columns. It tells MySQL that the column needs a unique integer number that increments as you INSERT a row. For more information about AUTO_INCREMENT, visit the official documentation for MySQL 8.x.
PRIMARY KEY
Optional. This tells MySQL that the column is a primary key.
CHARACTER SET charset_name
Optional. Defaults to utf8mb4. Works on string data types like VARCHAR. It tells MySQL what characters the column accepts, like English, Japanese, or others.
COLLATE collation_name
Optional. Defaults to utf8mb4_0900_ai_ci. It tells MySQL the collation rules for comparing strings for sorting and more. In this case, this applies to the column you’re adding. You can set a different character set and collation per column.
GENERATED ALWAYS AS (formula) STORED|VIRTUAL
Optional. This defines a calculated column based on a formula or expression. You can store the result in the table (STORED). Or have it computed as needed (VIRTUAL). You cannot UPDATE a generated column or specify a value during INSERT.
FIRST | AFTER existing_column_name
Optional. This lets you position a new column in a table’s columns list. You can place it FIRST in the list or AFTER an existing column. The default position is last.
Check out the examples in the next section.
6 Real-World MySQL ADD COLUMN Examples You Can Use Now
Example 1 – Adding Multiple Columns
In this example, you will learn how to add multiple columns at once.
Let’s create the table first:
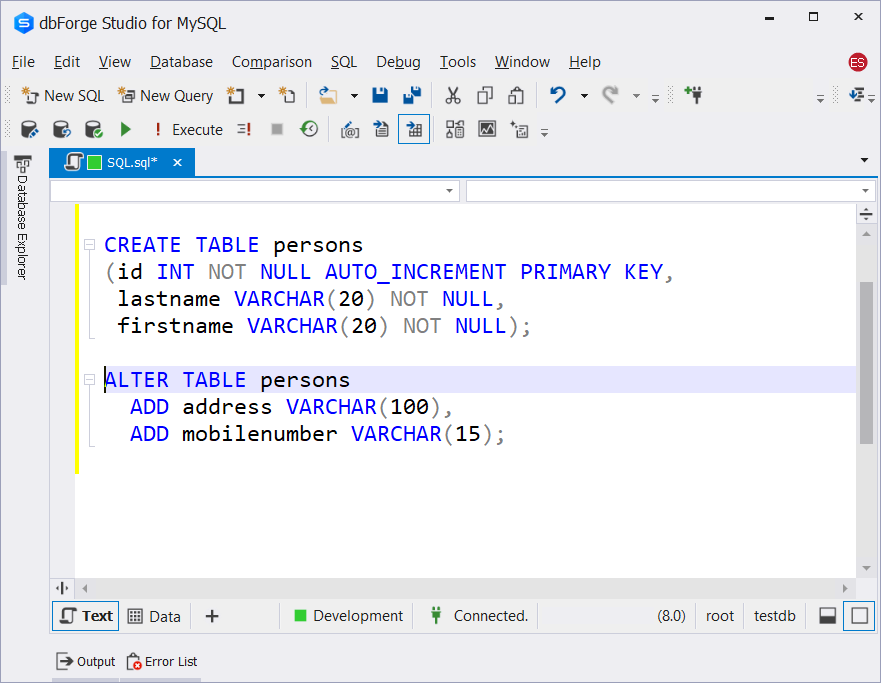
CREATE TABLE persons
(id INT NOT NULL AUTO_INCREMENT PRIMARY KEY,
 lastname VARCHAR(20) NOT NULL,
 firstname VARCHAR(20) NOT NULL);
Then, let’s add the address and mobile number columns:
ALTER TABLE persons
ADD address VARCHAR(100),
ADD mobilenumber VARCHAR(15);
Note that adding several columns at once needs a comma as a separator for each new column. We also didn’t use the COLUMN keyword.
Here’s what it looks like in a GUI tool like dbForge Studio for MySQL.
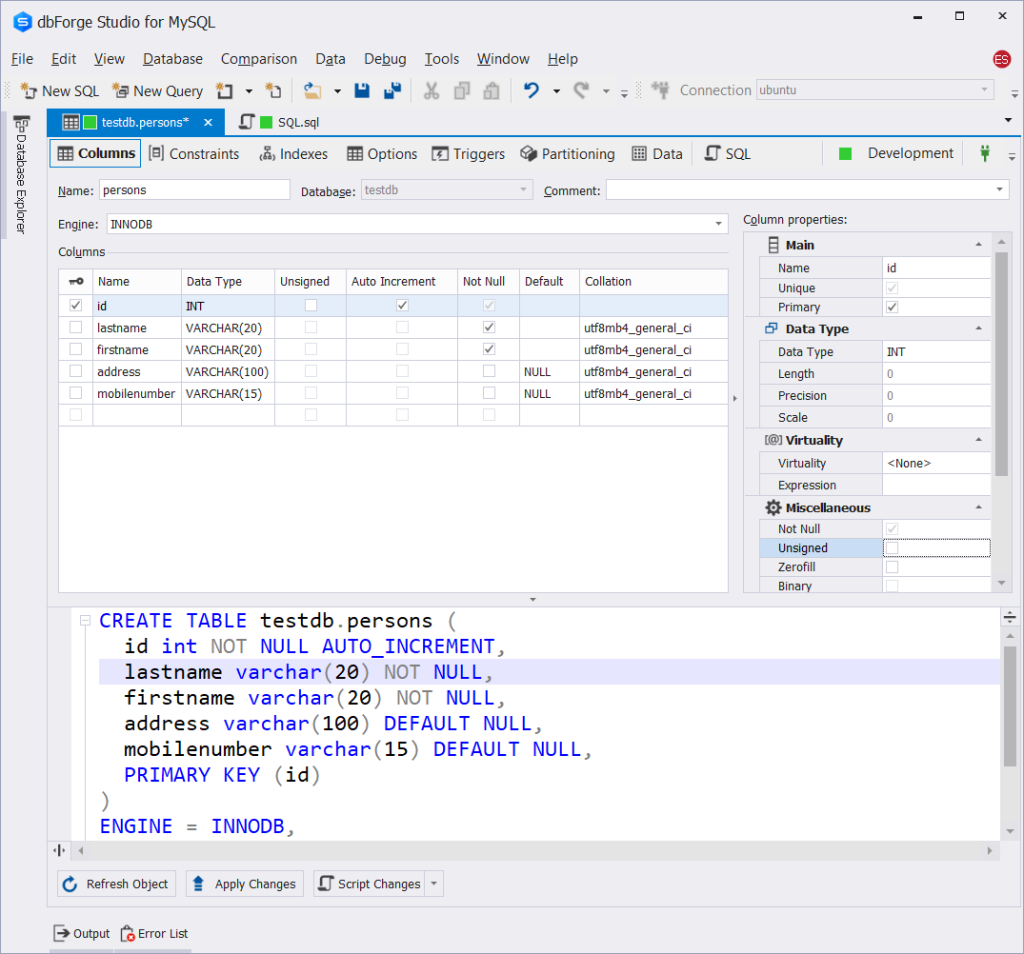
You can also check the table definition after adding these columns. Use DESCRIBE or a GUI tool for that. Check out the following table definition in dbForge Studio for MySQL:
Example 2: Inserting a New Column After an Existing Column
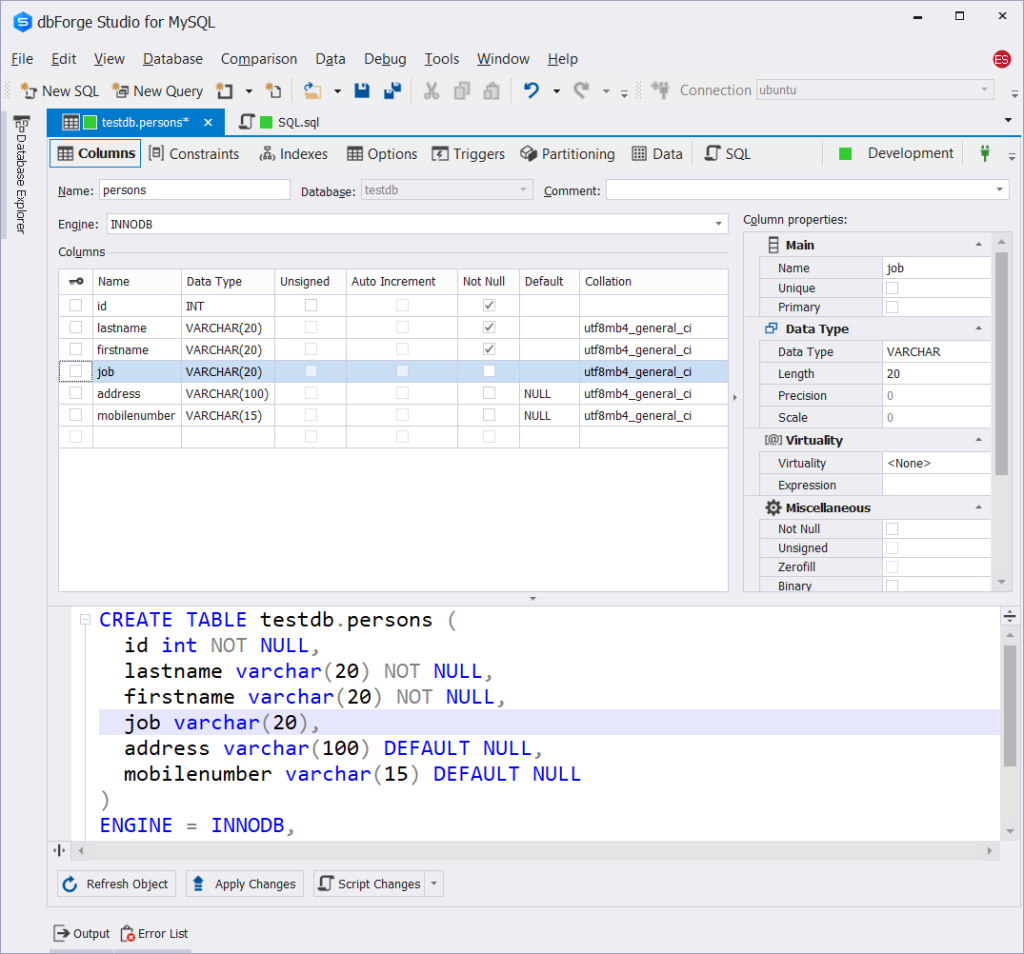
This example demonstrates the use of AFTER existing_column_name. Now, let’s insert the job column after the firstname column.
ALTER TABLE persons
ADD job VARCHAR(20) AFTER firstname;
The column name you will use in AFTER should exist or an error will occur. After running this command, below is the new table definition:
Example 3 – Adding a Column with a NOT NULL Constraint and Default Values
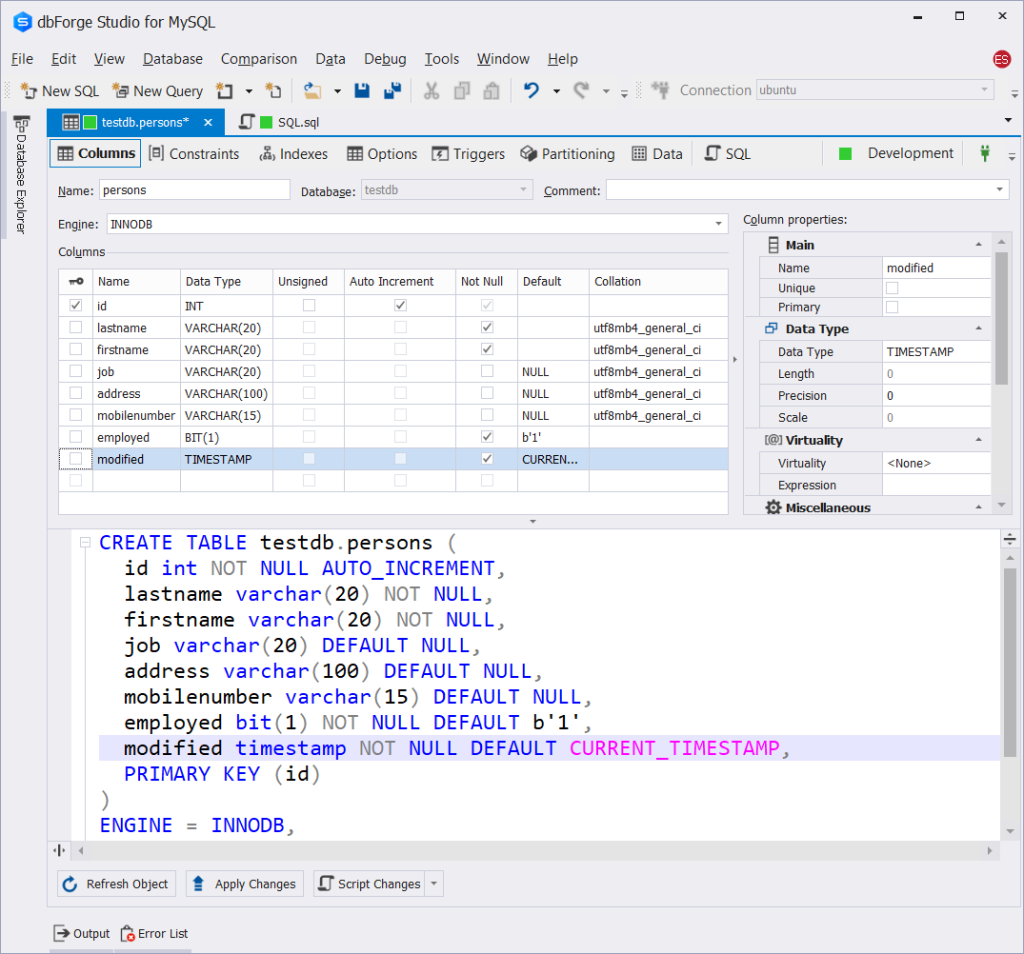
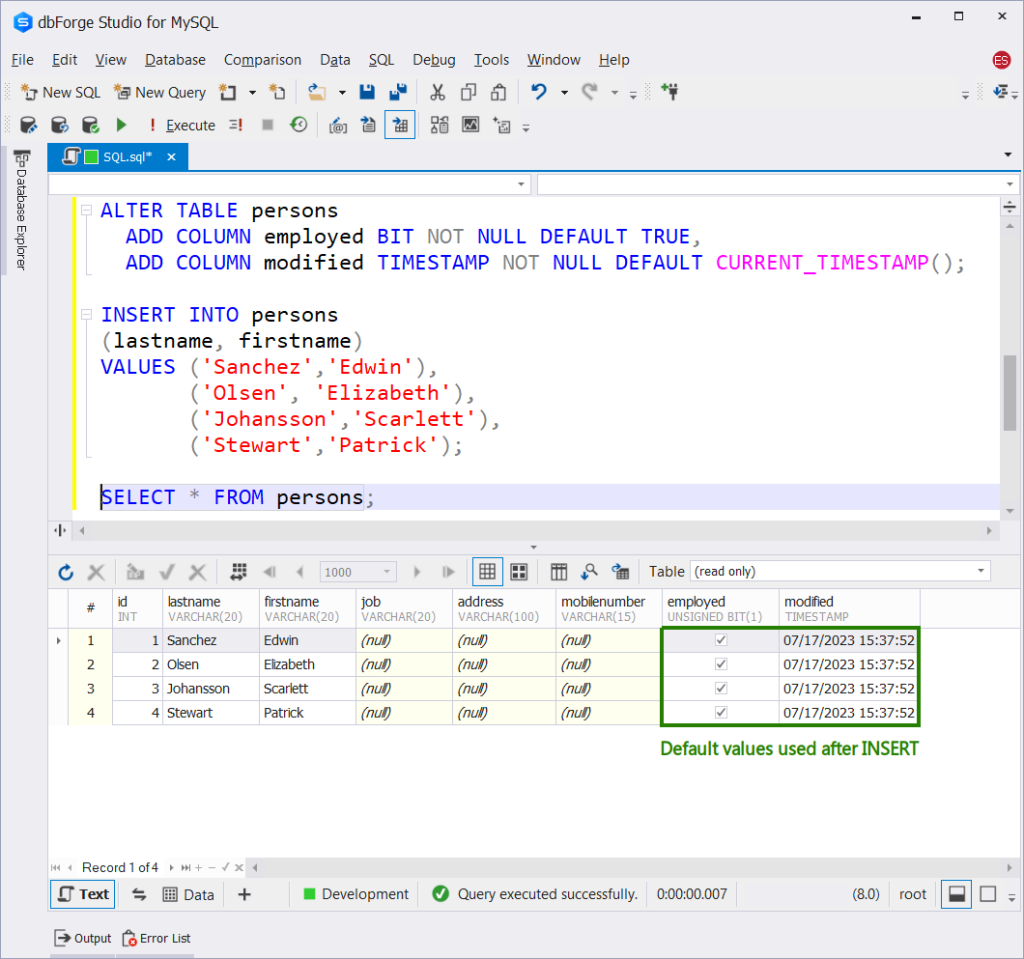
This example adds BIT and TIMESTAMP columns that can’t be null. The BIT column defaults to true. While the TIMESTAMP column defaults to the current date and time. Here’s the code:
ALTER TABLE persons
ADD COLUMN employed BIT NOT NULL DEFAULT TRUE,
ADD COLUMN modified TIMESTAMP NOT NULL DEFAULT CURRENT_TIMESTAMP();
Check out the updated table definition below. It shows both the BIT and the TIMESTAMP columns.
So, when your app writes to these columns, there should be a valid value. But the default values give you convenience when inserting rows into the table. You don’t need to explicitly specify these columns in the columns list of the INSERT statement. The following statement is an example of this:
INSERT INTO persons
(lastname, firstname)
VALUES ('Sanchez','Edwin'),
       ('Olsen', 'Elizabeth'),
       ('Johansson','Scarlett'),
       ('Stewart','Patrick');
This will succeed. When you SELECT the table rows, the BIT and TIMESTAMP columns will have values. Check out the screenshot below:
Example 4 – Adding Generated Columns
Here’s an example that forms the full name out of the first and last names:
ALTER TABLE persons
ADD COLUMN fullname VARCHAR(65)
        GENERATED ALWAYS AS (CONCAT(lastname, ', ', firstname))
        STORED AFTER firstname;
We used the CONCAT function to form the full name generated column. Check out the result set below:
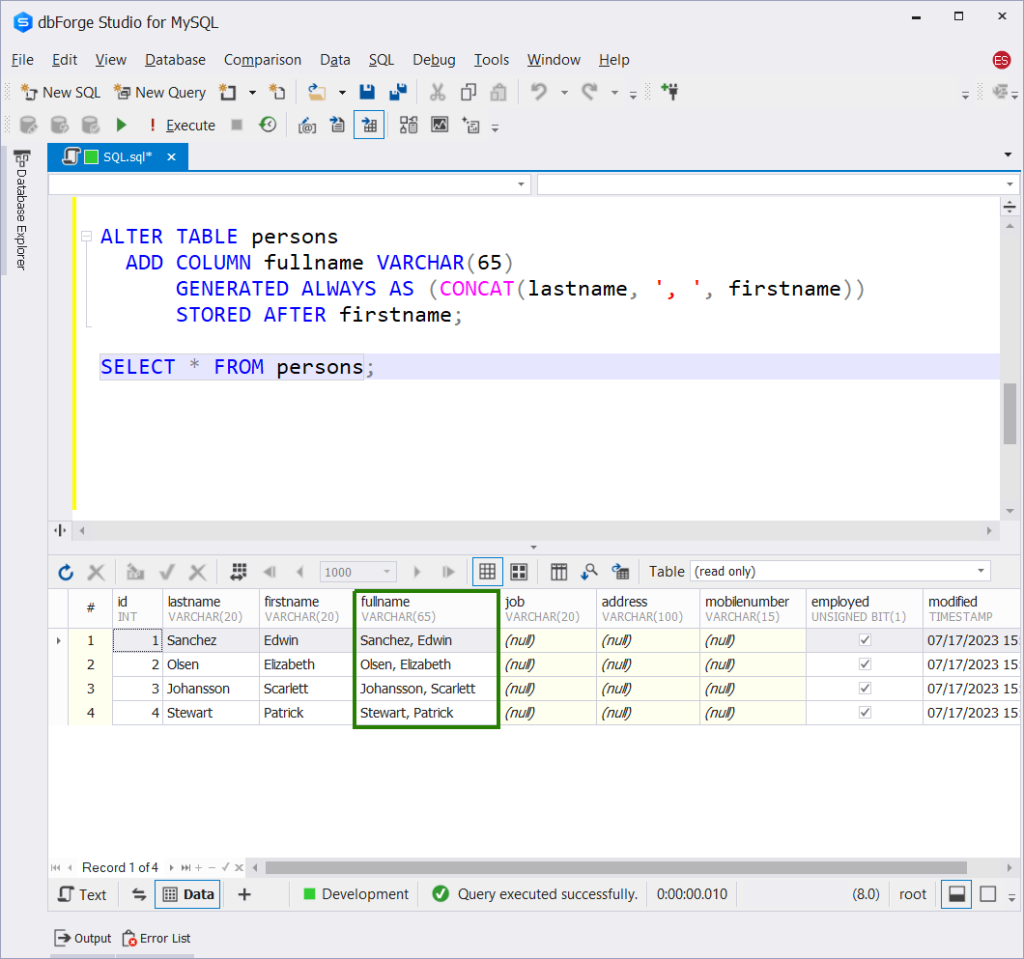
The result of the full names is what we expect from the CONCAT function.
Example 5 – Adding an Autogenerated Integer Column as Primary Key
In case you forgot to add a primary key (which should be unlikely), MySQL lets you add one. Let’s create a different table first without the primary key:
CREATE TABLE people
(lastname VARCHAR(20) NOT NULL,
 firstname VARCHAR(20) NOT NULL);
Now let’s insert a new INT column at the top of the columns list. And make it a primary key.
ALTER TABLE people
ADD COLUMN id INT AUTO_INCREMENT PRIMARY KEY FIRST;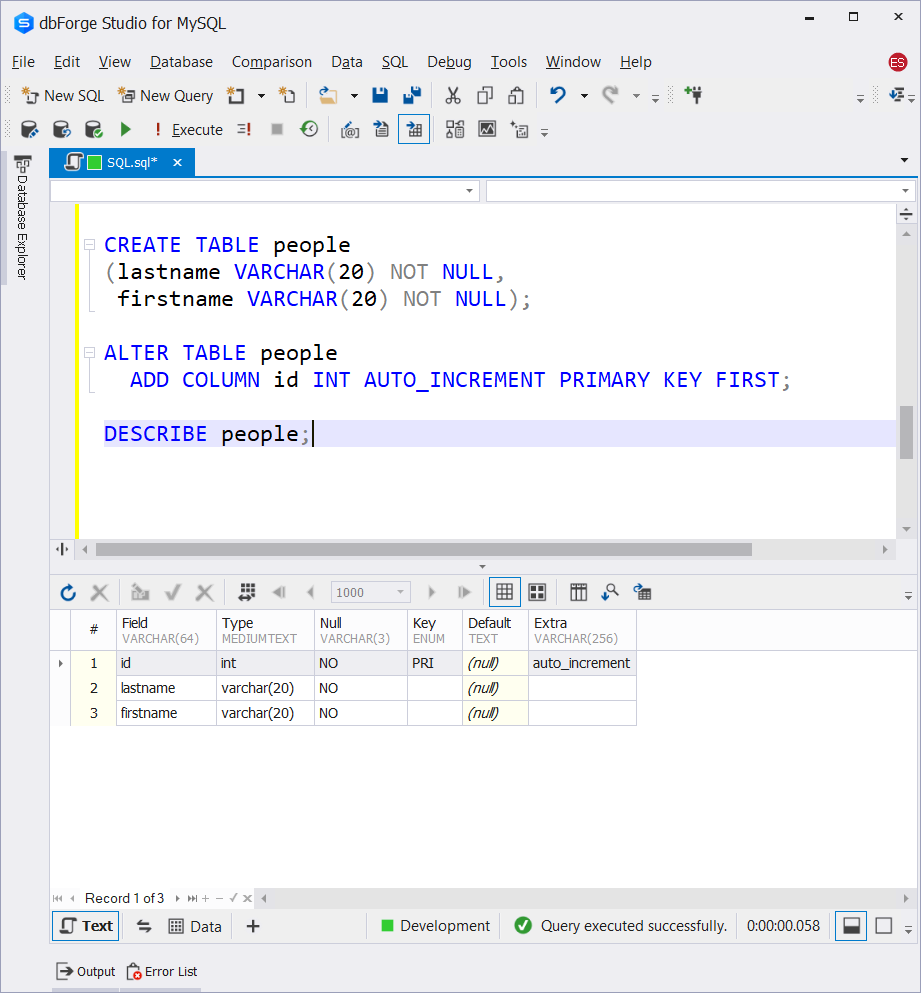
Using the FIRST keyword puts the new column at the top of the columns list. The result of DESCRIBE shows everything we indicated in the MySQL ADD COLUMN.
Example 6 – Adding a Column with a Specific Character Set and Collation
The following example adds a column that accepts Japanese characters and collations.
ALTER TABLE people
  ADD COLUMN japanese_name VARCHAR(30)
      CHARACTER SET sjis COLLATE sjis_bin;
Here’s a sample with the result set in dbForge Studio for MySQL:
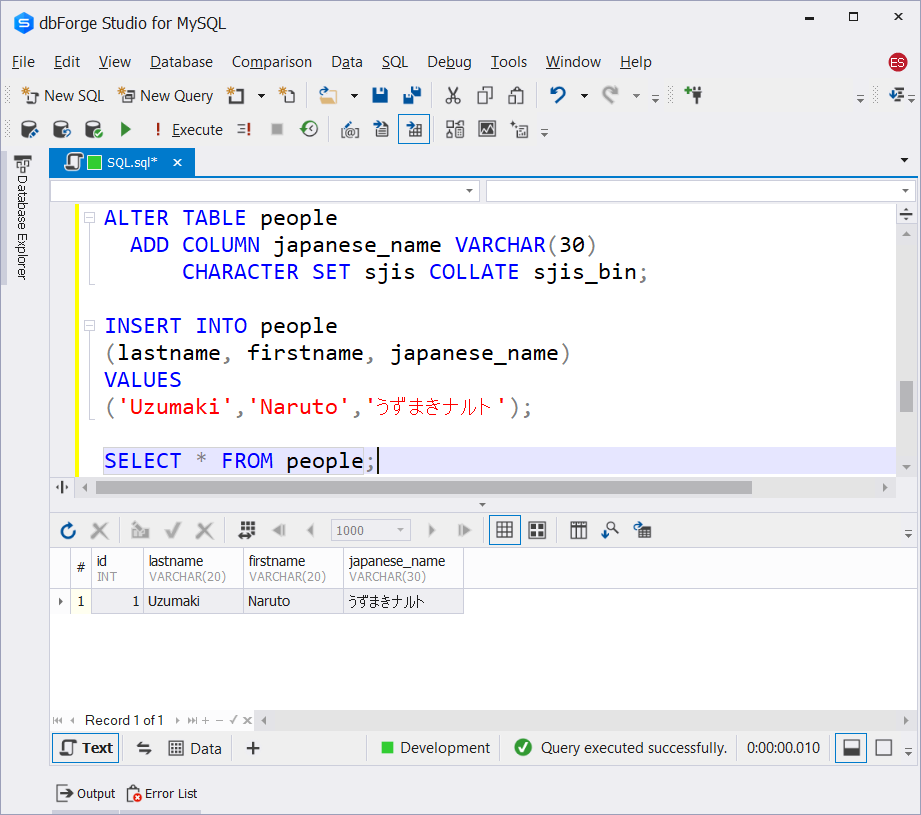
As you can see above, we added a Japanese name with its English counterpart in the table.
Are You Ready to Use MySQL ADD COLUMN?
It’s not so difficult, isn’t it?
But don’t mind the syntax alone. Know the suitable data types and sizes, existing data, and performance impact.
The syntax is simple. Use ALTER TABLE ADD COLUMN and set the column definition as needed. You also saw six real-world examples. So, you can add or insert a column without the oops. And maintain your tables with confidence.
Master the syntax by trying out the examples above. You’ll be glad you did it.
Masterful coding with MySQL ADD COLUMN is easier with the right tool. In this article, we used dbForge Studio for MySQL. And the features you saw are only the tip of the iceberg. Surprise yourself with this tool by downloading a copy today. And see how your MySQL coding productivity shoots up.
Last modified: August 21, 2023