
Are you adding MySQL to your list of database skillsets? Then MySQL UPDATE statement is one of the commands you need to learn.
We are continuing our journey to MySQL from the SQL Server point of view. It started with CREATE TABLE, followed by INSERT, and the most recent piece was about DELETE. Today, UPDATE is our focal point.
The differences are subtle and easy to learn. But just like in the previous articles, our goal is to have you up and running quickly. But before we proceed, let’s make these items clear:
- The examples used here were run on MySQL 8.0.23 using the InnoDB storage engine.
- We used SQL Server 2019.
Prepare the Sample Data
We can’t proceed without sample data. I would like to put T-SQL developers at home in this exercise. So, let’s import some familiar tables into the AdventureWorks sample database from SQL Server:
- Product
- SalesOrderHeader
- SalesOrderDetails
To import these tables to MySQL, I used dbForge Studio for MySQL. Here are the steps:
- Create a new database called adventureworks2019.
- Right-click adventureworks2019 and select Tools.
- Select Import Data. A new window will appear.
- Select ODBC. You need to create a User DSN to connect to your SQL Server and the AdventureWorks database.
- Click Next.
- Select the table you need to import, the MySQL connection, and the target database (adventureworks2019).
- Click Next.
- Change the column settings. You can also see sample data. You can skip this by clicking Next or change the settings as you see fit.
- Click Import.
- Import the next table by following the same on-screen instructions.
- Click Finish.
After importing these tables, you are now ready for the examples in this article. So, let’s begin.

1. Syntax Basics
MySQL UPDATE statement syntax goes like this:
UPDATE [LOW_PRIORITY] [IGNORE] table_references
    SET assignment_list
    [WHERE where_condition]
    [ORDER BY ...]
    [LIMIT row_count]
I can almost hear you after reading the syntax: LOW PRIORITY, IGNORE, ORDER BY, and LIMIT don’t fit! Let’s start discussing from the top.
First, LOW_PRIORITY is an alien keyword to us because SQL Server doesn’t support it. It’s optional, but if you include it, updates are delayed until all other clients are not reading the table.
Another alien keyword is IGNORE. It’s also optional, but if you include it and duplicates occur, an error will not be raised. For more ignorable errors, check out this link.
Then, ORDER BY. We know what it is for. But try it in SQL Server Management Studio and squiggly lines will appear beneath keywords.
Finally, LIMIT. This is the same as TOP in SQL Server. More of this and ORDER BY in a later section.
These are the obvious differences. Read on further in the next 2 subsections.
MySQL UPDATE Single Column
Updating a single column is almost similar. So, the example below will produce the same result from both database platforms. Note, however, that instead of backticks, SQL Server uses square brackets.
-- MySQL UPDATE single column
UPDATE `production.product`
SET ReorderPoint = 650
WHERE ProductID = 316;
Here’s an equivalent T-SQL syntax:
-- T-SQL UPDATE single column
UPDATE [Production].[Product]
SET ReorderPoint = 650
WHERE ProductID = 316;
The value assigned to a column can be any single-value expression as long as the returned type is the same as the data type of the column.
MySQL UPDATE Multiple Columns
Updating multiple columns is also almost similar to T-SQL. Here’s an example:
UPDATE `production.product`
SET ReorderPoint = 650, SafetyStockLevel = 1200
WHERE ProductID = 316;
To update multiple columns, simply separate column-value pairs with a comma. Again, the only difference here is the backticks.
So far, these are all single table updates. Let’s move on to MySQL UPDATE from another table.
2. MySQL UPDATE with JOIN
There are minor differences you will see when updating a table with joins. The best way to show this is through an example of using 3 tables.
UPDATE `sales.salesorderdetail` sod
INNER JOIN `sales.salesorderheader` soh ON sod.SalesOrderID = soh.SalesOrderID
INNER JOIN `production.product` p ON sod.ProductID = p.ProductID
set UnitPrice = p.ListPrice
WHERE p.ProductID = 758
AND soh.OrderDate = '2012-04-30';
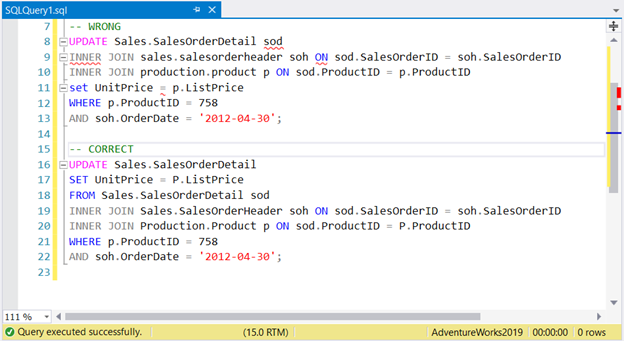
Notice that some clauses are arranged differently when compared to SQL Server. Joins appear first before the SET clause. There’s no FROM clause either. As you can expect, SQL Server Management Studio will put squiggly lines for the offending syntax. See this and the correct T-SQL syntax in Figure 1 below.
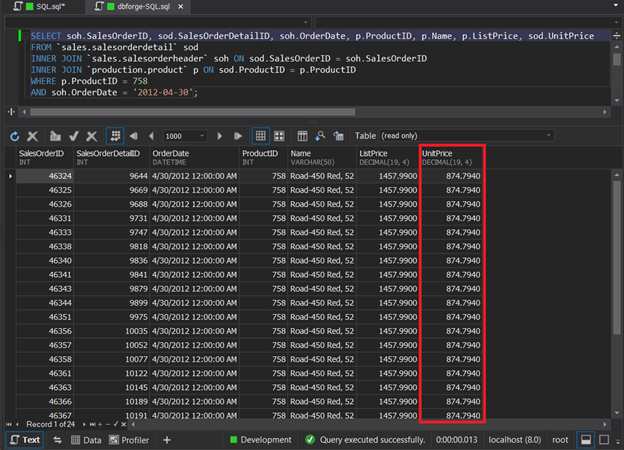
Before the update, the unit price value is 874.7940 as seen in Figure 2.
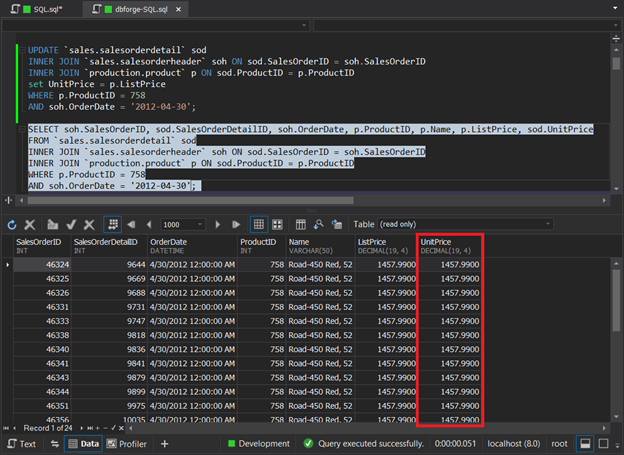
After the update, UnitPrice is updated from the Product table’s ListPrice. See Figure 3.
Aside from INNER JOIN, you can use LEFT or RIGHT JOIN depending on your requirements.
3. MySQL UPDATE with Subquery
You can use the MySQL UPDATE statement from another table using a subquery. The query with a join in the previous section can be rewritten using a subquery. The results will be the same. Here goes:
UPDATE `sales.salesorderdetail` sod
INNER JOIN `sales.salesorderheader` soh ON sod.SalesOrderID = soh.SalesOrderID
SET sod.UnitPrice = (select ListPrice from `production.product` WHERE ProductID = 758)
WHERE sod.ProductID = 758
AND soh.OrderDate = '2012-04-30';
The approach is different, but the result is the same as in Figure 3. However, note that the subquery used to update a column should return 1 value.
There’s another way to express this MySQL UPDATE statement.
4. MySQL UPDATE with CTE
Common Table Expressions (CTE) are supported in both MySQL and SQL Server. If you’re unfamiliar with CTEs, check out the previous article.
Now, here’s the equivalent statement with CTE used.
WITH priceIncrease AS
(
  SELECT soh.SalesOrderID, p.ProductID, p.ListPrice
  FROM `sales.salesorderdetail` sod
  INNER JOIN `sales.salesorderheader` soh ON sod.SalesOrderID = soh.SalesOrderID
  INNER JOIN `production.product` p ON sod.ProductID = p.ProductID
  WHERE p.ProductID = 758
  AND soh.OrderDate = '2012-04-30'
)
UPDATE `sales.salesorderdetail` s
INNER JOIN priceIncrease pi ON s.SalesOrderID = pi.SalesOrderID AND s.ProductID = pi.ProductID
SET s.UnitPrice = pi.ListPrice
SQL Server supports the same concept, but without backticks. The result will be the same as in Figure 3.
You may ask, which of the 3 approaches are better? We will compare their performance further.
5. MySQL UPDATE with LIMIT
MySQL UPDATE can limit the number of rows to update with the LIMIT keyword. Suppose we want to update 5 records in the Product table. We can express the statement like this:
UPDATE `production.product` p
SET p.StandardCost = p.StandardCost + 10, p.ListPrice = p.ListPrice + 10
ORDER BY p.ProductID
LIMIT 5;
This will sort the records based on ProductID, and then update the first 5 records. It stops after the 5th record.
The SQL Server’s counterpart of LIMIT is TOP. However, you cannot just change the LIMIT keyword to TOP and expect it will work in SQL Server. Here’s the modified version in T-SQL which will give the same result:
UPDATE Production.Product
SET StandardCost += 10, ListPrice += 10
WHERE ProductID IN (SELECT TOP 5 ProductID
		    FROM Production.Product
		    ORDER BY ProductID)
The logic is a bit different. It updates StandardCost and ListPrice columns based on the ProductIDs found in the subquery. The subquery, on the other hand, returns the first 5 records of the Product table sorted by ProductID.
Though TOP is also supported in T-SQL UPDATE, ORDER BY is not. Thus, using TOP with UPDATE will modify random records. The above syntax is applicable for ordered records with TOP.
MySQL UPDATE Performance
Earlier, we had an UPDATE statement with the same results even though we used different methods. We used a JOIN, subquery, and CTE. Which of them will perform best?
There’s also an execution plan in MySQL using the EXPLAIN keyword. The syntax is like this:
EXPLAIN [FORMAT=JSON]
<SQL statement>
Without the JSON format, you have basic information like tables, index keys used, and rows scanned. When JSON format is specified, you have more detailed information. dbForge Studio for MySQL includes a Query Profiler in addition to the result of EXPLAIN. MySQL Workbench includes a Visual EXPLAIN where you can see a graphical view of the plan based on EXPLAIN FORMAT=JSON.
Now that we know the command line statements and graphical tools, how can we use them to compare different methods?
Before we proceed, let me be honest. My proficiency in SQL Server is higher than in MySQL. I may miss something along the way or be wrong. You can fill the gaps in the Comments section later.
Dissecting EXPLAIN Results for UPDATE with JOIN
The first time I ran the MySQL UPDATE statement with JOIN, it took 11.3 seconds for 24 rows updated. Unbelievable, isn’t it?
Here’s what happened as seen in dbForge Studio. Check out Figure 4 below.
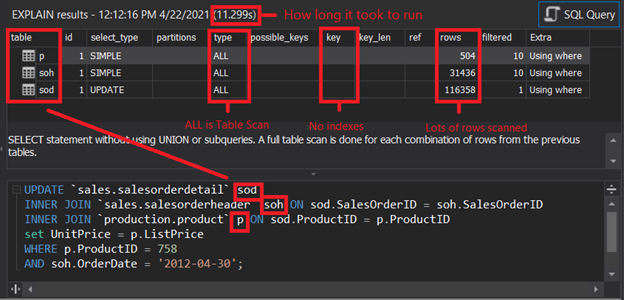
What does Figure 4 tell us?
- The 3 table aliases used are there. All 3 have access types of ALL. It means MySQL used Table Scan for all 3.
- Look at the key column. Nothing is displayed on all 3 tables, meaning no index keys were used. This supports the previous point of Table Scan.
- Finally, the rows column. It tells how many rows MySQL believes it should scan to achieve the final result. For 24 rows updated, thousands of rows were scanned for SalesOrderHeader and SalesOrderDetails. Meanwhile, all rows of the Product table were scanned.
I scratched my head upon learning this. I realized that when I imported tables from SQL Server, only the table structure and the data were imported, not the indexes.
So, I created appropriate indexes and primary keys in dbForge Studio. Here’s what I created:
- I made the ProductID in the Product table a primary key.
- I also added SalesOrderID as a primary key in the SalesOrderHeader table. Then, I made an index for OrderDate too.
- Finally, I made SalesOrderDetailID in the SalesOrderDetail table a primary key. I also added an index for the SalesOrderID and ProductID columns of this table.
After this, I generated a new execution plan for the same query to see the improvements. The result?
SPEED BOOST AFTER ADDING INDEXES
Execution time was reduced from 11.3 seconds to 0.019 seconds. Very cool!
Let’s check the new plan using dbForge Studio in Figure 5 below.
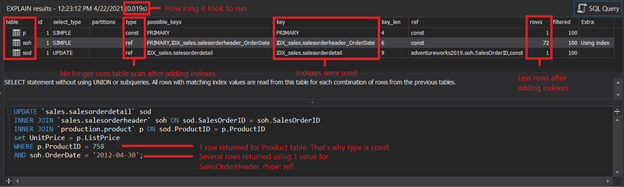
What does Figure 5 tell us?
- The access types of 3 tables were changed. The 2 values to avoid here are ALL and INDEX, especially on large tables. ALL is Table Scan and INDEX is Index Scan.
- The key column now includes the indexes used. This is good. All indexes added were used.
- The rows column now shows smaller figures. The indexes added reduced a lot of I/O on our query.
For more information about the EXPLAIN details and values, check this official documentation.
But how does this compare to MySQL UPDATE with subquery?
Dissecting EXPLAIN Results for UPDATE with Subquery
The previous query to update the UnitPrice column has another query alternative, which is using a subquery. How does it compare to the JOIN? Check out Figure 6 below.
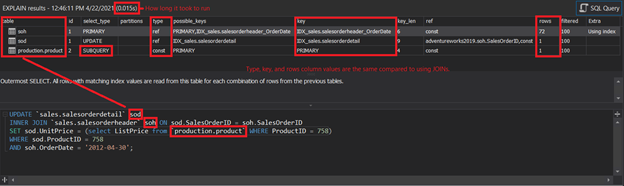
Figure 6 shows:
- Type, key, and rows column values are the same compared to using JOIN. This is logical since it should have the same results.
- The execution time took a bit faster. This won’t happen every time, though. It depends on the current resources available. The speed difference is also negligible. You won’t feel it at all.
Another way is using EXPLAIN FORMAT=JSON to get more information about the plan. Upon checking, the query cost (84.79) and cost info values are the same.
Now, let’s compare it with MySQL UPDATE with CTE.
Dissecting EXPLAIN Results for UPDATE with CTE
Using CTE as a basis for updating the UnitPrice column is like having a temporary table first and then joining the temporary table to SalesOrderDetails. At first glance, it may look like it’s not a good option compared to the first two. But it shows us that it is possible to have an update in MySQL using CTE. It can be a good option in other situations. Anyway, let’s have the EXPLAIN results for this approach.
If you don’t have dbForge Studio for MySQL, you can try to produce EXPLAIN results using the command in any other editor. Here’s an example:
EXPLAIN
WITH priceIncrease AS
(
  SELECT soh.SalesOrderID, p.ProductID, p.ListPrice
  FROM `sales.salesorderdetail` sod
  INNER JOIN `sales.salesorderheader` soh ON sod.SalesOrderID = soh.SalesOrderID
  INNER JOIN `production.product` p ON sod.ProductID = p.ProductID
  WHERE p.ProductID = 758
  AND soh.OrderDate = '2012-04-30'
)
UPDATE `sales.salesorderdetail` s
INNER JOIN priceIncrease pi ON s.SalesOrderID = pi.SalesOrderID AND s.ProductID = pi.ProductID
SET s.UnitPrice = pi.ListPrice
The result is in Figure 7 below.

Figure 7 shows:
- 4 tables were used instead of 3. The first use of SalesOrderDetail is in the CTE and then in the UPDATE statement.
- More tables mean more rows compared to the 2 previous approaches.
Surprisingly, this ran at 0.015 seconds (not shown in the figure). The same is with using a subquery. However, it won’t happen every time. It depends on system resources available at the time of execution.
The total query cost is 166.69. It’s higher than the previous 2 approaches. The lower the query cost, the better for performance over time.
Takeaways
We took a deep dive into the differences between MySQL and SQL Server’s UPDATE statement. We’ve learned how it is done when updating
- a single column
- multiple columns
- tables with a join
- columns using a subquery
- tables with a CTE
- with a LIMIT
In this post, you also had a sneak peek about EXPLAIN and how to use it to compare different UPDATE approaches.
I hope this can be helpful to you as you learn MySQL coming from SQL Server. If you like this post, please share it on your preferred social media platforms. And if something is lacking, let us know in the Comments section.
Happy coding!
Tags: mysql, mysql update, t-sql Last modified: June 27, 2023