
AWS Lambda is an event-driven, serverless cloud computing service provided by Amazon, a part of the Amazon Web Services. It responds to multiple events like uploading files to S3, clicks on websites, etc. Then, it takes action based on the trigger.
AWS Lambda supports multiple programming languages, such as Node, Python, C# (using dot net core), etc. For each of them, multiple runtime versions are supported. For example, it is possible to develop Python applications that target multiple versions of the runtime (3.6, 3.7, and 3.8).
Lambda functions are also known as serverless, as you do not need provisioning any infrastructure to run your applications. You can just write the code, deploy it to Lambda, and get it executed.
This article will discuss the packaging and deployment of custom libraries. Also, it will highlight the efficient usage of Layers in Lambda to reuse those libraries. We’ll focus on concepts explained by Python, but the approaches apply to other programming languages supported by Lambda as well.
Packaging Applications
When you write code for cloud-based applications, you might want to include several libraries to refer to them within the projects. They can be standard python libraries like Pandas, NumPy, etc., or custom-tailored libraries required for your project. AWS Lambda does not provide these libraries out of the box. Therefore, programmers need to manage their own dependencies while deploying codes to Lambda Functions.
AWS Lambda supports two ways to achieve this:
- Manage dependent libraries within the directory of each project.
- Use Layers to create a reusable library that can be referred to while deploying projects.
This article is going to explore the second way, i.e., deploying code by using Layers in AWS Lambda.
What are Layers in AWS Lambda
So far, we have talked about packaging and deploying applications. Now, let us learn what Layers exactly are and what purpose they serve in AWS lambda.
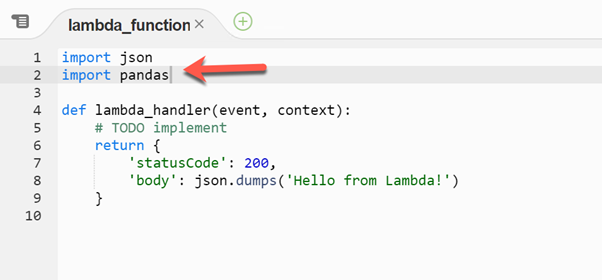
Suppose you are developing an application in Python that uses the Pandas library. While you are writing your code on your development machine, you might use some virtual environment or global libraries present on that machine. The code works fine on your machine because you can refer to the libraries. It is possible to execute the application.
Problems arise when you deploy your code chunk to AWS Lambda. By default, Lambda does not provide any environment to host the Pandas library which your code refers to. As a result, when you execute the code, you’ll get an error saying that the Pandas module is nowhere to be found.
When you execute the above, there is the following error:
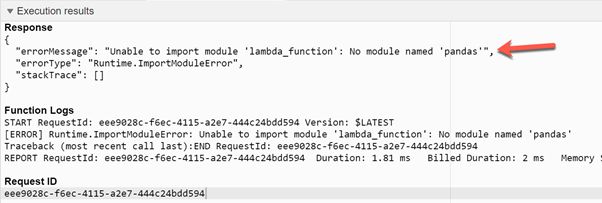
As you can see, the Pandas module is not found in the runtime. Hence, an exception takes place.
How to create a Layer in AWS Lambda
To overcome this issue, we need to provide the runtime with a valid distribution of the library along with its dependencies. This way, our code can refer to it during execution.
For running Pandas, we need to use the following libraries while creating the Layer in Lambda:
- Pandas – the official Pandas library from PyPi.
- NumPy – is required to support Pandas.
- PyTz – the library required by Pandas to handle the time zone-related data.
You can download all libraries from the official PyPi repository. Notice that since Amazon runs the Lambda containers on Amazon Linux distributions, we must download Linux versions of the libraries.
The necessary files are as follows.
- pandas-1.2.4-cp38-cp38-manylinux1_i686.whl (9.4 MB)
- numpy-1.20.2-cp38-cp38-manylinux1_x86_64.whl (13.7 MB)
- pytz-2021.1-py2.py3-none-any.whl (510.8 kB)
Once you download these files, rename the extension to ZIP and extract them:
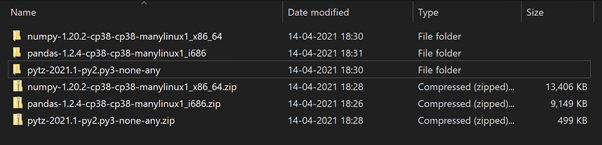
After extracting the libraries to their folders, we must create a new folder named python. Then we add the library contents to the python folder.
Add the contents of all three libraries to the python directory:

As you can see, all libraries are present in the same python folder. The next step is to compress the python folder to python.zip. At this point, the compressed zip folder contains all the necessary files required by the Pandas library to run on AWS Lambda.
Creating the Layer
When we have our dependencies compressed to an archive file, we can create a layer in AWS Lambda and upload the compressed folder. Then Lambda functions can use this Layer as a reference and execute the code upon it.
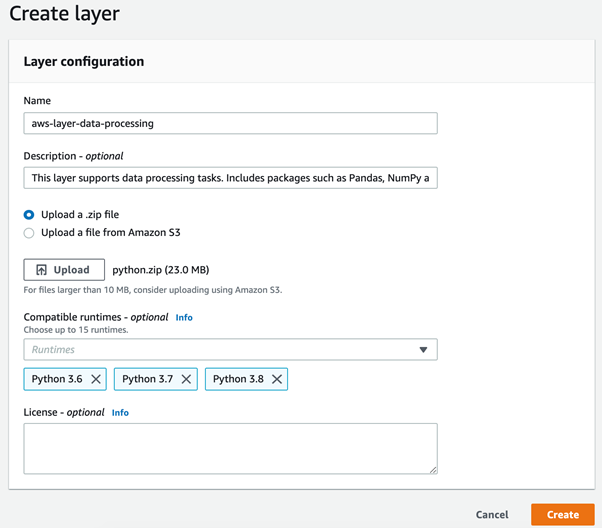
In the AWS console, open Lambda and click Layers on the left. Then click Create Layer and provide the following details:
- Name is the name of your Lambda layer. Use a short descriptive name.
- The description is an optional field, but you can provide a long text description to specify which details the layer can handle.
- Upload Files – you can do it in two ways, to upload a file to the layer directly, or to upload files to the S3 bucket and then provide the file URI. For simplicity, we will proceed with the first option.
- Compatible Runtimes is also an optional field. However, you can specify the runtimes that are compatible with the libraries in the layer.
- License is optional. If applied, it specifies the license required to access the packages in the layer.
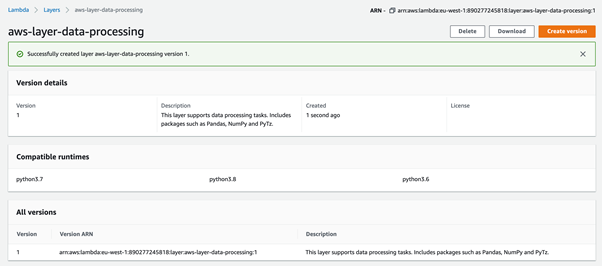
Once you have provided all the details, click Create – the layer will be created and ready to use. The process might take some time depending on your compressed file size. When the Layer is ready, you will see the confirmation as below:
Using Layers in Lambda
So, we have our Layer created and ready to use. Let us start using it.
Navigate to the Lambda function you have created earlier and click Layers. There is an option to add layers to the existing Lambda function. Click Add a Layer, and you will see the page to add a new layer created earlier.
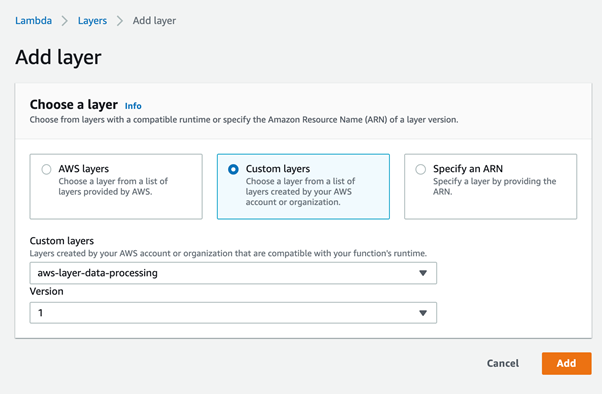
We have selected Custom Layers since it was not provided by AWS. Then we selected the Layer name and version.
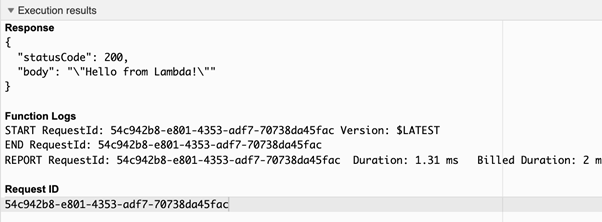
Click on Add, and the layer will be included in the Lambda Function. After that, it will execute without any errors.
Conclusion
We have understood where and how we can use the AWS Lambda Function. Also, we have explored deploying the Lambda code using a Layer.
For those Lambda functions that use compressed deployment packages, you can use layers to manage the dependencies. The code size gets smaller, as the dependencies will be handled by the layer.
The Lambda Layer can be associated with custom libraries, multiple runtime versions, and other dependencies.
To learn more about working with AWS Lambda Layers, you can use the official reference.
Tags: AWS, aws lambda, python Last modified: September 17, 2021