
In my previous article about SQL Server System Databases, we learned about each system database that comes as part of SQL Server installation. The current article will focus on frequently faced issues around the tempdb database and how to resolve them correctly.
What Is TempDB?
As the name of this system database indicates, tempdb holds temporary objects created by SQL Server. They relate to several operations and act as a Global working area for all users connecting to SQL Server instances.
The Tempdb database will hold the below object types while users perform their operations:
- Temporary objects are created explicitly by users. They can be either Local or Global temporary tables and indexes, Table Variables, tables used in Table-valued functions, and Cursors.
- Internal objects created by the Database engine like
- Work tables storing intermediate results for spools, cursors, sorts, and temporary large objects (LOB).
- Work files while performing Hash Join or Hash aggregate operations.
- Intermediate sort results while creating or rebuilding indexes if SORT_IN_TEMPDB is set to ON, and other operations like GROUP BY, ORDER BY, or SQL UNION queries.
- Version Stores which support Row versioning feature, either Common version store or Online Index build version store uses the tempdb database files.
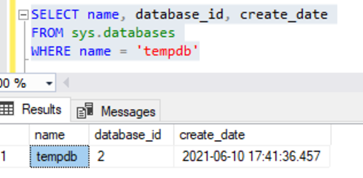
Tempdb database is created every time SQL Server Service starts. Hence, the time of the tempdb database creation can be considered as an approximate SQL Server Service startup time. We can identify it from sys.databases DMV using the query shown below:
SELECT name, database_id, create_date
FROM sys.databases
WHERE name = 'tempdb'
However, the actual startup of SQL Server Service involves starting up all system databases in a specific sequence. It may happen a little earlier than the tempdb creation time. We can obtain the value using sys.databases DMV by executing the below query on sys.dm_os_sys_info DMV.
SELECT ms_ticks, sqlserver_start_time_ms_ticks, sqlserver_start_time
FROM sys.dm_os_sys_info
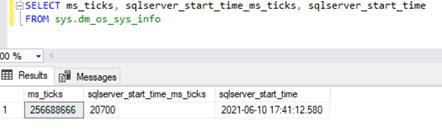
The ms_ticks column specifies the number of milliseconds since the computer or Server started. The sqlserver_start_time_ms_ticks column specifies the number of milliseconds since the ms_ticks number when the SQL Server Service started.
We can find more info about the order of databases that started up while starting the SQL Server services in the SQL Server Error Log.
In SSMS, expand Management > SQL Server Error Logs > open the current error log. Apply the Starting up database filter and click on Date to sort it in ascending order:
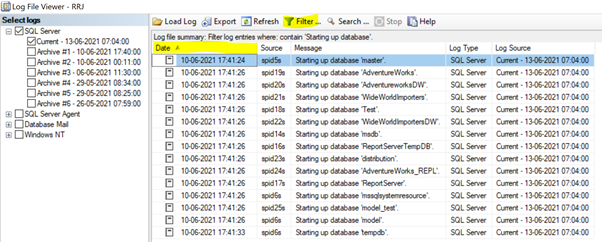
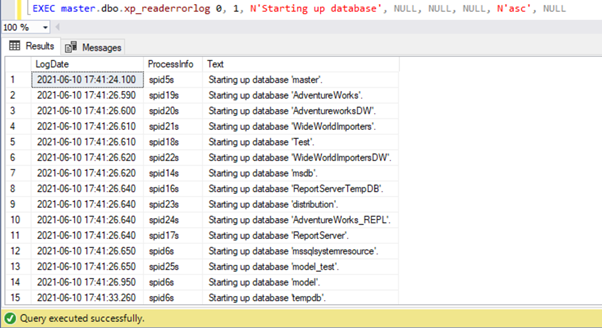
We can see that the master database has started first while starting the SQL Server service. Then all user databases and all other system databases followed. Finally, the tempdb started. You can also fetch this information programmatically by executing the xp_readerrorlog system procedure:
Note: Both the above approaches might not show the necessary information if the SQL Server Service wasn’t restarted recently, and SQL Server Error Log was recycled out which might have pushed older error logs to older files. In that case, we might need to scan the data across the Archived SQL Server Error Log files.
How to Overcome Regular TempDB Issues in SQL
As tempdb provides a global working area for all user sessions or activities, it can become a performance bottleneck for user operations if not carefully configured out. In my previous article, we have discussed the recommended best practices to implement in the tempdb database. However, even after implementing them, we might encounter issues frequently:
- Uneven file growth across tempdb data files.
- Tempdb data files are growing to a huge value and need to shrink Tempdb.
Solving the Puzzle of Unequal TempDB File Growth
Starting from SQL Server 2000, the default recommendation is to have multiple data files based upon the count of Logical cores available in the Server.
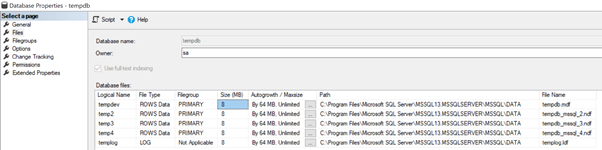
When we have multiple data files, for example, 4 tempdb data files as in the below image, autogrowth of tempdb data files will happen by 64 MB in a round-robin fashion starting from tempdev > temp2 > temp3 > temp4 > tempdev > and so on.
If one of the file sizes can’t auto-grow for some reason, it will result in certain files’ huge sizes compared to other files. It leads to additional overload placed on huge files and a negative performance impact on the tempdb database.
We need to manually ensure that all tempdb data files are evenly sized at any point in time manually to avoid the contention or performance issues till SQL Server 2014. Microsoft changed this behavior starting from SQL Server 2016 and later versions by implementing few features which will be discussed later in this article.
To overcome the above performance issues, SQL Server has introduced 2 Trace Flags named 1117 and 1118 to avoid the contention issues around tempdb.
- Trace Flag 1117 – enables Auto-growth of all files within a single Filegroup
- Trace Flag 1118 – enables UNIFORM FULL EXTENTS for tempdb
The Impact of Trace Flag 1117 on tempdb and User Databases
Without Trace Flag 1117 enabled, whenever tempdb is configured with multiple data files that are evenly sized out and data files need to auto-grow, SQL Server by default will try to increase the file sizes in a round-robin fashion if all files. If data files aren’t sized evenly, then SQL Server will try to increase the size of the largest data file of tempdb and will use this larger file for most of the user operations resulting in tempdb contention issues..
To resolve this problem, SQL Server introduced Trace Flag 1117. Once enabled, if one file within a filegroup needs to auto-grow, it will auto-grow all files within that filegroup. It resolves the tempdb contention issues. However, the catch is that once Trace flag 1117 is enabled, auto-growth is configured for all user databases as well.
How Trace Flag 1118 Boosts SQL Server Performance
Trace Flag 1118 is used to enable UNIFORM FULL EXTENTS. Let’s take a step back to understand how SQL Server stores the data from basic.
Page is the fundamental unit of storage in SQL Server with a size of 8 Kilobytes (KB).
Extent is a set of 8 physically contiguous pages with the size of 64KB(8*8KB). Based upon how many objects or owners store the data within an Extent, Extent can be classified into:
- Uniform Extents are 8 contiguous pages used or accessed by a single object or owner;
- Mixed Extents – are 8 contiguous pages used or accessed by a minimum of 2 and a maximum of 8 objects or owners
Enabling Trace Flag 1118 will allow tempdb to have uniform extents resulting in better performance.
How to Enable Trace Flags 1117 & 1118
Trace Flags can be enabled via several approaches. You can define the suitable way from the below options:
SQL Server Service Startup Parameters
Permanently available even after the SQL Service restart. The recommended way is to enable Trace Flags 1117 and 1118 via the SQL Server Service startup parameters.
Open up SQL Server Configuration Manager and click on SQL Server Services to list down the available services in that server:

- Right-click on SQL Server (MSSQLSERVER) > Properties > Startup Parameters.
- Type –T into the empty field to indicate the Trace Flag.
- Provide values 1117 and 1118 as shown below.
- Click Add to have the Trace Flags added as Startup parameters.
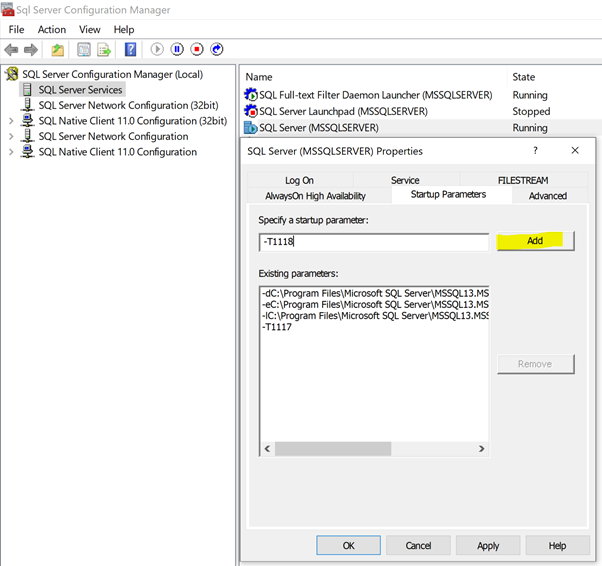
Then click OK to have the trace flags added permanently for this instance of SQL Server. Restart the SQL Server Service for the changes to get reflected.
DBCC TRACEON (<trace flag no>, -1)
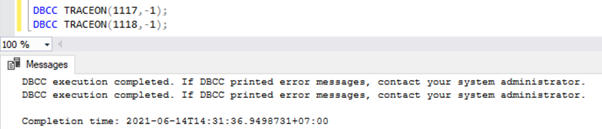
Enable a trace flag globally. SQL Server service will lose the trace flags upon the Service restart. To enable a trace flag globally, execute the below script in a new query window:
DBCC TRACEON(1117,-1);
DBCC TRACEON(1118,-1);
DBCC TRACEON (<trace flag no>)
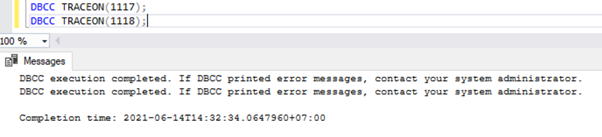
Enable the trace flag at a session-level. It applies only to the current session created by the user. To enable a trace flag at the session level, execute the below script in a new query window:
DBCC TRACEON(1117);
DBCC TRACEON(1118);
To view the list of trace flags enabled in an instance of SQL Server, we can use the DBCC TRACESTATUS command:
DBCC TRACESTATUS();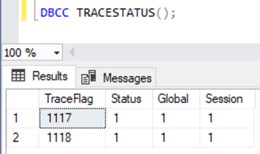
As we can see, Trace Flags 1117 and 1118 are enabled Globally in my instance along with Session.
To turn off a Trace Flag, we can use DBCC TRACEOFF command like:
DBCC TRACEOFF(1117,-1);
DBCC TRACEOFF(1118,-1);
SQL Server 2016 TempDB Enhancements
Across SQL Server versions SQL Server 2000 to SQL Server 2014, we have to enable Trace Flags 1117 and 1118 along with complete monitoring of tempdb to avoid tempdb contention issues. Starting from SQL Server 2016 and later versions, trace Flags 1117 and 1118 are implemented by default.
However, based upon my personal experience it is better to pre-grow tempdb to a huge size to avoid the need for autogrowth multiple times and to eliminate uneven file sizes or single files being used by SQL Server extensively.
We can verify how Trace Flag 1117 and 1118 are implemented in SQL Server 2016:
Trace Flag 1117 which sets the Autogrowth of all Files within a filegroup is now a property of the Filegroup. We can configure it while creating a new Filegroup or modifying an existing one.
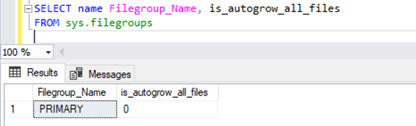
To verify the auto-grow property of the Filegroup, execute the below script from sys.filegroups DMV:
SELECT name Filegroup_Name, is_autogrow_all_files
FROM sys.filegroups
To modify the auto-growth property of the Primary Filegroup of AdventureWorks database, we execute the below script with either AUTOGROW_ALL_FILES to auto-grow all files equally or AUTOGROW_SINGLE_FILE to allow autogrowth of only a single data file.
ALTER DATABASE Adventureworks MODIFY FILEGROUP [PRIMARY]
AUTOGROW_SINGLE_FILE
-- AUTOGROW_ALL_FILES is the default behavior
GO
Trace Flag 1118 which sets the Uniform Extent property of data files is enabled by default for tempdb and all user databases starting from SQL Server 2016. We can’t change the properties for tempdb, as it now supports only the Uniform Extent option.
For User databases, we can modify this parameter. The System databases master, model, and msdb supports Mixed extents by default and can’t be changed either.
To modify the Mixed Page allocation property values for User databases, use the below script:
ALTER DATABASE Adventureworks SET MIXED_PAGE_ALLOCATION ON
-- OFF is the default behavior
GO
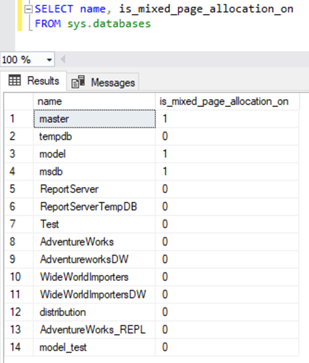
To verify the Mixed page allocation property, we can query the is_mixed_page_allocation_on column from sys.databases DMV with value as 0, indicating uniform extent page allocation, and 1 to indicate the mixed extent page allocation.
SELECT name, is_mixed_page_allocation_on
FROM sys.databases
How to Shrink TempDB in SQL Server
In SQL Server 2014 or earlier versions, if Trace flags 1117 and 1118 aren’t configured properly along with multiple data files created for the tempdb database, some of those files will inevitably grow huge. If it happens, a DBA usually tries to shrink the tempdb data files. But it is an improper approach to handle this scenario.
There are other options available to shrink the tempdb.
Let’s consider the DBCC commands available to Shrink tempdb and the impacts of doing these operations.
DBCC SHRINKDATABASE
The DBCC SHRINKDATABASE console command works by shrinking the end of the Data\Log Files.
To successfully shrink a database, the command needs free space at the end of the file. If there are any active transactions at the end of the file, the database files can’t be shrunken.
The impact of executing DBCC SHRINKDATABASE is that it will try to clear available free space at the end of every data file or log file which might have been reserved for future growth of table data. Hence, running this command might result in uneven file sizes leading to tempdb contention issues.
Syntax to shrink a user database for example Adventureworks database would be
DBCC SHRINKDATABASE (AdventureWorks, TRUNCATEONLY);DBCC SHRINKFILE
The DBCC SHRINKFILE console command works similar to DBCC SHRINKDATABASE, but it shrinks the specified Database Data or Log files.
If you identify that a particular tempdb Data file is huge, we can try shrinking that particular item using DBCC SHRINKFILE as shown below.
Be careful while using this command on tempdb because if a file is shrunk to a value lower or higher than other data files, that particular data file won’t be used effectively. Or, it will be used more frequently leading to the tempdb contention issues.
Syntax to execute DBCC SHRINKFILE operation on AdventureWorks data file to 1GB (1024 MB) would be:
DBCC SHRINKFILE (AdventureWorks, 1024);
GO
DBCC DROPCLEANBUFFERS
The DBCC DROPCLEANBUFFERS console command is used to clear all clean buffers from the Buffer pool and columnstore objects from the columnstore object pool.
Simply execute the below command:
DBCC DROPCLEANBUFFERSDBCC FREEPROCCACHE
The DBCC FREEPROCCACHE command clears all the stored procedure execution plan cache.
The Procedure Execution Plan Cache is used by SQL Server to execute the same procedure calls faster. After executing the DBCC FREEPROCCACHE, the Plan Cache is cleared out. Thus, SQL Server must create that cache again when the stored procedure is executed in the instance. It leaves a serious negative impact when executed in the Production DB instances.
It is not recommended to execute DBCC FREEPROCCACHE on the Production database instance!
The syntax to execute DBCC FREEPROCCACHE is below:
DBCC FREEPROCCACHEDBCC FREESESSIONCACHE
The DBCC FREESESSIONCACHE command clears the Distribution query connection cache from the SQL Server instance. It will be helpful when there are many distributed queries executing on a particular SQL Server instance.
The syntax to execute DBCC FREESESSIONCACHE would be:
DBCC FREESESSIONCACHEDBCC FREESYSTEMCACHE
The DBCC FREESYSTEMCACHE command clears all unused cache entries from all cache. SQL Server does this by default to make more memory available for new operations. However, we can execute it manually using the below command:
DBCC FREESYSTEMCACHEAs we know, tempdb stores all temporary user objects or internal objects including Execution Plan Cache, Buffer pool data, Session Caches, and System Caches. Therefore, executing the above 6 DBCC commands will help clear out the tempdb data files that prevent the normal shrinking process.
Even though we have gone through steps on how to shrink tempdb via various approaches, the recommended best practices to deal with tempdb database are listed below:
a. Restart SQL Server Services if possible to recreate tempdb data files evenly. Potential impact would be, we will lose all Execution plans and other cache information discussed above.
b. Pre-grow tempdb data files to a huge file size available in the drive holding tempdb data files. This will prevent SQL Server from increasing the file sizes unevenly in SQL Server versions 2014 and earlier.
c. If SQL Server Services can’t be restarted due to RTO or RPO, then try the above DBCC commands after understanding the impacts clearly.
d. Shrinking tempdb database or data files is not a recommended approach and hence never do that in your Production environment unless otherwise there are no other options.
Conclusion
We have learned more about the internals of how tempdb works so that we can configure tempdb for better performance avoiding contention issues on tempdb. We have also gone through the frequently faced issues in tempdb, measures available in SQL Server across various versions and how to handle it efficiently. In addition to that, we have examined why Shrinking of tempdb database or data files is not a recommended approach while dealing with tempdb database.
Tags: sql server system databases, tempdb Last modified: September 11, 2023