
As a database administrator, I started my journey in deploying managed SQL databases on the cloud, and I highly recommend deploying Azure SQL.
Azure SQL belongs to the family of managed resources on the Azure cloud platform that runs the very familiar SQL Server engine. For most of these database resources, the Microsoft Azure platform takes care of the management, scalability, reliability, and performance recommendations. It also provides the underlying infrastructure to run the SQL Server database engine. Thus, the database administrator can focus on other aspects of work in the cloud.
For most MS SQL database administrators, managing Azure SQL will be easy. The Azure SQL database engine runs on virtual machines. You can apply your usual database administration and management skills to it. If you want to brush up on your cloud skills as a database administrator, you can refer to the following guideline for more information and teaching videos.
Connectivity Catches to Notice and Avoid
When planning to deploy your Azure SQL server, you have to consider some essential aspects, so that you can connect to Azure SQL database securely. Most use cases relate to connectivity from a virtual machine that is running your client application and is deployed within the Azure virtual network to the managed Azure SQL.
Check the below solution diagram below for guidance:
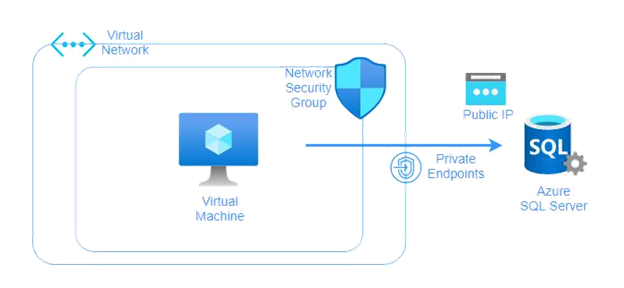
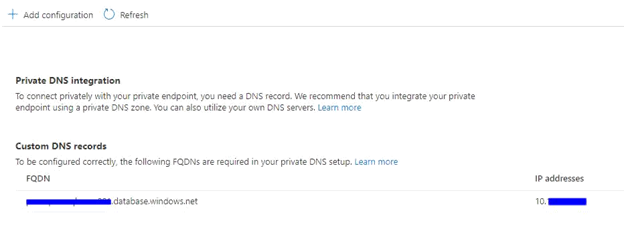
When you deploy an Azure SQL Server, you will note that the resource comes with a public IP assigned by Azure. Also, it will be assigned a DNS similar to the naming convention mydatabasename.database.windows.net. If you perform the nslookup to this DNS name, depending on the Azure region you chose, the result will return a public IP that is taken from the Azure public IP ranges database. The list of Azure public IP ranges is here – it is updated regularly with every new region announced by Microsoft.
According to our deployment diagram above, if you want your virtual machines to run your client applications to talk to your Azure SQL, you should assign an Azure private endpoint and attach it to the Azure SQL Server. This private link will allow your client application to establish a connection with Azure SQL database via a private IP. This reduces latency and improves throughput. Once the Azure private endpoint is created, it will get a private IP taken from the Azure virtual network.
However, you need to match additional requirements to allow network traffic. If the client is the Azure Virtual Machine, you can accomplish the task using Network Security Groups (NSG) with service tags
Just select SQL from the Service Tags dropdown list when adding a new inbound or outbound rule:
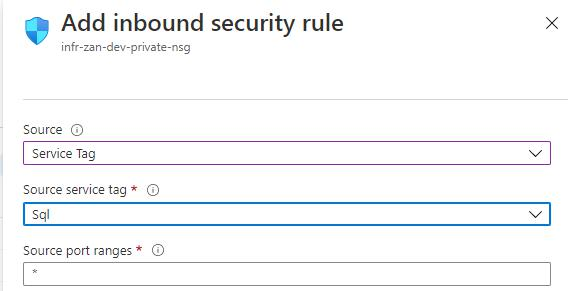
If the client that has to establish a connection is located on the workstation on-premises, you may need to consult your network admin to allow network traffic through the corporate firewall.
SQL Server Connection: Common Errors and Ways to Fix
One of the most common connectivity errors that take place when you are trying to establish a connection with your Azure SQL Server is as follows:
A network-related or instance-specific error occurred while establishing a connection to SQL Server. The server was not found or was not accessible. Verify that the instance name is correct and that SQL Server is configured to allow remote connections. (provider: TCP Provider, error: 0 – A connection attempt failed because the connected party did not properly respond after some time, or established connection failed because the connected host has failed to respond.) (Microsoft SQL Server, Error: 10060)
This very long error message means that your Azure SQL Server is not accepting connections from the virtual machine inside the Azure virtual network because it is blocked or missing a configuration. Also, the reason might be the absence of an open port outbound rule in the network security group of your virtual machine.
For some database administrators who are new to Azure SQL, this can be daunting. However, let me share with you one thing that will help you solve this problem.
It is usually found on missing outbound ports from the network security group attached to your virtual machine. Thus, in the Azure portal, go back to your virtual machine and the network security group, and revise the outbound rules:
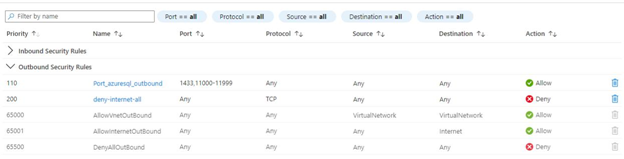
If it is not in your outbound rules, you need to add an allow rule. It must be in the outbound communication from the client (virtual machine) to all Azure SQL Server addresses in the region on ports in the range of 110000 – 11999.

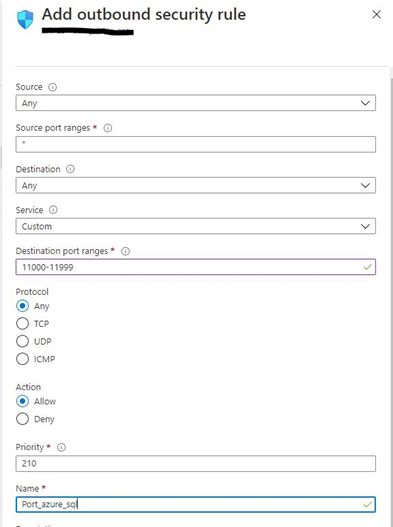
Create a new allow rule under the Outbound port rules tab:
- Both the source and destination should have Any value selected from the dropdown list.
- In the Destination port ranges, enter the value 1433 and 11000-11999. You can have a single outbound rule with both the port entries separated by a comma in the format like 1433, 11000-11999.
- In the Protocol field, select Any.
- The Priority value will depend on the number of outbound rules existing in your network security group.
- Click Save.
With this new outbound rule, we allow our virtual machines to connect to the Azure SQL Server. Add this rule to other network security groups that are attached to your virtual machines.
One more case is testing connectivity to the Azure SQL Server from the local workstation or a client which is not part of your secure corporate network. Here, you need to whitelist the static IP address of your client or your laptop.
You can do this by checking the networking configuration of the Azure SQL Server as shown in the screenshot below.
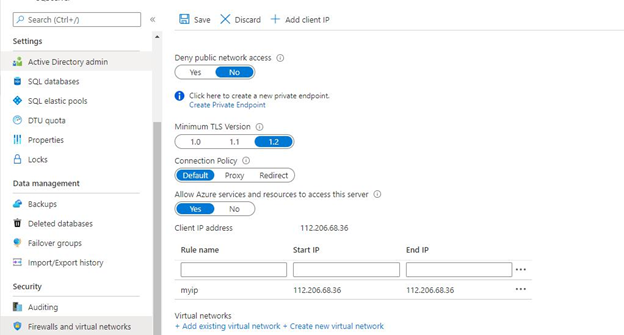
This should fix the connectivity issues.
Options Available to Connect to Azure SQL Database
There are 3 options:
- Redirect. It is the recommended practice, and I have described it above. This connectivity setup reduces latency as we are establishing connectivity from the client or virtual machine directly to the Azure SQL.
- Proxy. You are trying to establish connectivity to Azure SQL from outside the Azure virtual network, say your laptop, then connect to your corporate network, and then – to Azure SQL. In this case, latency increases, as you need to pass through the Azure gateways to connect successfully to the Azure SQL.
- Default. This configuration is in place after you have deployed Azure SQL. Afterward, depending on your use case, you configure connectivity either with a redirect or proxy setting.
Conclusion
Thus, we have examined different connectivity options and understood their impacts on Azure SQL deployment and client configuration from the Azure virtual network or outside the corporate network.
Hopefully, will help you to save your time and free from headaches of the connectivity issues troubleshooting.
Read More
Deploying a Database on Azure SQL
How SQL Server 2016 Took Azure SQL Data Warehouse to Next Level
Migrating SQL Server Database to Azure SQL (PaaS)