
A vital part of preventing any kind of data loss in any situation is having appropriate backup and recovery policies. It is also essential to ensure data recovery at any point in time of the application workflow life cycle. Both MySQL and MariaDB offer solutions for these cases. This article will explore the existing options and procedures as well as other potential backup options for MySQL and MariaDB.
Backup Strategies
As data is the most important part of any application, protecting its integrity is vital for surviving in the battle of existence. Any disruption of the data accessibility or integrity for any time is likely to harm the application and the business/service it is providing severely.
To ensure successful application workflow and business continuity, you need to implement suitable backup and recovery policies with daily, weekly, monthly, and yearly backups. Such backups will run at critical periods, such as:
- before a daily batch window;
- before massive data ingestions;
- before any application upgrade;
- weekly, monthly, and yearly backups to satisfy regulatory requirements;
- or other daily/weekly scheduled maintenance.
Backup tools
MySQL and MariaDB offer several ways to set up and execute backup and recovery plans. These methods include physical backups with MySQL’s Enterprise mysqlbackup tool, MariaDB’s mariabackup tool, or Percona’s XtraBackup tool. Also, logical backups created with the Mysql’s mysqldump tool may come in handy. Another option is the point-in-time recovery with the databases bin-logs (the transaction logs) in combination with the tools mentioned earlier.
You may assimilate suitable methods into your backup strategy to maximize the database recoverability in case of failure or disaster.
Note: In the MariaDB version 10.4.6, mysqldump’s symlink is called mariadb-dump. In the later versions, including 10.5.2, the names changed again – mysqldump became symlink.
To illustrate the procedures, I will use the mariabackup tool to create physical backups. The tool’s basic functionality is the same as in the aforementioned tools, though there are some slight differences unique to each tool.

Physical Database Backups
Physical backups are file-level backups that provide you with fast file copying methods. Such backups are preferable in disaster-recovery scenarios, cloning databases, and/or creating slave databases.
When making physical backups, you may choose to create full or incremental backups. Full backups include a complete backup of the database server. Incremental backups save changes from the last full or incremental backup only.
Important: The size of the database regulates the time of the backup. For that reason, a good strategy to backup a very large database may be to combine full and incremental backups. This way, you save both the backups storage space and the total backup and recovery time.
Another moment that you should notice is that when you recover the data from a physical backup, you must stop your MySQL/MariaDB database instance process until the final recovery steps are completed.
You can carry out the execution of a simple full physical backup as follows:
 mariabackup --backup \
   --target-dir=/data/backups/mariadb/D20210220 \
   --user=backupuser --password=backuppasswd
The –target-dir option tells the backup tool where to place the backup.
In this example, I have organized my backup into the directory called DYYYYMMDD where each full backup is stored (D stands for Daily). In doing so, we have an easy course of action to restore the database from the backup taken at a specific date.
The next example demonstrates executing a simple incremental backup:
mariabackup --backup \
   --target-dir=/data/backups/mariadb/D20210220_inc1/ \
   --incremental-basedir=/data/backups/mariadb/D20210220/ \
   --user=backupuser --password=backuppasswd
The subsequent incremental backup would look along these lines:
mariabackup --backup \
   --target-dir=/data/backups/mariadb/D20210220_inc2/ \
   --incremental-basedir=/data/backups/mariadb/D20210220_inc1 \
   --user=backupuser --password=backuppasswd
The –incremental-basedir option instructs the backup tool to use the previously taken full or incremental backup as a starting point in building incremental delta files for the current backup. This way, it builds a chain of one full backup with subsequent incremental backups. Together, they form one single backup to restore when needed.
Now, let’s find out what is the name of the physical database file in which all directory data is stored. The database that is located on Domain Controllers is an Active Directory. This directory is used to manage users, data, etc. The core of an Active Directory is the NTDS.DIT database file which consists of link, security descriptor, and data tables. All the directory data is kept in this physical database file.
It’s necessary to distinguish between physical and logical files. Actual system data is located in physical files, while logical files contain the description of records stored in physical files.
The task of restoring the MySQL database from physical files might be difficult sometimes. The mysqldump command might be helpful in this case. We will cover this topic further.
Logical Database Backups
Logical backups are created with the mysqldump tool. This backup method is more flexible than physical backup. It consists of all the DML and/or DDL SQL statements necessary to form a consistent backup, combining all committed data and changes made before and during the backup. If you want to know more about how to backup and restore all databases, you can read this article.
The logical backup can be a single file or multiple files (created with a specific script). Further, you can restore the structure and/or data without shutting down your MySQL/MariaDB instance (process). Accordingly, logical backups are performed on a database and/or table level, while physical backups are on a filesystem level (directories and files).
Note also that logical backups are exclusively full backups images of the intended databases and/or tables.
Creating a logical backup of the entire MySQL/MariaDB instance is below:
mysqldump --all-databases --single-transaction \
 --quick --lock-tables=false \
 -u backupuser -p backuppasswd \
> /data/backups/mariadb/logical/D20210220/full-backup-$(date +'%Y%m%d_%H%M%S').sql
Notice that physical backups and logical backups are specifically distinguished in the filesystem for backup management purposes.
Unlike the previous example, a logical backup of a single database (schema) is created in the following way:
mysqldump empdb --single-transaction \
 --quick --lock-tables=false \
 -u backupuser -p backuppasswd \
> /data/backups/mariadb/logical/D20210220/empdb-full-backup-$(date +'%Y%m%d_%H%M%S').sql
Finally, to create a logical backup of a single table in a database, add the table’s name after the database:
mysqldump empdb departments --single-transaction \
 --quick --lock-tables=false \
 -u backupuser -p backuppasswd \
> /data/backups/mariadb/logical/D20210220/empdb-departments-full-backup-$(date +'%Y%m%d_%H%M%S').sql
When you need to edit and add the DROP DATABASE or DROP TABLE statements to the recovery scenario, working with large backup files may have constricting effects on text editors to the point of them choking.
In such cases, consider adding other options, such as –add-drop-database and/or –add-drop-table to include these DROP statements into the backup. In other scenarios, you may want to exclude these statements and substitute them with the –skip-add-drop-table option to the command.
However, you can also create the data-only or DDL-only backups using –no-create-info or –no-data options. Separate data and structure backups can be a good choice in some recovery scenarios, especially when you only need the DDL structure to create an empty cloned database and/or its tables.
Backing up Database Using Disk Snapshots
As the data grows, it may become necessary to organize it on several disks and/or filesystems. Besides the performance reasons, as I/O is distributed across multiple disks/filesystems, you have to ensure that efficient backup and recovery strategies include the disk and filesystem snapshot capabilities.
Start by designing and building the filesystem layouts where each database, group of tables, and indexes reside. Then, organize your tables and configure the database system. They should either reside all in a single directory:
innodb_home_dir = /<path where your InnoDB tables will reside>Or, you may use the DATA_DIRECTORYand INDEX_DIRECTORY options in the CREATE table statement to distribute them separately to different filesystem locations.
For InnoDB, make sure to use file_per_table = ON (default ON in newest versions). Choose the path for the InnoDB tables carefully when you create them. It is impossible to change the path without dropping and re-creating the table.
It is helpful to have proper filesystems with built-in snapshot capabilities, e.g. XFS and ZFS on Linux. Notice that creating the snapshot backups is similar to creating physical backups, but it has specificities. It requires stopping the writing process (FLUSH with READ LOCK or similar — see the BACKUP STAGE command in the MariaDB online documentation) before taking the snapshot and releasing LOCKS immediately after the completion of the snapshot. It is necessary to ensure data consistency.
You should consider and use the snapshot backups in disaster recovery scenarios. However, they are also suitable for cloning database instances.
Recovery Strategies
Recovery from Physical Backups

Previously, we’ve described the physical backup steps. This way, you can either build up a chain of full backups or a chain of full and incremental backups. The latter option means that a full backup followed by a subsequent incremental backup is point zero if a failure happens.
For instance, a DBA takes full backups on Sundays and incremental backups on other days. A failure occurs after making an incremental backup on Wednesday. Therefore, they need to restore the database. Under such circumstances, our DBA has to use the full backup made on Sunday and incremental backups made on Monday, Tuesday, and Wednesday. If there were daily full backups, it would be sufficient to restore Wednesday’s backup.
To recover the “nearest” backup after a failure, whether it is a full or incremental backup, you need to ensure that ALL backup files are point-in-time consistent with the time of the nearest backup finish. Otherwise, the InnoDB engine will reject the data by deeming it corrupt.
Another key point is, when you prepare backups, copy the involved full backups to another location before applying the steps to ensure point-in-time consistency. This way, you preserve the original backup state, which may be handy later. I strongly recommend using sticking to this approach.
To prepare a full backup, pick the nearest one to the failure, copy it to the preferred location, and execute the following command:
mariabackup --prepare \
   --target-dir=data/backups/mariadb/COPY_D20210220
To restore to the nearest incremental backup, prepare a copy of the nearest full backup and add all relevant incremental backups in a subsequent order. The restored database image should be as follows:
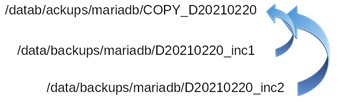
We achieve this by executing the prepare command for each incremental backup as shown below:
mariabackup --prepare \
   --target-dir=/data/backups/mariadb/COPY_D20210220 \
   --incremental-dir=/data/backups/mariadb/D20210220_INC#
After preparing the backup copy, we must shut down the database instance (process). Also, we must empty the database directory before finishing the restore process. You can issue either the command with the –copy-back option
mariabackup --copy-back \
   --target-dir=data/backups/mariadb/COPY_D20210220
or with the –move-back option:
mariabackup --move-back \
   --target-dir=data/backups/mariadb/COPY_D20210220
The latter command moves the copied directory into the database directory. Copying the original backup to another location is a wise choice. Otherwise, the backup will be lost, as won’t be able to use it for other situations and scenarios.
The last step before starting the database instance is to adjust the ownership of the files to match the user and the group of the process owner. Typically, it is MySQL.
Recovery from logical backups
Quite often, we overlook one key point when recovering databases and/or tables using logical backups. This point is setting the max_allowed_packet size of the session (it may be wiser to set it globally) to the maximum value of 1073741824. It is necessary to ensure that large buffers and INSERT statements fit into a single packet between the client and server. This should reduce the recovery time.
Another key aspect when making a backup is to include or exclude the DROP statements as mentioned earlier. We need it to ensure running the backup restore process as smoothly as possible. With that in mind, use the below code to execute the backup restore:
mysql -u backupuser -p backuppasswd < /data/backups/mariadb/logical/D20210220/emp-full-backup-20210228_153726.sqlIf you don’t have any database included in the backup, as with individual database backups, or you need to redirect the restore to another database, use a different code:
mysql -u backupuser -p backuppasswd newemp < /data/backups/mariadb/logical/D20210220/emp-full-backup-20210228_153726.sqlRecovery with disk snapshots
To recover from the disk snapshot always begin by ensuring that the database system is shut down before the recovery process is executed. Any attempt to recover a live database using the disk snapshot will result in data inconsistencies and, more likely, data corruption.
Point-in-time recovery
Point in time recovery (PITR) is, as the name implies, a method to recover databases and tables as close to the time before the failure. Or, if the daily batch process has failed and needs to be re-executed, you also have the only option – do PITR backup recovery.
It is vital to enable the database bin-log and set the bin-log format to either Statement-Based, Row-Based, or Mixed logging, depending on the type of workload your database is running. Further, you may need to enable compression using log_bin_compress = ON (default OFF) to save the disk space.
As bin-log is a transaction log and created in a sequence, it is crucial to make a backup of all logfiles. As for the PITR process, it is impossible without logfiles. Besides, the bin-log maintenance and life-cycle should follow the life-cycle of any full and incremental backups. Thus, make sure to only purge the logs that are older than the oldest backup in the backup policy.
You can purge binary logs in two ways. First, it is by declaring the nearest bin-log name to the oldest backup as shown in the below purge command:
PURGE BINARY LOGS TO 'mariadb-bin.000063';Second, it is by declaring the date of the oldest backup kept in the purge command:
PURGE BINARY LOGS BEFORE '2021-01-20 00:00:00';To prepare for recovery, we need to retrieve all the necessary statements to replay to the necessary point in time. Collect all bin-logs available from the time the backup started to the point in time you are recovering.
Begin by examining the log list from the time the backup ended to the PITR time:
mysqlbinlog --start-datetime=<backup end datetime> --stop-datetime=<PITR datetime> \
<list of binlogs> \
> temporary_file.sql
Then, examine the temporary files to find the exact log positions you want to apply and use. These are –start-position and –stop-position that set the exact positions in the command and re-execute the mysqlbinlog command:
mysqlbinlog --start-position=<exact log start position> --stop-position=<exact log position to stop on> \
<list of binlogs> \
> final_temporary_PITR_file.sql
At this point, the recovery process has begun. It uses either physical or logical backups, full or incremental.
Finish the recovery by applying the final_temporary_PITR_file.sql using the MySQL client as shown below:
mysql -u backupuser -p backuppasswd < final_temporary_PTR_file.sqlWe have completed the PITR recovery by restoring the backup and replayed transactions from the log to the nearest point to the moment of the failure occurrence.
Workbench
For database design and development, testing and maintenance in MySQL and MariaDB, we can use a Windows application Workbench. It works on Linux, too. With this application, users can design databases, view and change meta data, transfer data and meta data, and much more. It’s worth adding that it’s possible to use dbForge Studio for MySQL instead of Workbench.
Conclusion
Altogether, we have briefly discussed and illustrated the database backup and recovery techniques with tools and methods available in MySQL and MariaDB.
To recover the database system from any failure successfully, we must implement both physical and logical backup methods mentioned above into the policies and plans, from the whole system down to individual tables.
To perform a PITR successfully, we need the bin-log enabled and proper log-management needs in place.
However, using only one backup method and missing bin-logs would be the wrong approach. It can result in data loss and harm your application’s business continuity. Thus, combine different methods and always include the log files into the backup and restoring policies!