
This article explains the step by step deployment process of the SQL Server Log shipping. It is the database-level disaster recovery solution that is easy to set up and maintain.
The log shipping involves three steps:
- Generate the log backup on the primary database.
- Copy the backup to the network location or the specific directory on the secondary server.
- Restore the log backup on the secondary server.
The log shipping technology performs the steps described above by using SQL Server agent jobs. During the configuration process, the log shipping wizard creates those jobs on primary and secondary servers.
Log shipping can be in two operational modes.
- Restore mode. The SQL Job restores transaction log backups on the secondary database. The state of the database is RESTORING, and it is not accessible.
- Standby mode. The SQL Job restores transaction log backups on the secondary database, but the database can remain in read-only mode. Therefore, users can perform read operations on it. By this option, we can offload the reporting application.
Note: the Standby mode has a drawback: the database is not available during the restore job execution. All users connected to the database must disconnect during that process. Otherwise, the restore job can be delayed.
The main disadvantage of log shipping is the absence of automatic failover support. To perform a failover, you must execute the following steps:
- Generate a tail-log backup and copy it on a secondary database server.
- Stop all log shipping jobs on the primary server.
- Restore the Log on the secondary server.
This process can delay the availability of the secondary database.
Now, we proceed to the step-by-step deployment process examination. First of all, we’ve prepared the workstation by setting it in the following way:
| Server Name | Role |
| SQL01 | Primary Server |
| SQL02 | Secondary Server |
| iSCSI\SQL2017 | Monitoring server |
| \\domain\Log Shipping Backups | Network Share to copy the backups |
Configure the Primary Server
The SQL01 acts as a Primary Server and the database. We are going to setup Log shipping between the AdventureWorks2017 database.
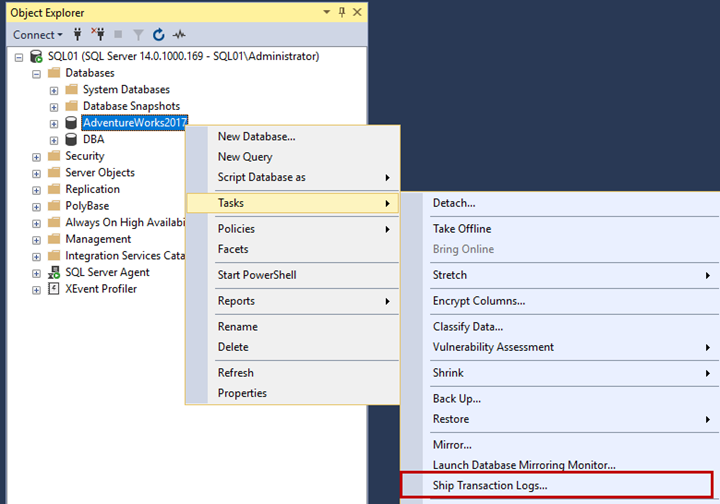
To configure the Log shipping, connect to the SQL01 instance:
- Open SQL Server Management Studio
- Expand Database
- Right-click on AdventureWorks2017
- Hover on Tasks
- Click on Ship Transaction Logs.
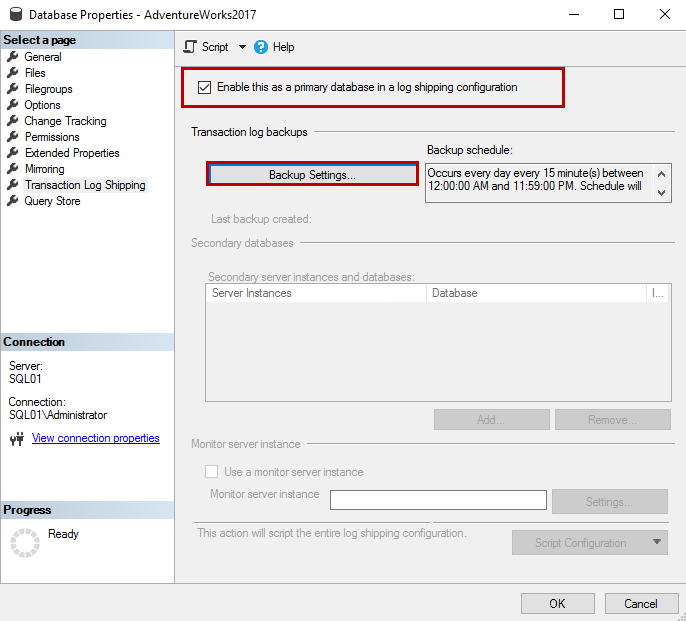
The Database Properties dialog box opens.
To enable log shipping, click on Enable this as a primary database in a log shipping configuration option.
To configure the transaction log backup schedule for log shipping, click on Backup Settings.
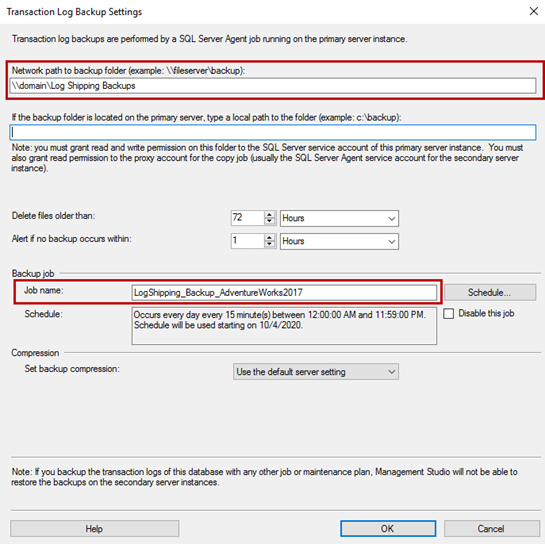
A dialog box, ‘Transaction Log backup setting’ opens.
In the dialog box, specify the network share where you want to copy the transaction log backups – the Network path to backup folder textbox. You can determine the backup retention period in Delete files older than stated in the textbox. If the backup job fails or the backup file does not occur for the time specified in the textbox, the SQL Server raises an alert.
In log shipping, SQL Server copies the log file backups to the network share. The wizard automatically creates a backup job during the deployment process. It makes a schedule automatically too, but you can change it by clicking on the Schedule button.
In my case, I have changed the name of the backup job to identify it. The name of the job is LogShipping_Backup_AdventureWorks2017.
I did not make any changes in the job schedule and backup compression settings.
Configure the Secondary Server
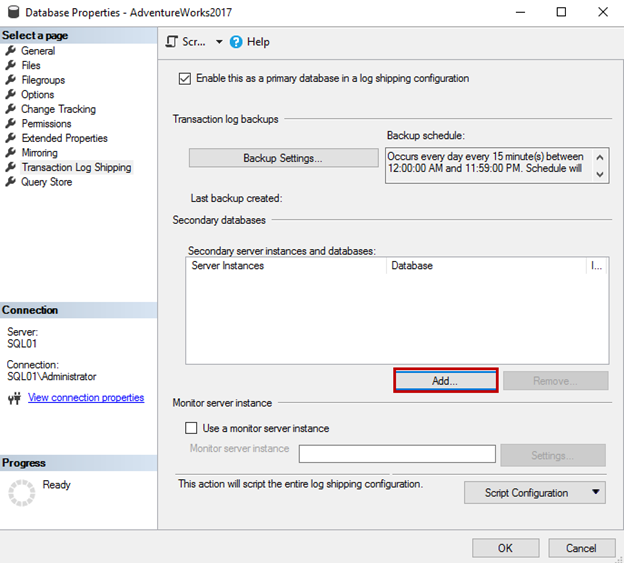
To add the secondary server and database, click “Add” on the Database Properties dialog box.
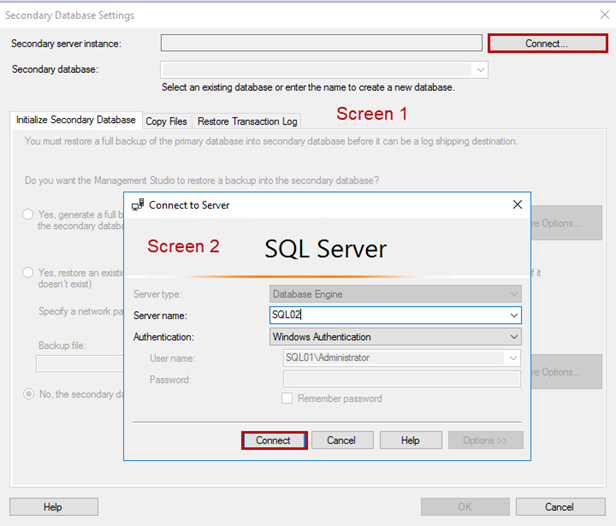
A dialog box named Secondary Database Settings will open. We must connect to the secondary database server. To do that, click “Add.”
A dialog box opens. Enter the server name and click Connect:
Secondary database settings configuration
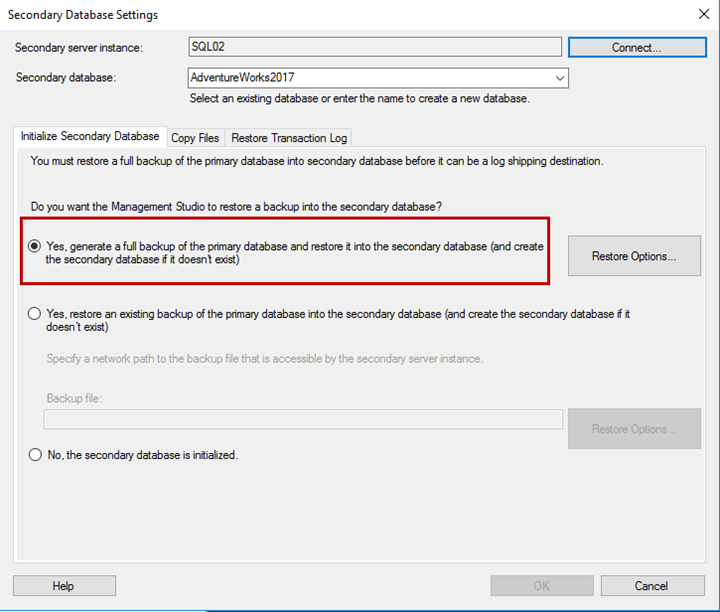
Initialize Secondary Database
In the initialize Secondary database tab, you can set up any of the following three options to restore the database:
- If the database does not exist on the Secondary server, you can generate a full backup and restore it on the secondary server. In this scenario, you can use the first option.
- If there is a database’s full backup generated by other backup jobs, or you have one already, you can restore it on the secondary server. In this scenario, you can choose the second option.
- If you have restored the secondary database with NORECOVERY state, you can choose the third option.
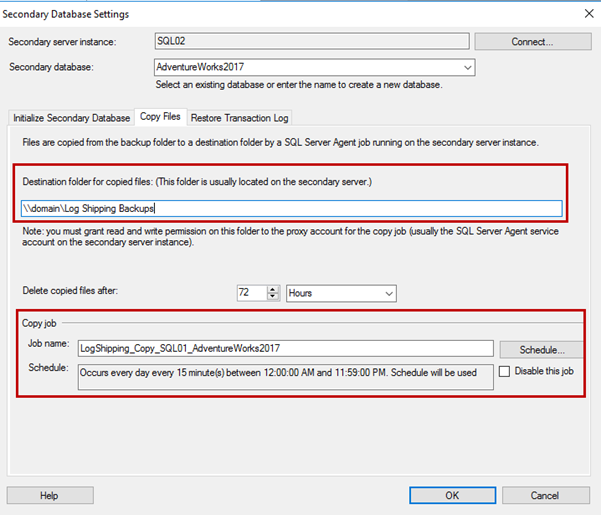
Copy Files
On the Copy files tab, you can specify the destination directory for copied backup files location. The retention period is also defined there.
The wizard creates a SQL Job to copy files to the destination directory. The backup destination folder is \\domain\Log Shipping Backups. The name of the copy job is LogShipping_Copy_SQL01_AdventureWorks2017.
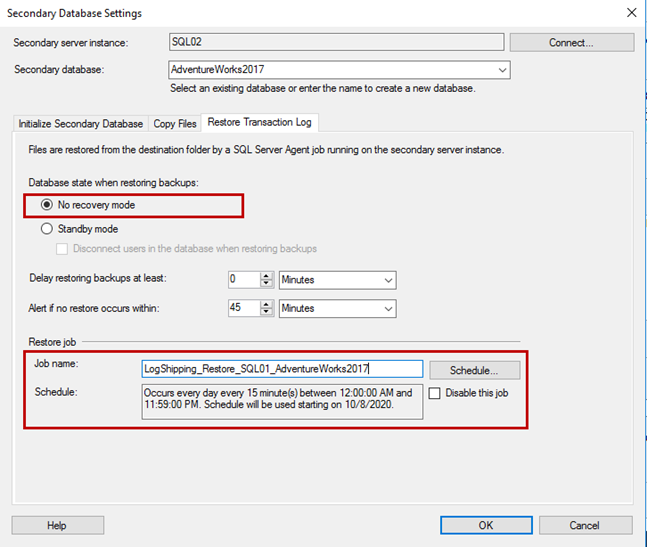
Restore Transaction Log
In the Restore Transaction Log tab, you can specify the database mode. If you want to keep the database in read-only mode, select Standby mode or choose the No recovery mode.
In this demo, we keep the database state as NORECOVERY. You can specify the backup restoration delay and configure alerts for backups not restored within a specified interval. In our case, we don’t use default settings.
The name of the restore job is LogShipping_Restore_SQL01_AdventureWorks2017.
Once the configuration is ready, click OK to save changes.
As you see, the secondary server and database have been added in “Secondary server instances and databases grid” on the Database Properties screen.
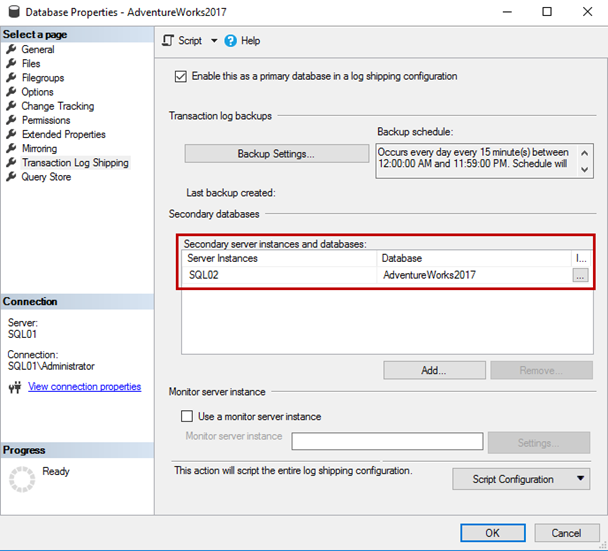
Configure Monitoring Instance
If you want to configure the Monitor server instance, put a checkmark for Use a monitor server instance. To add the monitor instance, click Settings.
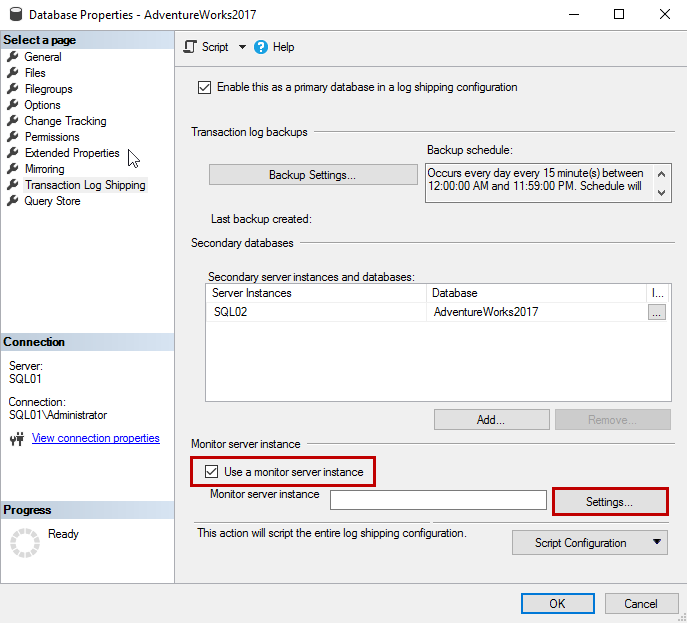
We are going to use iscsi\SQL2017 instance as a monitoring server of log shipping.
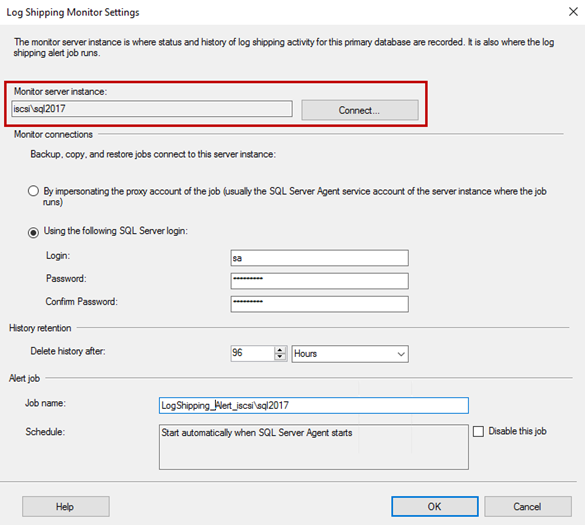
In the Log Shipping Monitor Setting dialog box, specify the name in the Monitor server instance text box.
We use the sa account to monitor the log shipping. Hence, you need to provide sa as the username and password. You can also specify the retention period of the monitoring alerts and history.
Here, we use default settings. The name of the alert job is LogShipping_Alert_iscsi\sql2017.
Click OK to save the configuration and close the dialog box.
You can generate a T-SQL script for the entire configuration by clicking on the Script configuration button. Either copy the configuration script to the clipboard or the file or open it in a new query editor window.
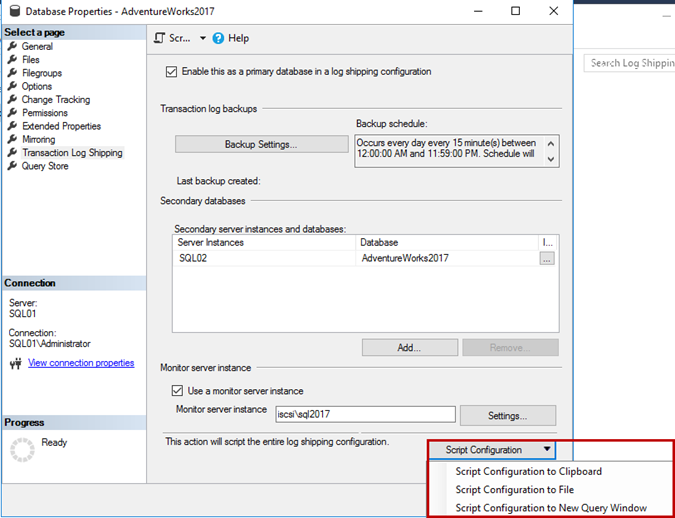
We do not want to script out the action. You can ignore this step.
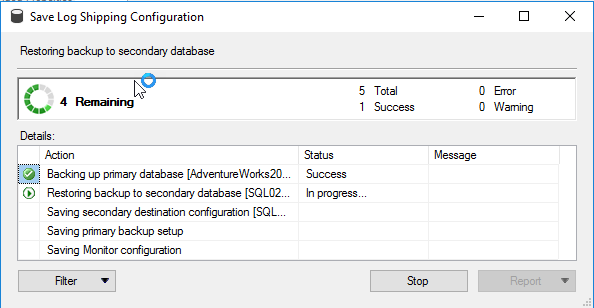
Click OK to save the log shipping configuration, and the process will start:
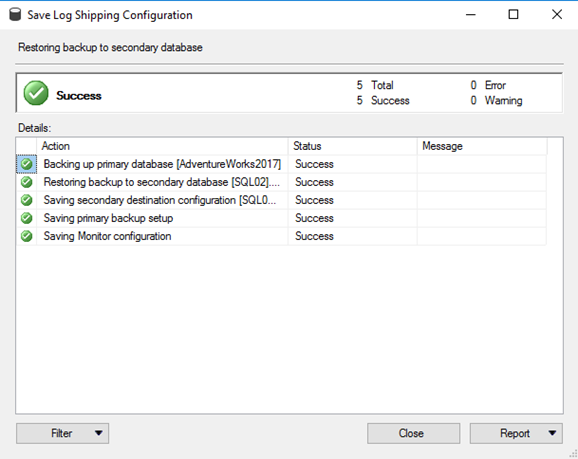
Once Log shipping is configured, you can see the success dialog box:
Test Failover Scenario
USE [AdventureWorks2017]
GO
CREATE TABLE [Person](
	[BusinessEntityID] [int] NOT NULL,
	[PersonType] [nchar](2) NOT NULL,
	[NameStyle] [dbo].[NameStyle] NOT NULL,
	[Title] [nvarchar](8) NULL,
	[FirstName] [dbo].[Name] NOT NULL,
	[MiddleName] [dbo].[Name] NULL,
	[LastName] [dbo].[Name] NOT NULL,
	[Suffix] [nvarchar](10) NULL,
	[EmailPromotion] [int] NOT NULL,
	[ModifiedDate] [datetime] NOT NULL,
 CONSTRAINT [PK_Person_BusinessEntityID] PRIMARY KEY CLUSTERED
(
	[BusinessEntityID] ASC
)WITH (PAD_INDEX = OFF, STATISTICS_NORECOMPUTE = OFF, IGNORE_DUP_KEY = OFF, ALLOW_ROW_LOCKS = ON, ALLOW_PAGE_LOCKS = ON) ON [PRIMARY]
) ON [PRIMARY]
GO
Execute the following query to insert demo data:
insert into [Person]([BusinessEntityID],[PersonType],[NameStyle],[Title],[FirstName] ,[MiddleName],[LastName] ,[Suffix] ,[EmailPromotion],[ModifiedDate])
select top 10 [BusinessEntityID],[PersonType],[NameStyle],[Title],[FirstName] ,[MiddleName],[LastName] ,[Suffix] ,[EmailPromotion],[ModifiedDate]
from Person.Person
To perform failover, take a tail-log backup of the adventureworks2017 database. Execute following query:
Backup Log adventureworks2017 to disk='\\domain\LogShippingBackups\Tail_Log_Backup.trn' with norecoveryConnect to the SQL02 (secondary server) and restore the tail log backup using RESTORE WITH RECOVERY. Execute the following code:
RESTORE LOG [AdventureWorks2017] FROM DISK = N'\\domain\LogShippingBackups\Tail_Log_Backup.trn' WITH RECOVERYOnce the tail-log backup restores successfully, execute the query to verify that data is copied to the secondary server:
Select * from personQuery Output:
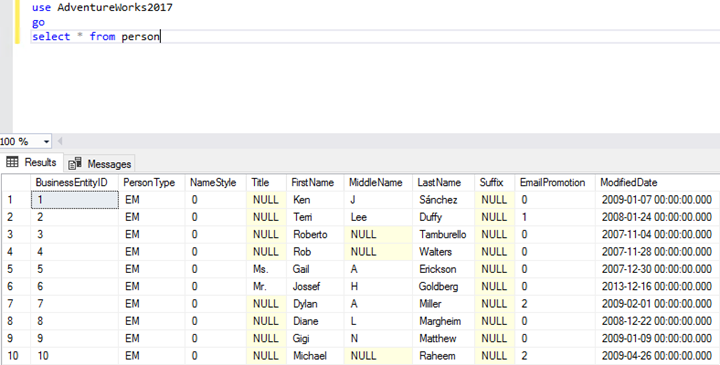
As you see, the data is restored on the secondary server.
Conclusion
In this article, we have explained the SQL Server log shipping process and how to configure it. We also demonstrated the step by step failover process of the log shipping.
Tags: database administration, sql server, transaction log Last modified: September 20, 2021