While using the SSIS data flow, we can perform ETL task that can be used for data migration, data offloading, design and implementation of the data warehouse.
In this article, I explain how to export data from an SQL table to excel and text file by using the SSIS data flow task.
In this demo, I will perform through the following steps:
1. Create an SSIS package and create ADO.NET connection manager.
2. Create data flow task that has ADO.NET source to populate data from SQL Server. Data will be written to excel file and text file hence configure flat file destination and excel destination.
3. Execute SSIS package and verify that data was written to excel and text files.
Create SSIS package and ADO.NET connection
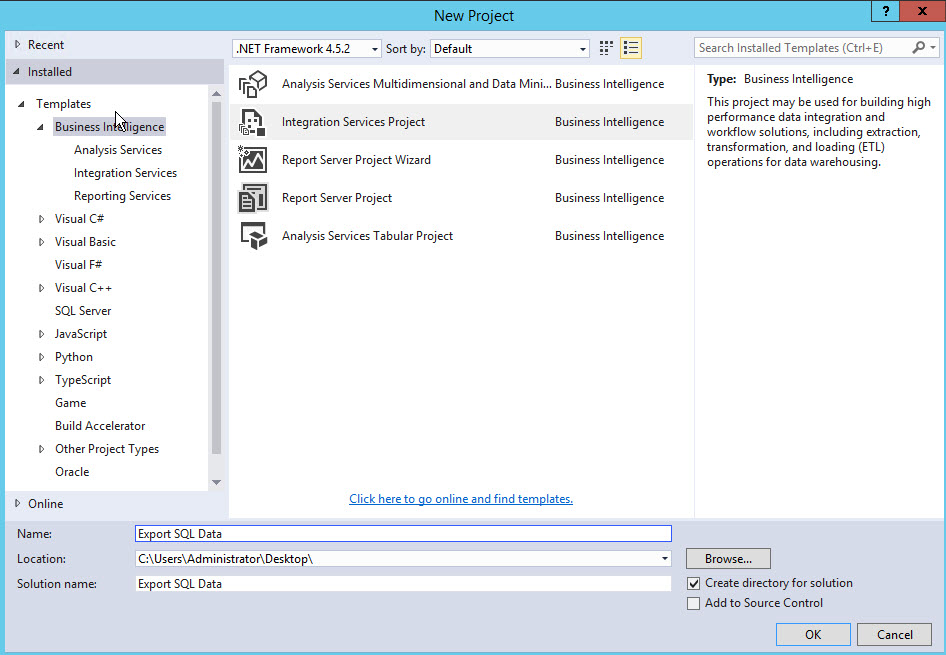
For this demo, I used SQL Server Data tools 2015. Firstly, I am creating a new Integration service project named “Export SQL Data”:
After the creation of an SSIS project, I will create the data flow task. Data flow task will use SQL Server as a source. Excel file and the flat file will be determined as the destination. Before the creation of the data flow task, we must create the ADO.NET connection.
Configure ADO.NET connection
As I mentioned above, I am going to use “WideWorldImportors” demo database that can be downloaded from here.
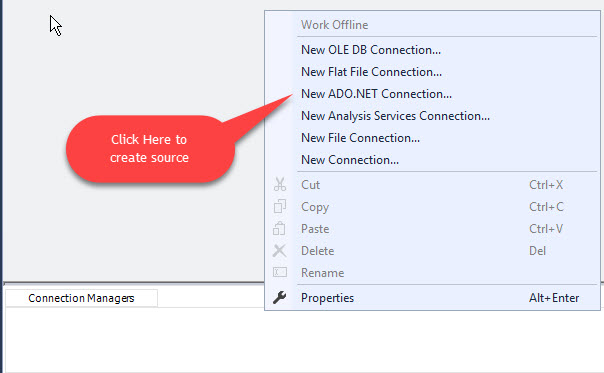
To create a “Source” connection, right click “Connection Managers” and select “New ADO.NET Connection” as shown in the image below:
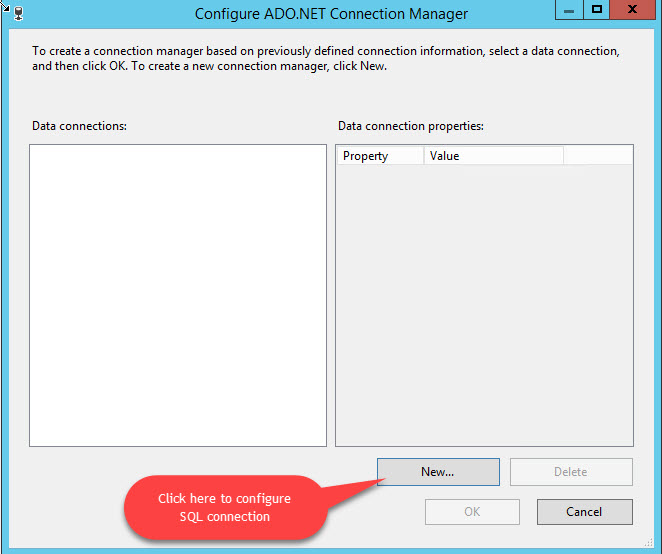
A dialog box “Configure ADO.NET Connection Manager” will open. In the dialog box, click on “New” as shown in the following image:
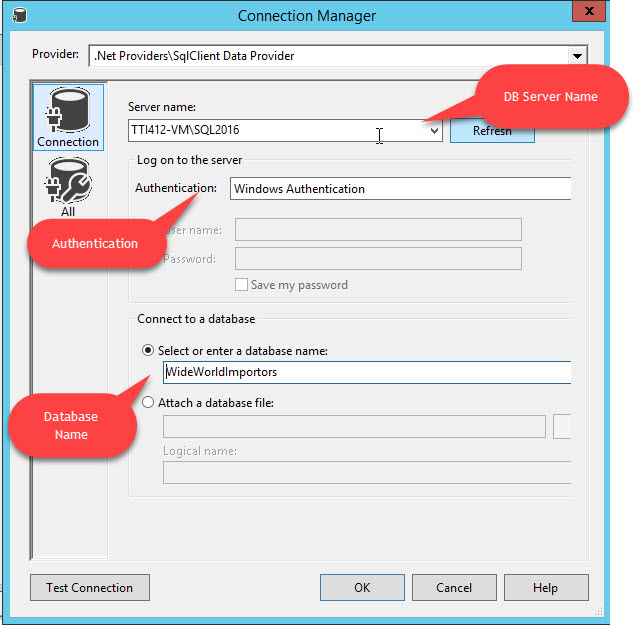
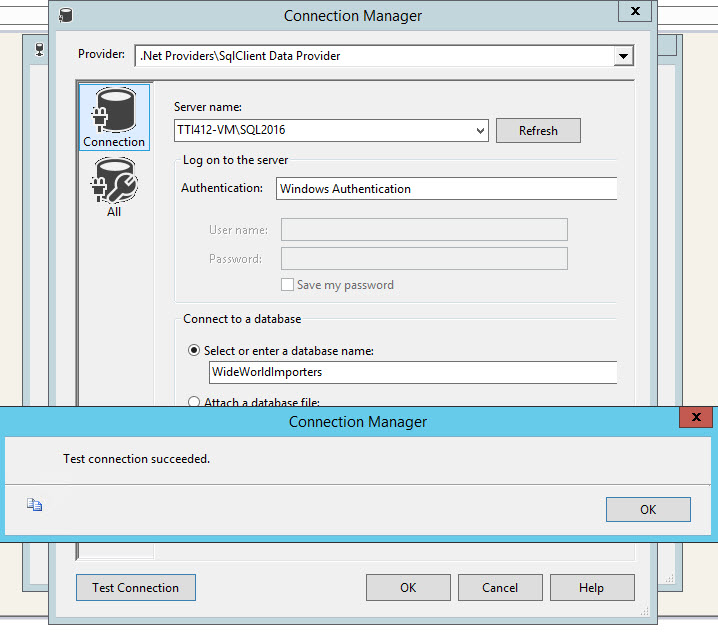
A dialog box “Connection Manager” will open. I will configure the SQL connectivity parameters:
1. Server Name – is the hostname or IP address of the database server where SQL is installed.
2. Authentication – is an “authentication type” used to connect Server that is selected on “Server Name” drop-down box. It can be either SQL Authentication or Windows Authentication.
3. Database Name – is the name of the database which we are going to use for data extracting.
In this demo, I am going to use my local VM. I will use windows authentication to connect the SQL instance and I am going to use “WideWorldImportors” database.
Look at the following image:
Click on “Test Connection” to verify the successful connectivity. Look at the following image:
Once SQL connection is configured, you will be able to see the connection in the “Connection managers” window. It is located in the bottom of the control flow window as shown in the following image:
Create Data flow task
Data flow task is used to move data between sources and destination. It can be used to perform ETL (Extract, Transform, and load) tasks. I will export data from SQL Server to Excel or Text file hence we will use the data flow task.
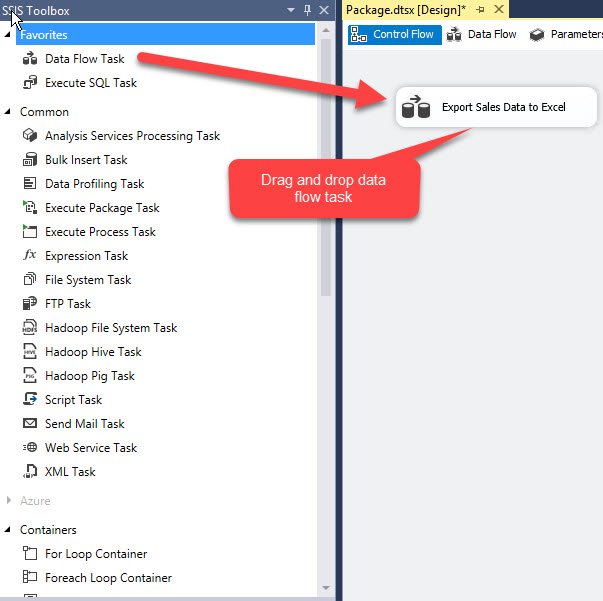
To configure the data flow task, firstly I will drag and drop the data flow task in the control flow window and rename it as “Export Sales Data to Excel” as shown in the image below:
Configure ADO.NET Source
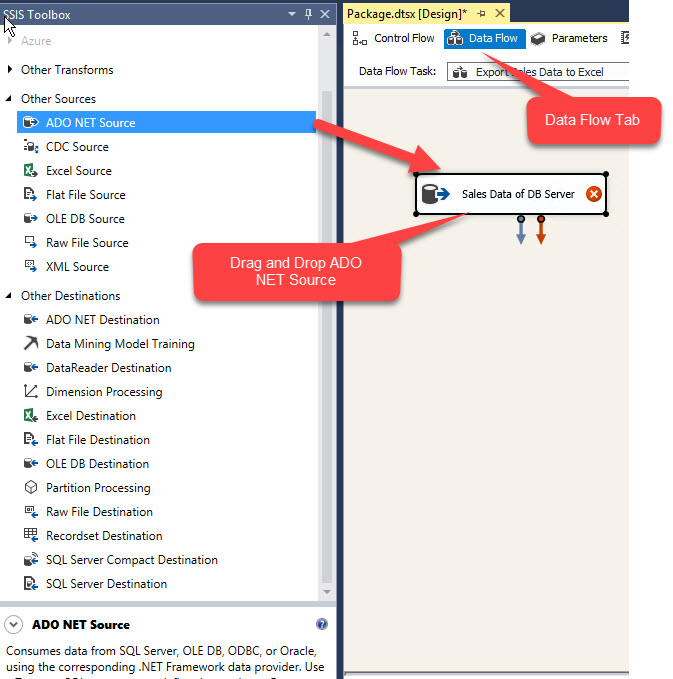
To populate data from SQL Server table, we must configure ADO.NET source component. Double-click on “Data flow task” to do that. The window “Configure Data flow task” will open. Alternatively, you can select “Data Flow” that is located next to “Control Flow”. As we already configured SQL connection, we will drag and drop ADO.NET Source to data flow window as shown in the image below:
Now we will configure ADO.NET Source in order to extract data from the table via querying SQL Server table. To do that, double-click “ADO Net source”. A dialog box will open. In the dialog box we must configure the following parameters:
1. ADO.NET Connection Manager – populates the list of ADO.NET connections created in SSIS package.
2. Data Access Mode has two options:
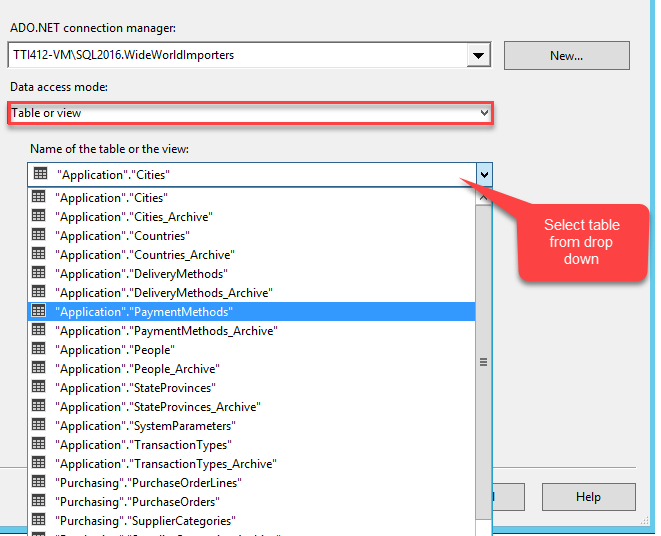
a. If you select “Table or View” in “Data access mode” drop-down box, “Name of the table or the view” dropdown will be filled with tables and views that exist in the database. See below image:
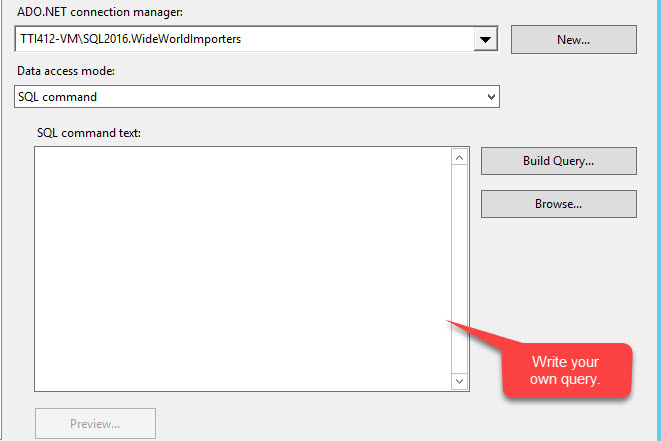
b. If we select “SQL Command”, it will open a multi-line text box where we can write the Ad-Hoc query to extract data from the database.
See below image:
We already created the ADO.NET connection, so in ADO.NET connection manager drop down to select the created name of it. In this demo, we are going to write our own query so data access method will be “SQL Command”.
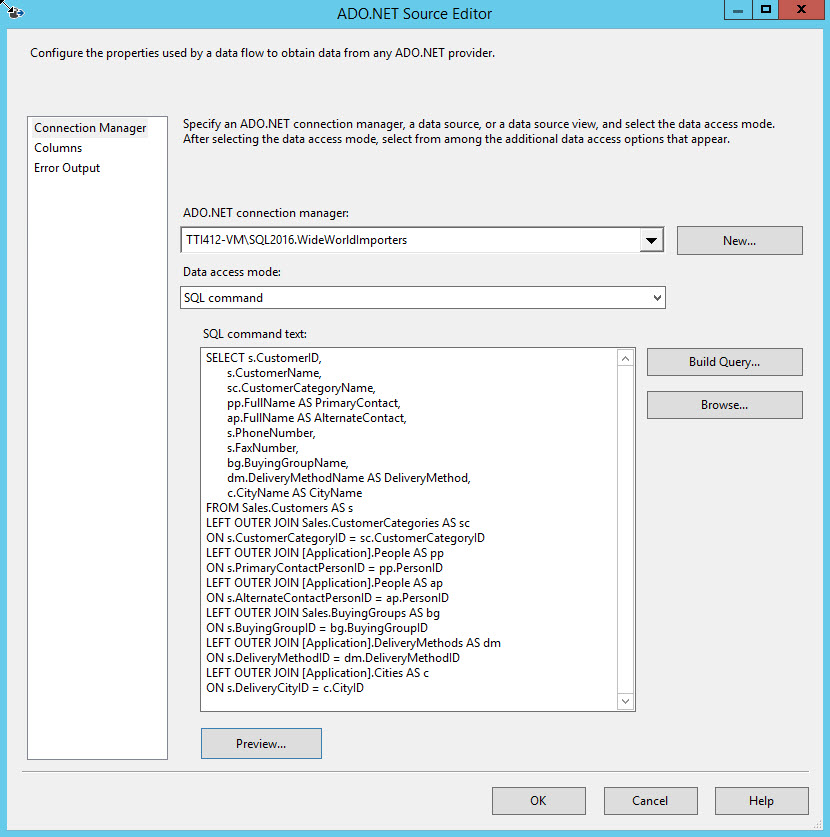
I created a query that will give me the list of customers from the database. This query is below:
SELECT s.CustomerID,
s.CustomerName,
sc.CustomerCategoryName,
pp.FullName AS PrimaryContact,
ap.FullName AS AlternateContact,
s.PhoneNumber,
s.FaxNumber,
bg.BuyingGroupName,
dm.DeliveryMethodName AS DeliveryMethod,
c.CityName AS CityName
FROM Sales.Customers AS s
LEFT OUTER JOIN Sales.CustomerCategories AS sc
ON s.CustomerCategoryID = sc.CustomerCategoryID
LEFT OUTER JOIN [Application].People AS pp
ON s.PrimaryContactPersonID = pp.PersonID
LEFT OUTER JOIN [Application].People AS ap
ON s.AlternateContactPersonID = ap.PersonID
LEFT OUTER JOIN Sales.BuyingGroups AS bg
ON s.BuyingGroupID = bg.BuyingGroupID
LEFT OUTER JOIN [Application].DeliveryMethods AS dm
ON s.DeliveryMethodID = dm.DeliveryMethodID
LEFT OUTER JOIN [Application].Cities AS c
ON s.DeliveryCityID = c.CityID
Finally, ADO.NET source editor will look like the image below:
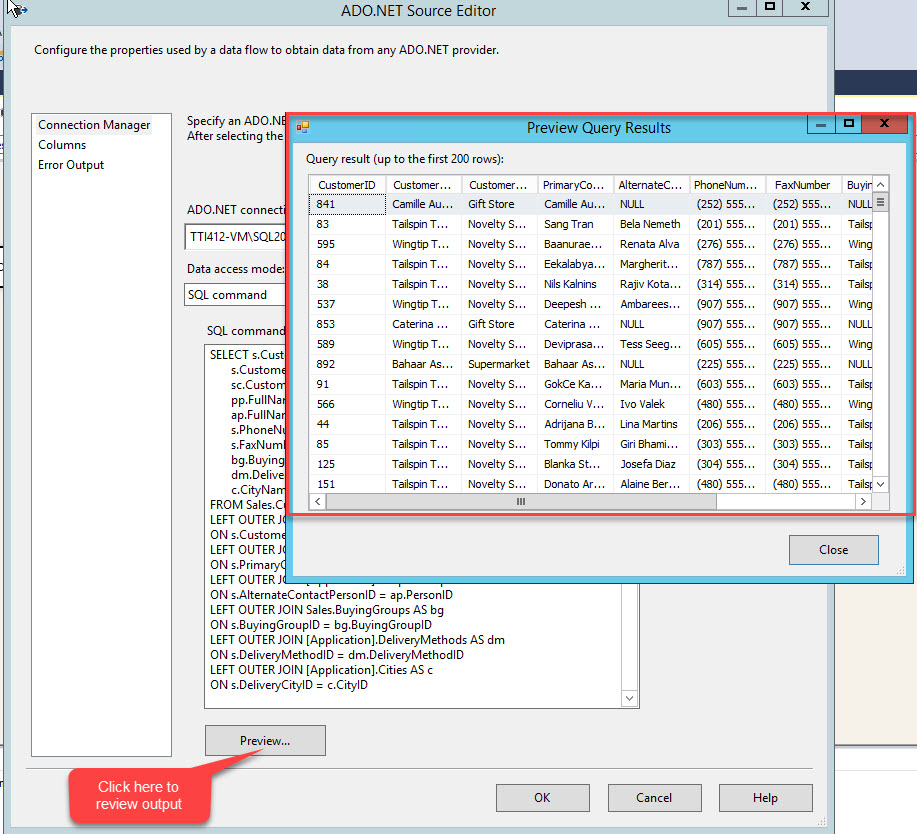
We can preview the output of the query by clicking the “Preview” button in the dialog box. Query result will be as is shown in the image below:
Configure excel destination
Once we configure ADO.NET source, we will configure Excel destination.
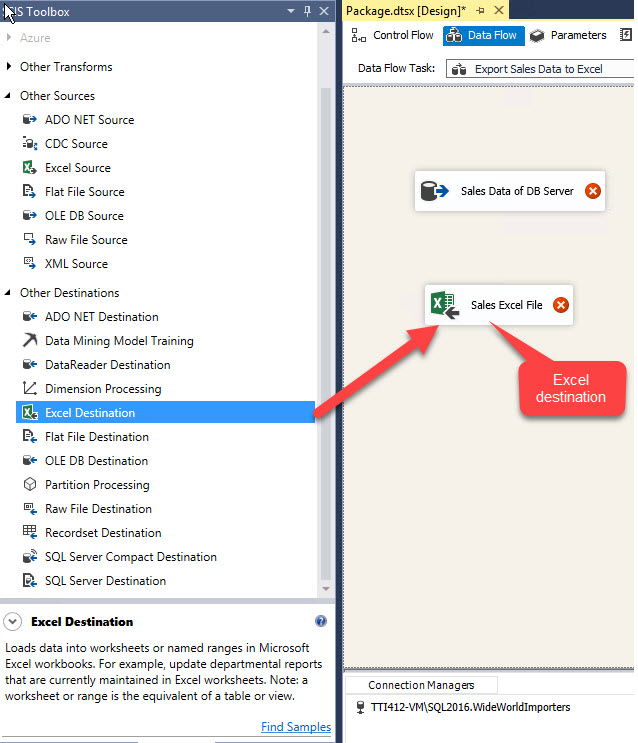
In SSIS tool-box, drag and drop excel destination in the data-flow window and rename it as “Sales Excel File” as shown in the image below:
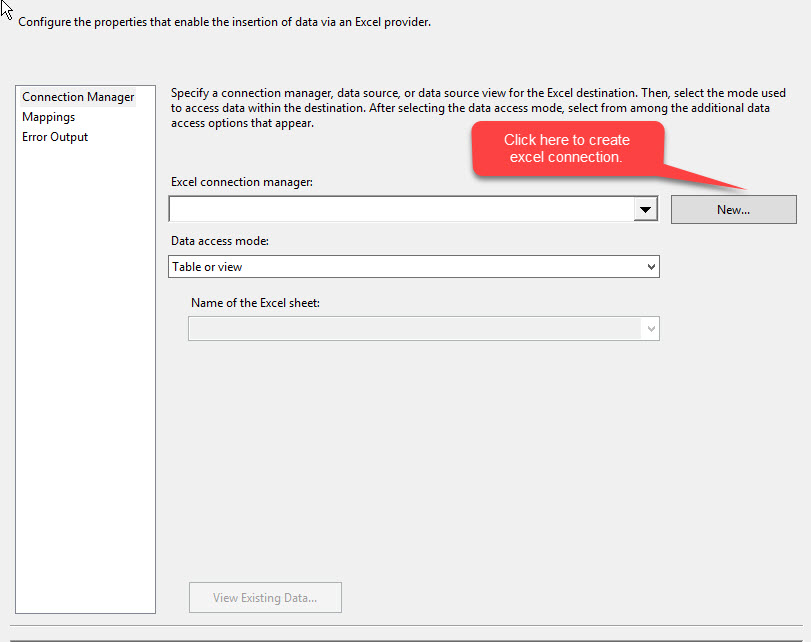
Double-click on the Excel destination. A dialogue box “Excel destination editor” will open to configure the following parameters:
1. Excel connection manager – used to connect the excel file.
2. Data access method. Excel worksheet is considered as a table or view. If you select “Table or View”, drop down box “Name of excel sheet” will be filled with all worksheets that are created in the excel workbook.
3. Name of excel sheet. By default, this drop-down box is disabled. It will be enabled automatically when we select “Table or View” as data access mode. We also can select appropriate excel worksheet.
We did not create excel destination connection yet, so firstly it is necessary to create an excel destination manager. To do that, click on “New” button next to “Excel connection manager” drop-down box as shown in the image below:
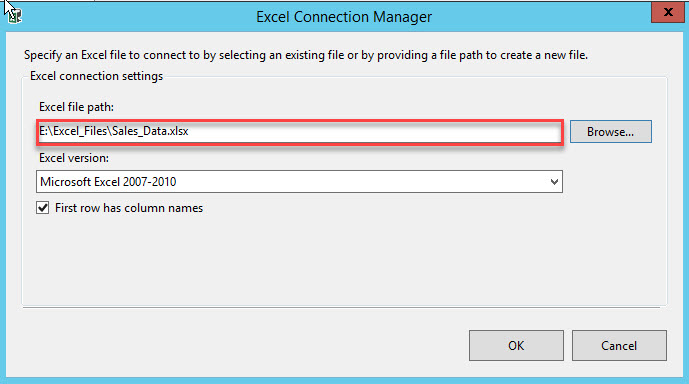
The dialog box “Excel connection manager” will open. Here we can configure:
1. Excel File Path – the location of the excel file.
2. Excel version – can select excel version from drop down box.
For this demo, I created an excel file and saved it on my computer. To locate the file, click on Browse, move through the file system, select the file and click OK, as shown in the image below:
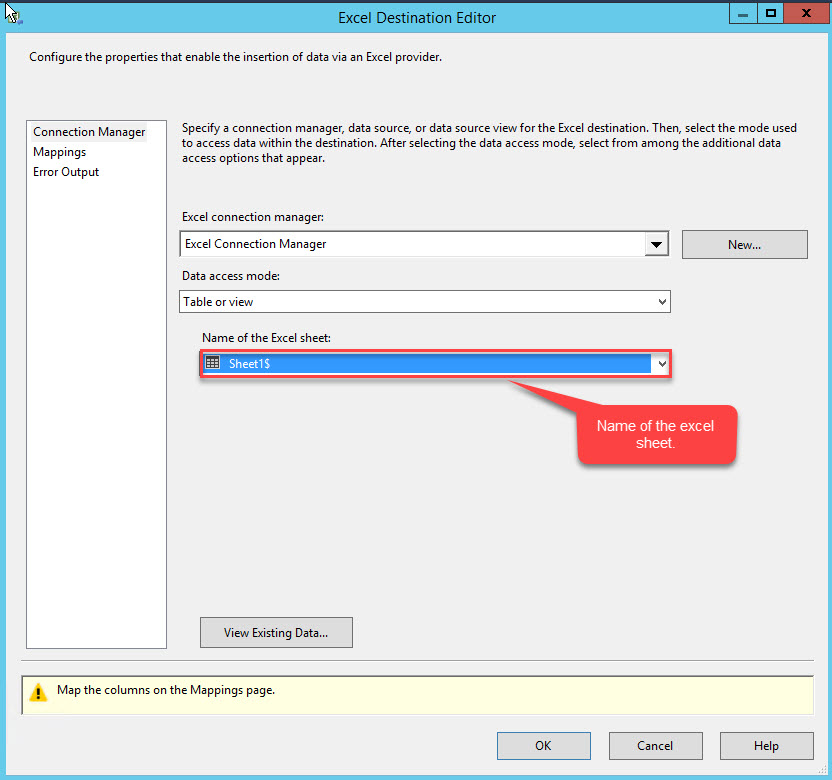
Now in select data access mode as “Table or view” in “Excel destination manager”. List of excel worksheets will be populated in drop down box. Select “Name of excel sheet” from drop down box as shown in the image below:
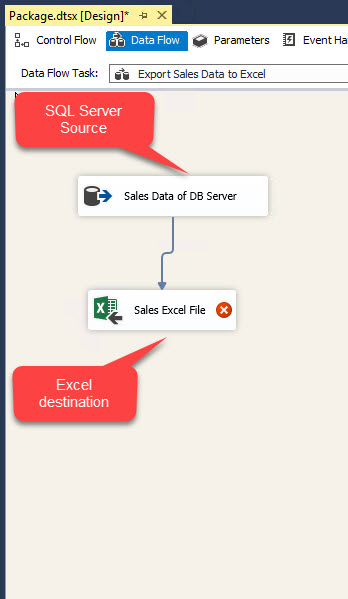
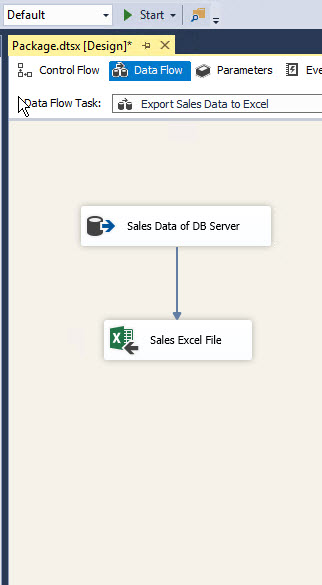
Now, in order to export data from SQL table to excel file, we must map the fields of SQL table and Excel file. To do that, drag blue arrow beneath “Sales Data of DB server” component and drop it on “Sales excel file” component as shown in the image below:
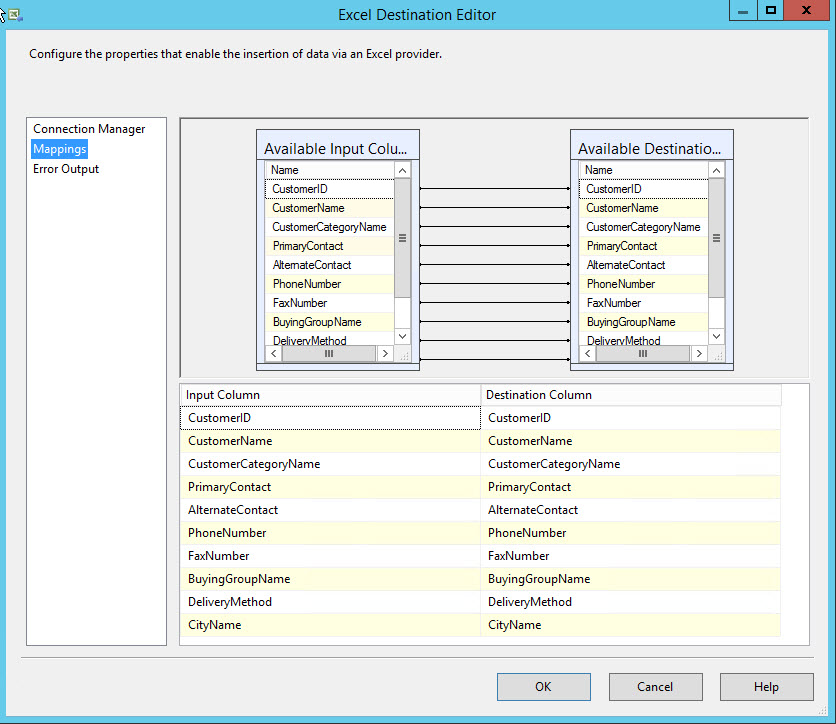
Double click on “Excel destination” to map the fields. “Excel destination editor (Sales Excel File)” will open. Select “Mappings” option from the left pane of the dialog box. In mapping, input columns will be the columns of SQL Query output and destination columns will be the columns of the excel file. It is suggested to keep the same name of SQL Query output and excel columns. This will make mapping much easier because we do not need to map fields manually. SSIS will map columns automatically.
For this demo, excel file and SQL Query output has the same name so mapping was performed automatically. Verify the fact that mapping has done correctly and click OK. See the image below:
Once mapping was completed, the entire data flow task will look like as on the image below:
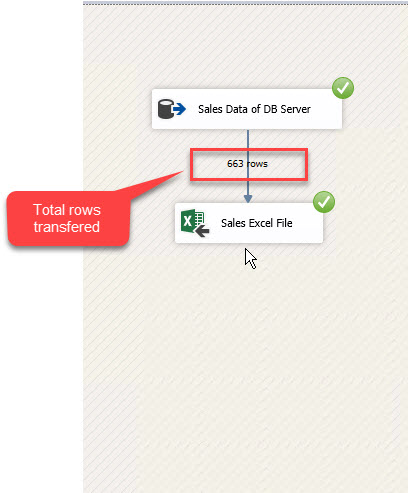
Now we can execute the package. To do that, click on “Start” button that is located in the menu bar. If the package executes successfully, you can see the green icon on each component as is shown in the image below:
Configure Flat file destination
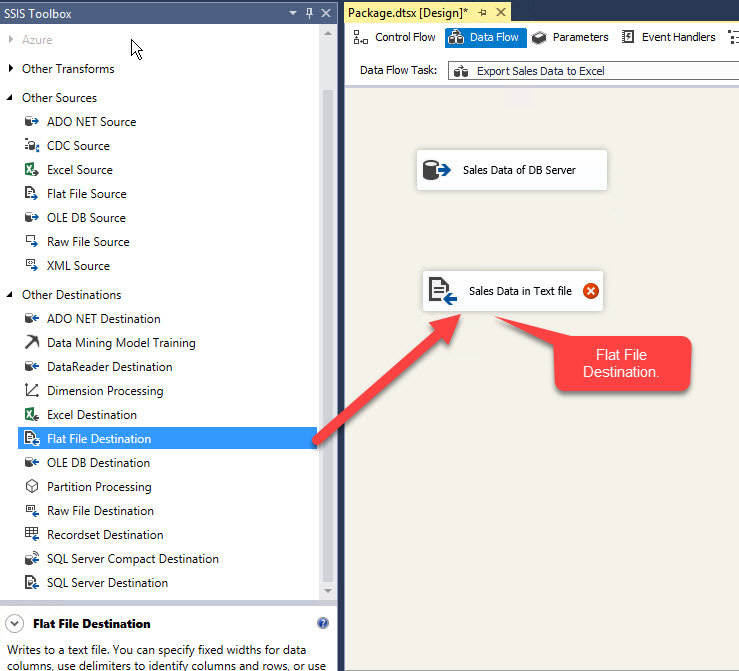
As I mentioned at the beginning of the article, in SSIS we can export data from SQL Table to text file. To do that, we must create a flat file destination in the data flow task. Drag and drop “Flat File destination” to the data flow task window and rename it as “Sales data to text file” as is shown in the image below:
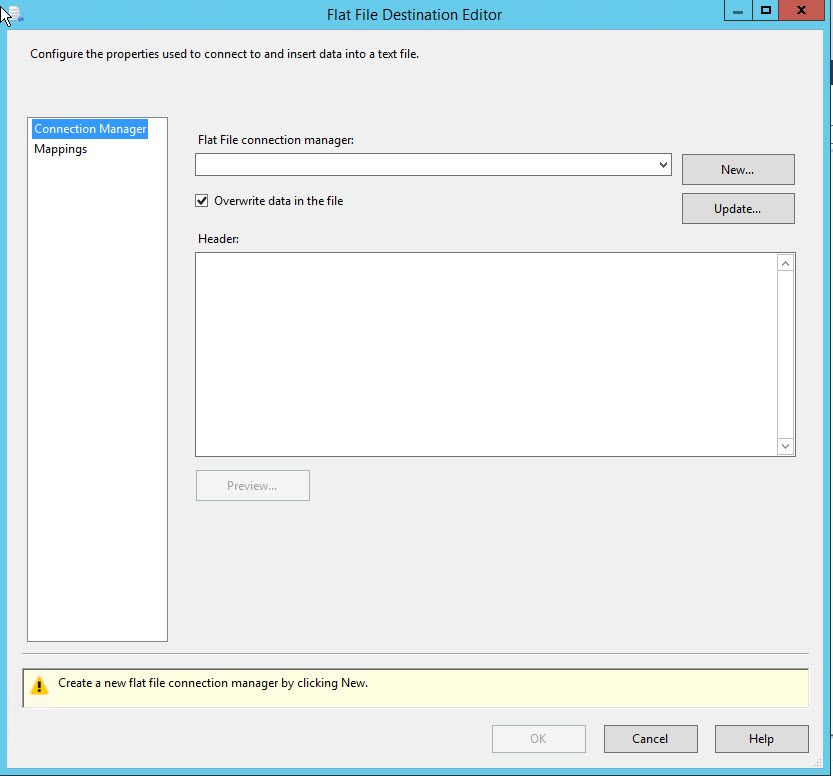
Now double click on “Flat file destination”. A dialog box “Flat File destination editor” will open as is shown in the image below:
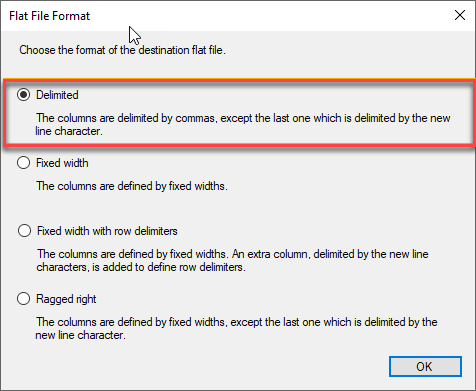
Now click on “New” button next to “Flat file connection managers” drop-down box. The dialog box “Flat File Format” will open. It has four options: export data to delimited, fixed width, fixed width with row delimiters and ragged right. For this demo, we will choose “Delimited”.
Select “Delimited” and click OK as it shown on the image below:
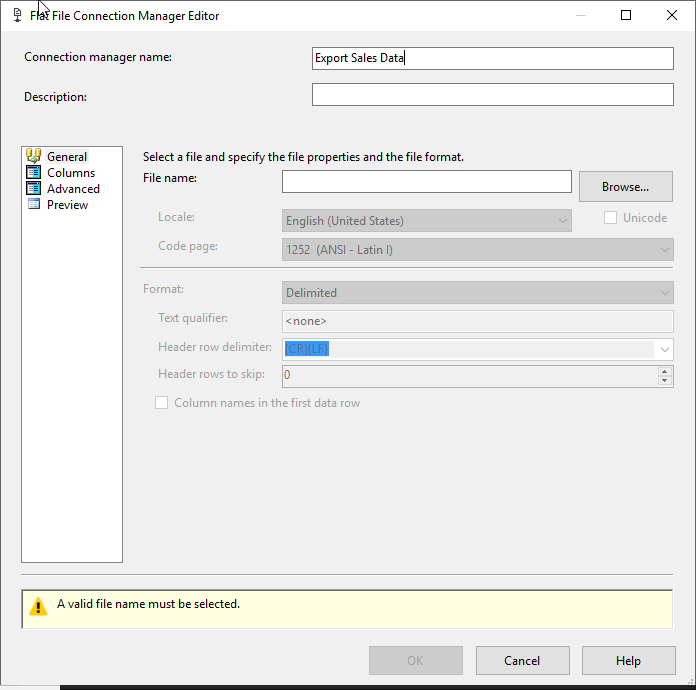
Another dialog box “Flat file connection manager editor” will open. Name the connection manager as “Export Sales Data” as it shown on the following image:
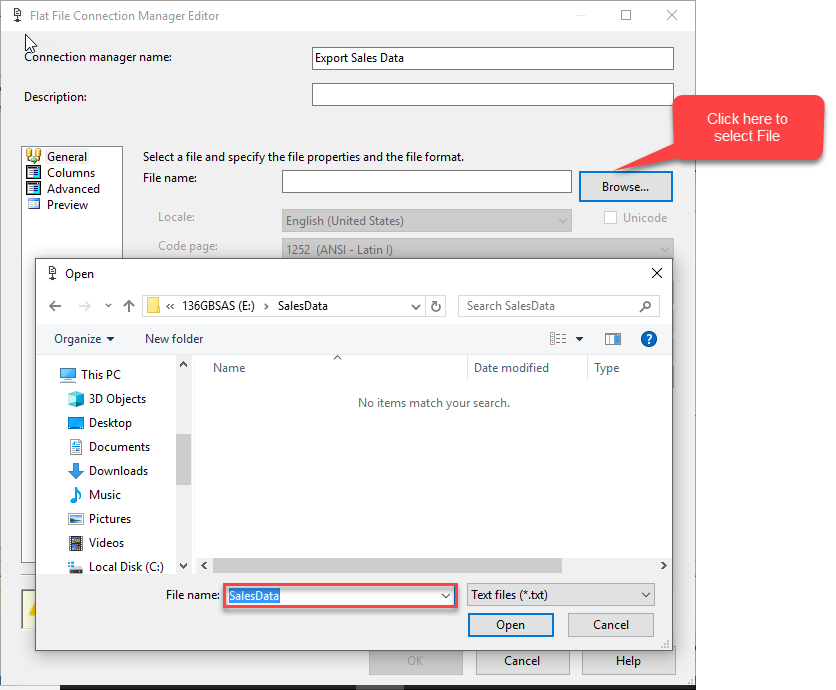
To save the SQL data in a text file, we can either create the new text file or choose the existing one.
For this demo, we are going to create a new file. I will create the file named “Sales Data”. To do that, I will click on the browse and move through the file system as is shown in the image below:
Now we will configure flat file parameters:
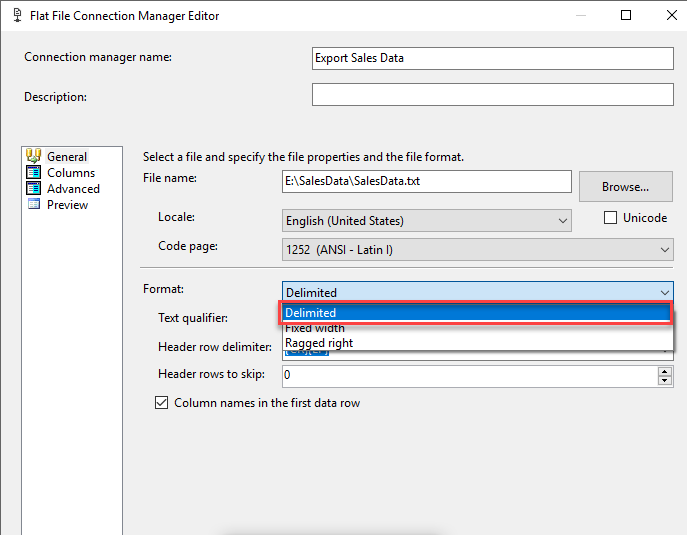
- Exported data from SQL Table will be stored in the delimited format so select “Delimited” in “Format” drop-down box as is shown in the image below:
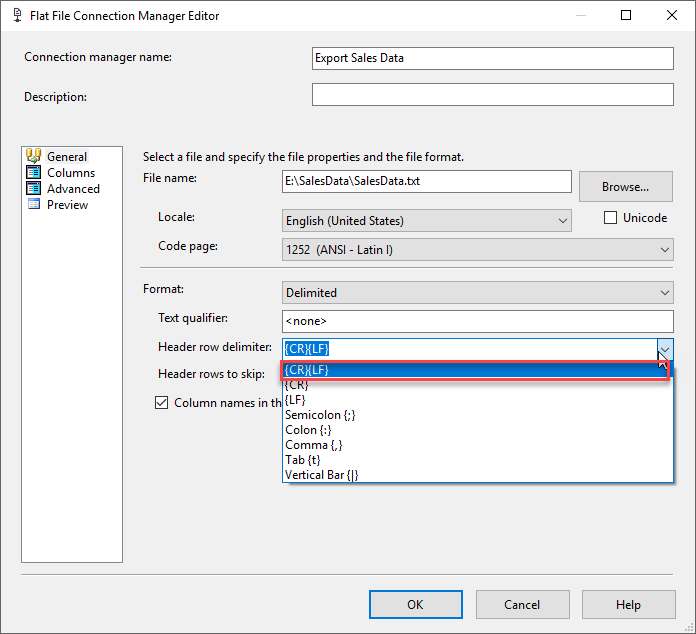
- “Header row delimiter” will be “{CR}{LF}”, so choose appropriate option in the drop-down box as is shown in the image below:
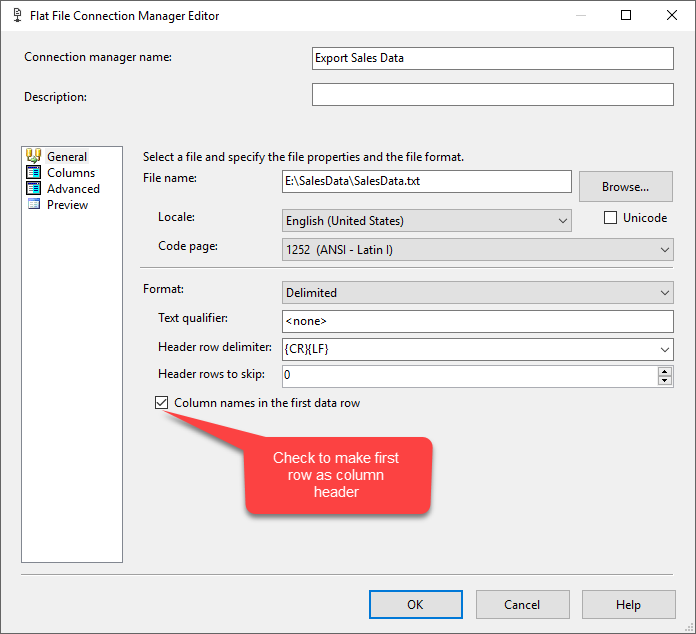
- In the text file, the first row will be the column header so check “Column names in the first data row” as is shown on the image below:
Click OK to close the “Flat file connection manager editor”.
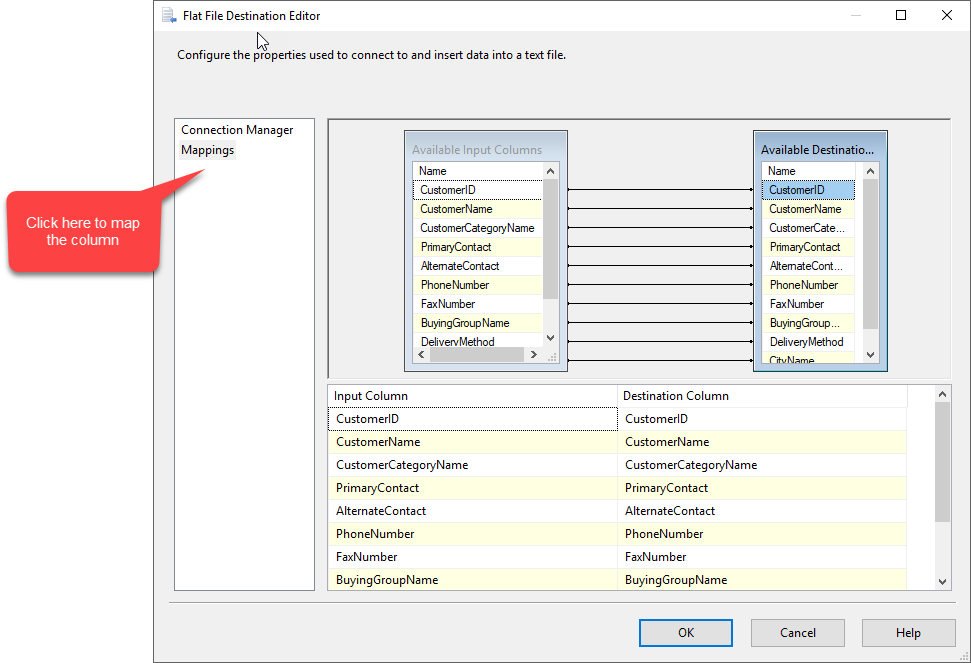
Now we will map the columns. To do that, click on “Mappings” on the left side of “Flat File destination editor” as is shown on the image below:
As the names of “SQL Query input” and “Text file destination” columns are same, SSIS package maps columns automatically.
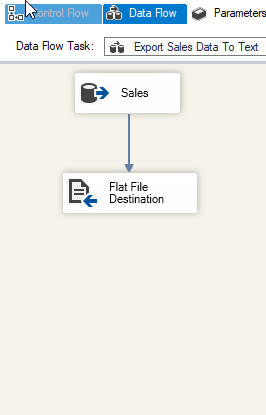
Once the mapping is completed, the entire data flow task will look like as on the image below:
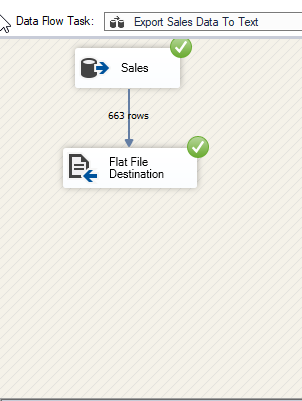
Now we can execute the package. To do that, click on “Start” button that is located in the menu bar. If the package executes successfully, you can see the green icon on each component as is shown in the image below:
Below is the screenshot of data that was extracted from the SQL table:
Learn all about SSIS components.
Summary
In this article, I covered:
- Creating the ADO.NET connection manager
- Creating data flow task and configuring of the source database
- Configuring excel destination and exporting data from the SQL table to Excel File.
- Configuring flat-file destination and exporting data from SQL table to Text file.
Useful tools:
Devart SSIS Data Flow Components – allow you to integrate database and cloud data via SQL Server Integration Services.
Tags: database administration, excel, sql server, ssis Last modified: October 08, 2024