
The current article is the first part of the series about designing a simple data warehouse business intelligence solution in Azure from scratch. Here we are going to get the basic knowledge and prerequisites along with the initial setup of the data warehouse.
Table of contents
- What Is Azure Data Warehouse?
- Why Simple Data Warehouse?
- Prerequisites for creating Azure Data Warehouse
- How to Design Data Warehouse Architecture in Azure
- How to connect GUI Tool for SQL Server to Azure SQL Data Warehouse
What Is Azure Data Warehouse?
Data warehousing is the process of creating an archive that contains all of your company’s information. This archive can be used to create reports, analyze sales trends, and other business-related tasks.
Azure Data Warehouse (ADW) is a cloud service provided by Microsoft. The ADW allows you to store, query, and visualize large amounts of structured and unstructured data.
The Azure Database for PostgreSQL offers many features such as full text search, geospatial support, and security. You can also use SQL Server Integration Services to connect the database to existing applications.
You can run queries against the database using a web interface or through the command line. The system supports both relational and non-relational databases.
When you start the service, you will need to specify a connection string that connects to your local machine. Once you have created the connection string, you can then access the database from any computer.
Why Simple Data Warehouse?
We are going to explain how to build a small data warehouse for demonstration purposes and explore it and experiment without worrying to break anything. The professional life environment where business objectives and business requirements come first has little room for experiments.
However, before we build a simple data warehouse, we need to clarify the most important things required to get a good start less likely to fail.
In our past articles SQL Server BI (Business Intelligence) – Basic Understanding we touched on the concept of the data warehouse. Now, let us consider the prerequisites for making most of the article.
Traditional Tools and Technologies
One might ask, why do we need to know traditional tools and technologies if we are working with modern Azure-based tools? The answer is, to understand the mixing and matching components and tools.
It is not odd to use a hybrid approach to build a data warehouse in Azure. Depending on your requirements, you might use one traditional component with the rest of the modern components. Or, there can be exceptional case scenarios of using both modern and traditional tools and technologies.
Please refer to the following article for additional information SQL Server Business Intelligence (BI) – Traditional Tools and Technologies
Modern Tools and Technologies (Azure Synapse Analytics)
Also, you will need to know the modern (Azure-based) tools and technologies used in data warehousing. You can read about them in article SQL Server Business Intelligence (BI): Tools and Technologies Overview
Prerequisites for creating Azure Data Warehouse
Account
To build the Azure-based data warehouse, you need an Azure account. Sign up for free here (and read terms and conditions carefully):
Create your Azure free account | Microsoft Azure
At the time of writing this article, Microsoft is offering free 30 days trial for all free and paid services. After the end of the trial, you may choose a plan or still enjoy some of the free services.
Azure SQL Database(s)
You need to set up Azure SQL databases and write and run scripts against them to add database objects to them, such as tables, procedures, and views.
Azure Data Factory
You need to set up an Azure Data Factory to create data pipeline(s) to move data from the source to the data warehouse.
Power BI
You must have a Power BI account at the final stage of the data warehouse. Then the data is consumed by the internal and external business users through Power BI reporting services.
GUI tool for SQL Server
I am using dbForge Studio for SQL Server to build and run my scripts against the Azure SQL database. You can also use any compatible tool such as Azure Data Studio or SQL Server Management Services (SSMS).
Not all prerequisites mentioned above are necessary right now. Still, they will be necessary later. So, it will be a good idea to take care of them in advance.
How to Design Data Warehouse Architecture in Azure
Professional data warehouse planning involves many factors, including gathering requirements and designing the solution to meet the business objectives. One of the most important design documents is to have a DWBI architecture that shows the complete proposed system in action.
Planning Simple Data Warehouse Business Intelligence Solution
Planning a simple data warehouse (DWBI) solution can be as simple as having a concrete model in hand, then mapping the objects in the workflow (design) to components and processes, and using the required tools to implement it.
However, having some experience is handy, especially if you have worked in a professional capacity.
Note: By data warehouse we mean the database, and, in broader terms, by the data warehouse business intelligence solution we mean the whole system for the data flow from the source to the database and reporting system.
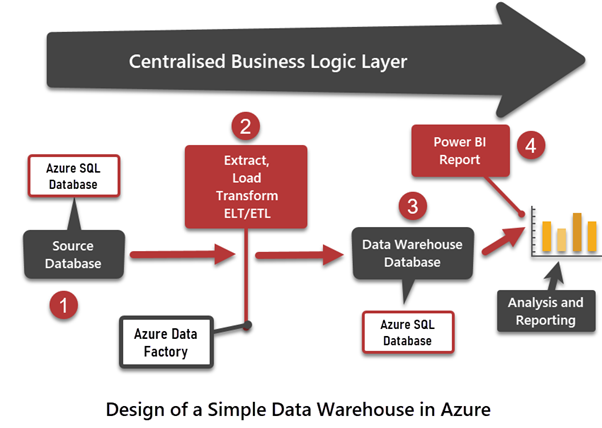
The design for our data warehouse includes the following things:
- A source database in the form of Azure SQL database
- A data warehouse database in the form of Azure SQL
- A process that defines how the data is going to be loaded from source to the destination
- A central business logic layer with the information about the most wanted calculations
- A reporting technology to visualize and analyse the data
Have a look at the diagram:
Setup Source and Target (Data Warehouse) Databases Resources
First, we must understand that where the data will come from. Building the source is a part of building a simple data warehouse. We also need to build the target databases.
In Azure, we create anything in form of a resource. So, to create two Azure SQL databases, we need the following resources:
- One Resource Group where the resources will be put into
- One Database Server resource to host databases
- Two Azure SQL Databases resources for source and data warehouse database
Creating Resource Group (HATestGroup)
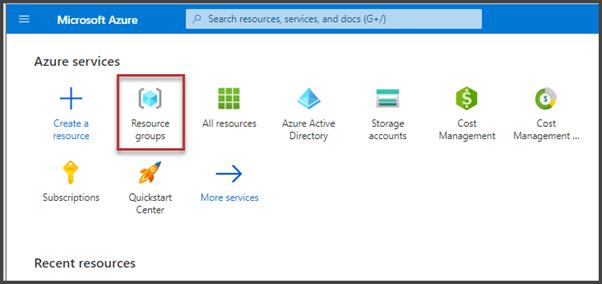
Please sign in to your Azure account and go to Home (if it is not showing up by default). If you see Resource groups under Azure services, click this service. Or, search for Resource Groups and click to open when found:
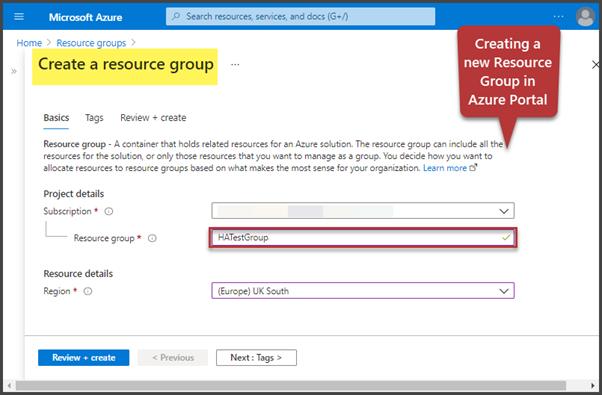
Click Review + create to create a new resource group called HATestGroup:
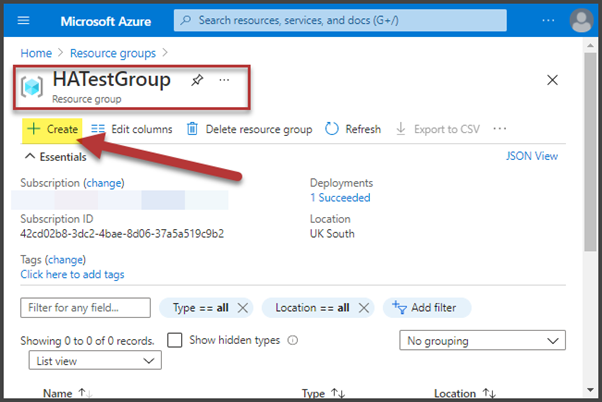
After reviewing the settings, we have a new Resource Group successfully created.
Setting up Database Server and Source Database Resource
Next, we need to set up a source (Azure SQL database). We must create it as a resource in our resource group.
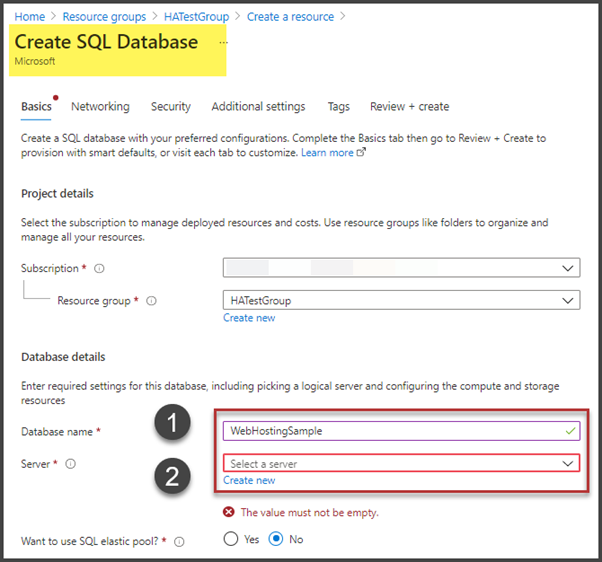
Click Create while staying inside HATestGroup in Azure Portal to set up the first database:
We’ll name this source database WebHostingSample and provide the required details when setting up a new database server (resource) to host the databases:
Set up a new server as follows:
Server name: sqlbidemos
Server admin login: sqladmin
Password: you chose
Location: UK South (select according to your choice)
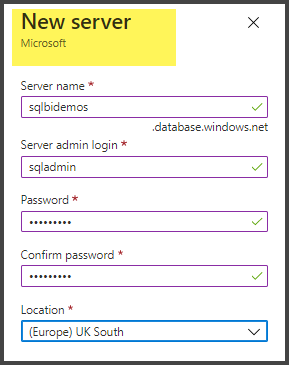
Important! Please note that you may not be able to use the same server name sqlbidemos if it is already there. So, try adding some number after it, e.g., sqlbidemos1. Remember to set up a password that you can reset if forgotten.
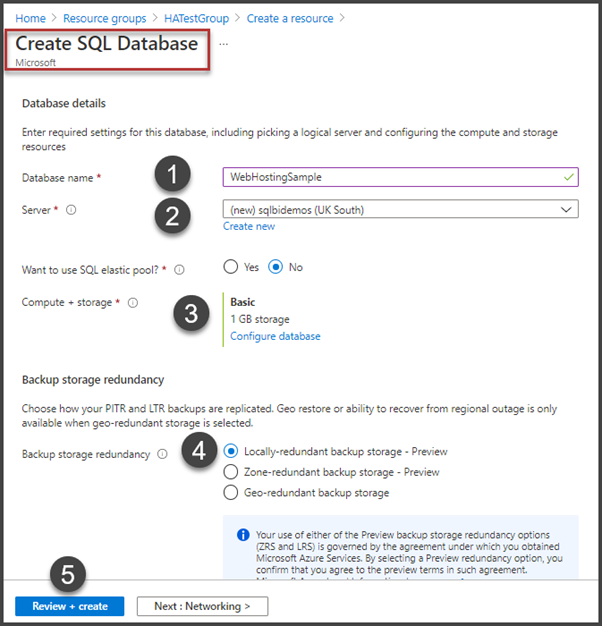
Finally, create the database resource as follows:
After successful deployment (creating a resource in Azure is known as deployment) you see the message:
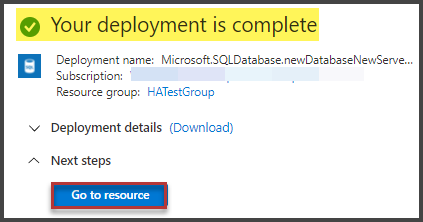
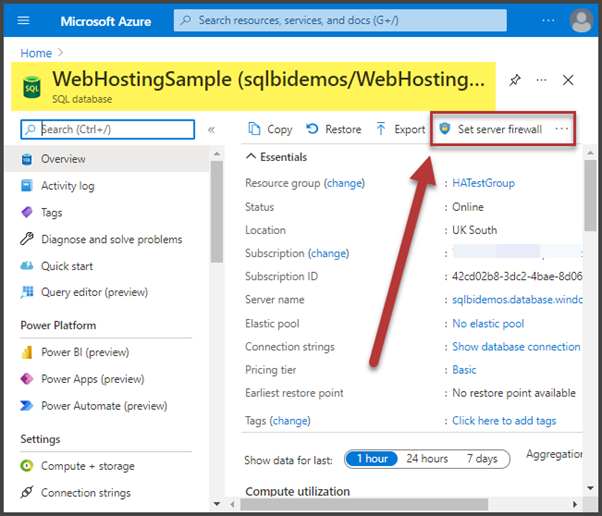
Click Go to resource – this will land you to the newly created source Azure SQL Database (WebHostingSample).
Setup Server Firewall
The next step is to set up the server firewall rule to access all Azure SQL Databases created against the database server from your working place with the database tools, such dbForge Studio for SQL Server.
Click Set server firewall when viewing the recently created resource:
Click Add Client IP and Save the changes, as your IP will be automatically selected. The Save button is greyed out, but it will become available immediately after clicking Add client IP.
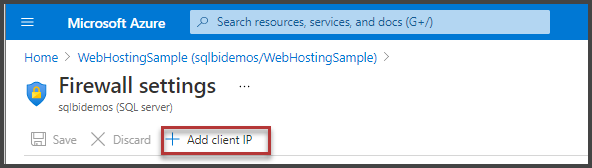
Once you’ve added your IP address, it remains there. You can connect to your databases as long as it does not change. However, the IP address may change with time especially for those on home network routers. In that case, you have to remove the previously added IP address and add a new one using the same method.
Setting up Data Warehouse Database Resource
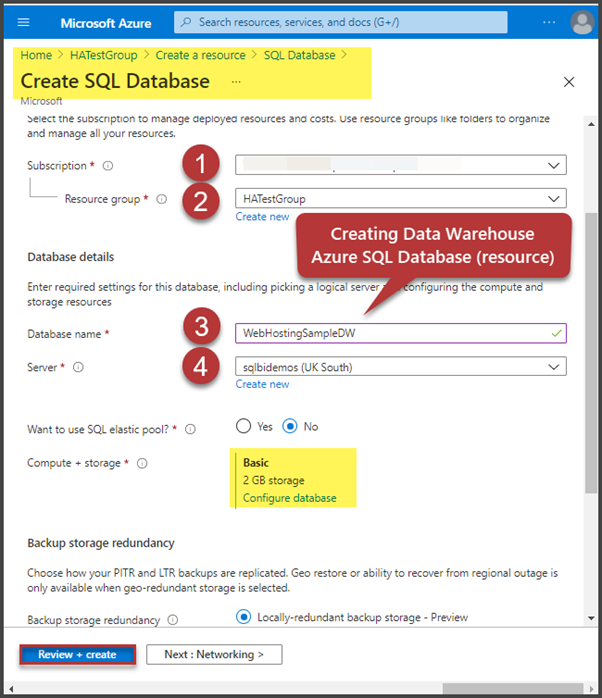
Now, create another resource for the data warehouse database – WebHostingSampleDW as follows:
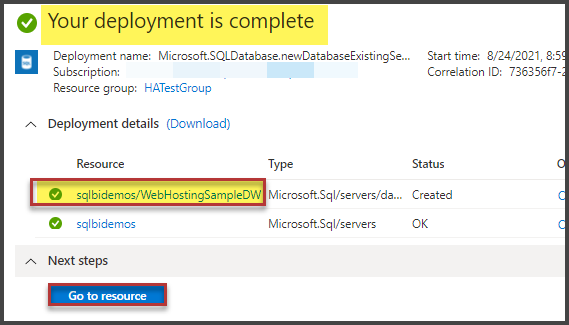
Once the deployment is finished, visit the newly-created target database by clicking Go to resource:
How to connect GUI Tool for SQL Server to Azure SQL Data Warehouse
It is time to connect to the database server in Azure. It contains both databases which are blank at the moment.
Open dbForge Studio for SQL Server (or any other compatible database management tools) and establish connection:
Server Name: sqlbidemos.database.windows.net (this name can be a little different in your case)
Authentication: SQL Server Authentication
Login: SQLadmin
Password: (you chose it when setting up a server)
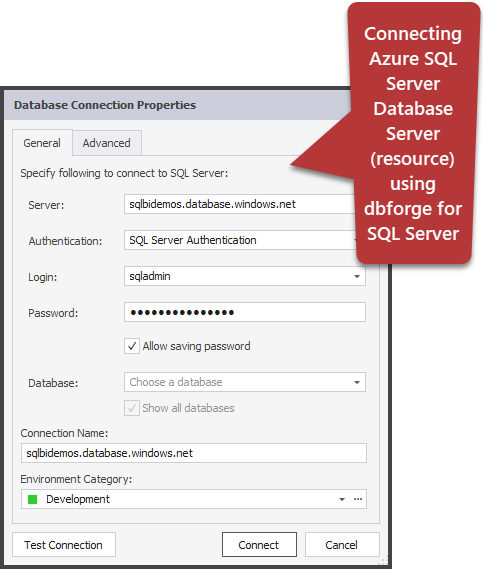
Click Connect
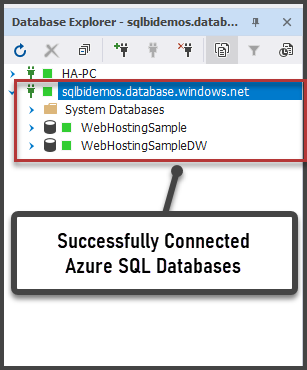
Congratulations! We have successfully set up the required resources in Azure, set up the firewall rule, and created a successful connection using dbForge Studio for SQL Server.
Please stay in touch as this journey of building a simple data warehouse becomes more interesting in the upcoming parts of this material.
Things to Do
Now that you know how to set up resources in Azure for a simple data warehouse, try the following things to improve your skills:
- Try to create another similar architecture – create another Resource Group called rg-dwtest and remove the resources along with the resource group once you can connect successfully.
- Create an Azure SQL Database called WebHostingSampleStaging in the HATestGroup Resource Group
- Try creating source and target databases in two different database servers. Remove the resources (servers, databases, and resource group) once you can connect successfully.
If you want to learn more about building a simple data warehouse in Azure, continue reading the second part of our article where we dive deeper into the implementation process and best practices.
Tags: create database, data warehoue Last modified: March 23, 2023