
This is the second part of the three-part article which aims to help both beginners and professionals in designing a simple but fully functional data warehouse business intelligence solution in Azure from scratch. Please get acquainted with the first part before reading this one.
This part is mainly focused on adding database objects such as tables into the source and target data sources in Azure and getting familiar with the database structural changes (including the difference of terms and terminologies) taking place once you move from the application database to the data warehouse database.
Please remember we are using dbForge Studio for SQL Server to manage both source and data warehouse databases in this article but you can use any compatible database management tool such as SQL Server Management Studio (SSMS) or Azure Data Studio.
Table of contents
- Data Warehouse Architecture with Azure Resources
- Word of Advice
- Building the Source Database (WebHostingSample)
- About WebHostingSample Database
- Connecting to the Source Database (WebHostingSample)
- Building Data Warehouse Database (WebHostingSampleDW)
- Skipping Staging and Leaving BI Schemas
- A Fairly Simple Source Tables Transformation into Data Warehouse Database
- Creating BI Schema
- Creating Customer and Product Dimension
- Setup Fact Sales Table
- Conclusion
Data Warehouse Architecture with Azure Resources
Let us review the design plan of the data warehouse architecture after we have created the main template by creating resources in Azure.
When we shared the design plan for the first time, it was a general one since we had not set up physically anything on the cloud (Azure) by that time.
Now we have set up quite a number of resources and it is time to review the architecture to get a clearer picture. Let’s keep in mind we have a resource group HATestGroup in Azure where we have created our source WebHostingSample and target databases WebHostingSampleDW. This resource group is to be used for the whole data warehouse business intelligence solution.
The architecture of our simple data warehouse pointing to the newly created resources (in the first part of the article) is as follows:
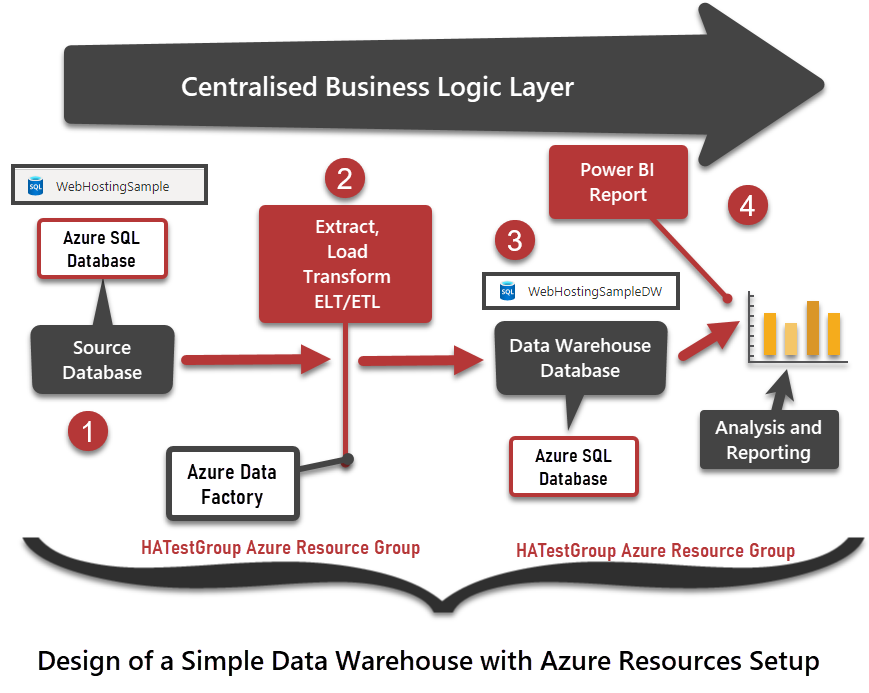
It is obvious from the design that we have specially allocated a resource group called HATestGroup that is where all the required resources are going to be set up. It is easy to be managed in the long run as more things can be easily added to it and also removed from it when required.
Word of Advice
Sometimes you need to remove a project for any reason that includes removing all the resources required by that project/solution. In that case, if you have put all the resources in one group, you can easily remove them from there ultimately removing the resource group itself.
Building the Source Database (WebHostingSample)
In real-time scenarios, you do not set up source databases unless you are a part of that team that deals with live or source data.
However, in our case, we are setting up the whole architecture that includes setting up the source database from where the data will flow towards the data warehouse database.
In the first part of the article, we created the resource for the source database in the form of setting up an Azure SQL Database on the database server and now we are going to create the structure of the database followed by adding some data to it.
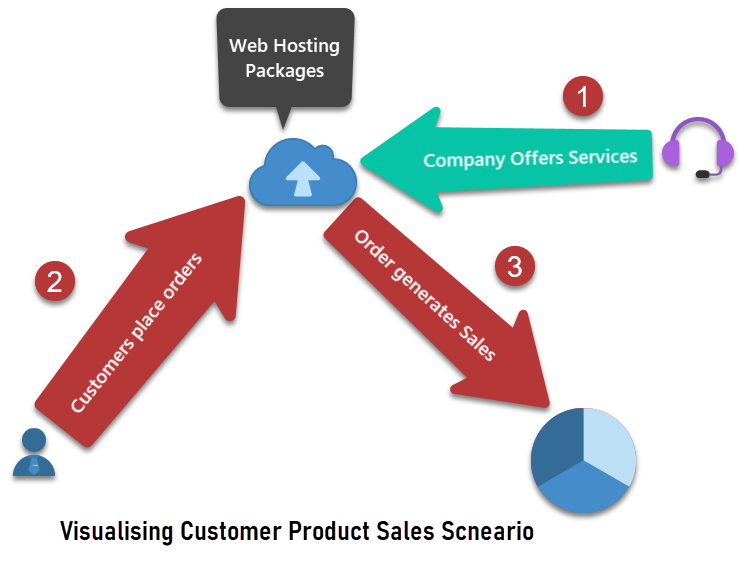
About WebHostingSample Database
This is a database of a fictitious web hosting services provider that offers services to customers living in different countries while the service has three different categories:
- Basic Package
- Business Package
- Premium Package
Our simple data warehouse business intelligence solution is going to help this sample company to understand different trends in its sales. We’ll give it insights of the data in the form of reporting against a dedicated data warehouse.
However, the main focus is on three things (tables):
- Customer
- Product
- Sale
This can be easily visualized with the help of the following diagram:
Connecting to the Source Database (WebHostingSample)
Please sign in to your Azure portal to see the details of the previously created data warehouse resources such as server address and so on.
It is fine if the names of your resources are different from the ones shown in this article but please make sure that you create the same number of resources.
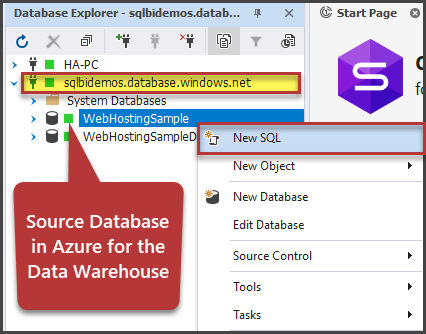
Please open dbForge Studio for SQL Server or any compatible database management tools such as SQL Server Management Studio (SSMS) and connect to the database server on Azure (we showed the setup in the first part of the article).
Creating the Customer Table
Once connected to the server (sqlbidemo.database.windows.net) right-click the source database WebHostingSample and click New Query:
Please write (and run) the following script against WebHostingSample to create and populate the Customer table:
-- Delete Customer table if already exists
IF EXISTS
(SELECT * FROM sys.tables t
where t.name='Customer')
DROP TABLE dbo.Customer

-- Create customer table
CREATE TABLE [dbo].[Customer]
(
	[CustomerId] INT NOT NULL PRIMARY KEY IDENTITY(1,1),
	[Name] VARCHAR(50),
	[Country] VARCHAR(50)
)

-- Populate customer table
SET IDENTITY_INSERT [dbo].[Customer] ON
INSERT INTO [dbo].[Customer] ([CustomerId], [Name], [Country])
VALUES
(1, 'Asif', 'Pakistan'),
(2, 'Adil', 'UAE'),
(3, 'Sarah', 'UK'),
(4, 'Mike', 'Germany'),
(5, 'Peter', 'UK'),
(6, 'Sadaf', 'UAE'),
(7, 'Naveed', 'UAE')

SET IDENTITY_INSERT [dbo].[Customer] OFF
Creating the Product Table
After the Customer table, create the Product table along with populating it with the required services offered by the company. Run the following script against the source database WebHostingSample as follows:
-- Delete Product table if already exists
IF EXISTS
(SELECT * FROM sys.tables t
where t.name='Product')
DROP TABLE dbo.Product

--
-- Create table [dbo].[Product]
--
PRINT (N'Create table [dbo].[Product]')
GO
CREATE TABLE dbo.Product (
  ProductId int IDENTITY,
  Name varchar(50) NULL,
  Cost decimal(10, 2) NULL,
  CONSTRAINT PK_Product_ProductId PRIMARY KEY CLUSTERED (ProductId)
)
GO

-- Populate Product table
SET IDENTITY_INSERT [dbo].[Product] ON
INSERT INTO dbo.Product (ProductId, Name, Cost) VALUES
(1, 'Basic Website Package', 50.00),
(2, 'Business Website Package', 75.00),
(3, 'Premium Website Package', 100.00)
GO
SET IDENTITY_INSERT [dbo].[Product] OFF
Creating the Sale Table
Finally, create the Sale table that shows all the orders placed by different customers at different times for different services.
Please run the following SQL script against the WebHostingSample database:
-- Delete Sale table if already exists
IF EXISTS
(SELECT * FROM sys.tables t
where t.name='Sale')
DROP TABLE dbo.Sale
--
-- Create table [dbo].[Sale]
--
PRINT (N'Create table [dbo].[Sale]')
GO
CREATE TABLE dbo.Sale (
  SaleId int IDENTITY,
  CustomerID int NOT NULL,
  ProductID int NOT NULL,
  SaleAmount decimal(10, 2) NULL,
  OrderDate datetime2 NULL,
  CONSTRAINT PK_Sale PRIMARY KEY CLUSTERED (SaleId)
)
GO

--
-- Create foreign key [FK_Sale_Customer] on table [dbo].[Sale]
--
PRINT (N'Create foreign key [FK_Sale_Customer] on table [dbo].[Sale]')
GO
ALTER TABLE dbo.Sale
  ADD CONSTRAINT FK_Sale_Customer FOREIGN KEY (CustomerID) REFERENCES dbo.Customer (CustomerId)
GO

--
-- Create foreign key [FK_Sale_Product] on table [dbo].[Sale]
--
PRINT (N'Create foreign key [FK_Sale_Product] on table [dbo].[Sale]')
GO
ALTER TABLE dbo.Sale
  ADD CONSTRAINT FK_Sale_Product FOREIGN KEY (ProductID) REFERENCES dbo.Product (ProductId)
GO
SET IDENTITY_INSERT Sale ON
INSERT INTO dbo.Sale (SaleId, CustomerID, ProductID, SaleAmount, OrderDate) VALUES
(1, 1, 1, 50.00, CONVERT(DATETIME2, '2020-01-01 12:00:00.0000000', 121)),
(2, 1, 2, 75.00, CONVERT(DATETIME2, '2020-01-01 12:00:00.0000000', 121)),
(3, 2, 1, 50.00, CONVERT(DATETIME2, '2020-01-01 12:00:00.0000000', 121)),
(4, 2, 2, 75.00, CONVERT(DATETIME2, '2020-02-01 00:00:00.0000000', 121)),
(5, 2, 3, 100.00, CONVERT(DATETIME2, '2020-02-01 12:00:00.0000000', 121)),
(6, 3, 3, 100.00, CONVERT(DATETIME2, '2021-01-01 12:00:00.0000000', 121)),
(7, 3, 1, 50.00, CONVERT(DATETIME2, '2021-01-01 12:00:00.0000000', 121)),
(8, 4, 2, 75.00, CONVERT(DATETIME2, '2021-02-01 12:00:00.0000000', 121)),
(9, 4, 3, 100.00, CONVERT(DATETIME2, '2021-03-01 12:00:00.0000000', 121)),
(10,3, 2, 75.00, CONVERT(DATETIME2, '2021-03-01 12:00:00.0000000', 121)
)
GO
SET IDENTITY_INSERT Sale OFF
Data Check
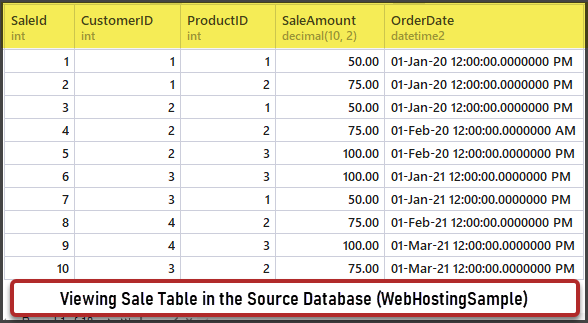
Let us view the inserted data in the Sale table by running the following T-SQL script against the source database (WebHostingSample):
-- View sale(s) table (in the source database)
SELECT * FROM dbo.Sale s
The output is as follows:
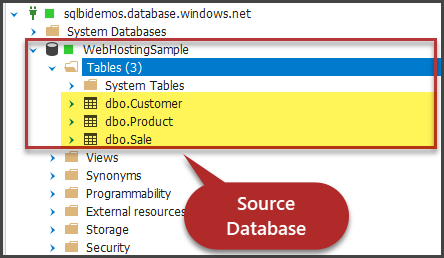
Also, if we expand the WebHostingSample database, we’ll see the three newly created tables as shown below:
Building Data Warehouse Database (WebHostingSampleDW)
Once the source is set up, the next big thing is to make the target database ready. In our case, the data warehouse database is the core of any data warehouse business intelligence solution.
You will find new keys being introduced since the data warehouse does not want to depend on the source database keys due to the number of valid and solid reasons. In addition, you may find tables getting changed into Dimensions and Fact.
Skipping Staging and Leaving BI Schemas
In a typical data warehouse business intelligence solution, there are two main schemas (or databases in some cases):
- Staging Area
- BI Area
Normally, the staging area is almost the exact copy of the source tables and then they are transformed into dimensions and Fact(s) where dimensions refer to the reference data and Facts refer to the calculations the business is interested in.
However, in a modern data warehouse, we can directly set up a BI environment without needing the staging area (although in professional scenarios such as with Azure Synapse Analytics (Azure Data Warehouse) an internal or sometimes exclusive staging area is used for special processing of data).
A Fairly Simple Source Tables Transformation into Data Warehouse Database
So, the tables get transformed into more business intelligence specific structures for easy analysis and reporting but we are going to keep them in their simplest form since we are building a simple data warehouse in Azure.
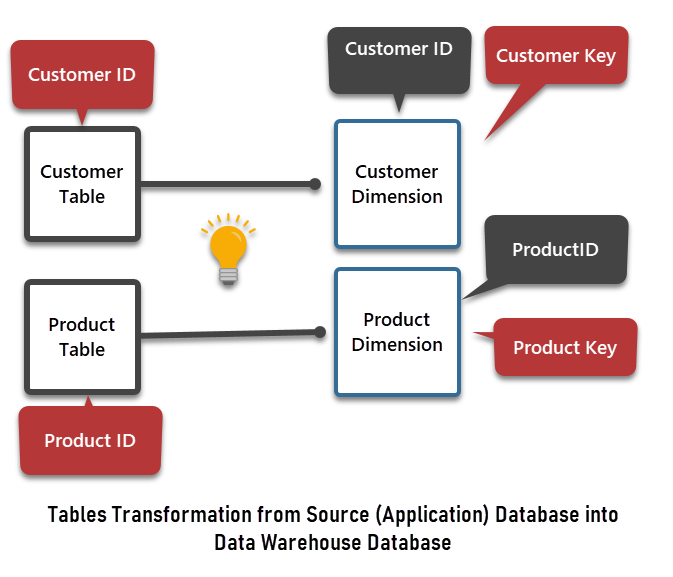
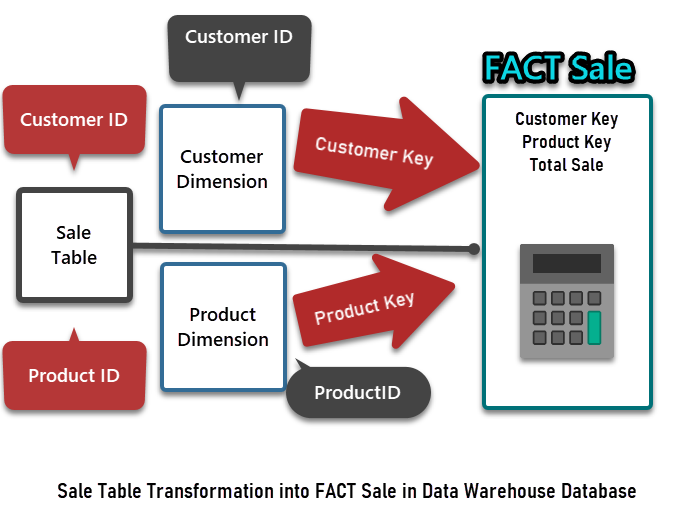
As a general rule of thumb, the reference tables such as Customer and Product become Customer Dimension and Product Dimension. It means they will have their ids from the source database but on top of that, they are going to have their own business keys to be passed onto the central Sale table which is now called Fact.
The Customer and Product tables transformation is visualized as follows:
Now Fact Sale is going to be the central table and can be visualized as follows:
Creating BI Schema
We need to have a dedicated schema to put our business intelligence object into it.
Please create a BI Schema in the data warehouse database (WebHostingSampleDW) by running the following script:
-- Create BI Schema
CREATE Schema BI
authorization dbo;
GO
Creating Customer and Product Dimension
Next, we have to create the Customer and Production dimension as DimCustomer and DimProduct in the BI Schema as follows:
--
-- Create table [BI].[DimCustomer]
--
PRINT (N'Create table [BI].[DimCustomer]')
GO
CREATE TABLE BI.DimCustomer (
  CustomerKey int IDENTITY,
  CustomerAlternateKey int NULL,
  Name varchar(50) NULL,
  Country varchar(50) NULL,
  PRIMARY KEY CLUSTERED (CustomerKey)
)
GO

--
-- Create table [BI].[DimProduct]
--
PRINT (N'Create table [BI].[DimProduct]')
GO
CREATE TABLE BI.DimProduct (
  ProductKey int IDENTITY,
  ProductId int NOT NULL,
  Name varchar(50) NULL,
  Cost decimal(10, 2) NULL,
  CONSTRAINT PK_DimProduct_ProductKey PRIMARY KEY CLUSTERED (ProductKey)
)
GO
Setup Fact Sales Table
Finally, set up the FactSale table by the following T-SQL script against the WebHostingSampleDW database:
--
-- Create table [BI].[FactSale]
--
PRINT (N'Create table [BI].[FactSale]')
GO
CREATE TABLE BI.FactSale (
SaleKey int IDENTITY,
CustomerKey int NOT NULL,
ProductKey int NOT NULL,
TotalSale decimal(10, 2) NULL,
DateKey date NULL,
CONSTRAINT PK__FactSale_SaleKey PRIMARY KEY CLUSTERED (SaleKey)
)
GO
--
-- Create foreign key [FK_FactSale_ProductKey] on table [BI].[FactSale]
--
PRINT (N'Create foreign key [FK_FactSale_ProductKey] on table [BI].[FactSale]')
GO
ALTER TABLE BI.FactSale
ADD CONSTRAINT FK_FactSale_ProductKey FOREIGN KEY (ProductKey) REFERENCES BI.DimProduct (ProductKey)
GO
--
-- Create foreign key [FK_Sale_Customer] on table [BI].[FactSale]
--
PRINT (N'Create foreign key [FK_Sale_Customer] on table [BI].[FactSale]')
GO
ALTER TABLE BI.FactSale
ADD CONSTRAINT FK_Sale_Customer FOREIGN KEY (CustomerKey) REFERENCES BI.DimCustomer (CustomerKey)
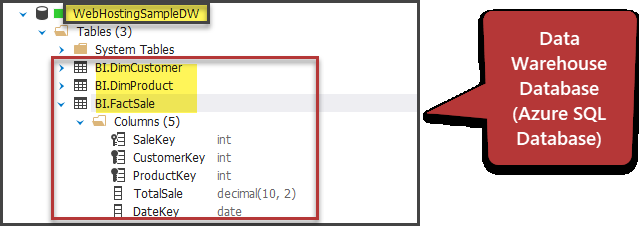
GOPlease refresh and expand the database node in dbForge Studio for SQL Server (or SQL Server Management Studio (SSMS)) to see the data warehouse database along with the Dimensions and Fact.
Conclusion
Congratulations! You have successfully set up both source and target databases in Azure along with understanding the process of transformation that takes place from application database to data warehouse database in a simple way.
You are getting closer to build a simple but fully functional data warehouse in Azure.
Please stay in touch as in the final part of this series we are going to make it functional by adding data workflow to load data into the data warehouse.
Things to do
Now that you know how to set up resources in Azure along with creating source and target databases for a simple data warehouse please try the following things to improve your skills further:
- Please try to add a Date dimension DimDate and populate it well enough to cover the years present in the Sale table in the source database and link it with DateKey just like Customer and Product keys
- Create another FACT table called FactProductSale to focus on products and their sale only in the data warehouse database
- Try creating a FACT table called FACTCustomerSale to only capture customer information and sale data excluding product and date when product was purchased
Don’t miss out on the third and final part of our article series on building a simple data warehouse in Azure, where we discuss advanced techniques such as data modeling, performance optimization, and automation. Keep reading to take your Azure data warehousing skills to the next level!
More Articles about Azure
- Azure SQL Elastic Pool – Understanding and Creating
- What is Azure Synapse Analytics? Complete Overview
- How to Connect to Azure SQL Database Securely
- Connecting to SQL Azure from SQL Server Management Studio (SSMS)
- How to Create and Deploy Azure Database for MySQL Server using Azure Portal and Workbench
- Deploying a Database on Azure SQL
- How to install SQL Server vNext and Azure data studio on Ubuntu 18.04
- Azure SQL Database Automatic Tuning