This article describes the ways of using an INNER JOIN to combine results from two tables in the SQL Server database and display them in an HTML5 table inside an ASP.NET webform. Additionally, it touches on the question of using CSS3 (cascading style sheets) to apply a style to the HTML5 table in an ASP.NET webform.
Let’s begin.
Creating Dummy Data
Before querying an SQL server database to display results in the HTML5 table, we need to have some data in that database. Thus, we have to create some dummy data. Here, we’ll work with a library database containing two tables, Authors and Books.
Authors and Books will relate as “one-to-many” – we assume that one author can write several books, but a book can have only a single author. Of course, in reality, one book can have several co-authors, but we won’t deal with this case here.
Execute the following script to create a dummy database named Library:
CREATE DATABASE LibraryThe next script adds the Authors and Books tables to the Library database. Notice that the Books table has a column AuthorIdF. We’ll use this column as a foreign key column to store the Authors’ IDs from the Authors table.
USE Library
CREATE TABLE Authors
(
AuthorId INT PRIMARY KEY,
AuthorName VARCHAR (50) NOT NULL,
AuthorGender VARCHAR (50) NOT NULL,
AuthorNationality VARCHAR (50) NOT NULL
)

USE Library
CREATE TABLE Books
(
BookId INT PRIMARY KEY IDENTITY(1,1),
BookName VARCHAR (50) NOT NULL,
BookPrice INT,
AuthorIdF INT,
)
The following script adds dummy records to our dataset:
INSERT INTO Authors
VALUES (1, 'Author-XYZ', 'Male', 'UK'),
(2, 'Author-WXY','Female', 'USA'),
(5, 'Author-VWX','Female', 'FRANCE'),
(20, 'Author-UVW','Female', 'USA'),
(25, 'Author-TUV','Male', 'UK')


INSERT INTO Books
VALUES ( 'Book-ABC', 100, 20),
( 'Book-BCD', 200,  20),
( 'Book-CDE', 150,  1),
( 'Book-EFG', 100,1),
( 'Book-FGH', 200, 8),
( 'Book-GHI', 150, 9),
( 'Book-HIJ', 100, 1),
( 'Book-JKL', 200, 10),
('Book-KLM', 150, 8)
How does the SQL Server INNER JOIN Query Work?
The SQL INNER JOIN query returns rows from different tables that have specific common values matching in several columns where we apply the JOIN query. It might sound complicated but it is not. You will see it yourself when observing the INNER JOIN query results.
Further, we’ll create an ASP.NET webform that will display the INNER join query results, combining the data from both the Authors and Books tables. However, we need first to write an INNER JOIN query and see the results it provides.
Execute the following script:
USE Library
SELECT  Books.BookName, Books.BookPrice, Authors.AuthorName, Authors.AuthorId
FROM Books
INNER JOIN Authors
ON Books.AuthorIdF = Authors.AuthorId
This script implements an INNER JOIN query on two columns: the AuthorId column from the Authors table and the AuthorIdF column from the Books table. Here the result is:
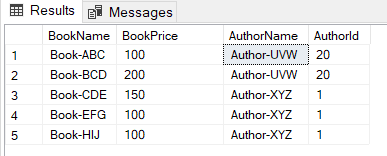
As you can see, the query returned those rows only where both the Books and Authors tables had a common value. It was in the AuthorIdF column (Books table) and the AuthorId column (Authors table).
Note: The original Books table contained such Author Ids as 8,9, and 10. However, there weren’t authors with such IDs in the Authors table. Hence, the query did not return results for corresponding books.
Similarly, the Authors table includes such Authors’ IDs as 1, 2, and 25. However, these IDs are absent in the AuthorIdF column of the Books table. Thus, the INNER JOIN query did not return the corresponding rows from the Authors table.
Now that we’ve clarified what INNER JOIN is and how it works, let’s create an ASP.NET application. It will connect to an SQL Server database and display the HTML5 table with the results of our INNER JOIN query.
Displaying INNER JOIN Result in HTML5 Table with ASP.NET Webform
We will create the ASP.NET webforms application with the Microsoft Visual Studio IDE.
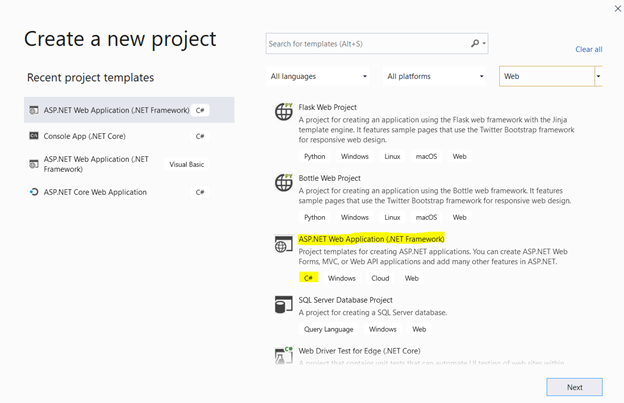
Open a new project in the Visual Studio and select ASP.NET Web Application (.NET Framework) with the C# template from the list:
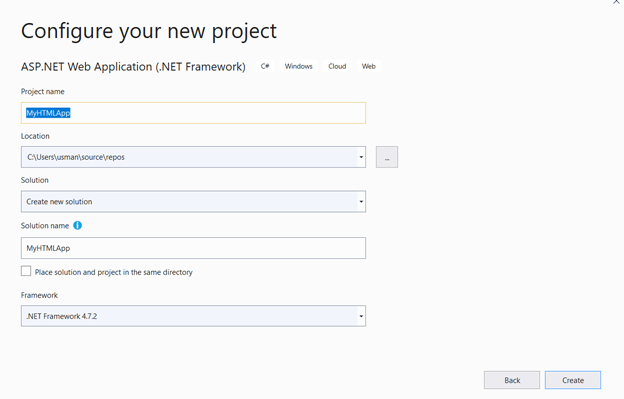
Next, give your project a custom name and click Create:
You will see several options for your ASP.NET Web Application:
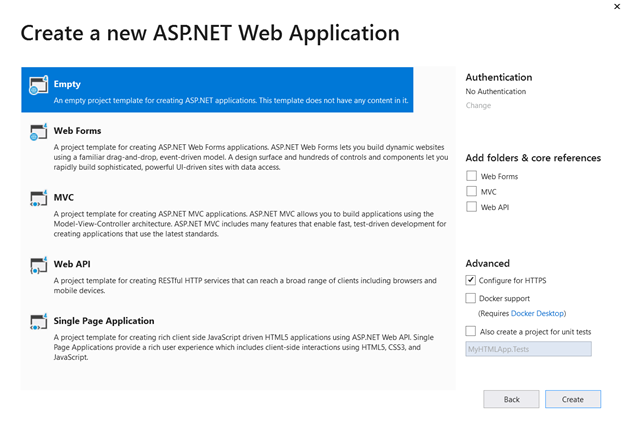
Select Empty from the list of templates and click Create:
Connecting SQL Server with Visual Studio
The dummy data that we created earlier are stored in an SQL Server instance. Therefore, to execute queries on them via the Visual Studio application, we need to connect that application to the SQL Server instance storing the dummy data.
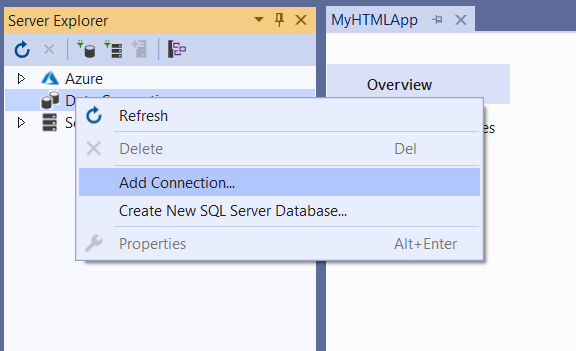
To do so, click on Server Explorer > right-click on Data Connections to get to the menu:
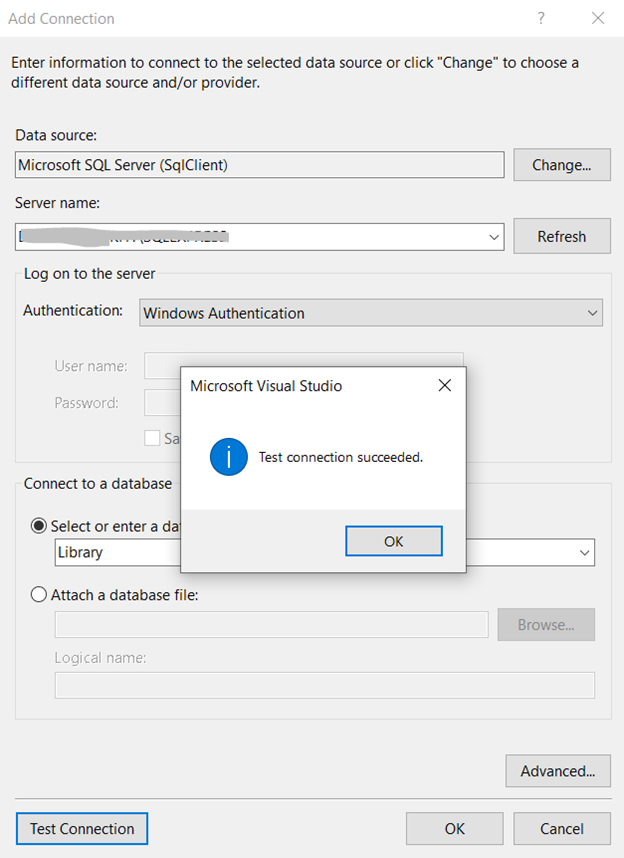
In the Add Connection window, fill in the required data:
- Data source – Microsoft SQL Server (SqlClient).
- Server name – enter the name of your SQL Server instance.
As soon as you enter the name of that SQL Server instance which contains the dummy records of the Library database, that database will appear automatically in the list.
Select it and click Test Connection. If it is successful, you will see the Test connection succeeded message:
Adding and Designing the ASP.NET Webform
After establishing a connection with the SQL Server database from Visual Studio, we need to add a webform to the application. The webform will display the results of the INNER JOIN query inside an HTML 5 table.
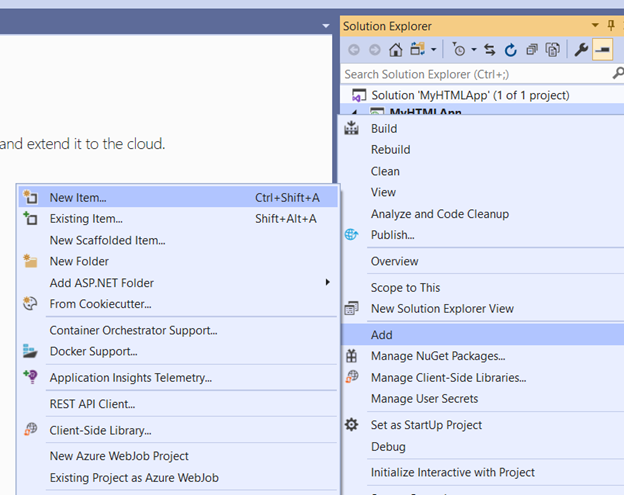
To add a webform, right-click on the project name > Add > New Item:
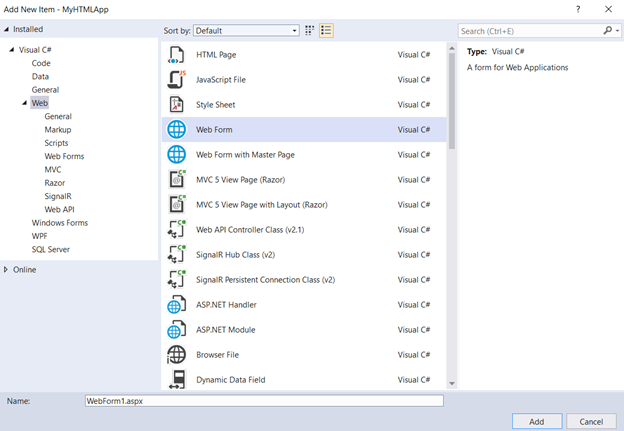
From the list of items, click Web Form > Add. A webform named WebForm1.aspx by default will be added to your application:
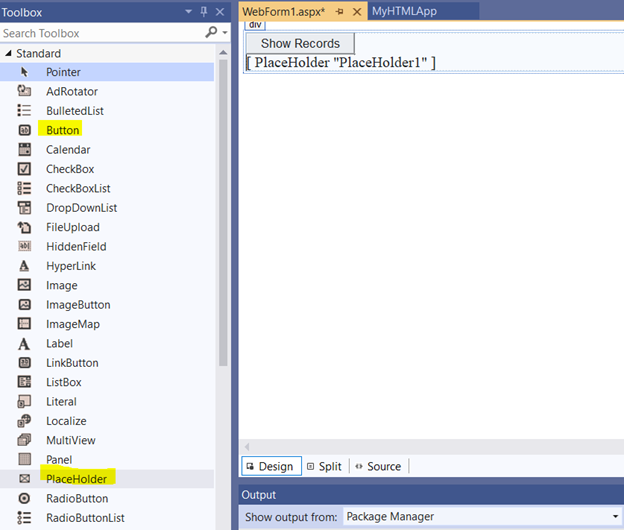
Open the ASP.NET webform you’ve just added. Use the design view and drag and drop the button and the placeholder from the Toolbox to the Webform as shown in the following screenshot.
Rename the button text to Show Records. When you click the button, the HTML table containing the INNER JOIN query result will be displayed in the placeholder.
Creating the HTML Table on the Fly
Double-click the button that you added to the Webform in the previous step. A C# file will open. Update the imported details at the top of the file so that they match the following script precisely:
using System;
using System.Collections.Generic;
using System.Data.SqlClient;
using System.Linq;
using System.Text;
using System.Web;
using System.Web.UI;
using System.Web.UI.WebControls;
The only button on the webform is protected void Button1_Click. When you click it, the event handler will start. Inside the method for the event handler, add the logic that retrieves results from the Library table of your SQL Server Instance.
First, create a connection string to your SQL Server instance. Next, pass the string to the SqlConnection class object i.e. conn. Finally, the connection is opened via the Open() method.
The next step is to execute the INNER JOIN query.
Write the query in a string format and assigned it to the “query” variable. The string and connection are then passed to the “SqlCommand” class object.
To read the records, it calls the ExecuteReader() method of the SqlCommand object. This method returns the SqlDataReader type object. We can use thus SqlDataReader class object to iteratively loop through each record line by line.
Have a look at the following script:
// Create Connection with the SQL Server
            String conn_str = @"Data Source=DESKTOP-XXXXXXXXXXXXX;Initial Catalog=Library;Integrated Security=True";
            SqlConnection conn = new SqlConnection(conn_str);

            conn.Open();

            // Query for INNER Join
            string query = "SELECT  Books.BookName, Books.BookPrice, Authors.AuthorName, Authors.AuthorId" +
                            " FROM Books" +
                            " INNER JOIN Authors" +
                            " ON Books.AuthorIdF = Authors.AuthorId";

            // SQL Command Reader for reading results
            SqlCommand comm = new SqlCommand(query, conn);
            SqlDataReader reader = comm.ExecuteReader();

            StringBuilder table = new StringBuilder();
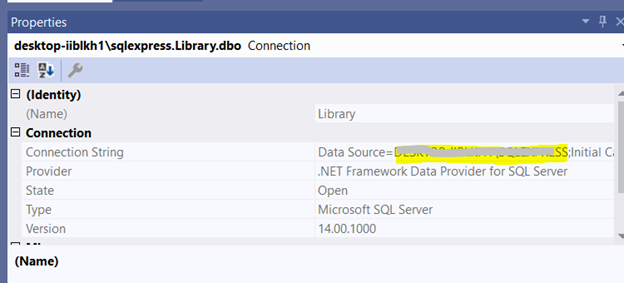
You can get the connection string by clicking the SQL Server instance and going to the Properties section:
Next, we need to write HTML code for the HTML5 table which will contain the INNER JOIN query results. You can use a StringBuilder object for that purpose.
The following script creates the HTML5 table with 4 columns: Book Name, Book Price, Author Name, and Author Id.
// Creating HTML5 Table on the Fly
            table.Append("<table border=1><tr>");


            table.Append("<th>Book Name</th><th>Book Price</th><th>Author Name</th><th>Author Id</th></tr>");

            while (reader.Read())


            {
                table.Append("<tr>");
                table.Append("<td>" + reader.GetString(0) + "</td>");
                table.Append("<td>" + reader.GetInt32(1).ToString() + "</td>");
                table.Append("<td>" + reader.GetString(2) + "</td>");
                table.Append("<td>" + reader.GetInt32(1).ToString() + "</td>");
                table.Append("</tr>");
            }

            table.Append("</table");

            conn.Close();

            // Binding Table with the Placeholder
            PlaceHolder1.Controls.Add(new Literal { Text = table.ToString() });
The SqlDataReader will return each record from the INNER JOIN query until the Read() method returns true.
During each iteration of the while loop, each data column value gets extracted via the GetString() and GetInt32() methods depending upon the column type.
Finally, the table is assigned to the Text attribute of the Literal object of the placeholder added to the form.
The complete code for the Button1 event handler is as follows:
protected void Button1_Click(object sender, EventArgs e)
        {
            // Create Connection with the SQL Server
            String conn_str = @"Data Source=DESKTOP-IIBLKH1\SQLEXPRESS;Initial Catalog=Library;Integrated Security=True";
            SqlConnection conn = new SqlConnection(conn_str);

            conn.Open();

            // Query for Join
            string query = "SELECT  Books.BookName, Books.BookPrice, Authors.AuthorName, Authors.AuthorId" +
                            " FROM Books" +
                            " INNER JOIN Authors" +
                            " ON Books.AuthorIdF = Authors.AuthorId";

            // SQL Command Reader for reading results
            SqlCommand comm = new SqlCommand(query, conn);
            SqlDataReader reader = comm.ExecuteReader();

            StringBuilder table = new StringBuilder();

            // Creating HTML5 Table on the Fly
            table.Append("<table border=1><tr>");


            table.Append("<th>Book Name</th><th>Book Price</th><th>Author Name</th><th>Author Id</th></tr>");

            while (reader.Read())


            {
                table.Append("<tr>");
                table.Append("<td>" + reader.GetString(0) + "</td>");
                table.Append("<td>" + reader.GetInt32(1).ToString() + "</td>");
                table.Append("<td>" + reader.GetString(2) + "</td>");
                table.Append("<td>" + reader.GetInt32(1).ToString() + "</td>");
                table.Append("</tr>");
            }

            table.Append("</table");

            conn.Close();

            // Binding Table with the Placeholder
            PlaceHolder1.Controls.Add(new Literal { Text = table.ToString() });

        }
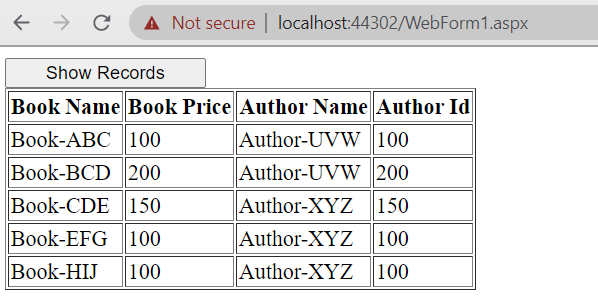
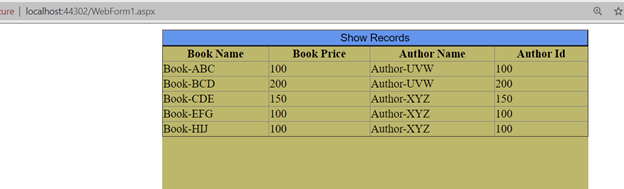
Now, if you run the project, you will see a webpage with a single button containing the Show Records text. After clicking that button, we see the INNER JOIN query results as shown below:
CSS3 Styling of HTML5 Table
Our table looks a little dry. We can improve its look and style with the help of CSS3 (Cascading Style Sheet 3). It serves to add styles to HTML objects in a webpage.
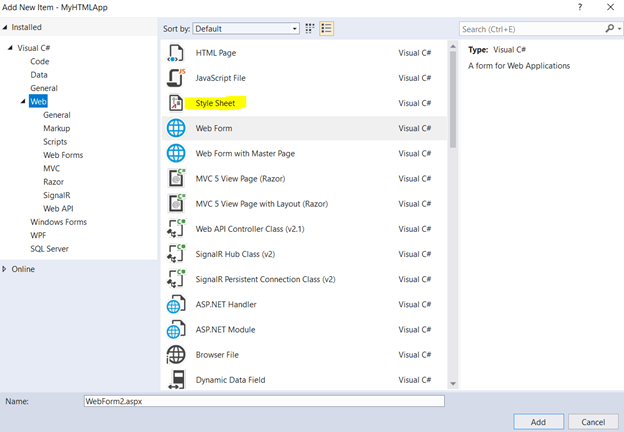
To add a CSS3 file in Visual Studio, right-click on the project name > Add > New Item:

From the list of items, click Style Sheet. Rename the stylesheet main_stylesheet.css and click Add.
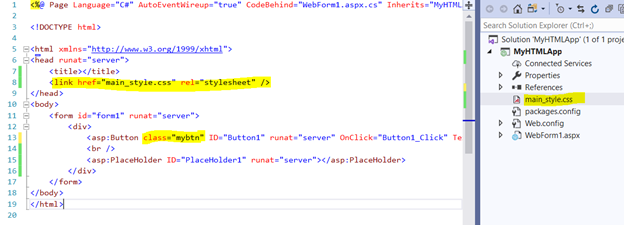
To connect the stylesheet to the webform, drag the stylesheet and drop it in the head section of the webform. Also, add class=mybtn to the script for Button1. This class will modify the style of the button from inside the stylesheet.
Now, open the stylesheet and add the following styles to your stylesheet.
body {
}

#form1 {
    width: 600px;
    height: 600px;
    background-color: darkkhaki;
    margin: auto;
}

.mybtn {
    width: 100%;
    background-color: cornflowerblue;
    font-size: 15px;
}

table {
    width: 100%;
    border-collapse: collapse;
}
These styles update the width, height, background color, and margins. They also update the button width so that it gets expanded to 100% of the parent container. The background color of the button gets also updated, and the table is expanded to 100%.
If we run the webform again, you will see the following webpage with the button and form styles updated there:
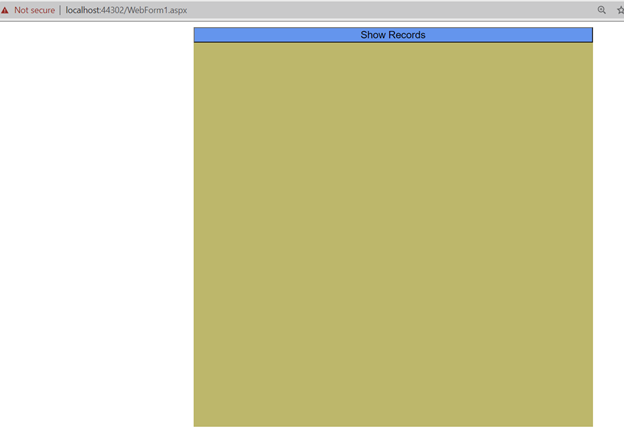
If you click Show Records, you will see the INNER JOIN query results in an HTML5 table, styled via the CSS3 script.
Conclusion
The article clarifies the essence and purpose of the SQL Server INNER JOIN query. We learned to apply this query to get and combine the results from different tables having common values.
Using the ASP.NET webform lets us visualize the query results, so we learned to create such a custom application for our needs. Finally, we learned to adjust the results view with the help of CSS to our preferences.
Read also
Your Ultimate Guide to SQL Join: INNER JOIN – Part 1
SQL Server Inner Join Basics with Examples
Tags: inner join, sql server, sql server joins Last modified: September 17, 2021


