
We already covered some theory about configuring Always ON Availability Groups for Linux-based SQL Servers. The current article will focus on practice.
We are going to present the step-by-step process of configuring the SQL Server Always ON Availability Groups between two synchronous replicas. Also, we’ll highlight the usage of the configuration-only replica to perform automatic failover.
Before we start, I would recommend you to refer to that previous article and refresh your knowledge.
The below design diagram displays the two-node synchronous replica and a configuration-only replica that help us ensure automatic failover and data protection.
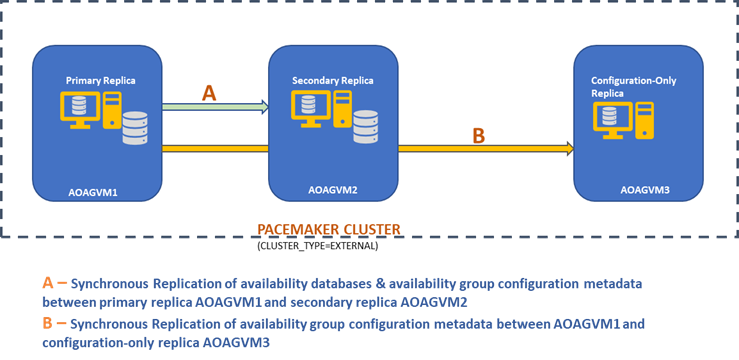
We explored this design in the previously mentioned article, so please refer to it for information before we proceed to practical tasks.
Install SQL Server on Ubuntu Systems
The above design diagram mentions 3 Ubuntu systems – aoagvm1, aoagvm2, and aoagvm3 with the SQL Server instances installed. Refer to the instruction on installing SQL Server on Ubuntu – the example relates to SQL Server 2019 on Ubuntu 18.04 system. You can go ahead and install SQL Server 2019 on all 3 nodes (make sure to install the same build version).
To save license costs, you can install the SQL Server Express edition for the third node replica. This one will work as a configuration-only replica without hosting any availability databases.
Once SQL Server is installed on all 3 nodes, we can configure the Availability Group between them.
Configure Availability Groups between three nodes
Before going ahead, validate your environment:
- Ensure there is communication between all 3 nodes.
- Check and update the computer name for each host by running the command sudo vi /etc/hostname
- Update the host file with IP address and Node names for each node. You can use the command sudo vi /etc/hosts to get this done
- Ensure you have all instances running beyond SQL Server 2017 CU1 if you are not using SQL Server 2019
Now, let’s start to configure the SQL Server Always ON Availability Group between 3-nodes. We need to enable the Availability Group feature on all 3 nodes.
Run the below command (note that you need to restart the SQL Server service after that action):
--Enable Availability Group feature
sudo /opt/mssql/bin/mssql-conf set hadr.hadrenabled  1

--Restart SQL Server service
sudo systemctl restart mssql-server
I have executed the above command on the primary node. It should be repeated for the remaining two nodes.
The output is below – enter the username and password whenever prompted.
aoagvm1@aoagvm1:~$ sudo /opt/mssql/bin/mssql-conf set hadr.hadrenabled  1
SQL Server needs to be restarted to apply this setting. Please run
'systemctl restart mssql-server.service'.

aoagvm1@aoagvm1:~$ systemctl restart mssql-server
==== AUTHENTICATING FOR org.freedesktop.systemd1.manage-units ===
Authentication is required to restart 'mssql-server.service'.
Authenticating as: Ubuntu (aoagvm1)
Password:
The next step is to enable the Always ON extended events for each SQL Server instance. Although this is an optional step, you must enable it to troubleshoot any issues which might come later. Connect to the SQL Server instance using SQLCMD and run the below command:
--Connect to the local SQL Server instance using sqlcmd
sqlcmd -S localhost -U SA -P 'C0de!n$!ght$'
Go
ALTER EVENT SESSION  AlwaysOn_health ON SERVER WITH (STARTUP_STATE=ON);
Go
The output is below:
aoagvm1@aoagvm1:~$ sqlcmd -S localhost -U SA -P 'C0de!n$!ght$'
1>ALTER EVENT SESSION  AlwaysOn_health ON SERVER WITH (STARTUP_STATE=ON);
2>GO
1>
Once you enable this option on the primary replica node, do the same for the remaining aoagvm2 and aoagvm3 nodes.
The SQL Server instances running on Linux use certificates to authenticate communication between the mirroring endpoints. So, the next option is to create the certificate on the primary replica aoagvm1.
First, we create a master key and a certificate. Then we back up this certificate in a file and secure the file with a private key. Run the below T-SQL script on the primary replica node:
--Connect to the local SQL Server instance using sqlcmd
sqlcmd -S localhost -U SA -P 'C0de!n$!ght$'

--Configure Certificates
CREATE MASTER KEY ENCRYPTION BY PASSWORD = 'C0de!n$!ght$m@$terKEY';
CREATE CERTIFICATE dbm_certificate WITH SUBJECT = 'dbm';
BACKUP CERTIFICATE dbm_certificate TO FILE = '/var/opt/mssql/data/dbm_certificate.cer'
WITH PRIVATE KEY (FILE = '/var/opt/mssql/data/dbm_certificate.pvk',ENCRYPTION BY PASSWORD = 'C0de!n$!ght$pr!v@teKEY');
The output:
aoagvm1@aoagvm1:~$ sqlcmd -S localhost -U SA -P 'C0de!n$!ght$'
1>CREATE MASTER KEY ENCRYPTION BY PASSWORD = 'C0de!n$!ght$m@$terKEY';
2>CREATE CERTIFICATE dbm_certificate WITH SUBJECT = 'dbm';
3>GO
1>BACKUP CERTIFICATE dbm_certificate TO FILE = '/var/opt/mssql/data/dbm_certificate.cer'
2>WITH PRIVATE KEY (FILE = '/var/opt/mssql/data/dbm_certificate.pvk',ENCRYPTION BY PASSWORD = 'C0de!n$!ght$pr!v@teKEY');
3>GO
1>
The primary replica node now has two new files. One is the certificate file dbm_certificate.cer and the private key file dbm_certificate.pvk at the /var/opt/mssql/data/ location.
Copy the above two files to the same location on the remaining two nodes (AOAGVM2 and AOAGVM3) that will be participating in the Availability Group configuration. You can use the SCP command or any third-party utility to copy these two files to the target server.
Once the files are copied to the remaining two nodes, we’ll assign permissions to the mssql user to access these files on all 3 nodes. For that, run the below command and then execute it for the 3rd node aoagvm3 as well:
--Copy files to aoagvm2 node
cd /var/opt/mssql/data
scp dbm_certificate.* root@aoagvm2:var/opt/mssql/data/

--Grant permission to user mssql to access both newly created files
cd /var/opt/mssql/data
chown mssql:mssql dbm_certificate.*
We will create the master key and certificate files with the help of the above two copied files on the remaining two nodes aoagvm2 and aoagvm3. Run the below command on those two nodes to create the master key:
--Create master key and certificate on remaining two nodes
CREATE MASTER KEY ENCRYPTION BY PASSWORD = 'C0de!n$!ght$m@$terKEY';
CREATE CERTIFICATE dbm_certificate
    FROM FILE = '/var/opt/mssql/data/dbm_certificate.cer'
    WITH PRIVATE KEY (FILE = '/var/opt/mssql/data/dbm_certificate.pvk', DECRYPTION BY PASSWORD = 'C0de!n$!ght$pr!v@teKEY');
I have executed the above command on the second node aoagvm2 to create the master key and certificate. Have a look at the execution output. Ensure to use the same passwords as when creating and backing up the certificate and master key.
aoagvm2@aoagvm2:~$ sqlcmd -S localhost -U SA -P 'C0de!n$!ght$'
1>CREATE MASTER KEY ENCRYPTION BY PASSWORD = 'C0de!n$!ght$m@$terKEY';
2>CREATE CERTIFICATE dbm_certificate
3>FROM FILE = '/var/opt/mssql/data/dbm_certificate.cer'
4>WITH PRIVATE KEY (FILE = '/var/opt/mssql/data/dbm_certificate.pvk', DECRYPTION BY PASSWORD = 'C0de!n$!ght$pr!v@teKEY');
5>GO
1>
Run the above command on the AOAGVM3 node as well.
Now, we configure database mirroring endpoints – earlier we have created certificates for them. The mirroring endpoint named hadr_endpoint should be on all 3 nodes as per their respective role type.
As availability databases are hosted on only 2 nodes aoagvm1 and aoagvm2, we will run еру below statement on those nodes only. The third node will act like a witness – so we will just change ROLE to witness in the below script, and then run the T-SQL to the third node aoagvm3. The script is:
--Configure database mirroring endpoint Hadr_endpoint on nodes aoagvm1 and aoagvm2
CREATE ENDPOINT [Hadr_endpoint]
    AS TCP (LISTENER_PORT = 5022)
    FOR DATABASE_MIRRORING (ROLE = ALL,
	    AUTHENTICATION = CERTIFICATE dbm_certificate,
		ENCRYPTION = REQUIRED ALGORITHM AES);

--Start the newly created endpoint
ALTER ENDPOINT [Hadr_endpoint] STATE = STARTED;
Here is the output of the above command on the primary replica node. I have connected to sqlcmd and executed it. Ensure to do the same on the 2nd replica node aoagvm2 as well.
aoagvm1@aoagvm1:~$ sqlcmd -S localhost -U SA -P 'C0de!n$!ght$'
1>CREATE ENDPOINT [Hadr_endpoint]
2>AS TCP (LISTENER_PORT = 5022)
3>FOR DATABASE_MIRRORING (ROLE = ALL, AUTHENTICATION = CERTIFICATE dbm_certificate, ENCRYPTION = REQUIRED ALGORITHM AES);
4>Go
1>ALTER ENDPOINT [Hadr_endpoint] STATE = STARTED;
2>Go
1>
Once you’ve executed the above T-SQL script on the first 2 nodes, we need to modify it for the third node – change the ROLE to WITNESS.
Run the below script to create the database mirroring endpoint on the witness node AOAGVM3. If you want to host availability databases there, run the above command on the 3rd replica node as well. But make sure you have installed the right edition of SQL Server to achieve this capability.
If you installed the SQL Server Express edition on the 3rd node to implement configuration-only replica, you can only configure ROLE as a witness for this node:
--Connect to the local SQL Server instance using sqlcmd
sqlcmd -S localhost -U SA -P 'C0de!n$!ght$'

----Configure database mirroring endpoint Hadr_endpoint on 3rd node aoagvm3
CREATE ENDPOINT [Hadr_endpoint]
    AS TCP (LISTENER_PORT = 5022)
    FOR DATABASE_MIRRORING (ROLE = WITNESS, AUTHENTICATION = CERTIFICATE dbm_certificate, ENCRYPTION = REQUIRED ALGORITHM AES);

--Start the newly created endpoint on aoagvm3
ALTER ENDPOINT [Hadr_endpoint] STATE = STARTED;
Now we have to create the Availability Group named ag1.
Connect to the SQL Server instance using the sqlcmd utility and run the below command on the primary replica node aoagvm1:
--Connect to the local SQL Server instance using sqlcmd hosted on primary replica node aoagvm1
sqlcmd -S localhost -U SA -P 'C0de!n$!ght$'

--Create availability group ag1
CREATE AVAILABILITY GROUP [ag1]
    WITH (CLUSTER_TYPE = EXTERNAL)
    FOR REPLICA ON
     N'aoagvm1’ WITH (ENDPOINT_URL = N'tcp://aoagvm1:5022',
        AVAILABILITY_MODE = SYNCHRONOUS_COMMIT,
        FAILOVER_MODE = EXTERNAL,
        SEEDING_MODE = AUTOMATIC),
     N'aoagvm2' WITH (ENDPOINT_URL = N'tcp://aoagvm2:5022',
        AVAILABILITY_MODE = SYNCHRONOUS_COMMIT,
        FAILOVER_MODE = EXTERNAL,
        SEEDING_MODE = AUTOMATIC),
     N'aoagvm3' WITH (ENDPOINT_URL = N'tcp://aoagvm3:5022',
        AVAILABILITY_MODE = CONFIGURATION_ONLY);

--Assign required permission
ALTER AVAILABILITY GROUP [ag1] GRANT CREATE ANY DATABASE;
The above script configures Availability Group replicas with the below configuration parameters (we have just used them in the T-SQL script):
- CLUSTER_TYPE = EXTERNAL because we are configuring availability group on Linux based SQL Server installations
- SEEDING_MODE = AUTOMATIC causes SQL Server to automatically create a database on each secondary replica. Availability databases will not be created on configuration-only replica
- FAILOVER_MODE = EXTERNAL for both Primary and Secondary replicas. it means that the replica interacts with an external cluster resource manager, such as Pacemaker
- AVAILABILITY_MODE = SYNCHRONOUS_COMMIT for primary and secondary replicas for automatic failover
- AVAILABILITY_MODE = CONFIGURATION_ONLY for 3rd replica which works as a configuration-only replica
We also need to create a Pacemaker login on all SQL Server instances. This user must be assigned the ALTER, CONTROL, and VIEW DEFINITION permissions on the Availability Group on all replicas. To grant permissions, run the below T-SQL script on all 3 replica nodes immediately. First, we will create a Pacemaker login. Then, we’ll assign the above permissions to that login.
--Create pacemaker login on each SQL Server instance. Run below commands on all 3 SQL Server instances
CREATE LOGIN pacemaker WITH PASSWORD = 'P@cemaker@12'

--Grant permission to pacemaker login on newly created availability group. Run it on all 3 SQL Server instances
GRANT ALTER, CONTROL, VIEW DEFINITION ON AVAILABILITY GROUP::ag1 TO pacemaker
GRANT VIEW SERVER STATE TO pacemaker
After assigning appropriate permissions to the Pacemaker login on all 3 replicas, we execute the below T-SQL scripts to join the secondary replicas aoagvm2 and aoagvm3 to the newly created availability group ag1. Run the below commands on the secondary replicas aoagvm2 and aoagvm3.
--Execute below commands on aoagvm2 and aoagvm3 to join availability group ag1
ALTER AVAILABILITY GROUP [ag1] JOIN WITH (CLUSTER_TYPE = EXTERNAL);
ALTER AVAILABILITY GROUP [ag1] GRANT CREATE ANY DATABASE;
Below is the output of the above executions on node aoagvm2. Make sure to run it on the aoagvm3 node as well.
aoagvm2@aoagvm2:~$ sqlcmd -S localhost -U SA -P 'C0de!n$!ght$'
1>ALTER AVAILABILITY GROUP [ag1] JOIN WITH (CLUSTER_TYPE = EXTERNAL);
2>Go
1>ALTER AVAILABILITY GROUP [ag1] GRANT CREATE ANY DATABASE;
2>Go
1>
Thus, we have configured the Availability Group. Now, we need to add a user or a test database to this Availability Group. If you have already created a user database on the primary node replica, just run a full backup and then let the automatic seeding restore it on the secondary node.
Thus, run the below command:
--Run a full backup of test database or user database hosted on primary replica aoagvm1
BACKUP DATABASE [Test] TO DISK = N'/var/opt/mssql/data/Test_15June.bak';
Let’s add this database Test to the Availability Group ag1. Run the below T-SQL statement on the primary node aoagvm1. You can use the sqlcmd utility to run T-SQL statements.
--Add user database or test database to the availability group ag1
ALTER AVAILABILITY GROUP [ag1] ADD DATABASE [Test];
You can verify the user database or a test database that you have added to the Availability Group by looking into the secondary SQL Server instance, whether it is created on secondary replicas or not. You can either use SQL Server Management Studio or run a simple T-SQL statement to fetch the details about this database.
--Verify test database is created on a secondary replica or not. Run it on secondary replica aoagvm2.
SELECT * FROM sys.databases WHERE name = 'Test';
GO
You will get the Test database created on the secondary replica.
With the above step, the AlwaysOn Availability Group has been configured between all three nodes. However, these nodes are not yet clustered. Our next step is installing the Pacemaker cluster on them. Then we will add the Availability Group ag1 as a resource to that cluster.
PACEMAKER Cluster Configuration between Three Nodes
So, we will use an external cluster resource manager PACEMAKER between all 3 nodes for cluster support. Let’s start with enabling the firewall ports between all 3 nodes.
Open firewall ports using the below command:
--Run the below commands on all 3 nodes to open Firewall Ports
sudo ufw allow 2224/tcp
sudo ufw allow 3121/tcp
sudo ufw allow 21064/tcp
sudo ufw allow 5405/udp
sudo ufw allow 1433/tcp
sudo ufw allow 5022/tcp
sudo ufw reload

--If you don't want to open specific firewall ports then alternatively you can disable the firewall on all 3 nodes by running the below command (THIS IS ALTERNATE & OPTIONAL APPROACH)
sudo ufw disable
See the output – this one is from the primary replica AOAGVM1. You need to execute the above commands on all three nodes, one by one. The output should be similar.
aoagvm1@aoagvm1:~$ sudo ufw allow 2224/tcp
Rules updated
Rules updated (v6)

aoagvm1@aoagvm1:~$ sudo ufw allow 3121/tcp
Rules updated
Rules updated (v6)

aoagvm1@aoagvm1:~$ sudo ufw allow 21064/tcp
Rules updated
Rules updated (v6)

aoagvm1@aoagvm1:~$ sudo ufw allow 5405/udp
Rules updated
Rules updated (v6)

aoagvm1@aoagvm1:~$ sudo ufw allow 1433/tcp
Rules updated
Rules updated (v6)

aoagvm1@aoagvm1:~$ sudo ufw allow 5022/tcp
Rules updated
Rules updated (v6)

aoagvm1@aoagvm1:~$ sudo ufw reload
Firewall not enabled (skipping reload)
Install Pacemaker and corosync packages on all 3 nodes. Run the below command on each node – it will configure Pacemaker, corosync, and fencing agent.
--Install Pacemaker packages on all 3 nodes aoagvm1, aoagvm2 and aoagvm3 by running the below command
sudo apt-get install pacemaker pcs fence-agents resource-agents
The output is huge – almost 20 pages. I have copied the first and last few lines to illustrate it (you can see all packages installed):
aoagvm1@aoagvm1:~$ sudo apt-get install pacemaker pcs fence-agents resource-agents
Reading package lists... Done
Building dependency tree
Reading state information... Done
The following additional packages will be installed:
  cluster-glue corosync fonts-dejavu-core fonts-lato fonts-liberation ibverbs-providers javascript-common libcfg6 libcib4 libcmap4 libcorosync-common4 libcpg4
  libcrmcluster4 libcrmcommon3 libcrmservice3 libdbus-glib-1-2 libesmtp6 libibverbs1 libjs-jquery liblrm2 liblrmd1 libnet-telnet-perl libnet1 libnl-3-200
  libnl-route-3-200 libnspr4 libnss3 libopenhpi3 libopenipmi0 libpe-rules2 libpe-status10 libpengine10 libpils2 libplumb2 libplumbgpl2 libqb0 libquorum5 librdmacm1
  libruby2.5 libsensors4 libsgutils2-2 libsnmp-base libsnmp30 libstatgrab10 libstonith1 libstonithd2 libtimedate-perl libtotem-pg5 libtransitioner2 libvotequorum8
  libxml2-utils openhpid pacemaker-cli-utils pacemaker-common pacemaker-resource-agents python-pexpect python-ptyprocess python-pycurl python3-bs4 python3-html5lib
  python3-lxml python3-pycurl python3-webencodings rake ruby ruby-activesupport ruby-atomic ruby-backports ruby-did-you-mean ruby-ethon ruby-ffi ruby-highline
  ruby-i18n ruby-json ruby-mime-types ruby-mime-types-data ruby-minitest ruby-multi-json ruby-net-telnet ruby-oj ruby-open4 ruby-power-assert ruby-rack
  ruby-rack-protection ruby-rack-test ruby-rpam-ruby19 ruby-sinatra ruby-sinatra-contrib ruby-test-unit ruby-thread-safe ruby-tilt ruby-tzinfo ruby2.5
  rubygems-integration sg3-utils snmp unzip xsltproc zip
Suggested packages:
  ipmitool python-requests python-suds apache2 | lighttpd | httpd lm-sensors snmp-mibs-downloader python-pexpect-doc libcurl4-gnutls-dev python-pycurl-dbg
  python-pycurl-doc python3-genshi python3-lxml-dbg python-lxml-doc python3-pycurl-dbg ri ruby-dev bundler
The following NEW packages will be installed:
  cluster-glue corosync fence-agents fonts-dejavu-core fonts-lato fonts-liberation ibverbs-providers javascript-common libcfg6 libcib4 libcmap4 libcorosync-common4
  libcpg4 libcrmcluster4 libcrmcommon3 libcrmservice3 libdbus-glib-1-2 libesmtp6 libibverbs1 libjs-jquery liblrm2 liblrmd1 libnet-telnet-perl libnet1 libnl-3-200
  libnl-route-3-200 libnspr4 libnss3 libopenhpi3 libopenipmi0 libpe-rules2 libpe-status10 libpengine10 libpils2 libplumb2 libplumbgpl2 libqb0 libquorum5 librdmacm1
  libruby2.5 libsensors4 libsgutils2-2 libsnmp-base libsnmp30 libstatgrab10 libstonith1 libstonithd2 libtimedate-perl libtotem-pg5 libtransitioner2 libvotequorum8
  libxml2-utils openhpid pacemaker pacemaker-cli-utils pacemaker-common pacemaker-resource-agents pcs python-pexpect python-ptyprocess python-pycurl python3-bs4
  python3-html5lib python3-lxml python3-pycurl python3-webencodings rake resource-agents ruby ruby-activesupport ruby-atomic ruby-backports ruby-did-you-mean
  ruby-ethon ruby-ffi ruby-highline ruby-i18n ruby-json ruby-mime-types ruby-mime-types-data ruby-minitest ruby-multi-json ruby-net-telnet ruby-oj ruby-open4
  ruby-power-assert ruby-rack ruby-rack-protection ruby-rack-test ruby-rpam-ruby19 ruby-sinatra ruby-sinatra-contrib ruby-test-unit ruby-thread-safe ruby-tilt
  ruby-tzinfo ruby2.5 rubygems-integration sg3-utils snmp unzip xsltproc zip
0 upgraded, 103 newly installed, 0 to remove and 2 not upgraded.
Need to get 19.6 MB of archives.
After this operation, 86.0 MB of additional disk space will be used.
Do you want to continue? [Y/n] Y
Get:1 http://azure.archive.ubuntu.com/ubuntu bionic/main amd64 fonts-lato all 2.0-2 [2698 kB]
Get:2 http://azure.archive.ubuntu.com/ubuntu bionic/main amd64 libdbus-glib-1-2 amd64 0.110-2 [58.3 kB]
…………
--------
Once the Pacemaker cluster installation is finished, the hacluster user will be populated automatically while running the below command:
aoagvm1@aoagvm1:~$ cat /etc/passwd|grep hacluster
hacluster:x:111:115::/var/lib/pacemaker:/usr/sbin/nologin
Now, we can set the password for the default user created while installing Pacemaker and the Corosync packages. Make sure to use the same password on all 3 nodes. Use the below command:
--Set default user password on all 3 nodes
sudo passwd hacluster
Enter the password when prompted:
aoagvm1@aoagvm1:~$ sudo passwd hacluster
Enter new UNIX password:
Retype new UNIX password:
passwd: password updated successfully
The next step is to enable and start the pcsd service and Pacemaker on all 3 nodes. It allows all 3 nodes to join the cluster after reboot. Run the below command on all 3 nodes to get this step done:
--Enable and start pcsd service and pacemaker
sudo systemctl enable pcsd
sudo systemctl start pcsd
sudo systemctl enable pacemaker
See the execution on the primary replica aoagvm1. Ensure to run it on the remaining two nodes as well.
--Enable pcsd service
aoagvm1@aoagvm1:~$ sudo systemctl enable pcsd
Synchronizing state of pcsd.service with SysV service script with /lib/systemd/systemd-sysv-install.
Executing: /lib/systemd/systemd-sysv-install enable pcsd

--Start pcsd service
aoagvm1@aoagvm1:~$ sudo systemctl start pcsd

--Enable Pacemaker
aoagvm1@aoagvm1:~$ sudo systemctl enable pacemaker
Synchronizing state of pacemaker.service with SysV service script with /lib/systemd/systemd-sysv-install.
Executing: /lib/systemd/systemd-sysv-install enable pacemaker
We have configured the Pacemaker packages. Now we create a cluster.
First, make sure that you don’t have any previously configured clusters on those systems. You can destroy any existing cluster configurations from all nodes by running the below commands. Note that removing any cluster configuration will stop all cluster services and disable the Pacemaker service – it needs to be re-enabled.
--Destroy previously configured clusters to clean the systems
sudo pcs cluster destroy

--Reenable Pacemaker
sudo systemctl enable pacemaker
Below is the output from the primary replica node aoagvm1.
--Destroy previously configured clusters to clean the systems
aoagvm1@aoagvm1:~$ sudo pcs cluster destroy
Shutting down pacemaker/corosync services...
Killing any remaining services...
Removing all cluster configuration files...

--Reenable Pacemaker
aoagvm1@aoagvm1:~$ sudo systemctl enable pacemaker
Synchronizing state of pacemaker.service with SysV service script with /lib/systemd/systemd-sysv-install.
Executing: /lib/systemd/systemd-sysv-install enable pacemaker
Next, we create the 3-node cluster between all 3 nodes from the primary replica aoagvm1. Important: Execute below commands from your primary node only!
--Create cluster. Modify below command with your node names, hacluster password and clustername
sudo pcs cluster auth <node1> <node2> <node3> -u hacluster -p <password for hacluster>
sudo pcs cluster setup --name <clusterName> <node1> <node2...> <node3>
sudo pcs cluster start --all
sudo pcs cluster enable --all
See the output on the primary replica node:
aoagvm1@aoagvm1:~$ sudo pcs cluster auth aoagvm1 aoagvm2 aoagvm3 -u hacluster -p hacluster
aoagvm1: Authorized
aoagvm2: Authorized
aoagvm3: Authorized

aoagvm1@aoagvm1:~$ sudo pcs cluster setup --name aoagvmcluster aoagvm1 aoagvm2 aoagvm3
Destroying cluster on nodes: aoagvm1, aoagvm2, aoagvm3...
aoagvm1: Stopping Cluster (pacemaker)...
aoagvm2: Stopping Cluster (pacemaker)...
aoagvm3: Stopping Cluster (pacemaker)...
aoagvm1: Successfully destroyed cluster
aoagvm2: Successfully destroyed cluster
aoagvm3: Successfully destroyed cluster
Sending 'pacemaker_remote authkey' to 'aoagvm1', 'aoagvm2', 'aoagvm3'
aoagvm1: successful distribution of the file 'pacemaker_remote authkey'
aoagvm2: successful distribution of the file 'pacemaker_remote authkey'
aoagvm3: successful distribution of the file 'pacemaker_remote authkey'
Sending cluster config files to the nodes...
aoagvm1: Succeeded
aoagvm2: Succeeded
aoagvm3: Succeeded
Synchronizing pcsd certificates on nodes aoagvm1, aoagvm2, aoagvm3...
aoagvm1: Success
aoagvm2: Success
aoagvm3: Success
Restarting pcsd on the nodes to reload the certificates...
aoagvm1: Success
aoagvm2: Success
aoagvm3: Success


aoagvm1@aoagvm1:~$ sudo pcs cluster start --all
aoagvm1: Starting Cluster...
aoagvm2: Starting Cluster...
aoagvm3: Starting Cluster...

aoagvm1@aoagvm1:~$ sudo pcs cluster enable --all
aoagvm1: Cluster Enabled
aoagvm2: Cluster Enabled
aoagvm3: Cluster Enabled
Fencing is one of the essential configurations while using the PACEMAKER cluster in production. You should configure fencing for your cluster to ensure there won’t be any data corruption in case of any outages.
There are two types of fencing implementation:
- Resource-level – ensures that a node cannot use one or more resources.
- Node-level – ensures that a node does not run any resources at all.
We generally use STONITH as fencing configuration – the node-level fencing for PACEMAKER.
When PACEMAKER cannot determine the state of a node or a resource on a node, fencing brings the cluster to a known state again. To achieve this, PACEMAKER requires us to enable STONITH, which stands for Shoot The Other Node In The Head.
We will not focus on the fencing configuration in this article because the node-level fencing configuration depends heavily on the individual environment. For our scenario, we’ll disable it by running the below command:
--Disable fencing (STONITH)
sudo pcs property set stonith-enabled=false
However, if you plan to use Pacemaker in a production environment, you should plan the STONITH implementation depending on your environment and keep it enabled.
Next, we will set some essential cluster properties: cluster-recheck-interval, start-failure-is-fatal, and failure-timeout.
As per MSDN, if failure-timeout is set to 60 seconds, and cluster-recheck-interval is set to 120 seconds, the restart is tried at an interval that is greater than 60 seconds but less than 120 seconds. Microsoft recommends setting a value for cluster-recheck-interval greater than the value of failure-timeout. Another setting start-failure-is-fatal needs to be set as true. Otherwise, the cluster will not initiate the failover of primary replica to their respective secondary replica, should any permanent outages occur.
Run the below commands to configure all 3 important cluster properties:
--Set cluster property cluster-recheck-interval to 2 minutes
sudo pcs property set cluster-recheck-interval=2min

--Set start-failure-is-fatal to True
sudo pcs property set start-failure-is-fatal=true

--Set failure-timeout to 60 seconds. Ag1 is the name of the availability group. Change this name with your availability group name.
pcs resource update ag1 meta failure-timeout=60s
Integrate Availability Group to Pacemaker Cluster Group
Here, our goal is to describe the process of Integrating the newly-created Availability Group ag1 to the newly-created Pacemaker cluster group.
First, we will install the SQL Server resource agent for integration with Pacemaker on all 3 nodes:
--Install SQL Server Resource Agent on all 3 nodes
sudo apt-get install mssql-server-ha
I have executed the above command on all 3 nodes. See the output below (taken from aoagvm1):
--Install SQL Server resource agent for integration with Pacemaker
aoagvm1@aoagvm1:~$ sudo apt-get install mssql-server-ha
Reading package lists... Done
Building dependency tree
Reading state information... Done
The following NEW packages will be installed:
  mssql-server-ha
0 upgraded, 1 newly installed, 0 to remove, and 2 not upgraded.
Need to get 1486 kB of archives.
After this operation, 9151 kB of additional disk space will be used.
Get:1 https://packages.microsoft.com/ubuntu/16.04/mssql-server-preview xenial/main amd64 mssql-server-ha amd64 15.0.1600.8-1 [1486 kB]
Fetched 1486 kB in 0s (4187 kB/s)
Selecting previously unselected package mssql-server-ha.
(Reading database ... 90430 files and directories currently installed.)
Preparing to unpack .../mssql-server-ha_15.0.1600.8-1_amd64.deb ...
Unpacking mssql-server-ha (15.0.1600.8-1) ...
Setting up mssql-server-ha (15.0.1600.8-1) ...
Repeat the above steps on the remaining 2 nodes.
We have already created the Pacemaker login on all SQL Server instances hosted on 3 nodes when we have configured the Availability Group ag1. Now, we assign the sysadmin role on all 3 SQL Server instances. You can connect using sqlcmd for running this T-SQL command. If you have not created the Pacemaker login, you can run the below command to do it.
--Create a pacemaker login if you missed creating it in the above section.
USE master
Go
CREATE LOGIN pacemaker WITH PASSWORD = 'P@cemaker@12'
Go

--Assign sysadmin role to pacemaker login on all 3 nodes. Run this T-SQL on all 3 SQL Server instances.
ALTER SERVER ROLE [sysadmin] ADD MEMBER [pacemaker]
We must save the above SQL Server Pacemaker login and its credentials on all 3 nodes. Run the below command there:
--Save pacemaker login credentials on all 3 nodes by executing below commands on each node
echo 'pacemaker' >> ~/pacemaker-passwd
echo 'P@cemake@12' >> ~/pacemaker-passwd
sudo mv ~/pacemaker-passwd /var/opt/mssql/secrets/passwd
sudo chown root:root /var/opt/mssql/secrets/passwd
sudo chmod 400 /var/opt/mssql/secrets/passwd
We will create the Availability Group Resource as master/subordinate.
We are using the pcs resource create command to create the Availability Group resource and set its properties. The following command will create the ocf:mssql:ag resource for the Availability Group ag1.
The Pacemaker resource agent automatically sets the value of REQUIRED_SYNCHRONIZED_SECONDARIES_TO_COMMIT on the Availability Group based on the Availability Group’s configuration during the creation of the Availability Group resource.
Execute the below command:
--Create availability group resource ocf:mssql:ag
sudo pcs resource create ag_cluster ocf:mssql:ag ag_name=ag1 meta failure-timeout=30s --master meta notify=true
Next, we create a virtual IP resource in Pacemaker. Ensure you have the unused private IP address from your network. Replace the IP value with your virtual IP address. This IP will point to the primary replica and you can use it to make databases connections with active nodes.
The command is below:
--Configure virtual IP resource
sudo pcs resource create virtualip ocf:heartbeat:IPaddr2 ip=10.50.0.7
We are adding the colocation constraint and ordering constraint to the Pacemaker cluster configuration. These constraints help the virtual IP resource to make decisions on resources, e.g., where they should run.
Constraints have some scores, and Pacemaker uses these scores to make decisions. Scores are calculated per resource. The cluster resource manager chooses the node with the highest score for a particular resource.
The colocation constraint has an implicit ordering constraint. We need to add an ordering constraint to prevent the IP address from temporarily pointing to the node with the pre-failover secondary. Ordering constraint ensures the cluster comes online in a particular sequential manner.
Run the below commands to add colocation constraint and ordering constraint to the cluster.
--Add colocation constraint
sudo pcs constraint colocation add virtualip ag_cluster-master INFINITY with-rsc-role=Master

--Add ordering constraint
sudo pcs constraint order promote ag_cluster-master then start virtualip
Hence, Two-Node Synchronous Replicas (aoagvm1 & aoagvm2) and a Configuration-Only Replica (aoagvm3) on PACEMAKER Cluster between 3-Node Ubuntu Systems has been completed.
We can test the configuration to validate the automatic failover. Run the below command to check the status of the Pacemaker cluster. The command also initiates the Availability Group failover.
Remember, once you couple your Availability Group with the PACEMAKER cluster, you cannot use T-SQL statements to initiate the Availability Group failovers. You can also shut down the primary replica to initiate the automatic failover.
The command is the following:
--Validate the PACEMAKER cluster configuration
sudo pcs status

--Initiate availability group failover to verify AOAG configuration
sudo pcs resource move ag_cluster-master aoagvm2 –master
Conclusion
This article was meant to help you understand the configuration of the Two-Node Synchronous Replicas and a Configuration-Only Replica on PACEMAKER Cluster. We hope that you got useful information that will help you in your workflow.
Always plan all steps carefully and do proper testing in a lower life cycle before deploying to your production environment.
We’ll be glad to hear your thoughts about this topic. Feel free to leave your feedback in a comment section.
Tags: Always On, sql server availability groups, synchronous replicas Last modified: September 16, 2021