The previous article explained the creation of a virtual machine using Oracle VM Virtual machine. Now, we will learn how to install Ubuntu 18.04 and SQL Server 2019 on Linux.
Install Ubuntu Linux
First, we need an operating system ISO file. Once the file is downloaded, we mount it on a virtual disk drive:
Launch Oracle VM Virtual Machine Manager and right-click on LinuxSQL01. Then click Settings.

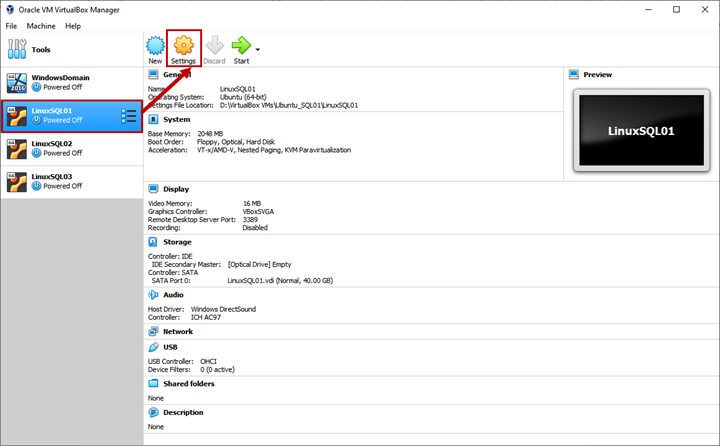
Click Storage > Empty. You’ll see the list of virtual storage devices.
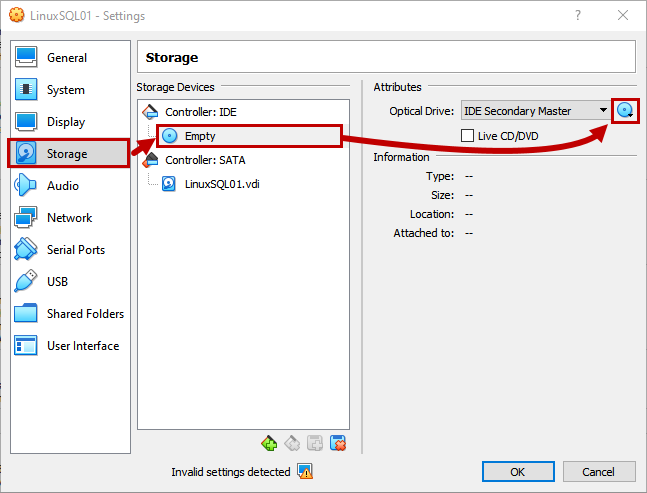
We want to mount an ISO file of the Ubuntu Linux. Hence click the Optical Drive icon next to the Optical Drive drop-down menu in the Attributes section.
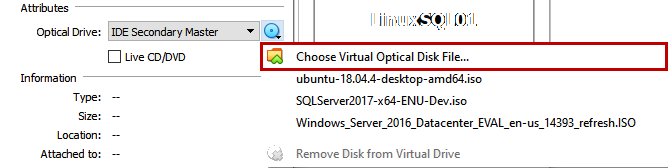
In the menu, go to Choose Virtual Optical Disk File:
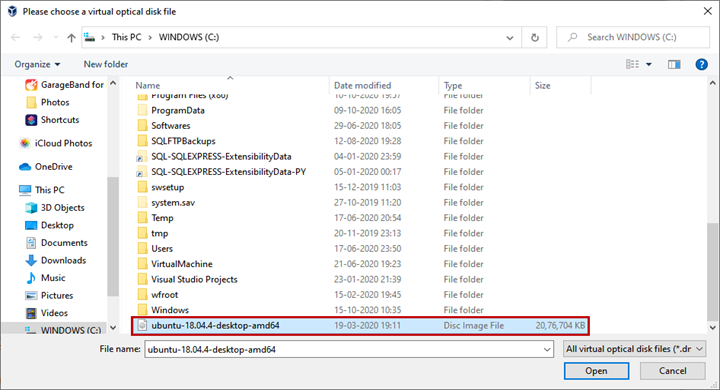
Choose the ISO image and click Open.
Back to the Storage screen, you can see the ISO image details under Attributes.
Click OK to save the configuration.

On Oracle VM VirtualBox Manager, click on LinuxSQL01 > Start.
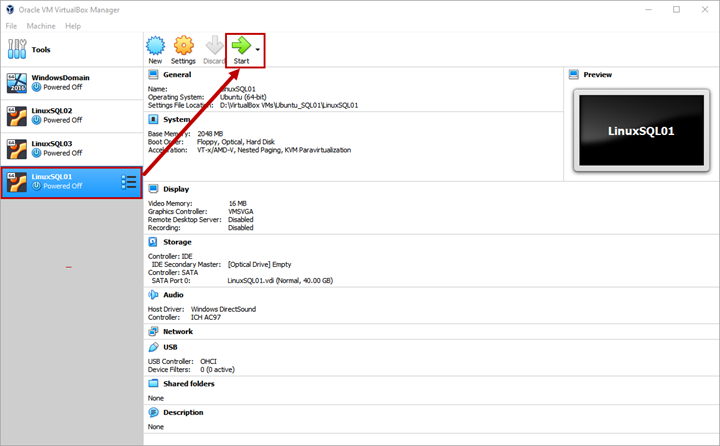
The virtual machine starts and launches the Ubuntu installation wizard.
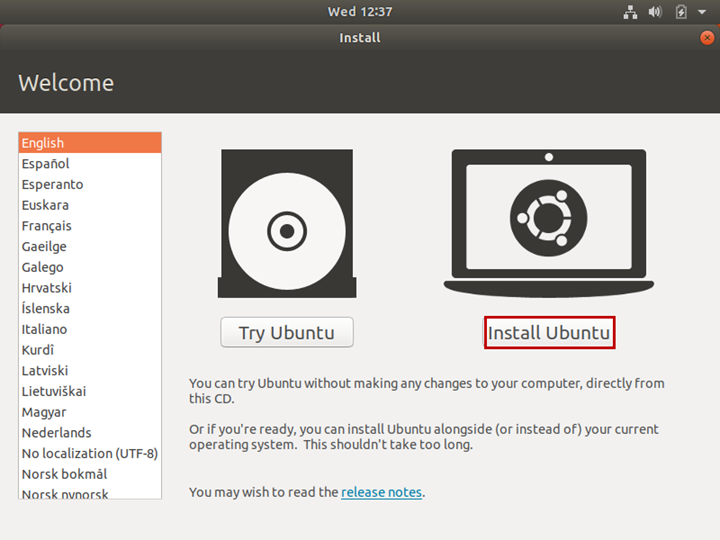
The ISO image in use is a live disk. We can run the operating system without installing it on disk using the Live CD.
Click Install Ubuntu, as it is what we want.
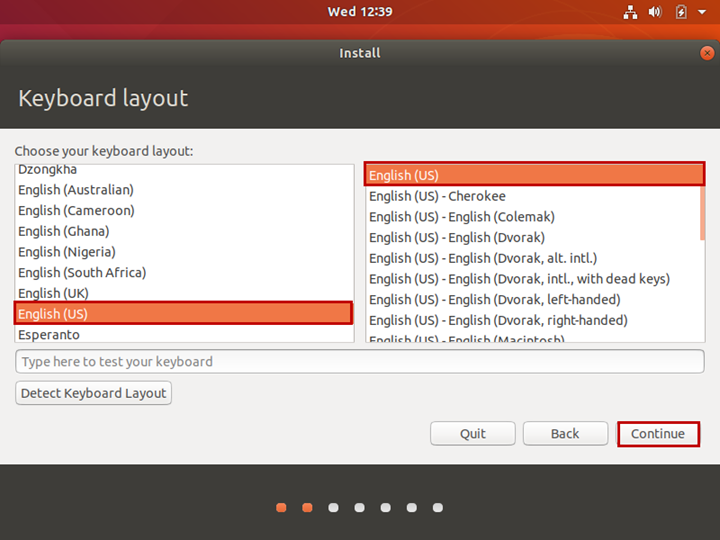
On the Keyboard layout screen, choose the desired keyword layout. We will use English (US) – select it from the list. Click Continue.
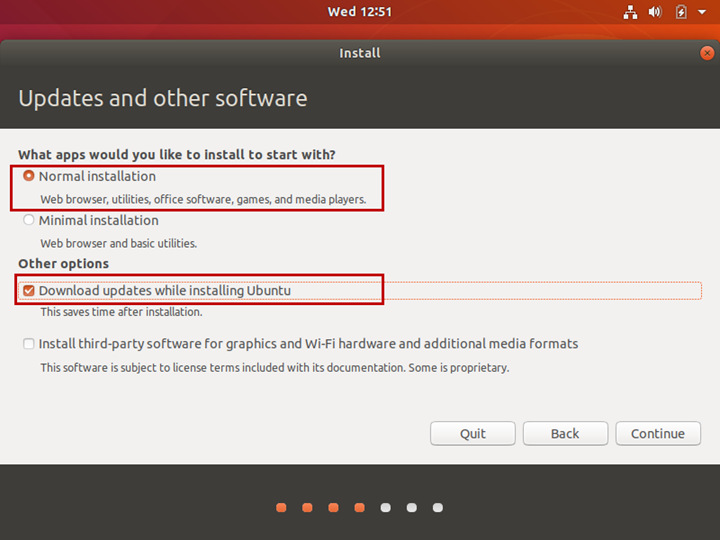
On the Update and other software screen, choose the installation type.
We perform Normal installation, so select it. Also, we need to install the updates – select Download updates during the installation.
Click Continue.
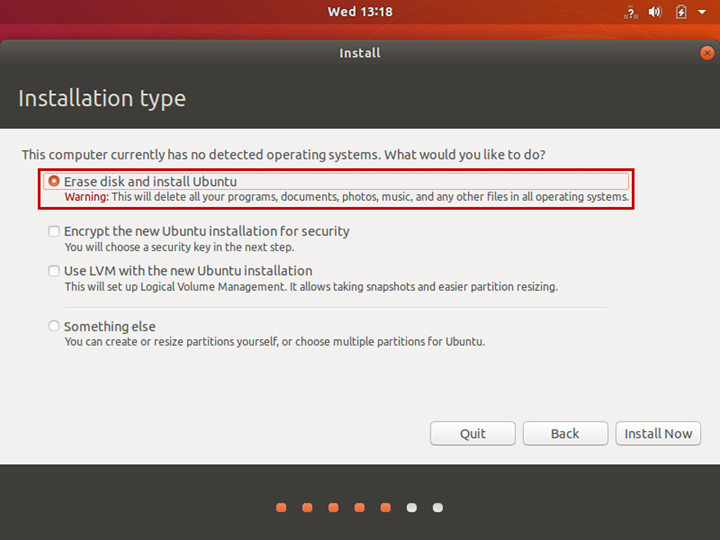
On the Installation type screen, select Erase disk and install Ubuntu.
Click Install Now.
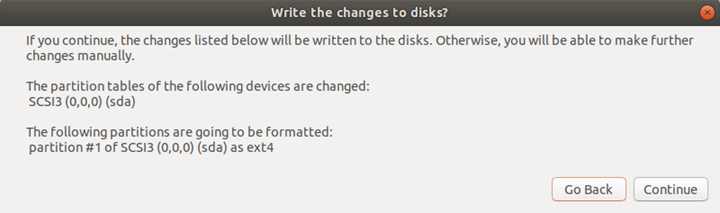
Before the installation wizard formats the disk, it will show the confirmation message.
Review the disk partition details and click Continue.
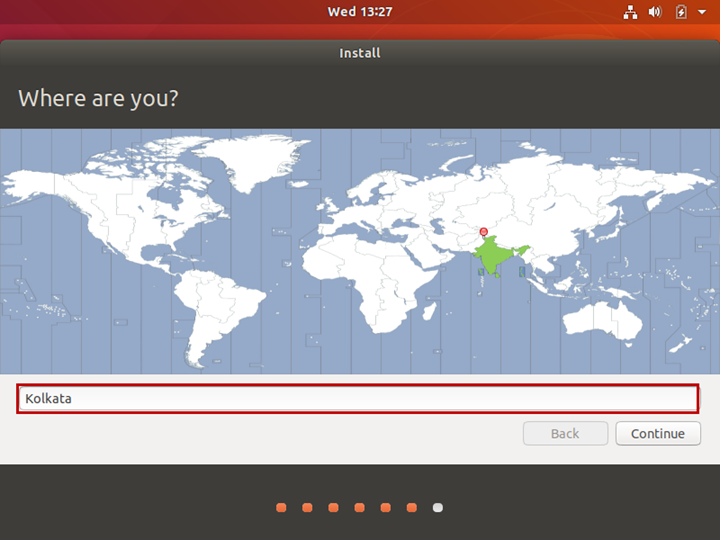
Select the time zone. Click Continue.
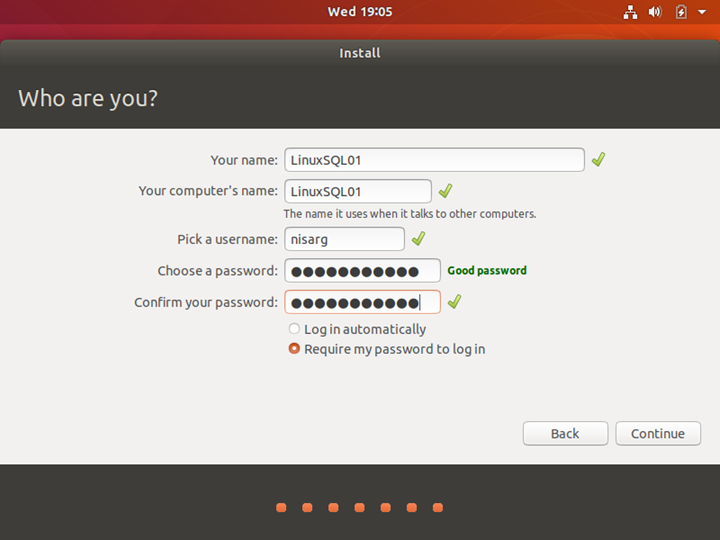
On the next Who are you screen, specify the name of the machine (hostname).
Enter the username and password, and click Continue to begin the installation.
The installation process begins. It takes time, depending on the host machine configuration.
Once the process is complete, you must restart the machine.
After installing Ubuntu successfully, we configure the Network.
Configure Network
In the previous article, we also explained how to configure the bridge adaptor for the virtual machine. The bridge adaptor automatically assigns IP Address to the machines connected to it. To deploy the Availability groups, we should use static IP Addresses. For that, we change the network settings.
Sign-in to the virtual machine.
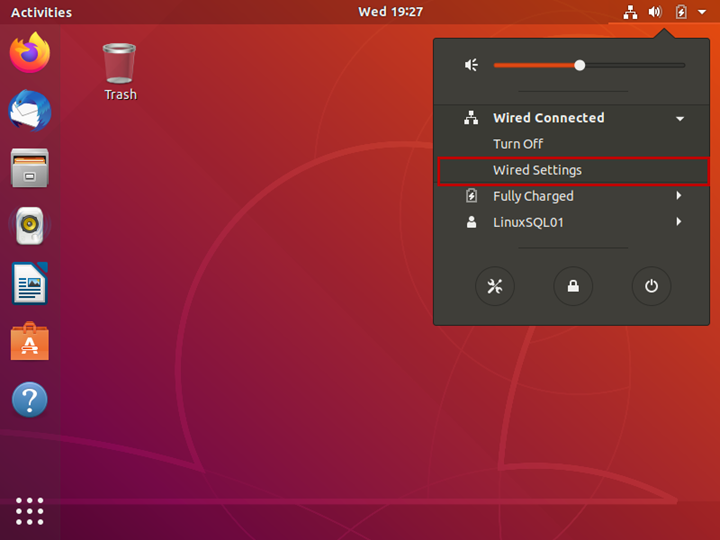
On the Ubuntu desktop, click on the Network symbol – it can be in the top-right corner:

A drop-down menu opens. Click Wired Connected > Wired Settings.
On the Network Settings screen, click on the configure icon:
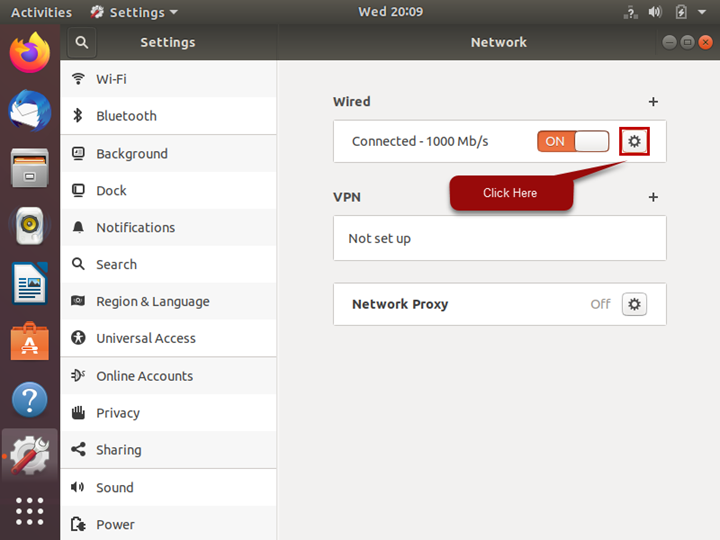
In the Wired section, go to the IPv4 tab. There, select IPv4 Method > Manual.
Enter the following details:
- IP Address: 192.168.0.140
- Subnet: 255.255.255.0
- Gateway: 192.168.0.1
- DNS: 192.168.0.1
Click on Apply to save the network configuration and close the network settings.

Now, let us test the network settings. First, let us try to ping to www.google.com. To run the ping command, we must install the net-tools package. Run the following command to install the package.
root@LinuxSQL01:~# Sudo apt-get install net-toolsOnce package installation completes, run the ping command on the terminal.
root@LinuxSQL01:~# Ping www.google.comThe output:
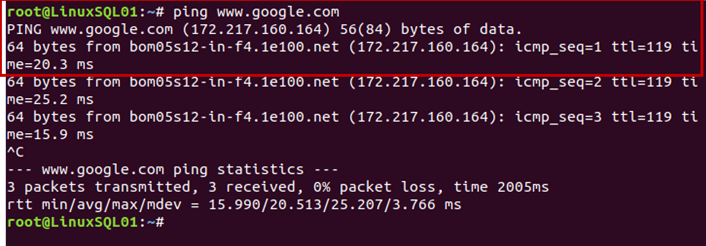
As you can see, we can connect to the internet.
Now, install Ubuntu Linux on LinuxSQL02 and LinuxSQL03 virtual machines, and assign them corresponding IP Addresses.
| Hostname | IP Address | Subnet | Gateway | DNS |
| LinuxSQL02 | 192.168.0.141 | 255.255.255.0 | 192.168.0.1 | 192.168.0.1 |
| LinuxSQL03 | 192.168.0.142 | 255.255.255.0 | 192.168.0.1 | 192.168.0.1 |
I have installed the PuTTY application to connect to the terminals of all virtual machines.
Once IP Addresses are assigned, check the connectivity by Ping commands.
Install SQL Server 2019 on Linux
The process of installing SQL Server 2019 on Linux is very simple. You only need to do the following, step by step:
Open Putty application and connect to the LinuxSQL01. Putty uses SSH to connect to Linux. Thus we must install the SSH on LinuxSQL01 first of all.
Run the following command and install SSH:
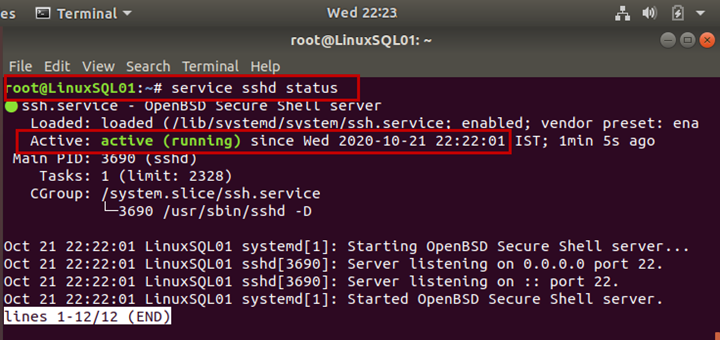
root@LinuxSQL01:~# Sudo apt-get install sshOnce the SSH package is installed, verify that the SSH services are running by the following command:
root@LinuxSQL01:~# service sshd statusThe output:
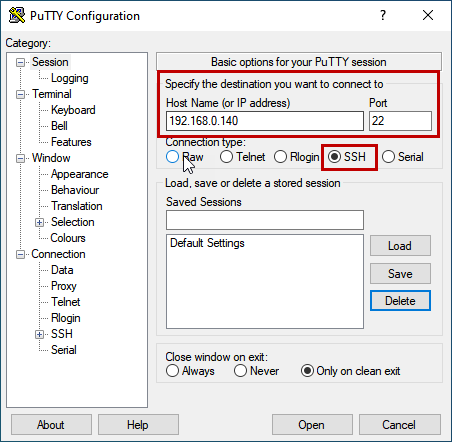
Launch PuTTY. On the Basic options screen, enter the hostname or IP Address and port. Choose SSH as the connection type.
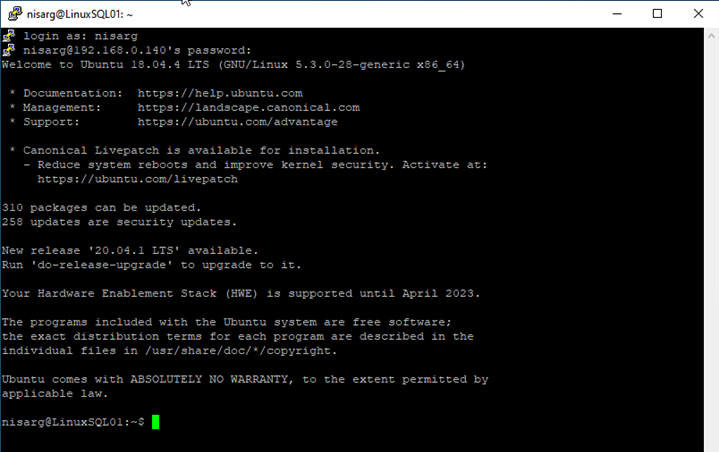
The PuTTY command line window opens and prompts for login. Provide the appropriate information and hit Enter.
We install SQL Server using the root user. Execute the following command to access it:
nisarg@LinuxSQL01:~# Sudo -sIt prompts for the password of the current user, so enter it:

Update the Ubuntu repository by executing the following command:
root@LinuxSQL01:~# sudo apt-get updateOnce the repository is updated, import GPG keys for SQL Server and Command Line tools:
/*Following command to import GPG Keys of SQL Server*/
root@LinuxSQL01:~# wget -qO- https://packages.microsoft.com/keys/microsoft.asc | sudo apt-key add –
/*Following command to import GPG Keys */
root@LinuxSQL01:~# curl https://packages.microsoft.com/keys/microsoft.asc | sudo apt-key add -
Register SQL Server Ubuntu repository for SQL Server and command-line tools:
/*Following command to register Ubuntu repository for SQL Server*/
root@LinuxSQL01:~# sudo add-apt-repository "$(wget -qO- https://packages.microsoft.com/config/ubuntu/18.04/mssql-server-2019.list)"
/*Following command to register Ubuntu repository for SQL Command Line tools*/
root@LinuxSQL01:~# curl https://packages.microsoft.com/config/ubuntu/18.04/prod.list | sudo tee /etc/apt/sources.list.d/msprod.list
Run the following command to update the Ubuntu repository and install SQL Server:
root@LinuxSQL01:~# sudo apt-get update
root@LinuxSQL01:~# sudo apt-get install -y mssql-server
Once the package installation completes, run the below command to configure the SQL Server instance parameters. This command prompts to choose the SQL Server edition and set the SA password:
root@LinuxSQL01:~# sudo /opt/mssql/bin/mssql-conf setupExecute the following command to install the command line tools:
root@LinuxSQL01:~# sudo apt-get install mssql-tools Once the installation process is complete, run the following command to set the PATH variable so it can be accessed from the login sessions:
root@LinuxSQL01:~# echo 'export PATH="$PATH:/opt/mssql-tools/bin"' >> ~/.bash_profile
root@LinuxSQL01:~# echo 'export PATH="$PATH:/opt/mssql-tools/bin"' >> ~/.bashrc
root@LinuxSQL01:~# source ~/.bashrc
Thus, we’ve installed SQL Server 2019 and the command line tools successfully. Execute the following command to check the SQL Server service status:
root@LinuxSQL01:~# service mssql-server statusThe output:
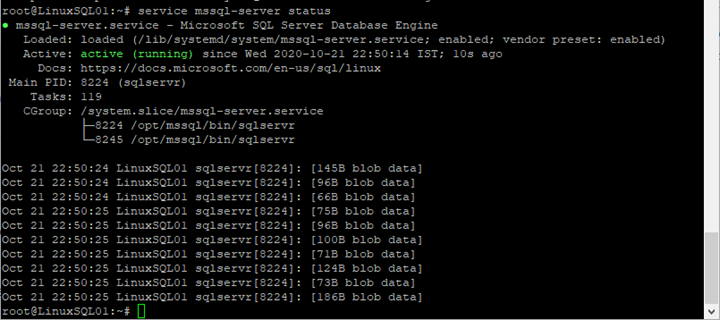
As you can see in the above image, SQL Server services are running. We’ve configured our SQL Server properly.
Note: I have also written an article explaining the installation process of SQL Server 2017 on Linux. You can read it for a detailed explanation.
Summary
In this article, we’ve clarified the step by step installation of Ubuntu 18.04 and SQL Server 2019 on Linux. Also, we’ve defined how configure Network in Ubuntu.
The next article will explain how to deploy the AlwaysOn availability groups on SQL Server 2019 on Linux. Stay tuned!
Tags: failover cluster instance, linux, sql always on, sql server 2019, sql server availability groups Last modified: September 18, 2021