
This article focuses on the step-by-step processes of installing and configuring the ODBC driver for MySQL. In particular, it will cover the following issues:
- Installing the ODBC driver on Windows 10.
- Configuring the ODBC data source with ODBC driver for MySQL.
- Creating a basic list report with PowerBI that uses the ODBC driver for the data population from the MySQL database.
ODBC/Connector Installation on Windows
Connector/ODBC is a universal cross-platform solution. It works on all platforms that MySQL supports – Windows, Unix-like OS, and macOS. The developers continually track all the new OS versions to make sure that MySQL in general and ODBC, in particular, will be compatible with them.
The full list of currently supported platforms is below:
- Oracle Linux / Red Hat / CentOS, versions 6 – 8
- Oracle Solaris 11
- Canonical – Ubuntu, versions 18.04 – 21.04
- SUSE Enterprise Linux, versions 12 – 15
- Debian 10 – 11
- Microsoft Windows Server 2012 – 2019
- Microsoft Windows 10
- macOX 10.15 – 11
This article will focus on installing ODBC drivers on Windows OS. Official MySQL documentation also provides instructions on installing on any other supported OS.
Using MySQL community installer, you can view, install, update, configure, and remove various MySQL products. We’ll also install ODBC drivers from the MySQL Community installer (available for download here).
Once the process is complete, open the installer. On the initial screen, you see the list of MySQL software installed on the computer.
To install the ODBC driver, click Add.

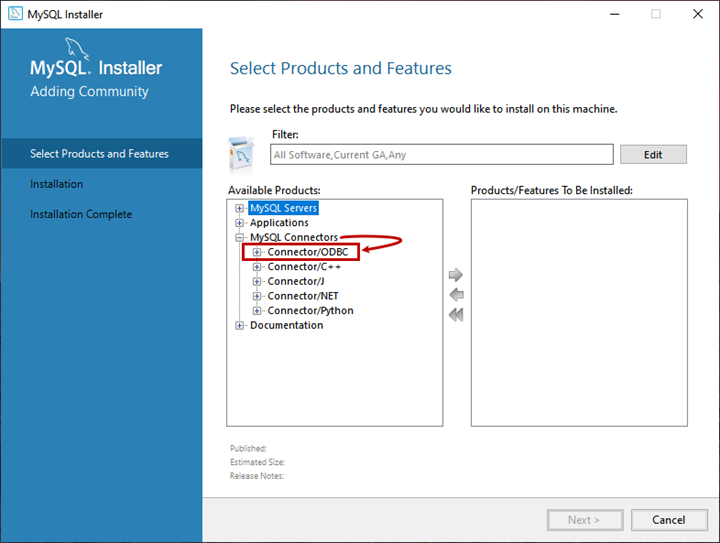
On the new Select Products and a Features screen, you will see the list of MySQL products in various categories. ODBC drivers are available under the MySQL Connectors category.
Expand MySQL Connectors > Expand Connector/ODBC
Two versions of ODBC drivers are available. We want to install the latest driver.
Expand Connector/ODBC 8.0 and choose the most recent version of the ODBC driver. Click on the arrow sign.
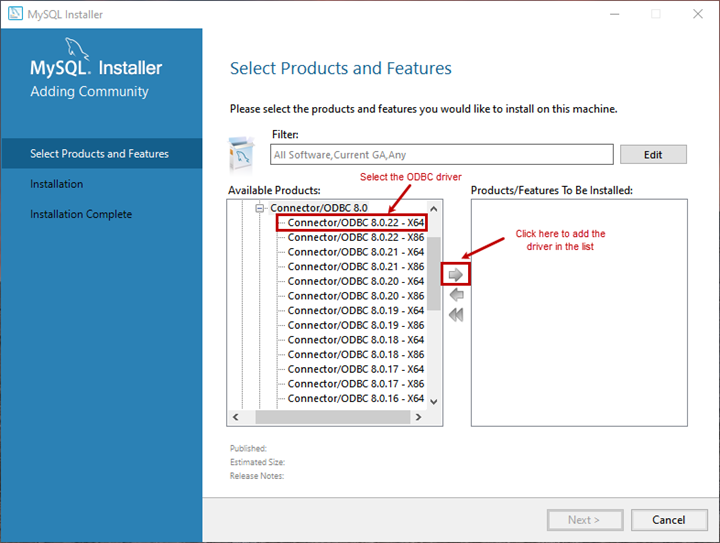
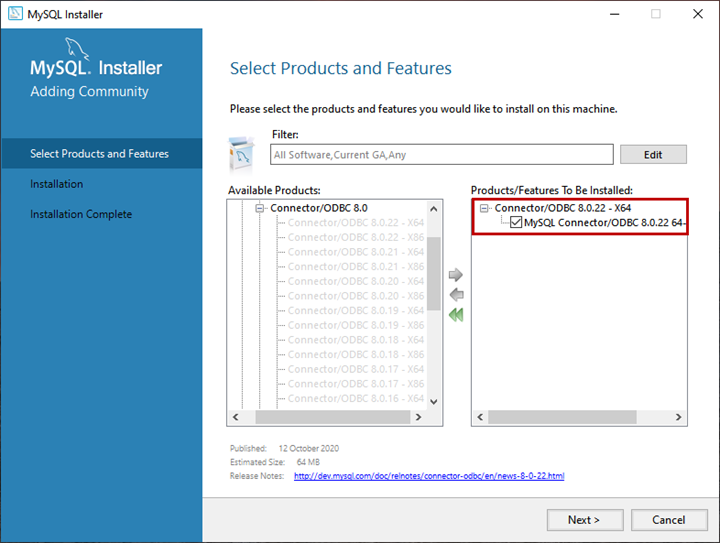
The ODBC driver will move from Available Products to Products to be installed. Click Next.
On the Installation screen, you can view the list of MySQL products we are installing. Click Execute.
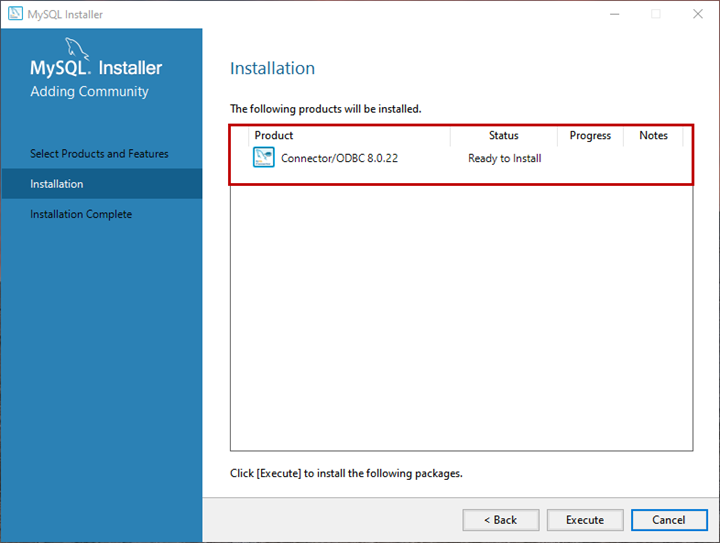
The installation starts. Wait for its completion, and once it’s done, click Next.
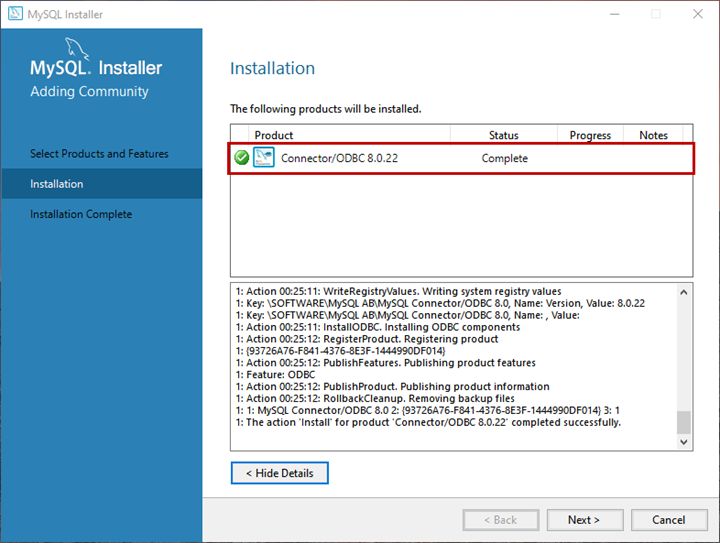
Now you can see the ODBC driver in the list of DSN.
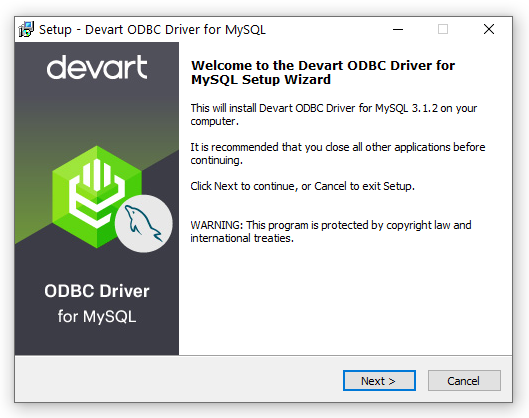
Devart ODBC Driver for MySQL Installation
- Download and run the installer.
- Follow the instructions in the wizard.
3. In case if you already have the specified installation folder for MySQL on the PC or another Driver version is installed, you will get a warning. Click Yes to overwrite the old files with the current installation, but it is recommended to completely uninstall the previous driver version first, and then install the new one. Devart ODBC Driver for MySQL is currently compatible with Windows, macOS, and Linux.
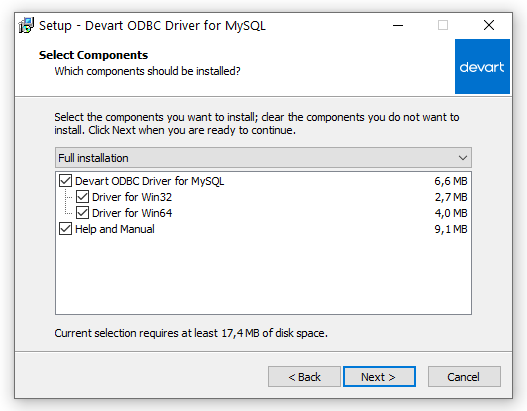
4. On the Select Components page you can select whether to install the 64-bit version of the driver or not. Clear the check box if you need no 64-bit installation. There is also a check box on this page, that allows you to select whether to install Help and Manual.
5. In the License Information dialog box, you should select the license type and activate the product. If you have no activation key, you can select Trial and use the driver for evaluation purposes.
6. If you have an activation key, select the Activation Key option. Copy the activation key from the registration email or your Customer Portal account and paste it into the Activation Key edit box
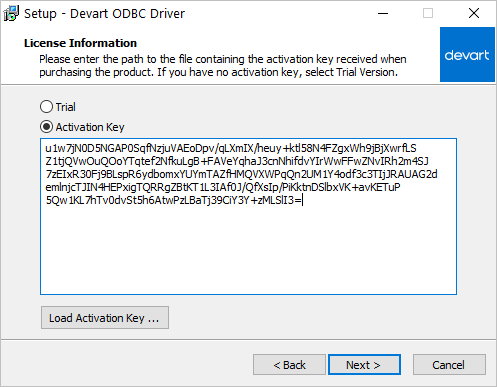
7. If you have the activation key file, click the Load Activation Key button and browse to it
8. Click Install, then Finish.
9. After the installation is completed, you need to configure the driver.
Connecting to MySQL from Microsoft Excel using ODBC Driver for MySQL
You can use Microsoft Excel to access data from a MySQL database using ODBC connector. With ODBC Driver, you can import the data directly into an Excel Spreadsheet and present it as a table. Make sure that you use matching Excel and ODBC Driver, e.g. if you have installed a 64-bit ODBC Drive, you will need to use the 64-bit version of Excel.
When working with Microsoft Excel, there are different ways of retrieving data from various data sources using our ODBC drivers. Please see the list of sections that will help you to connect Excel to MySQL database:
- Connecting Excel to MySQL with Get & Transform (Power Query)
- Connecting Excel to MySQL with Data Connection Wizard (Legacy Wizard)
- Connecting Excel to MySQL with the Query Wizard
- Connecting Excel to MySQL with Microsoft Query
- Connecting Excel to MySQL with PowerPivot
Connecting Excel to MySQL with Get & Transform (Power Query)
You can use Get & Transform (Power Query) to connect to MySQL from Excel with ODBC. This method assumes that you’ve installed an ODBC driver for MySQL.
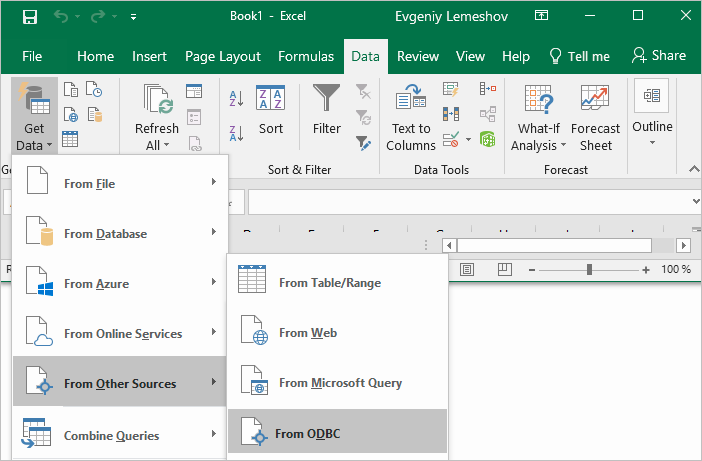
- Click the Data in Excel, then expand the Get Data drop-down list. Click From Other Sources > From ODBC.
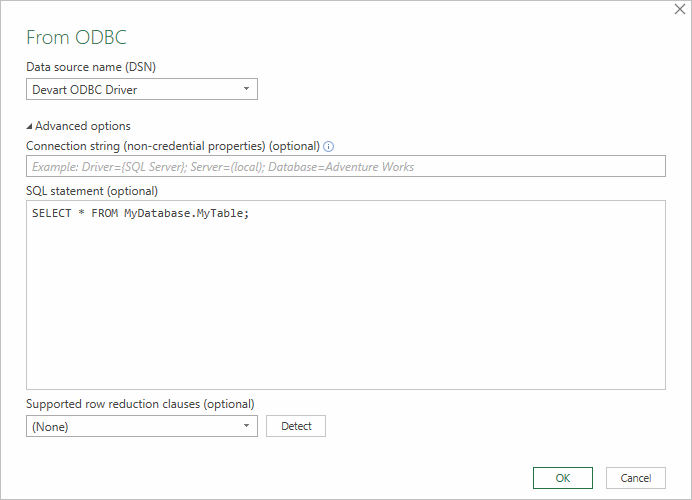
2. In the From ODBC dialog, choose your data source name (DSN). If you haven’t configured your ODBC driver yet, you can expand the Advanced Options dialog box and enter the connection string for your data source (without credentials, which are defined in the credentials dialog box in the next step). Additionally, you can enter an SQL statement that will be executed right after establishing a connection to the data source. Click OK.
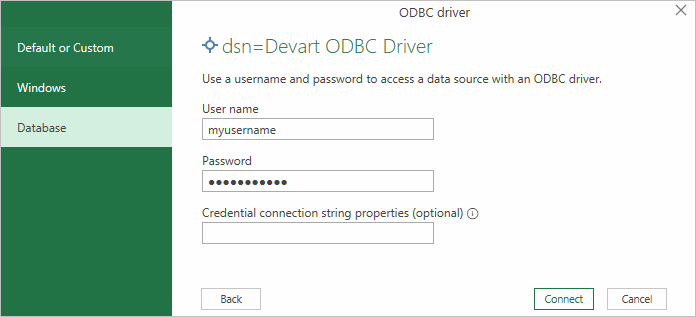
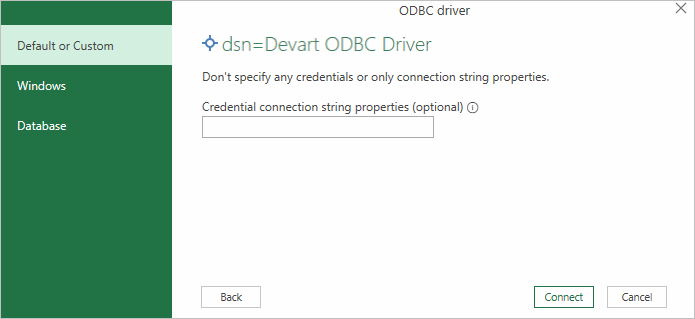
3. If you’re using a database username or password, select Database and enter your credentials in the dialox bog, then click Connect.
If your database is not password-protected or you’ve already specified your credentials in the ODBC data source settings, select Default or Custom and press Connect.
4. In the window that appears, select the table you want to retrieve data from, and click Load.
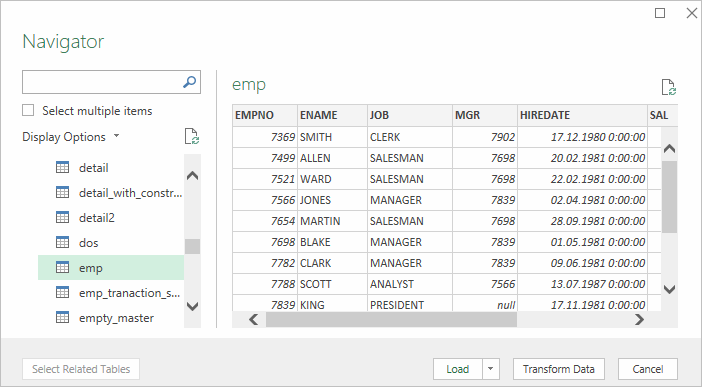
The data from the table will be a displayed in an Excel spreadsheet where you can further work with it.

Connecting Excel to MySQL with Data Connection Wizard (Legacy Wizard)
You can use this option to connect to OLE DB or ODBC external data source that has already been defined.
- In Excel, go to the Data tab. Click From Other Sources, and then click From Data Connection Wizard.
- In the opened dialog, select ODBC DSN and click Next to continue.
- Now select a data source you want to connect to, and click Next.
- To connect to the table containing the required data, select its name and click Next to enter and save information about your new file or click Finish.
- In the Import data dialog, you can select the way your data will be viewed in Excel and the place where to put it in the worksheet, and click OK.
- The required data is now displayed in the existing Excel worksheet.
Connecting Excel to MySQL with the Query Wizard
You can use this option to create a simple query for retrieving data from MySQL to Excel via ODBC driver.
- Open Excel, in the main menu, click the Data tab.
- Click the From Other Sources dropdown menu, and then click From Microsoft Query.
- In the appeared dialog, you can choose the data source you want to connect to.
- After a successful connection, you can select the data you want to be displayed in Excel and click Next.
- The next two steps allow filtering and sorting the data. Click Next to skip these procedures.
- If you plan to further use the query, you can save it by clicking the Save button on the right.
- Select Return Data To Microsoft Excel and click Finish.
- In the Import data dialog, you can select the way your data will be viewed in Excel and the place where to put it in the worksheet, and click OK.
- The required data is successfully imported to Excel.
Connecting Excel to MySQL with Microsoft Query
You can use this option to create a more complex query for retrieving MySQL data to Excel via ODBC driver.
- Start Excel, click the Data tab.
- In the appeared ribbon, click From Other Sources, and then click From Microsoft Query.
- In the next dialog, choose the data source you want to connect to (e.g., using data source name – Devart ODBC MySQL). Uncheck Use the Query Wizard to Create/Edit Queries and click OK.
- Now you can select the tables you want to add to your query. When you finish, just click the Add button.
- In the graphical editor, you can filter rows or columns of data, sort data, join multiple tables, create a parameter query, etc.
Connecting Excel to MySQL with PowerPivot
You can use PowerPivot – an Excel add-in to perform data analysis and create complex data models. To load the required data, do the following:
- In Excel, click the PowerPivot tab, then click Manage to go to the PowerPivot window.
- In the opened window, click From Other Sources.
- When the Table Import Wizard opens, select Others (OLEDB/ODBC) and click Next.
- In the Specify a Connection String window, click the Build button.
- In the Data Link Properties dialog, specify the data source you want to connect (e.g., using data source name – Devart ODBC MySQL), and then click Next.
- Now you should choose how to import the data (either select a table from the list or write a query to specify the data to be imported).
- When the Import operation succeeded, click the Close button. The retrieved data is inserted in the active worksheet.
ODBC Connection Configuration
Open Control Panel > Administrative tools > ODBC Data Sources (64-bit) > System DSN tab > Add.
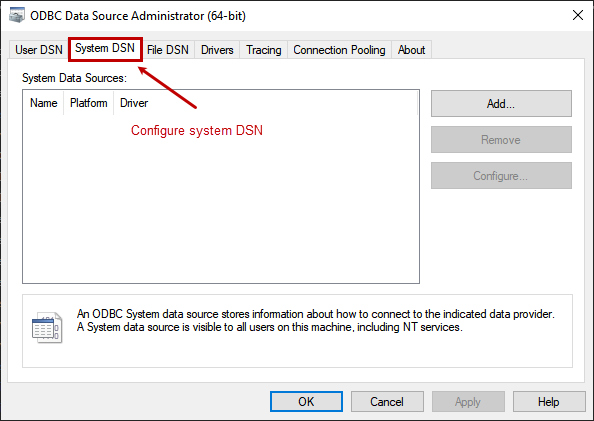
This will launch the Create New Data Source wizard.
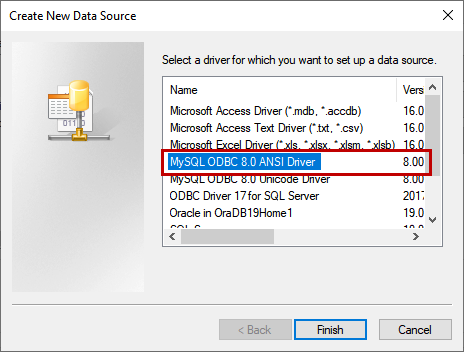
Select MySQL ODBC 8.0 ANSI driver from the list and click Finish.
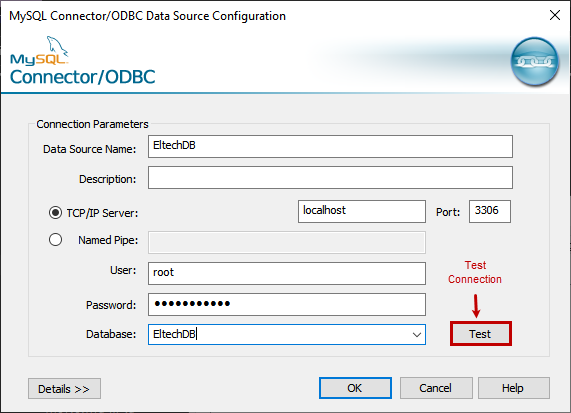
The configuration wizard opens. There, specify the following connection parameters:
- Data Source name: the desired data source name.
- TCP/IP Server: the hostname or IP Address of the server where the MySQL database server is installed.
- Port: the appropriate port number of the server where the MySQL database server is installed.
- Named Pipe: If this parameter to connect to the database server is configured, choose it and specify its appropriate name.
- User: the username to connect to the MySQL database server.
- Password: the appropriate password for the user specified in the User field.
- Database: the MySQL database you want to connect.
When all parameters are set, click Test to check the connectivity to the MySQL database server:
If the configured parameters are correct, the connection will be established successfully.
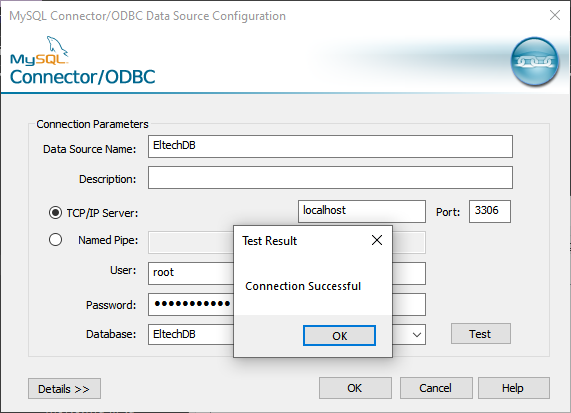
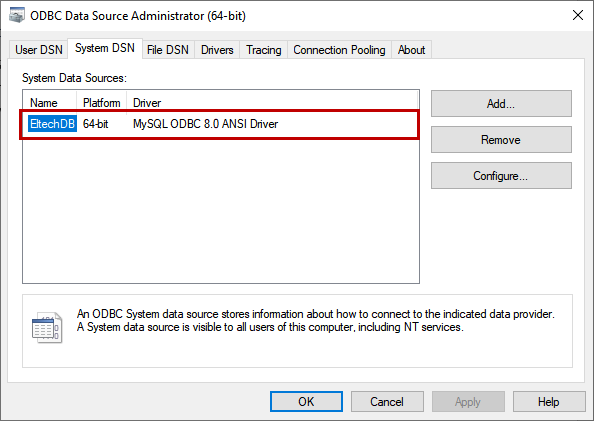
Click OK to save the configuration and close the ODBC configuration wizard.
You will see the configured MySQL ODBC data source under the System DSN:
Generate a PowerBI report using MySQL ODBC driver
At this stage, we are going to create a PowerBI report using the MySQL ODBC driver. For demonstration purposes, I have installed MySQL 8.0 on my workstation and created a database named eltechDB on MySQL. Then, I created a table named tblemployee in that database. We will use the database view to generate the report, and I have also created a view named vwEmployees.
The following script creates the eltechDB database:
Create database eltechDBTo create the tblEmployees table, run this script:
CREATE TABLE `tblemployees` (
  `emp_no` int NOT NULL,
  `birth_date` date NOT NULL,
  `first_name` varchar(14) NOT NULL,
  `last_name` varchar(16) NOT NULL,
  `gender` enum('M','F') NOT NULL,
  `hire_date` date NOT NULL,
  PRIMARY KEY (`emp_no`)
)
This script creates the vwEmployees view:
CREATE
VIEW `eltechdb`.`vwemployees` AS
    SELECT
        `eltechdb`.`tblemployees`.`emp_no` AS `emp_no`,
        `eltechdb`.`tblemployees`.`birth_date` AS `birth_date`,
        `eltechdb`.`tblemployees`.`first_name` AS `first_name`,
        `eltechdb`.`tblemployees`.`last_name` AS `last_name`,
        `eltechdb`.`tblemployees`.`gender` AS `gender`,
        `eltechdb`.`tblemployees`.`hire_date` AS `hire_date`
    FROM
        `eltechdb`.`tblemployees`
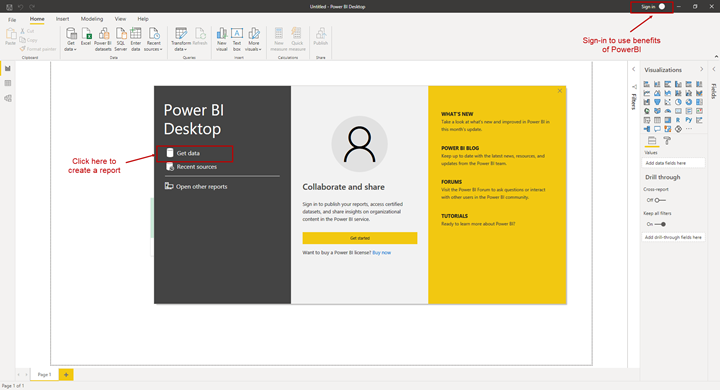
Once the database and objects are ready, download the PowerBI desktop version, install it, and open. Note: I don’t have a PowerBI license or subscription, but if you own it, log in your account with your credential.
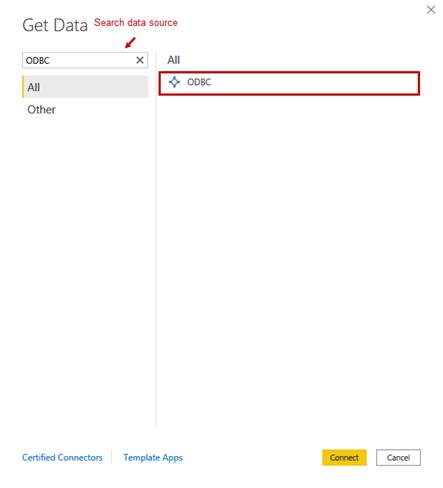
On the Welcome screen, click Get data:
The new window that will open will display the list of various data sources, supported by the PowerBI report is here. To find the necessary data source, you can type the initials of its name. We are using ODBC drivers, so, type ODBC in the search field, select ODBC, and click Connect:
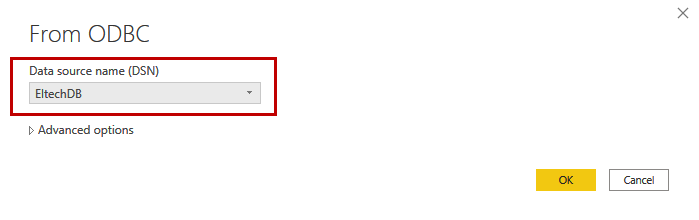
Select the EltechDB database from the Data Source Name (DSN) drop-down menu, and click OK.
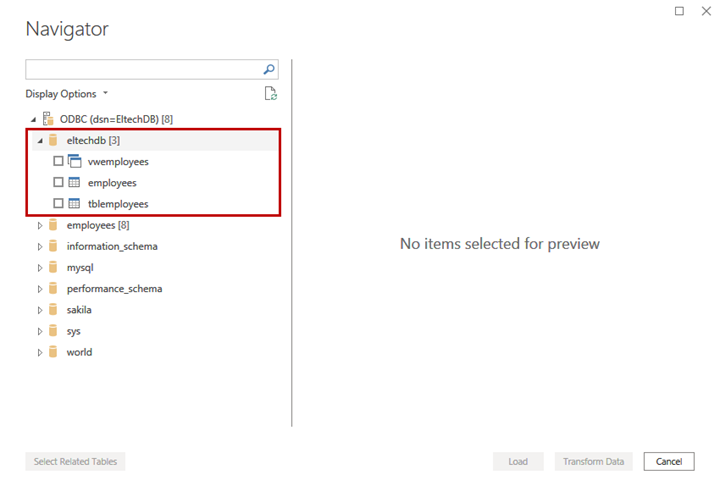
On the Navigator screen, you can view the list of MySQL databases under the ODBC connection string. We are going to generate a PowerBI report to display the list of the employees from vwEmployees.
To select the necessary view, expand ODBC data source > EltechDB. Under the EltechDB database, you will see the list of available tables and views.
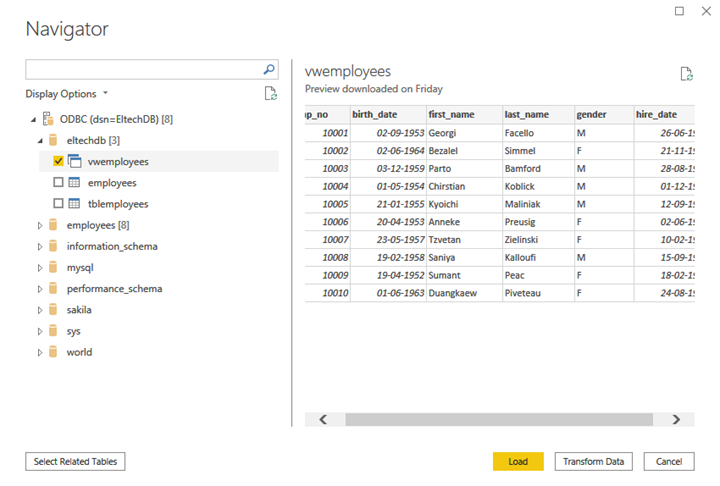
When you click on vwEmployees, you can preview the data in the right pane. Click Load to load the data into the PowerBI report:
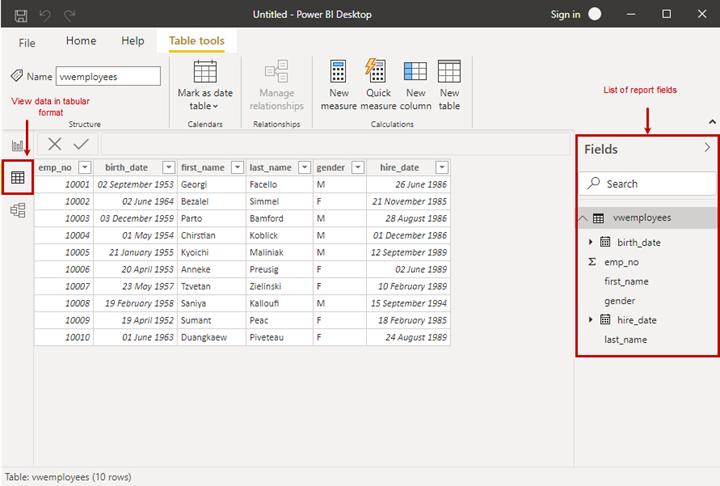
After you’ve loaded the data in the report, you can view it by clicking on the table icon located on the left pane. If needed, you can add more fields from the report. For that, drag and drop the data fields located on the right pane of the report:
Summary
Thus, we have explored the process of installing the MySQL ODBC driver and learned to configure the data source using the MySQL ODBC driver. We’ve also created a basic list report in the PowerBI using the ODBC data source. Hope that this article was of help to you.
Tags: mysql, odbc, power bi Last modified: January 30, 2023